Page is loading ...

Rev 5/18/04
TM
IntelliValve
Operator’s
Training & Service
Manual

(1)
How It Works…………………..................2
How To Install IntelliValve……................3-11
How To Add Accessories and Replace
IntelliValve Parts........................................12-14
How To Maintain……………………........15
How To Trouble Shoot During
Installation……………………………......16
Trouble Shooting
Causes & Remedies……………………....17-20
Trouble Shooting Reference Guide...........21-22
IntelliValve Models, Options,
& Accessories..............................................23-26
IntelliValve Recommended Stocking
Levels For Service Locations.....................27-28
IntelliValve Warranty.................................39
How To Contact Deltrol Controls.............30
TABLE OF CONTENTS

(2)
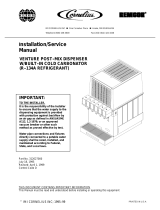
How It Works
IntelliValve - Water And Syrup
Modules Proportional Actuator Detail
SECTION A-A
Water & Syrup Modules
Closed - (No Flow)
SECTION B-B
Water & Syrup Modules Open To
Achieve Desired Flow & Achieve Con-
stant Water To Syrup Mix Ratio
Syrup
Module
Water
Module
The IntelliValve™ valve is a smart valve that automatically adjusts for changing dispenser conditions over
time. The IntelliValve valve is designed to maintain the optimal water-to-syrup ratio over its life and over a
wide operating range of syrup &
water pressures and temperatures.
The optimal ratio is maintained by
a set of water and syrup Flow Con-
trol Modules working in conjunc-
tion with the water flow sensor,
syrup pressure sensor and syrup
temperature sensor.
The Flow Control Modules have
been developed for use with a mi-
croprocessor based controller that
measures water and syrup flow
rates and controls both the water
and syrup flow by making many ad-
justments as the valve dispenses beverage. These measurements are taken continually in order to respond to
dispenser condition changes. This allows the product drink quality to be maintained at the optimal water-to-
syrup ratio as the beverage is being dispensed.
The main control board measures both water and syrup flow. The flow rates are continually compared and
adjustments to the output signal for each water and syrup flow control are made. To increase the flow rate the
flow control stem is electro-magnetically pulled from its fully closed position allowing more water or syrup to
pass through the exposed opening. Decreasing the flow rate is accomplished by reducing the electro-magnetic
force allowing the valve stem to close. Loss of power during dispensing will automatically cause both the
water and syrup to return to the off, or the fully closed, state.
Automatic Shut Off…In the event that either the water or syrup supplies are missing (e.g. water turned-off
or empty syrup box) a built-in sold-out feature on the main control board will prevent the valve from operat-
ing. The valve will dispense for up to one second without water or syrup and then it will automatically shut-
off. To restart dispensing, it is necessary to release the dispensing lever and then re-activate the lever. This
feature has been developed to prevent the consumer from receiving a poor-quality drink.
Flavor Chips...In order to provide the IntelliValve controller with the necessary product specific data to
control each flavor ratio and flow rate properly, a flavor chip that contains unique data conversion factors
associated with each flavor must to be installed. This data is read every time power to the valve is turned on.
The valve will not operate without this flavor chip.
Water
Module
Syrup
Module

How To Install IntelliValve
(3)
The IntelliValve is easy to install, requires no special set-up equipment for installation and no calibration at
start-up or after long-term operation. Installation and start-up requires only that the lever, nozzle, flavor
chip and power be connected to the valve.)
Preparing the Intellivalve for mounting on the dispenser.
A) If the Intellivalve was received with the lever and nozzle packaged loose then these items should be
installed prior to mounting the Intellivalve on the dispenser.
B) If the Intellivalve was received fully assembled, the cover will need to be removed in order to mount the
valve, install the flavor tab and connect electrical power.
C) The procedures outlined below detail the nozzle installation, cover removal, lever installation, mount-
ing the valve on the dispenser, flavor chip installation, electrical power connection, reinstalling the
cover and commissioning the valve into service.
Nozzle Installation
A) Prior to mounting the nozzle turn the valve over and insure that
the sealing o-ring is in position.
B) Check to insure there is a seal on the diffuser and install the dif-
fuser of the nozzle assembly by pushing it into the central port.

How To Install IntelliValve (Con’t)
(4)
C) Install the nozzle cover by inserting it into the receiving groove with the
locking tabs aligned to the clearance slots. Press the nozzle in and turn it
30 degrees to lock it into position.
Removing The Cover
A) Hold onto the valve by the back plate and nozzle. Grasp the front of the
cover by the serrated finger grips and lift the front of the cover up. Note:
The front of the cover will only lift up approximately 1/16” (1.5mm)
B) Once the front locking tabs have been disengaged the cover can be pulled
forward 3/8” (9.5mm) to disengage the back locking tabs.
C) The cover may now be removed from the Intellivalve with CAUTION.
Depending on the model of the IntelliValve the cover may include an inte-
grated membrane switch, which is attached to the main control circuit
board of the IntelliValve. Excessive pressure on the membrane switch tail
can cause it to become dislodged from the circuit board connector and
may damage the conductive traces on the tail.

How To Install IntelliValve (Con’t)
(5)
D) The cover has been designed with internal curbs that allow it to
be mounted on the front of the baseplate of the Intellivalve. With
the cover removed the lever can now be mounted.
Mounting The Lever
A) Locate and remove the lever pivot pin
from the baseplate of the Intellvalve.
B) Insert the lever into the receiving slots
on the bottom of the valve. Looking
from the side of the valve align the
pivot hole in the lever with the rota-
tional slots in the baseplate and insert
the pivot pin. Insert the pivot pin until
the flanged head of the pin engages the retaining slot in the baseplate
of the valve. The pin is correctly seated when equal lengths are
exposed on both sides of the baseplate.
Mounting The Valve On The Dispenser
A) The valve is now ready for mounting on the dispenser. Please note
that the valve is fully compatible with the UFB-1/UF-1 mounting
block. The easiest way to mount the valve is to rest the cover on
top of the solenoids, grasp the nozzle, as if you are making a
handshake, and press the valve straight into the mounting block.
Avoid placing any pressure on the circuit board while installing the
valve.

How To Install IntelliValve (Con’t)
(6)
B) Once the valve is seated, slide the mounting block into the locked,
operating position.
C) With the valve mounted to the dispenser the cover can be rotated
forward and mounted onto the baseplate of the valve so that no
undue stress is being applied to the membrane
switchtail.
Installing Flavor Chip
A) Assemble the flavor chip to
the main circuit board.
The flavor chip has a po-
larized 5pin connector to
insure proper orientation
on the board. The main
board also has a rubber pad that restricts excessive movement of the
flavor chip during installation.
B) Make sure the flavor chip I.D. matches
the desired syrup (e.g. Pepsi syrup flavor
chip will be marked as “Pepsi”). Note: The Intellivalve will not
function without the flavor chip being installed prior to apply-
ing electrical power to the valve.
Electrical Power Connection
A) Connect the electrical power to the valve by attaching the 2-pin AMP
connector. Note: The AMP connector is polarized and will fully insert
intothe valve connector in only one orientation.

How To Install IntelliValve (Con’t)
(7)
B) To facilitate reassembly of the cover, place the power connector
as shown.
Reinstalling The Cover
A) Reinstall the cover to valve
by sliding the cover down
over the solenoids until it
bottoms out on the baseplate
of the valve. If necessary to
facilitate installation, the
back, open end, of the cover can be spread apart for
increased clearance.
B) Once bottomed, the cover can be
slid back toward the dispenser
until the locking tabs are en-
gaged.
Commissioning The Valve Into Service
A) Restore power to the dispenser by either turning on the dispenser
key or reconnecting power to the dispenser transformer.
B) Complete (3) five-second beverage dispenses. This will allow the IntelliValve microprocessor to adjust
for actual machine operating conditions.
You have now completed installation and launch of a new IntelliValve.
Enjoy the trademark drink quality!

(8)
Front Face Of Board With Water
(W) And Syrup (S) Only Buttons
Water And Syrup Purge Maintenance Features…
Upon removal of the cover, the front face of the microprocessor control
board is accessible. The upper left hand section of this control board has
buttons which can be manually pressed to pour water (w) or syrup (s) only.
Each button will discharge as long as that button is pressed. The syrup (s)
button has a 3-second delay to prevent inadvertent syrup dispense. These
features are not necessary for IntelliValve start-up but may be usefull to
remedy other conditions in dispenser operation. (Refer to Trouble Shoot-
ing Causes & Remedies)
When installing flavor chips, power cycling (off and on) is critical to having the control read the new data.
Power does not have to be turned off to prevent damage to the flavor chip or main control because there is
low voltage power to the chip only during a brief time during power-up when the data is being read. If the
chip is changed with the power on, no damage is done but the control does not know to read in new data.
General Note On Flavor Chip Installation
How To Install IntelliValve (Con’t)
Programming Portion Control
The IntelliValve Portion Control model is different than predecessors. It programs and stores portion
SIZE not dispense TIME values. Therefore it is normal for the dispense times to vary as needed to allow
the valve to dispense the same quantity regardless of changes in system pressures during dispense.

To reprogram the drink size without an automatic top off,
follow the steps listed below:
1. Enter programming mode by holding the hidden programming button down for 3 seconds. The
programming LED will illuminate.
2. Press and hold the drink size button to be programmed down until the required drink volume is
dispensed.
3. Release the drink size button, the programming LED will be blinking.
4. Press the manual top off button (button face with red up arrow & green down arrow) the pro-
gramming LED will stay illuminated but stop blinking.
5. Go to the next size and repeat steps 2, 3 & 4.
6. Once all drink sizes have been reprogrammed, hold the hidden programming button for 3 seconds,
the LED will go out indicating programming is complete.
How To Install IntelliValve (Con’t)
These are the default dispense volumes as shipped. There
is no factory preset top-off volume for each size. The
Portion Control model is initially set-up for manual top-
off. Any of these drink sizes can be changed by repro-
gramming the membrane control switch as follows:
Hidden Programming Button
(9)
The Portion Control model is pre-programmed at the fac-
tory with the following drink sizes:
Small Pushbutton 7 ounces / dispense
Medium Pushbutton 11 ounces / dispense
Large Pushbutton 16 ounces / dispense
X-Large Pushbutton 22 ounces / dispense

To reprogram the drink size with an automatic top off follow the steps listed below:
1. Enter programming mode by holding the hidden programming button down for 3 seconds. The
programming LED will illuminate.
2. Press and hold the drink size button to be programmed down until the required drink volume is
dispensed.
3. Release the drink size button, the programming LED will be blinking.
4. After the foam has settled, press and hold the same size drink button until the drink has been
topped off.
5. Press the manual top off button (button face with red up arrow & green down arrow) the
programming LED will stay illuminated but stop blinking.
6. Go to the next size and repeat steps 2, 3 & 4.
7. Once all drink sizes have been reprogrammed, hold the hidden programming button for 3 seconds,
the LED will go out indicating programming is complete.
To reset the drink sizes to factory default setting, follow the steps listed below:
1. Enter programming mode by holding the hidden programming button down for 3 seconds. The
programming LED will illuminate.
2. Press and hold the manual top-off button (button face with red up arrow & green down arrow).
3. While holding down the manual top-off button, press the drink size button to be reset. The LED
will blink twice.
4. Release both buttons before defaulting next size.
5. Repeat steps 3 & 4 for each drink size to be defaulted.
6. Exit programming mode by holding the hidden programming button down for 3 seconds.
How To Install IntelliValve (Con’t)
(10)

(11)
Programming IntelliFill
How To Install IntelliValve (Con’t)
Hidden Top-Off
Programming Button
The IntelliFill model features an improved means of automatic filling. An automatic top-off feature is also
provided. This feature is time-based and preset at the factory to pour after a 3 second delay from the comple-
tion of the primary drink dispense. This delay can also be reprogrammed in the field. To program a top-off,
follow these steps:
1. Hold down the hidden program button for 3 seconds until LED
comes on solid.
2. Depress and hold the IntelliFill lever, allowing drink to dispense
(LED is solid) into a cup.
3. When contact is sensed, the drink dispense will halt and the LED
will blink.
4. When the foam has gone down, press the hidden program button
and the drink dispense will resume with the LED on solid.
5. When contact is sensed, the drink dispense will stop. This ends
the sequence.
6. Remove the cup from the autofill lever.
7. Press and hold the hidden program button for 3 seconds to save/
exit programming mode.
8. The LED will extinguish indicating the valve is in normal operating
mode.
To clear top-off, repeat the above steps, except skip steps 4 and 5.

How To Add Accessories & Replace
IntelliValve Parts
Upgrade To Water Only Cover
Any base model of the IntelliValve can be converted to a model having a
water or soda-only option by replacement of the cover with a cover having
the water/soda-only option. This cover is fitted with a user friendly mem-
brane switch. This membrane switch tail must be connected to the main con-
trol board prior to cover installation. This added dispensing feature is for the
operator or consumer and not to be confused with service buttons available
on every valve’s circuit board under cover. Please refer to the last section of
this document, that covers options and accessories for the appropriate cover.
Attaching Cover Mounted Membrane
Switch To Main Control Board
Nozzle Replacement
The nozzle can be removed by a simple counter-clockwise turn and pull
from the valve base. The nozzle is replaced by positioning the two nubs
into the base holes and turning clock-wise. It is important to check that
the red O-RING is properly aligned on the nozzle inlet stem prior to
nozzle insertion into the valve base.
Refer to the nozzle cleaning instructions for information on nozzle component assembly.
(12)
Nozzle Removal
O-ring, Diffuser and Nozzle Replacement Replacement

Lever Installation And Removal
Self-serve sanitary lever versions of the IntelliValve are typically shipped with Delrin plastic levers which are
very durable and designed for long service life. Should the plastic lever ever need replacement follow these
simple steps.
For new lever installation, simply position the lever in the pivot channel such that rotational slots are aligned
then fully insert the retaining pin such that both ends of the pin are visible.
The lever can be removed by first removing the cover and then the retain-
ing pin that the lever pivots around. The lever can then be removed from
the pivot channel.
An accessory lever is available for those customer
locations that desire the looks of a stainless steel
lever. The stainless steel lever is installed and
replaced with exactly the same procedures as the
standard plastic levers.
The IntelliFill model is supplied with a unique
conductive stainless steel lever.
How To Add Accessories & Replace
IntelliValve Parts (Con’t)
IntelliValve With
Stainless Steel Lever
(13)
IntelliValve With
Plastic Lever
IntelliFill - Standard
Stainless -Steel Lever
Installing Plastic
Lever With Pin

How To Add Accessories & Replace
IntelliValve Parts (Con’t)
Replacing Power Wire Harness
The power wire harness can be replaced by removal of the connector from the black retaining coil clip. The
clip is then slid off the coils for removal of the harness from the main control board connector.
NOTE: Insure that the coil connector plug with black wires is connected to the water side solenoid and the
connector with white wires is connected to the syrup side solenoid. Failure to make the proper connection
will result in the valve not dispensing.
(14)

How To Maintain
(15)
The IntelliValve is a “smart” valve that automatically adjusts for changing dispenser conditions over time.
While other valve designs require multiple service-calls to correct mix ratios as pressure and/or temperature
conditions change or as mechanical adjustment drift over time, the IntelliValve does not require such periodic
maintenance.
Maintaining the IntelliValve is as simple as normal exterior nozzle cleaning and maintenance. This can be done
on an interval as is the custom for the local operator.
Weekly Nozzle Cleaning Procedure
This cleaning procedure must be performed each week or more often if needed to maintain cleanliness of the
nozzle and inner nozzle.
1. Prepare a washing solution of 3 gallons of warm water (120°F) and 1 ounce of mild non-scented
detergent.
2. Remove nozzle assembly (contains Inner Nozzle) from dispensing valve. Separate the inner nozzle
from the nozzle and wash the two parts in the cleaning solution. It may be necessary to use a small stiff
Nylon bristle brush to thoroughly clean the nozzles. Do not use a brush with metal
bristles.
3. Rinse the nozzle and the Inner Nozzle in potable water.
4. Inspect the two nozzle parts to be sure they are clean. If any residue remains,
return to step 2 and clean the parts again.
5 Return the Inner Nozzle to the nozzle and replace the assembly to the valve.
Weekly IntelliValve Cleaning Procedure
The IntelliValve is as easy as wiping the valve exterior and lever off with a damp
cleaning rag, making sure not to get too much water on the case of valve.

If the valve leaks water through the nozzle for extended periods,
Confirm the valve is installed on a cold carbonation dispenser. The IntelliValve has been designed to
achieve Trademark drink quality with cold carbonation dispensers. Many ambient carbonation dispensers
may be set at carbonation pressures exceeding the IntelliValve design limits for Trademark drink quality.
Other possible causes and remedies for water leakage are covered in the next section. Trouble Shooting
Causes & Remedies.
How To Trouble Shoot
During Installation
If any questions arise during installation, please refer to the trouble-shooting information included in the
instructions or as specified below and in the following pages.
If the valve fails to operate properly upon installation, first
• Check for 24V-AC power.
• Check for adequate water and syrup supply (unit has built-in sold-out and will not dispense if no
water or syrup is present).
• Check for missing flavor chip (valve will not pour without a flavor chip present).
• Check for any loose connector
(16)

Trouble Shooting Causes
And Remedies
(17)
Trouble Probable Cause Remedy
Water-to-Syrup Ratio Too A. Wrong Flavor Chip Replace Flavor Chip With
Low Or Too High Correct Flavor Chip.
Please Refer to Installing
Flavor chips section in
“How To Install”. Cycle
Power On/Off. Complete
3 Short Beverage Dis-
penses. Recheck mix ratio.
B. Incorrect Syrup for designated flavor Replace to correct syrup
C. Inadequate water supply Repair/Restore water
supply to dispenser
D. Inadequate syrup supply Check syrup supply and
replace if necessary
E. CO2 gas pressure set incorrectly Adjust the CO2 supply for
causing improper carbonation level water supply regulator to
75 PSI or per
manufacturer’s recommen-
dation
Valve Dispenses For Only A. Out of Syrup Replace Syrup
A Moment
B. Water Line is Disconnected or Repair/Restore Water
Shut Off Supply to Dispenser

No Product Dispensed From A. No Electrical Power to Dispenser Connect Electrical Power
All Dispensing Valves To Dispenser
B. Disconnected or Broken Wiring Connect or Replace
To Dispensing Valves Wiring
C. Inoperative 24VAC Transformer Replace Transformer
Trouble Shooting Causes
And Remedies Con’t
Trouble Probable Cause Remedy
E. CO2 Regulator Not Properly Adjusted Adjust CO2 Regulator
F. Syrup Pump Not Working Repair or Replace
Syrup Pump
G. Tank Quick Disconnect Sanitize Syrup System
or Syrup Lines Restricted
(18
Valve Dispenses For Only C. Excessive air in syrup line (note: Remove cover. On the
A Moment (Con’t) Small amounts of air are normal upper lefthand corner, at
and the valve will function properly front face of the control
under these conditions.) board, there are manual
syrup (s) and water (w)
purge buttons. Depress
the syrup (s) purge button
to bleed excess air from
the syrup line.
D. Broken or Disconnected Wiring Make sure the wires are
connected as shown in
photos.

Trouble Shooting Causes
And Remedies Con’t’
Trouble Probable Cause Remedy
No Product Dispensed From A. Broken or Disconnected Wiring Make Sure the Wires are
Dispensing Valve Connected as in Photos
C. Membrane Switch Tail Loose Check Connection To The
Main Control Board
(19)
Flavor Tab Installation
B. Flavor Chip Not Installed Install Flavor Chip
/