154057

Veranda 154057 Installation guide

  • Hello! I am an AI chatbot trained to assist you with the Veranda 154057 Installation guide. I’ve already reviewed the document and can help you find the information you need or explain it in simple terms. Just ask your questions, and providing more details will help me assist you more effectively!
GATES
Installation Tips
Planning
• Priortoconstruction,checkwithyourlocalregulatoryagencyforspecialcoderequirementsinyourarea.
• Contactyourutilitysuppliertolocateandmarkundergroundlines.
• Carefulplanningandmeasuringofyourfenceprojectisessential,asmovingpostsaftertheconcretesetsisextremelydifficult.
Digging Post Holes
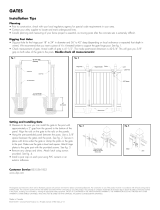
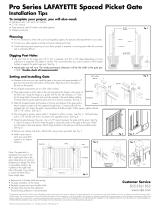
• Digpostholeforthehingepost18”to24”indiameterand36”to42”deep(dependingonlocalordinanceorexpectedfrostdepthin
winter).Werecommendthatyouinsertapieceof4x4treatedlumbertosupportthegatehingepost.Seefig.1.
• Checkmeasurementofgate.Actualwidthofgateis41-1/2”.Theinsidepost-to-postdimensionis42-3/4”Thiswillgiveyou5/8”
gaponbothsidesofthegatetotheposts.Double-check all measurements!
Setting and Installing Gate
• Measuretobesureyoucaninstallthegatetothepostwith
approximatelya2”gapfromthegroundtothebottomofthe
panel.Aligntherailsonthegatetotherailsonthepanels.
• Hangthepre-assembledpanelbetweentheposts.Usea5/8”
spacerbetweenthegatesandtheposts.Seefig.2.Securein
placewithshimsunderthegateorclampthejambonthegate
tothepost.Makesurethegateislevelandsquare.Attachhinge
platestothegatepostwiththeprovidedscrews.Seefig.3.
• Removeanyclampsandshims.Attachlatchusingscrews
provided.Seefig.4.
• InstallapostcaponeachpostusingPVCcementoran
exterioradhesive.
Customer Service877-463-8379
www.verandavinylfencing.com
Thediagramsandinstructionsshownareforillustrationpurposesonlyandarenotmeanttoreplacealicensedprofessional.Anyconstructionoruseoftheproductmustbeinaccordancewithalllocalzoningand/or
buildingcodes.Theconsumerassumesallrisksandliabilityassociatedwiththeconstructionoruseofthisproduct.Theconsumerorcontractorshouldtakeallnecessarystepstoensurethesafetyofeveryoneinvolved
intheproject,including,butnotlimitedto,wearingtheappropriatesafetyequipment.EXCEPTASCONTAINEDINTHEWRITTENLIMITEDWARRANTY,THEWARRANTORDOESNOTPROVIDEANYOTHER
WARRANTY,EITHEREXPRESSORIMPLIED,ANDSHALLNOTBELIABLEFORANYDAMAGES,INCLUDINGCONSEQUENTIALDAMAGES.
MadeinCanada
©2010-2011UniversalForestProducts,Inc.Allrightsreserved.5784Gate_4/11
fig. 3
fig. 4
fig. 1
fig. 2
PUERTAS
Consejos de instalación
Planificación
• Antesdecomenzarlaconstrucción,compruebeconsuagenciareguladoralocalcualquierrequisitoespecialensuárea
• Contácteseconlascompañíasdeserviciospúblicosparalocalizarymarcarlaslíneassubterráneas.
• Esesencialunaplanificaciónymedicióncuidadosadesucerca,puestoquemoverlospostesdespuésdequeelconcretosehaasentado
esextremadamentedifícil.
Excavación de huecos para postes
• Excavehuecosparapostesabisagradosde18pulgadasa24pulgadasdediámetroyde36pulgadasa42pulgadasdeprofundidad
(dependiendodelareglamentacióndeconstrucciónlocalodelaprofundidaddeescarchaqueseespereenelinvierno).Recomendamos
queinserteunapieza4x4pulgadasdemaderatratadaparasoportarlabisagradelapuertaenelposte.VealaFig.1
• Compruebelamedidadelapuerta.Eltamañorealdelapuertaesde41-1/2pulgadasdeancho.Ladimensióninternadeposteaposte
esde42-3/4pulgadas.Estoledaráunaaperturade5/8depulgadaalosdosladosdelapuertahastaelposte.¡Compruebe dos
veces todas las medidas!
fig. 3
fig. 4
fig. 1 fig. 2
Colocación e instalación de la puerta
• Midaparaasegurarsequepuedeinstalarlapuertaalposte
conunespaciodeaproximadamente2pulgadasdesdeel
suelohastalaparteinferiordelpanel.Alineelasbarandil
lasdelapuertaconlasbarandillasdelospaneles.
• Cuelgueelpanelpreensambladoentrelospostes.Use
unespaciadorde¾depulgadaentrelaspuertasylos
postes.VealaFig.2.Asegureensusitioconcuñasdebajo
delapuertaosujetelajambadelapuertaalpostecon
unaabrazadera.Asegúresequelapuertaesténiveladay
encuadrada.Sujetelasplacasdelabisagraalpostedela
puertaconlostornillosprovisto.VealaFig.3.
• Quitecualquierabrazaderaocuñas.Sujeteelpestillo
usandolostornillosprovistos.VealaFig.4.
• InstaleunamoldurasobrecadaposteusandocementoPVC
ounadhesivoparausoexterior.
Customer Service877-463-8379
www.verandavinylfencing.com
Losdiagramaseinstruccionesenestefolletosonsoloconfinesilustrativosynoreemplazanaunprofesionalcertificado.Cualquierconstrucciónousodeesteproductodebeestardeacuerdocontodosloscódigos
localesdeplanificaciónurbanay/oconstrucción.Elconsumidorasumetodoriesgoyresponsabilidadasociadosconlaconstrucciónousodeesteproducto.Elconsumidorocontratistadebetomartodoslospasos
necesariosparagarantizarlaseguridaddetodoslosinvolucradosenelproyecto,incluyendoperonolimitándosealusodelequipoapropiadodeseguridad.EXCEPTOCOMOSEINDICAENLAGARANTÍA
LIMITADAESCRITA,UNIVERSALCONSUMERPRODUCTS,INC.NOOFRECENINGUNAOTRAGARANTÍA,SEAEXPRESAOIMPLÍCITA,YNOSERÁRESPONSABLEDENINGÚNDAÑO,INCLUSODE
DAÑOSCONSIGUIENTES.
©2010-2011UniversalForestProducts,Inc.Todoslosderechosreservados.5784Gate_4/11
HechoenCanadá
/