Page is loading ...


NB4 User Guide YML733Rev1
2 www.netcomm.com.au
Contents
Introduction ................................................................................................................................ 4
Do I need a Micro filter? .............................................................................................................. 5
Package Contents ....................................................................................................................... 6
Quick Start.................................................................................................................................. 7
Step 1 - Hardware Installation .............................................................................................. 8
Step 2 - Modem Configuration .............................................................................................. 9
Step 3 - Computer Hardware Configuration ......................................................................... 11
Windows® XP PCs ......................................................................................................... 11
Windows 2000 PCs ........................................................................................................ 11
Windows ME PCs ........................................................................................................... 12
Windows 95, 98 PCs ...................................................................................................... 13
Mac OS 9.x .................................................................................................................... 14
Mac OS X ....................................................................................................................... 14
LED Indicators ........................................................................................................................... 15
Back Panel Ports ....................................................................................................................... 16
Resetting Factory Defaults ................................................................................................... 16
Configuring Your Computer .......................................................................................................17
Configuring Your NB4 ................................................................................................................ 19
Quick Start Settings .................................................................................................................. 20
Additional Settings ................................................................................................................... 22
Setup .................................................................................................................................. 22
LAN Setup ..................................................................................................................... 23
DHCP Configuration ................................................................................................ 23
Management IP ...................................................................................................... 24
PPPoE Connection Setup .............................................................................................. 25
NAT ......................................................................................................................... 25
PPP Settings ........................................................................................................... 26
PVC Settings ........................................................................................................... 26
Static Settings......................................................................................................... 27
DHCP Settings......................................................................................................... 27
Bridge Settings ....................................................................................................... 27
CLIP Settings .......................................................................................................... 27
Advanced ............................................................................................................................ 29
Advanced Features ....................................................................................................... 30
UPnP ....................................................................................................................... 30
SNMP ....................................................................................................................... 31
LAN Clients ............................................................................................................. 32
MacFilters ............................................................................................................... 33
Enable/Disable MAC Filtering ................................................................................. 33
Create MAC Filter Rules .......................................................................................... 33
Edit or Delete MAC Filter Rules ............................................................................... 34
Hidden MAC Filter Rules ......................................................................................... 34

YML733 Rev1 NB4 User Guide
www.netcomm.com.au 3
Multicast ................................................................................................................. 35
Static Routing ......................................................................................................... 36
Configuring Static Routing: ..................................................................................... 36
Dynamic Routing ..................................................................................................... 37
Port Forwarding ...................................................................................................... 38
Easy Port Forwarding: Applying Pre-Defined Rules ................................................. 39
Advanced Port Forwarding: Creating Custom Rules ................................................ 39
To create a New Port Forward Rule: ........................................................................ 40
Adding Custom Rules to Applied Rules List ............................................................ 40
Access Control ......................................................................................................... 41
IP Filters .................................................................................................................. 43
DMZ Settings .......................................................................................................... 44
Tools ................................................................................................................................... 45
System Commands ....................................................................................................... 46
User Management ........................................................................................................ 47
Update Firmware .......................................................................................................... 48
Ping Test .......................................................................................................................49
Modem Test .................................................................................................................. 50
Status .................................................................................................................................. 51
Network Statistics ......................................................................................................... 52
Connection Status......................................................................................................... 53
DHCP Clients ........................................................................................................... 54
Modem Status .............................................................................................................. 55
Product Information ...................................................................................................... 56
System Log ................................................................................................................... 57
Help .................................................................................................................................... 58
Firewall ......................................................................................................................... 59
Bridge Filters ................................................................................................................ 60
LAN Clients ................................................................................................................... 60
PPP Connection ............................................................................................................ 60
UPnP ............................................................................................................................. 60
Appendix A: Specification ......................................................................................................... 61
Appendix B: Cable Connections ............................................................................................... 63
RJ-45 Network Ports ...................................................................................................... 63
Twisted pair cables ....................................................................................................... 63
Straight and crossover cable configuration ................................................................... 64
RJ11 connector and cable .............................................................................................. 64
605 to RJ-11 adapter...................................................................................................... 65
Appendix C: Glossary .............................................................................................................. 66
Appendix D: Registering your NetComm Product .................................................................... 74
Contact Information ............................................................................................................ 74
Appendix E: Legal & Regulatory Information ........................................................................... 75
Customer Information ......................................................................................................... 75
Product Warranty ............................................................................................................... 75
Limitations of Warranty....................................................................................................... 76

NB4 User Guide YML733Rev1
4 www.netcomm.com.au
IntroductionIntroduction
IntroductionIntroduction
Introduction
Congratulations on becoming the owner of the NB4 ADSL 4-port Modem Router. Your LAN
(local area network) will now be able to access the Internet using your high-speed ADSL
connection. This User Guide will show you how to set up the NB4, and how to customize its
configuration to get the most out of your new product.

YML733 Rev1 NB4 User Guide
www.netcomm.com.au 5
Do I need a Micro filter?Do I need a Micro filter?
Do I need a Micro filter?Do I need a Micro filter?
Do I need a Micro filter?
Micro filters are used to prevent common telephone equipment, such as phones, answering
machines and fax machines, from interfering with your ADSL service. If your ADSL enabled
phone line is being used with any other equipment other than your ADSL Modem then you
will need to use one Micro filter for each phone device.
Splitters may be installed when your ADSL line is installed or when your current phone line is
upgraded to ADSL. If your telephone line is already split you will not need to use a Microfilter
- check with your ADSL service provider if you are unsure.
Each micro filter is connected in-line with your telephone or fax machine so that all signals
pass through it. Telephones and/or facsimiles in other rooms that are using the same exten-
sion will also require Microfilters. The following diagram gives an example of connecting your
ADSL Modem/Router using a Microfilter.

NB4 User Guide YML733Rev1
6 www.netcomm.com.au
Package ContentsPackage Contents
Package ContentsPackage Contents
Package Contents
The following items should be contained in your Ethernet/USB ADSL Modem Package:
■ NB4 ADSL 4-port Modem Router
■ CD-ROM containing Manual
■ RJ45 Ethernet Cable (CAT5 UTP Straight-Through)
■ RJ11 ADSL Cable (Standard telephone cable)
■ Power Adapter
■ Quick Installation Guide and Package Contents Note
Check the contents of your package and, if any parts are missing or damaged, please contact
your Dealer.

YML733 Rev1 NB4 User Guide
www.netcomm.com.au 7
Quick StartQuick Start
Quick StartQuick Start
Quick Start
This Quick Start provides basic instructions for connecting the NB4 ADSL Modem Router to a
computer and to the Internet.
■ Step 1 - describes setting up the hardware.
■ Step 2- shows you how to configure basic settings on the NB4 ADSL Modem Router to get
your computer connected to the Internet.
■ Step 3 - describes how to configure Internet properties on your computer(s).
This Quick Start Guide assumes that you have already established an ADSL service with your
Internet service provider (ISP). These instructions provide a basic configuration that should be
compatible with your home or small office setup. Refer to the Advanced Features section for
additional configuration instructions.
NOTE: NetComm Technical Support for this product only covers the basic installation
and features outlined in the Quick Start section. For detailed information
regarding the advanced features of this product, please refer to the configuring
sections.
The NetComm NB4 ADSL Modem Router can be connected directly to your computer via an
Ethernet interface. If your computer has a network card (NIC) but isn’t connected to a network hub
or switch, or another computer, then connect the NB4 to the network port of your PC.
Warning:Warning:
Warning:Warning:
Warning:
Before you begin, turn the power off for all devices. These includeBefore you begin, turn the power off for all devices. These include
Before you begin, turn the power off for all devices. These includeBefore you begin, turn the power off for all devices. These include
Before you begin, turn the power off for all devices. These include
your computer(s) and the NB4 ADSL Modem Router.your computer(s) and the NB4 ADSL Modem Router.
your computer(s) and the NB4 ADSL Modem Router.your computer(s) and the NB4 ADSL Modem Router.
your computer(s) and the NB4 ADSL Modem Router.

NB4 User Guide YML733Rev1
8 www.netcomm.com.au
Step 1 - Hardware Installation
To connect your modem, follow the step by step instructions below:
1. Connecting the ADSL cable.
Connect one end of the provided phone cable to the port labeled DSL on the Rear Panel of
the device. Connect the other end to your wall phone jack.
2. Connecting the Ethernet cable.
Connect one end of the ethernet cable to the network port on your PC and the other end of
the cable to the ethernet port of the NB4 ADSL Modem Router.
3. Attach the power connector.
Connect the AC power adapter to the Power connector on the back of the device and plug
in the adapter to a wall outlet or power strip. Switch the power on to the NB4.
4. Power up your systems.
Turn on and boot up your computer.
After completing the above, refer to the appropriate operating system section to configure
your computer.
NOTE: At this stage, if your ADSL line is active the ADSL Light should stay perma-
nently ON - if it is blinking, then an ADSL Service has not been detected.

YML733 Rev1 NB4 User Guide
www.netcomm.com.au 9
Step 2 - Modem Configuration
In Step 2, you log directly into the configuration page of the NB4 ADSL Modem Router and
configure the basic settings for your Internet connection. Your ISP should provide you with the
necessary information to complete this step.
The settings that you most likely need to change to access the internet are grouped onto a single
Quick Configuration page.
To configure your NB4 ADSL Modem Router follow the steps below:
Note: If your computer's Ethernet interface is not set to use DHCP or you have trouble
accessing/configuring your NB4, see instructions overleaf "Computer Hardware
Configuration".
1. Insert the NetComm NB4 CD into your CD drive. The NB4 ADSL Modem Router autorun
screen will appear. Click on Configure NB4.
(Alternatively, if the CD-Rom is not available, you can open a web browser and type
http://192.168.1.1 in the location bar to access the NB4's setup screen directly.)
2. The logon page will be displayed. Enter the NB4’s username and password.
The default username is admin.
The default password is password.
Click on OK.
3. The Quick Start - login settings page will be displayed.

NB4 User Guide YML733Rev1
10 www.netcomm.com.au
4. Under the User ID heading, enter the Username that your ISP has provided. In the
password field, enter the password that your ISP has given you.
5. Leave the Protocol, VPI and VCI settings as default unless advised to change them by
your ISP.
6. Click on the Connect button to test the settings.
7. If the test was successful, then click "Save Settings". If it failed, please try again by clicking
on the "Connect" button a second time. Also, check your settings to ensure they are
correct.
8. You should now be able to access the Internet with a web browser, email client or other
Internet application.

YML733 Rev1 NB4 User Guide
www.netcomm.com.au 11
Step 3 - Computer Hardware Configuration
Step 3 of the Quick Start provides instructions for configuring the Internet settings on your computer
to work with the NB4. These steps are only required if you are having trouble accessing/configuring
your NB4.
Windows® XP PCs
1. In the Windows task bar, click the Start button, and then click Control Panel.
2. Click on Network & Internet Connections icon. (Category mode only).
3. Click the Network Connections icon.
4. In the LAN or High-Speed Internet window, right-click on the icon corresponding to your
network interface card (NIC) and select Properties. (Often, this icon is labeled Local Area
Connection).
5. The Local Area Connection dialog box displays with a list of currently installed network
items. Ensure that the check box to the left of the item labeled Internet Protocol (TCP/IP)
is checked. Select Internet Protocol TCP/IP and click on Properties.
6. In the Internet Protocol (TCP/IP) Properties dialog box, click the radio button labeled
Obtain an IP address automatically. Also click the radio button labeled Obtain DNS
server address automatically.
7. Click OK twice to confirm your changes, and close the Control Panel.
Windows 2000 PCs
First, check for the IP protocol and, if necessary, install it:
1. In the Windows task bar, click the Start button, point to Settings, and then click Control
Panel.
2. Double-click the Network and Dial-up Connections icon.
3. In the Network and Dial-up Connections window, right-click the Local Area Connection
icon, and then select Properties.
4. In the Local Area Connection Properties dialog box, select Internet Protocol (TCP/IP),
and then click Properties
5. In the Internet Protocol (TCP/IP) Properties dialog box, click the radio button labeled
Obtain an IP address automatically. Also click the radio button labeled Obtain DNS server
address automatically.
6. Click OK twice to confirm and save your changes, and then close the Control Panel.

NB4 User Guide YML733Rev1
12 www.netcomm.com.au
Windows ME PCs
1. In the Windows task bar, click the Start button, point to Settings, and then click Control
Panel.
2. Click on View All Control Panel Options.
3. Double-click the Network icon.
4. The Network Properties dialog box displays with a list of currently installed network
components. If the list includes Internet Protocol (TCP/IP), then the protocol has already
been enabled. Skip to step 10.
5. If Internet Protocol (TCP/IP) does not display as an installed component, click Add…
6. In the Select Network Component Type dialog box, select Protocol, and then click
Add…
7. Select Microsoft in the Manufacturers box.
8. Select Internet Protocol (TCP/IP) in the Network Protocols list, and then click OK. You
may be prompted to install files from your Windows ME installation CD or other media.
Follow the instructions to install the files. If prompted, click OK to restart your computer
with the new settings.
Next, configure the PC to accept IP information assigned by the NB4 ADSL Modem
Router:
9. Follow steps 1 – 4 above..
10. In the Network Properties dialog box, select TCP/IP, and then click Properties.
If you have multiple TCP/IP listings, select the listing associated with your network card or
adapter.
11. In the TCP/IP Settings dialog box, click the radio button labeled Obtain an IP address
automatically.
12. Click OK twice to confirm and save your changes, and then close the Control Panel.

YML733 Rev1 NB4 User Guide
www.netcomm.com.au 13
Windows 95, 98 PCs
First, check for the IP protocol and, if necessary, install it:
1. In the Windows task bar, click the Start button, point to Settings, and then click Control
Panel.
2. Double-click the Network icon.
3. The Network dialog box displays with a list of currently installed network components. If
the list includes TCP/IP, and then the protocol has already been enabled. Skip to step 9.
4. If TCP/IP does not display as an installed component, click Add… The Select Network
Component Type dialog box displays.
5. Select Protocol, and then click Add… The Select Network Protocol dialog box displays.
6. Click on Microsoft in the Manufacturers list box, and then click TCP/IP in the Network
Protocols list box.
7. Click OK to return to the Network dialog box, and then click OK again. You may be
prompted to install files from your Windows 95/98 installation CD. Follow the instructions
to install the files.
8. Click OK to restart the PC and complete the TCP/IP installation.
Next, configure the PCs to accept IP information assigned by the NB4 ADSL Modem
Router:
9. Follow steps 1 – 3 above.
10. Select the network component labeled TCP/IP, and then click Properties. If you have
multiple TCP/IP listings, select the listing associated with your network card or adapter.
11. In the TCP/IP Properties dialog box, click the IP Address tab.
12. Click the radio button labeled Obtain an IP address automatically.
13. Click OK twice to confirm and save your changes. You will be prompted to restart
Windows.
14. Click Ye s .

NB4 User Guide YML733Rev1
14 www.netcomm.com.au
Mac OS 9.x
1. Click on the Apple in the toolbar, select Control Panels, and then click on TCP/IP.
2. Choose Connect: via Ethernet and Configure: Using DHCP Server.
3. Close the TCP/IP configuration box and save the changes.
Mac OS X
1. On the Dock, click on System Preferences.
2. Click on Network.
3. Confirm that Built in Ethernet is selected. From the TCP/IP tab select Configure: Using
DHCP. Click on Apply Now to save any changes and exit from the System Preferences.
NOTE: For Windows NT 4 Configuration instructions please refer to the NB4 User
Guide located on the CD-ROM.
For detailed information regarding the advanced features of this product,For detailed information regarding the advanced features of this product,
For detailed information regarding the advanced features of this product,For detailed information regarding the advanced features of this product,
For detailed information regarding the advanced features of this product,
please refer to the configuring sections.please refer to the configuring sections.
please refer to the configuring sections.please refer to the configuring sections.
please refer to the configuring sections.

YML733 Rev1 NB4 User Guide
www.netcomm.com.au 15
LED IndicatorsLED Indicators
LED IndicatorsLED Indicators
LED Indicators
The LED Indicators are located on the front of the unit, they are green in color. The meanings
are as follows:
Label Meaning Status Indicates
PWR Power On Power is on
Off Power is off
LAN 1/ LAN 2/ LAN 3/ LAN 4
LAN Link Flashing Flashes when data is being sent or received
on the LAN connection.
On Indicates a link to your LAN or Network card
is active.
Off Indicates no link to LAN
ADSL Link Link A valid ADSL connection.
Active Act An active WAN session.

NB4 User Guide YML733Rev1
16 www.netcomm.com.au
Back Panel PortsBack Panel Ports
Back Panel PortsBack Panel Ports
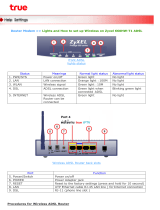
Back Panel Ports
ADSL Telephone jack (RJ-11) to connect to your Telephone Wall Socket (ADSL
line).
ETHERNET 4 x 10/100 Base-T Ethernet jack (RJ-45) to connect to your Ethernet
Network card or Ethernet Hub / Switch.
RESET To reset your ADSL Router to factory default settings. (All customised
settings that you have saved will be lost!)
Please refer to the section below on how to use the reset function.
DC Connect the Power Adapter that comes with your package.
Resetting Factory Defaults
The restore to factory defaults feature will set the ADSL Router to its factory default configura-
tion by resetting the ADSL Router. You may need to place the ADSL Router into its factory
defaults; if the configuration has changed, you lose the ability to configure the ADSL Router
via the web interface, or following a software upgrade. To reset the ADSL Router:
■ Ensure that your ADSL Router is powered on (for at least 10 seconds).
■ Use a paper clip or a pencil tip to depress the reset button for five seconds and release. At
this point, the reset is in progress. Do not power off the unit at this point.
■ When indicator lights return to steady green, reset is complete. The default settings are
now restored.
RJ11 for ADSL
connection to
telephone line
4 x RJ45 Ports for
10/100 Ethernet
LAN connection
Reset
factory
defaults
Power jack for
AC power
adaptor

YML733 Rev1 NB4 User Guide
www.netcomm.com.au 17
Configuring Your ComputerConfiguring Your Computer
Configuring Your ComputerConfiguring Your Computer
Configuring Your Computer
You can use the RJ-45 cable to connect the ADSL Router.
Step 1: Move your cursor as following sequence Start \ Settings \ Control Panel and click
Control Panel. Then double-click on the Network Connections
Step 2: In the LAN or High-Speed Internet window, right-click on icon corresponding to
your network interface card (NIC) and select Properties.(This icon may be labeled
Local Area Connection).

NB4 User Guide YML733Rev1
18 www.netcomm.com.au
Step 3: In the General Tab of the Local Area Connection Properties menu. Highlight Internet
Protocol (TCP/IP) under "This connection uses the following items." by click on it
once. Click on the Properties button.
Step 4: Select Obtain an IP Address automatically: by clicking once in the circle. Click OK
button to confirm and save your changes, and the close the Control Panel.

YML733 Rev1 NB4 User Guide
www.netcomm.com.au 19
Configuring Your NB4Configuring Your NB4
Configuring Your NB4Configuring Your NB4
Configuring Your NB4
Step 1 Launch your PC web browser and enter the URL: http://192.168.1.1
Step 2: In the User name/Password prompt, please type in admin/password as default.
Step3: Please wait for the Home page to appear.

NB4 User Guide YML733Rev1
20 www.netcomm.com.au
Quick Start SettingsQuick Start Settings
Quick Start SettingsQuick Start Settings
Quick Start Settings
After you have configured your computer and logged directly into the configuration page of
the NB4 ADSL Modem Router you will need to complete the Quick Start section. The settings
that you most likely need to change before using the device are grouped onto a single Quick
Start page.
To configure your NB4 ADSL Modem Router follow the steps below:
1. Insert the NetComm NB4 CD into your CD drive. The NB4 ADSL Modem Router autorun
screen will appear. Click on Configure NB4.
(Alternatively, if the CD-Rom is not available, you can open a web browser and type
http://192.168.1.1 in the location bar to access the NB4's setup screen directly.)
2. The logon page will be displayed. Enter the NB4’s username and password.
The default username is admin.
The default password is password.
Click on OK.
3. The Quick Start - login settings page will be displayed.
4. Under the User ID heading, enter the Username that your ISP has provided. In the
password field, enter the password that your ISP has given you.
5. Leave the Protocol, VPI and VCI settings as default unless advised to change them by
your ISP.
6. Click on the Connect button to test the settings.
/