Page is loading ...

in.k1000+
full-featured color capacitive
touchscreen display keypad for spas
TechBook
Gecko Alliance
450 des Canetons, Québec (Qc), G2E 5W6 Canada, 1.800.78.GECKO
www.geckoalliance.com
Printed in Canada
9919-101605-C
Rev. 12-2019
© Groupe Gecko Alliance inc., 2019
All trademarks or registered trademarks
are the property of their respective owners.
A touch of engineering magic!
Now with your own personal swim coach!
Now connects to the Internet of Things!
1
+

1
1
+
Warning ��������������������������������������������������������������������������������������������������������������������������������������������������������������������������� 2
Introduction ��������������������������������������������������������������������������������������������������������������������������������������������������������������������� 3
Overview
- in�k1000+ dimensions ��������������������������������������������������������������������������������������������������������������������������������������� 4
- in�k1001+ dimensions ��������������������������������������������������������������������������������������������������������������������������������������� 5
Installation
- Installation of in�k1000+ ������������������������������������������������������������������������������������������������������������������������������������� 6
- Drilling template ������������������������������������������������������������������������������������������������������������������������������������������������� 7
- Installation notes ������������������������������������������������������������������������������������������������������������������������������������������������� 9
- Connecting in�k1000+ to the spa pack �������������������������������������������������������������������������������������������������������������� 9
Keypad functions
- in�k1000+ keypad layout ���������������������������������������������������������������������������������������������������������������������������������� 11
- Sleep mode ������������������������������������������������������������������������������������������������������������������������������������������������������ 11
- Main screen ����������������������������������������������������������������������������������������������������������������������������������������������������� 11
- Start or stop accessories ����������������������������������������������������������������������������������������������������������������������������������� 12
- Notifications ������������������������������������������������������������������������������������������������������������������������������������������������������ 12
- Water temperature ������������������������������������������������������������������������������������������������������������������������������������������� 13
- Spa menu ��������������������������������������������������������������������������������������������������������������������������������������������������������� 13
- Display page ����������������������������������������������������������������������������������������������������������������������������������������������������� 13
- Contrast page ��������������������������������������������������������������������������������������������������������������������������������������������������� 14
- Sleep ���������������������������������������������������������������������������������������������������������������������������������������������������������������� 14
- Settings ������������������������������������������������������������������������������������������������������������������������������������������������������������� 14
- Water Care �������������������������������������������������������������������������������������������������������������������������������������������������������� 15
- Modifying schedules ����������������������������������������������������������������������������������������������������������������������������������������� 16
- Heat Pump ������������������������������������������������������������������������������������������������������������������������������������������������������� 17
- Maintenance ���������������������������������������������������������������������������������������������������������������������������������������������������� 19
- Reminders �������������������������������������������������������������������������������������������������������������������������������������������������������� 19
- Standby ������������������������������������������������������������������������������������������������������������������������������������������������������������ 19
- Date and Time �������������������������������������������������������������������������������������������������������������������������������������������������� 19
- Keypad settings ������������������������������������������������������������������������������������������������������������������������������������������������ 20
- Temperature units �������������������������������������������������������������������������������������������������������������������������������������������� 21
- Display page ����������������������������������������������������������������������������������������������������������������������������������������������������� 21
- Contrast page ��������������������������������������������������������������������������������������������������������������������������������������������������� 21
- Language select ����������������������������������������������������������������������������������������������������������������������������������������������� 22
- Keypad lock/unlock (optional) �������������������������������������������������������������������������������������������������������������������������� 22
- Keypad Color (optional) ������������������������������������������������������������������������������������������������������������������������������������ 23
- Electrical Configuration ������������������������������������������������������������������������������������������������������������������������������������� 23
- Select logo �������������������������������������������������������������������������������������������������������������������������������������������������������� 24
- Wi-Fi (in�touch only) ����������������������������������������������������������������������������������������������������������������������������������������� 24
- Wi-Fi (in�touch 2) ���������������������������������������������������������������������������������������������������������������������������������������������� 25
- Miscellaneous ��������������������������������������������������������������������������������������������������������������������������������������������������� 25
- Warm weather �������������������������������������������������������������������������������������������������������������������������������������������������� 25
- Info messages �������������������������������������������������������������������������������������������������������������������������������������������������� 26
- About ���������������������������������������������������������������������������������������������������������������������������������������������������������������� 26
- Wipe screen ����������������������������������������������������������������������������������������������������������������������������������������������������� 26
- Swim functions ������������������������������������������������������������������������������������������������������������������������������������������������� 27
- in�stream 2 functions ���������������������������������������������������������������������������������������������������������������������������������������� 32
- in�clear functions ���������������������������������������������������������������������������������������������������������������������������������������������� 34
- in�mix functions ������������������������������������������������������������������������������������������������������������������������������������������������ 36
Error messages �������������������������������������������������������������������������������������������������������������������������������������������������������������� 37
Feature matrix ��������������������������������������������������������������������������������������������������������������������������������������������������������������� 38
Specifications ���������������������������������������������������������������������������������������������������������������������������������������������������������������� 39
Table of contents

2
1
+
WARNING :
Before installing or connecting the unit, please read the following�
FAILURE TO COMPLY WITH THE FOLLOWING WARNINGS MAY SIGNIFICANTLY SHORTEN THE PRODUCT’S LIFE TIME,
AND LEAD TO FAILURES AS WELL AS HAZARDOUS CONDITIONS*� COMMON SENSE MUST ALWAYS PREVAIL WHEN
EVALUATING THE INSTALLATION AND/OR USE OF ANY ELECTRONIC CONTROL IN A FINAL APPLICATION�
* RESPECT ENVIRONMENTAL CONDITIONS LISTED AT END OF TECHBOOK�
* THIS UNIT MUST BE INSTALLED BY QUALIFIED PERSONNEL�
* ONLY QUALIFIED PERSONNEL ARE TO SERVICE THIS UNIT�
THERE ARE NO USER SERVICEABLE PARTS INSIDE�
* THIS UNIT SHOULD BE INSTALLED ON A CLEAN FLAT SURFACE�
* THE GASKET ON THE BACK OF THE UNIT WILL PREVENT WATER INFILTRATION INSIDE, BEHIND THE MOUNTED
SURFACE� IF THE GASKET IS DAMAGED, SEAL THE BACK OF THE UNIT WITH SILICONE TO AVOID ANY LEAKAGE
BEHIND THE MOUNTED SURFACE�
* THIS UNIT MUST BE MOUNTED ON THE OUTSIDE EDGE OF THE SPA� SEE INSTALLATION SECTION FOR DETAILS�
* THE BACK OF THIS UNIT SHOULD NOT BE ENCLOSED IN A WAY THAT CAUSES WATER TO COLLECT�
SEE INSTALLATION SECTION FOR DETAILS�
* HAZARDOUS CONDITION:
A CONDITION THAT IS POTENTIALLY DAMAGING AND/OR DANGEROUS TO THE OPERATOR OR SURROUNDINGS�
THIS INCLUDES, BUT IS NOT LIMITED TO: FIRE, FLOODING OR OTHER WATER DAMAGE, DIELECTRIC BREAKDOWNS
(PRESENCE OF HIGH VOLTAGE), ETC�
MAINTENANCE
IF YOU HAVE PROBLEMS, DO NOT ATTEMPT TO REPAIR THE UNIT YOURSELF� RETURN IT TO YOUR DEALER OR
SERVICE STATION FOR SERVICING�
ACCESSORY PARTS
BE SURE TO USE ONLY THE SPECIFIED ACCESSORY PARTS� USE OF OTHER THAN DESIGNATED PARTS MAY DAMAGE
THIS UNIT INTERNALLY OR MAY NOT SECURELY INSTALL THE UNIT IN PLACE� THIS MAY CAUSE PARTS TO BECOME
LOOSE RESULTING IN HAZARDS OR PRODUCT FAILURE�
DISPOSAL OF THE PRODUCT
THE APPLIANCE (OR THE PRODUCT) MUST BE DISPOSED OF SEPARATELY
IN ACCORDANCE WITH THE LOCAL WASTE DISPOSAL LEGISLATION IN FORCE�
Compatible spa controllers:
in�xm2, in�xe, in�yt, in�yj and in�ye with compatible software revision�
Aeware®, Gecko®, and their respective logos are Registered Trademarks of Gecko Alliance Group�
in�k1000+™, in�xm2™, in�xe™, in�yt™, in�ye™, in�yj™, in�tune™, in�stream™, in�stream 2, in�mix™, in�clear™, in�touch™ and
in�therm™, and their respective logos are trademarks of Gecko Alliance Group�
All other product or company names that may be mentioned in this publication are tradenames, trademarks
or registered trademarks of their respective owners�
Warning

3
1
+
Introduction
in�k1000+
full-featured color capacitive
touchscreen display keypad for spas
A touch of engineering magic!
Gecko’s new version of its in�k1000 capacitive touch
screen display keypad boasts a new state of the art
touch screen with more precise fingertip contact areas
for accurate target selection, enabling easier and more
precise interactions�
in�k1000+ features optimal water resistance and lots
of memory�
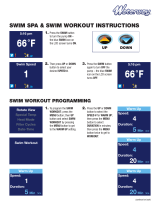
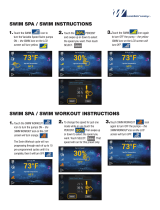
Now with your own personal swim coach!
With its swim spa training program, in�k1000+ can
transform any swim spa into the ultimate training
machine� Directly on the keypad, training sessions can be
customized by setting flow intensities, durations and color
indicators� Pre-sets Lap, Transition, Cardio and Power
drills can also be selected and customized to match any
training needs�
in�k1000+ can now control multiple 2 speed pumps and
synchronize the jets to create the wide selection of water
stream strengths a swimmer needs for serious training�
Now connects to the Internet of Things!
in�k1000+ can access the internet through its in�touch 2
connection, making your spa an integral part of the
Internet of Things�

4
1
+
Overview
Side view
0,26"
(6,6 mm)
1,69"
(43 mm)
Front view
7,49"
(190 mm)
5,17"
(131 mm)
3,5"
(89 mm)
MAX
in.k1000+ dimensions

5
1
+
Overview
in.k1001+ dimensions
Side view
0,26"
(6,6 mm)
1,93"
(49 mm)
Front view
6,23"
(158 mm)
3,91"
(99 mm)
3,5"
(89 mm)
MAX

6
1
+
Installation of in.k1000+
Installation
Gasket with or without adhesive
Optional wing nuts
and spacers
To install the in�k1000+, use the drilling template provided in this section�
Determine the mounting location and stick the template on the chosen location�
Cut out an opening according to the template (see illustration)�
Clean the installation surface and peel the adhesive gasket from the back
of the keypad�
Insert the keypad and align it correctly, then ensure it is properly glued
by gently pressing evenly on the entire surface�

7
1
+
Installation
Drilling template
3,19"
(82 mm)
5,5"
(140 mm)
ø 0,19"
(5 mm)

8
1
+
Drilling template
Installation
1,75"
(44 mm)
TYP
1,5"
(38 mm)
TYP
ø 2,5"
(64 mm)
TYP

9
1
+
The back of the in�k1000+ should not be enclosed where
water can gather, but instead in a cut out�
Connecting in.k1000+ to the spa pack
Note: always shut power down before connecting an accessory to the spa pack�
To connect the keypad, remove the cover, then insert the in�link connector into the appropriate keypad connector
(as illustrated)� Route the cable through one of the molded strain relief channels on the bottom right side of the spa
pack (as illustrated)� Fill the remaining space with the foam gaskets supplied� Don’t forget to replace the cover and all
screws (torque to 8 in� lb max (0�9 N�m))�
The vent hole on back of keypad should not be blocked�
Install the keypad facing the outside of the spa� Also make
sure that the spa cover can never get in contact with the
keypad glass surface�
Installation notes
Installation
water
keypad
cover
vent hole
4°
When installing the keypad on the spa, a minimum angle
of 4 degrees must be respected�
Main keypad in�k1000+
Connect the
main keypad as
indicated here�

10
1
+
Installation
Installation errors
Upon connecting the in�k1000+ to the spa pack you may
see one of two error messages�
Please follow the instructions in the message or contact
your dealer for more information�

11
1
+
Keypad functions
Sleep mode
Touch the screen to exit sleep mode� 3 minutes after the
last pump is turned off, the screen will shut off if there is
no touch activity�
Then Follow the instructions on the screen to access the
main screen�
Main screen
The main screen gives you access to your accessories and
water temperature� At the bottom of the screen
you will see any error or maintenance messages that are
present�
in.k1000+ keypad layout
all-on or all-off key
(one touch activation)
direct to function
selection wheel
(settings and
additional options)
on-screen
system messages
and reminders
interactive display icons
(main spa functions)
mode selection
wheel (settings and
accessories)

12
1
+
Start or stop accessories
To start or stop an accessory, touch the associated icon�
Icons will become animated when their accessory is
turned on and animation will stop when turned off�
Icons on the screen will reflect the speed or state of
the devices running on your spa� When an accessory has
more than one speed press the button until it reaches
the desired speed�
Notifications
A notification area at the top right-hand side of the screen
shows the state of certain installed accessories�
Keypad functions
Notification icons
in.touch:
• Indicates that the in�touch module is detected
and connected to a Wi-Fi network�
• A red cross indicates that the in�touch module
is detected but is not connected to a Wi-Fi network�
• An animated icon indicates that the in�touch
module is connecting to a Wi-Fi network�
For more information about the in�touch,
refer to the Wi-Fi section�
in.clear:
• The icon is green when the in�clear is
generating bromine�
• The icon is grey when the in�clear is not
generating bromine�
• A red cross indicates that the in�clear is
turned off�
For more information about the in�clear,
refer to the in�clear functions section�
in.stream 2:
• The icon is green when the in�stream 2 is on�
• A red cross indicates that the in�stream 2 is
turned off�
For more information about the in�stream 2,
refer to the in�stream 2 functions section�
in.mix:
• Indicates that an in�mix system is detected�
For more information about the in�mix system, refer
to the in�mix functions section�

13
1
+
Water temperature
The temperature shown at the bottom of the screen
indicates the current water temperature� Use the Up and
Down icons to set the desired temperature� The set point
will appear in blue� After 3 seconds without any change to
the set temperature value the current water temperature
will reappear in white�
When the set value is lower than the current temperature
Cooling to xx.x will appear below� When the set value is
higher than the current temperature, Heating to xx.x will
be indicated under the value�
Spa menu
From the home page you can access the following:
•
swim (if configured)
•
in�clear (if installed)
•
in�stream 2 (if installed)
•
in�mix (if installed)
•
Spa menu
•
Settings
To select an option, slide the left wheel up or down until
the desired icon menu is highlighted in the middle�
On the right side is a menu for access to the Display and
Contrast pages�
Keypad functions
Display page
Use this page to change the display orientation�

14
1
+
Contrast page
Use this page to change the display contrast�
Settings
In the Settings page you can access the following:
•
Water Care
•
Heat Pump (if installed)
•
Maintenance
• Date & Time
•
Keypad
•
Electrical Config
•
Wi-Fi
•
Miscellaneous
•
About
To select an item, slide the right wheel until the desired
icon is highlighted in the middle or press on the menu
name�
Keypad functions
Sleep
Press key to go directly into the sleep mode� In sleep
mode, water splashing on the keypad can't inadvertently
start/stop a pump�

15
1
+
Water Care
The Water Care page will help you set up your ideal
filtration and heating settings� Choose between
Away from Home, Standard, Energy Savings,
Super Energy and Weekender, depending on your need�
Touch the Water Care name to choose your setting�
A green checkmark will appear on the selected icon to
confirm your choice�
When you select another water care setting, a confirmation
window appears to prevent inadvertent selection that
could result in a setup modification for your spa�
In Economy mode, the set point will be reduced by 20°F*,
which means that the heating system will not be engaged
unless the temperature falls to 20°F below the spa's set
temperature�
The filtration schedule shown on the in�k1000+ screen
will apply to the main filtration pump, most likely pump 1�
If your spa uses a circulation pump configured to run
24 hours, the screen will show you the purge setting
instead of filtration�The purges are pre-programmed for
a fixed number of minutes, therefore the duration will
be set to N/A on the screen and only the start time can
be modified�
* Default pack value
Water care modes
Away:
In this mode the spa will always be in economy;
the set point will be reduced by 20° F�
Standard:
The spa will never be in economy mode and will be
filtering according to the pack's low level configuration�
Energy Savings:
The spa will be in economy mode during the peak hours
of the day and resume normal mode on the weekend�
Super Energy Savings:
The spa will always be in economy mode during peak
hours, every day of the week�
Weekender:
The spa will be in economy mode from Monday to Friday,
and will run normally on the weekend�
Keypad functions

16
1
+
Keypad functions
Modifying schedules
To modify a Water Care category, touch the pencil icon
at the right end of the desired Water Care to open the
selected Water Care menu�
Touch the Economy tab to change the economy setting
and Filter cycle tab for the filtration settings (or schedules)�
You can add economy or filtration schedules by touching
the orange line labelled« Add Filter cycle » or "Add
Economy cycle"�
To delete a schedule, touch the garbage can icon at the
right end of the desired line� Confirm your action when
prompted�
You can modify the programmed schedules by selecting
one and adjusting the schedule�
You have several possibilities for the schedule (Mon-Fri,
weekend, every day, or single days)� The schedules will
be repeated every week� The time and duration are set in
30 minute increments� When changes are done, press
"confirm"� If you don't want to keep any changes, press
"cancel" or use the calendar icon to go back� Ensure that
you have selected the desired Water Care mode in the
main Water Care menu�

17
1
+
Heat Pump
From the Settings page, you can access the Heat Pump
menu, which gives you access to the following
Heat Pump Modes:
• Eco Heat
• Smart Heat
• Eco Auto
• Smart Auto
• Cool
• Electric
Slide to make a selection and Press on it to confirm�
When you select a Heat Pump Mode, you will be asked to
confirm your choice�
Regulation Mode
The Regulation Mode page will help you set up your ideal
Heat Pump regulation settings� Choose between Eco Heat,
Smart Heat, Eco Auto, Smart Auto, Cool and Electric,
depending on your need� Touch the Regulation Mode
name to choose your setting� A green checkmark will
appear on the selected icon to confirm your choice�
When you select another Regulation Mode setting,
a confirmation window appears to prevent inadvertent
selection that could result in a setup modification for
your spa�
Keypad functions
*If a Gecko Brand Heat Pump (in.temp) is connected
to your spa setup, the following Menu will appear when
selecting Heat Pump in the Settings Menu instead of the
Regulation Mode Menu.

18
1
+
Keypad functions
Eco Heat
In this mode, the heat pump is used as
the unique source of heating� The heating
element is kept off and the heat pump
is not used to cool the water should its
temperature rise above the current set point�
Smart Heat
This mode uses the heat pump as the main
heating source� The heating element is
turned on only if there is a large temperature
difference between the water and the set
point� The heat pump is not used to cool the
water in this mode�
Eco Auto
This mode borrows functionality from both
Eco Heat and Cool modes and has the
ability to select the proper Heat or Cool
mode automatically according to the water
temperature� The heating element is never
activated in this mode�
Heat pump modes
Est. Energy Saved
Only available with a Gecko Brand Heat Pump (in.temp)
In this section, you can view your estimated kWh economy
graph� These calculations are made while using a in�temp
to heat your spa� The economy estimate can be viewed
in days or months format by pressing the button below
the graph�
Disclaimer:
The data provided by this tool is estimated by sampling numerous operating parameters in real time in order to
generate an estimate that is as close as possible to reality� The data is presented to the users with the best intention but
Gecko Alliance inc� makes no warranty about its accuracy or completeness� To increase the accuracy of those estimates,
make sure the heat pump is well maintained and operates in the recommended conditions in regards to water flow, air
exchange through discharge panel, adequate compressor pressure and cleanliness of pipes and heat exchanger�
Smart Auto
This mode borrows functionality from both
Smart Heat and Cool modes and has the
ability to select the proper Heat or Cool
mode automatically according to the water
temperature� The heating element is activated
only if there is a large temperature difference
between the water and the set point�
Cool
This mode uses the heat pump in cooling
mode only� The heat pump is not used as a
heating source and the heating element is
never activated�
Electric
This mode keeps the heat pump off and
uses only the heating element to regulate
water temperature�

19
1
+
Keypad functions
Reminders
The in�k1000+ keypad will provide reminders about
maintenance required on your spa, like rinsing or cleaning
the filter� Every task has its own duration based on
normal use�
The Reminders menu allows you to check the time left
before maintenance is required, as well as to reset the
time once a task has been completed�
To reset a task, select it by pressing the curved arrow,
then confirm when prompted� Once you have confirmed,
the task will be reset�
You can also use the option Reset Reminders to reset all
the reminders�
Date and Time
Use this page to change Date/Time settings�
Standby
The Standby mode allows you to service your spa� Pumps
will stop for 30 minutes and will automatically restart after�
The normal page will return at the end, once the pumps
will be restarted�
Maintenance
From the Maintenance page you can access the following:
• Reminders
• Standby
To acces the desired option simply touch the
corresponding menu item�
/