Page is loading ...

1
Quick Reference Card
Please consult your spa user manual for complete info on the features of your spa system.
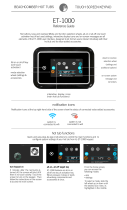
in.k1000
touch screen keypad
No buttons, keys and overlays! Mode and function selection wheels, all-on or all-off one touch activation key of last
used settings, interactive display icons and on-screen messages are all elements of the in.k1000 user interface
designed to let spa users interact intuitively with their spa and its value-added accessories.
notification icons
Notification icons at the top right-hand side of the screen show the status of connected value-added accessories.
spas functions
Quick and easy step-by-step instructions to control the main functions and
to configure system settings of your spa from its in.k1000 main spa keypad.
in.clear
system is on
in.clear
system is idle
in.clear
system is off
in.stream 2 audio
system is on
in.stream 2 audio
system is off
in.mix
is installed
system is connected
to wifi
system is not
connected to wifi
All-on or all-off key
(one touch activation)
direct to function
selection wheel
(settings and
additional options)
on-screen
system message
and reminder
interactive display icons
(main spa functions)
mode selection
wheel (settings
and accessories)
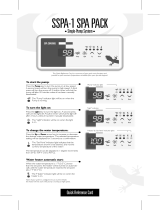
turn keypad on
3 minutes after the last pump is turned off, the
screen will shut off if there is no touch activity.
Touch the screen to turn on the keypad.
Then follow the instructions on the screen to
access the main screen.
all-on, all-off target key
in.k1000 features an all-on or all-off one touch
activation key. When pressed, it tops or starts all
working components and accessories at once.
From the home page, you can access the
following modes:
• sanitization (with in.clear connected)
• audio (with in.stream 2 connected)
• color (with in.mix installed)
• spa
• settings
To select a mode, slide the left wheel up or down
until the desired icon menu is highlighted in the
middle.

1
direct to function
selection wheel:
water care -
maintenance -
date & time -
keypad -
electrical config -
wifi -
about -
spa mode
spa mode
To select the spa mode, slide the left wheel up
or down until the spa icon is highlighted in the
middle.
The home page will display its equipment
start or stop keys, up and down buttons, water
temperature, messages and quick access to
display options:
• display orientation
• display contrast
To select an option, slide the right wheel up or
down until the desire icon menu is highlighted in
the middle.
display orientation
To modify the display orientation settings, slide
the right wheel until the display orientation icon is
highlighted in the middle.
Simply touch the line of the orientation you want
to select.
start or stop accessories
To start or stop an accessory (pump, blower,
light), touch the associated icon. Icons will
become animated when their accessory is turn
on, and animation will stop when turn off.
Icons on the screen will reflect the speed or state
of the devices running on your spa. When an
accessory has more than one speeds press the
button until it reaches the desired speed.
display contrast
To modify the display contrast settings, slide
the right wheel until the display contrast icon is
highlighted in the middle.
Simply touch the line of the contrast you want
to select.
water temperature
The temperature at the bottom of the screen
shows the current water temperature. Use the Up
and Down icon to set the desired temperature.
The set point will appear in blue. After 3 seconds
without any changes to the set temperature value,
the current water temperature will reappear.
When the set value is lower than the current
temperature Cooling to xx.x will appear below.
When the set value is higher than the current
temperature, Heating to xx.x will be indicated
under the value. Normally there is a short delay
before the heating starts, during which Heating
Suspended is indicated under the value.
list of featured items
mode selection
wheel:
settings icon
settings
You can use the Settings mode to manage settings of your spa system.
To select the settings mode, slide the left wheel up or down until the settings icon menu is highlighted in
the middle.
In the Settings page you can access the following:
• water care • electrical configuration
• maintenance • wifi
• date & time • miscellaneous
• keypad • about
To select an item, slide the right wheel until the desired icon is highlighted in the middle or press on the
menu name.
sleep
Press key to go directly into the sleep mode. In
sleep mode, water splashing on the keypad can't
inadvertently start/stop a pump.

1
water care
The Water care page will help you set up your ideal filtration and heating settings.
Choose, set or modify one of the 5 suggested modes depending on your needs at any given time.
Away from home
In this mode the
spa will always be in
economy; the set point
will be reduced
by 20° F.
Beginner
The spa will never be
in economy mode
and will be filtering
according to the pack's
low level configuration.
Energy Savings
The spa will be in
economy mode during
the peak hours of
the day and resume
normal mode on
the weekend.
Super Energy
The spa will always
be in economy mode
during peak hours,
every day of the week.
Weekender
The spa will be in
economy mode from
Monday to Friday, and
will run normally on
the weekend.
modifying water care schedules
water care
To modify a Water care category, touch the pen
icon at the right end of the desired water care to
open the selected Water Care menu.
In Economy mode, the set point will be reduced
by 20°F, which means that the heating system
will not be engaged unless the temperature falls to
20°F below the spa's set temperature.
The filtration schedule show on the screen will be
applied to the main filtration pump, most likely
pump 1. If your spa uses a circulation pump
configured to run 24 hours, the screen will show
you the purge setting instead of filtration.
The purges are pre-programmed for a fix number
of minutes, therefore the duration will be set to
N/A on the screen, and only the start time can be
modified.
economy
Touch the Economy tab to change the economy
schedule. You can add economy schedules by
touching the orange line labelled "Add Economy" .
To delete a schedule, touch the garbage can icon
at the right end of the desired line.
You can modify the programmed schedules by
selecting one and adjusting the schedule.
You have several possibilities for the schedule
(Mon-Fri, weekend, every day, or single days).
The schedules will be repeated every week.
The time and duration are set in 30 minute
increments.
purges
Touch the Purge tab to change the purge
settings. You can add purges by touching the
orange line labelled "Add purge time".
To delete a schedule, touch the garbage can icon
at the right end of the desired line.
filter cycles
Touch the Filter cycle tab to change the filter
cycle schedules. You can add filtration schedules
by touching the orange line labelled "Add filter
cycle" .
To delete a schedule, touch the garbage can icon
at the right end of the desired line.
Once you have set the schedule, press "Confirm".
If you don't want to keep any changes, press
"Cancel" or use the calendar icon to go back.
You can modify the programmed purges by
selecting one and adjusting the schedule.
You have several possibilities for the schedule
(Mon-Fri, weekend, every day, or single days).
The schedules will be repeated every week.
The time and duration are set in 30 minute
increments. Once you have set the purge,
press "Confirm". If you don't want to keep
changes, press "Cancel" or the calendar icon.

1
maintenance
date and time
keypad settings
maintenance
To modify maintenance settings, slide the right
wheel until the maintenance icon is highlighted
in the middle.
From the Maintenance page you can access
the following:
• Reminders
• Standby
Simply touch the line of the item you want
to change.
date and time
To modify date and time settings, slide the right
wheel until the date and time icon is highlighted
in the middle.
Simply touch the line of the item you want to
change.
keypad settings
To modify keypad settings, slide the right wheel
until the keypad icon is highlighted in the middle.
Simply touch the line of the item you want to
change.
display contrast
Use this page to set or change the display day or
night contrast.
reminders
The in.k1000 keypad will provide reminders
about maintenance required on your spa, like
rinsing or cleaning the filter. Every task has its own
duration, based on normal use.
The reminders menu allows you to check the time
left before maintenance is required, as well as to
reset the time once a task has been completed.
To reset a task, select it by pressing the curved
arrow, then confirm when prompted. Once you
have confirmed, the task will be reset.
set date
Here you can adjust the year, month and date.
Simply swipe up and down the column you want
to change, and select the desired value. When
done, touch the calendar icon at the right of the
screen.
temperature units
Use this page to set or change the temperature in
F˚ or C˚ units.
display language
Use this page to set or change the display
language.
standby
The Standby mode allows you to service your
spa. Pumps will stop for 30 minutes and will
automatically restart after.
The normal page will return at the end, once the
pumps will be restarted.
set time
Here you can change the hour, minute and time
format. Simply swipe up and down the column
you want to change, and select the desired value.
When done, touch the calendar icon at the right
of the screen
display orientation
Use this page to set or change the normal or
inverted display orientation.

1
keypad settings
keypad lock/unlock (optional)
When this option is enabled, the user can partially
or completely lock the keypad.
When Full Lock is selected, all functions are
locked.
In Partial Lock, you may only activate accessories.
Settings may not be changed in this mode.
keypad color (optional)
If this option is available (depending on the spa
configuration), the keypad rim color can be
changed.
8 pre-defined colors are available. If the in.mix
is installed, the keypad rim color can also be
associated to an in.mix zone.
When the user wants to lock the keypad he is
asked to select a 4-digit code. The same code will
be needed to unlock the keypad.
Next time he wants to lock the keypad, he will be
prompted again to select a 4-digit code (same
functionality as a Safe in a hotel room).
The keypad can be unlocked with a universal
unlock code (3732) or by a reset of the keypad.
miscellaneous
This menu gives access to modify the Warm
Weather option and info messages in the media
center.
warm weather
When pumps are running, they produce heat that
may increase your water temperature. "Warm
Weather" option gives you the option to bypass
the pack filtration over-temperature feature.
When Warm Weather is "OFF" the filtration over-
temperature is disabled and your spa filtering will
continue even if the water temperature is high.
info messages
Press display/hide key to modify message display:
If hide option is selected, smart winter mode
message will only appear when a SWM purge is in
action. Otherwise the message will always appear
when the spa is in a SWM condition.
If hide option is selected, heating suspended and
filtering suspended messages will not appear.
miscellaneous

1
wifi
(This function is available only if an in.touch module is connected to your system.)
wifi settings
To modify wifi network settings, slide the right
wheel until the wifi icon is highlighted in the
middle.
in.touch module not connected
If the in.touch module of your spa system is not
connected, this message will be displayed.
wifi networks
After a few seconds the available networks will
appear on-screen, as well as their signal strength.
Select network will be identified by a green check
mark.
Swipe Up or Down the list to select your network.
wifi network password
If the wifi network is password protected, enter
it when keyboard prompts. Use Enter key to
validate the password.
If no password is required the in.touch will
connect automatically.
electrical configuration
Please do not make changes in this section
unless you are a qualified electrician.
about
To get info about your spa system, slide the right
wheel until the about icon is highlighted in the
middle.
Information about the in.k1000 software number
and the revision numbers of the different
components of your system will be displayed.
about your spa system
wifi (in.touch 2)
When a in.touch 2 is detected, this network will
appear.

1
direct to function
selection wheel:
on/off -
speakers -
source -
bluetooth -
mute / last track / play/pause / next track
mode selection
wheel:
audio mode
audio mode
(only available if the system detects a connected in.stream 2 audio station)
To select the audio mode, slide the left wheel up or down until the audio icon menu is highlighted in the middle.
In the Audio page you can access the following:
• in.stream 2 on/off • audio source selector
• speaker calibration • disconnect bluetooth
To select an item, slide the right wheel until the desired icon is highlighted in the middle.
on/off
speakers setting audio source selector disconnect bluetooth
turn in.stream 2 ON (icon red)
Slide the right wheel until the power on/off icon
is highlighted in the middle. Press the icon at the
center of the screen to turn in.stream 2 on.
to modify your speaker settings
Slide the right wheel until the speaker calibration
icon is highlighted in the middle.
You can adjust:
• balance
• fade
• subwoofer
Use the sliders to change the speaker settings at
the desired level.
The fade and subwoofer sliders will only appear
on the screen if the corresponding speakers are
installed on the in.stream 2.
turn in.stream 2 OFF (icon green)
Press the icon at the center of the screen to turn
in.stream 2 off.
to select an audio source
Slide the right wheel until the source icon is
highlighted in the middle.
In the menu list, the following sources are
available:
• Bluetooth
• FM
• USB
• Aux. 1
Simply select the desired one to use.
Note that only the sources installed on the
in.stream 2 will be displayed in the source menu.
Please note that the Play/Pause and Change
Track functions apply to devices using Bluetooth
technology and USB, and will not work when AUX
is selected as the source.
main display
Press Play / Pause to start or pause playback of
audio files.
Drag the volume slider to adjust the volume or tap
the mute button to mute or unmute sound.
Press the last track or next track buttons to go to
the previous song or skip to the next.
If a device with Bluetooth technology is connected
to the in.stream 2, you can disconnect it by
pressing the Disconnect key at the bottom of the
screen.
Doing so will also prevent the in.stream 2 from
automatically reconnecting to this specific device
until it has been reconnected using the device
itself.

1
direct to function
selection wheel:
on/off -
bromicharge -
boost level -
maintenance -
status and messages
mode selection
wheel:
in.clear icon
sanitization mode
(only available if the system detects a connected in.clear water sanitization system)
To select the sanitization mode, slide the left wheel up or down until the in.clear icon menu is
highlighted in the middle.
In the sanitization page you can access the following:
• in.clear on/off • boost level
• bromicharge • maintenance level
To select an item, slide the right wheel until the desired icon is highlighted in the middle.
on/off
bromicharge™ level
turn in.clear ON - Step 1 (icon red)
Slide the right wheel until the power on/off icon is
highlighted in the middle. Press the icon to turn
in.clear on.
turn in.clear OFF - Step 2 (icon yellow)
Press icon for 5 seconds to confirm power off.
To perform a water test, slide the right wheel until
the add BromiCharge™ icon is highlighted in the
middle.
There is no need to add sodium bromide if the
indicator is in the green zone.
When adding sodium bromide, the gauge
indicator will gradually shift to the right. When
adding clean water to the spa, the indicator will
shift to the left.
In order to achieve the proper level, start pumps
and add 227g (.5 lb) of BromiCharge™ at a time
and always allow 5 minutes for the gauge to react
before adding more sodium bromide.
When performing a test, the BromiCharge™
gauge indicates the approximate sodium bromide
level of the spa water.
The green zone in the center area of the gauge
should be targeted for optimal performance.
turn in.clear OFF - Step 3 (icon green)
Press the icon to turn off the in.clear.

1
boost level
maintenance level
Use a test kit to check the bromine level. It should
be between 3-5 ppm. If the bromine level stays
within that range for 3 consecutive days, your
maintenance level is well adjusted.
modify the boost level
Boost mode is activated automatically 5 minutes
after starting a pump. Boost mode increases
the bromine generation rate to keep the water
clear, clean and soft. As a rule of thumb, its level
correspond to the number of bathers.
To modify the boost level, slide the right wheel
until the boost icon is highlighted in the middle
and use the up or down arrow keys to adjust the
level.
Click on the the level icon to confirm your
selection.
modify the maintenance level
To verify or modify the maintenance level, slide
the right wheel until the maintenance icon is
highlighted in the middle.
The recommended maintenance level is 12.
Use the up or down arrow keys to adjust the level.
Note that the level can be adjusted by increment
of 2 using the up and down arrow keys.
Please note that it is not recommended to change
the maintenance level at steps greater than 2.
A confirmation will be asked by the system if
you do.
If you do, retest the bromine level the day after.
If the bromine is not in the 3-5 range and is
higher than 5 ppm, decrease the maintenance
level. If the bromine is lower than 3 ppm, increase
it. Repeat until the test reads a bromine level in
the 3-5 range.

1
mode selection
wheel:
in.mix icon
synchronization/
desynchronization icon
color mode
(only available if in.mix is detected among the spa accessories)
To select the color mode, slide the left wheel up or down until the in.mix icon menu is highlighted in the
middle.
In the color page you can access the following:
• zone selection • synchronizing zones
• changing colors • intensity
• on/off
zone selection
To select a zone, turn the right wheel until the
desired icon is highlighted in the middle.
This selection allows you to modify its color.
changing colors
Once a zone has been selected, use the color
wheel to choose the desired color or the rainbow
icon to get changing colors.
on/off
There are two ways to turn in.mix on or off. The
first one is by using the Light icon on the SPA
Screen. The second way is by touching the light
bulb icons located each side of the intensity bar.
synchronizing zones
The synchronization/desynchronization icon
allows you to match the color of the selected zone
with the other zones.
intensity
Located at the bottom of the screen, the slider
allows you to modify the intensity of the color.
zone 3
zone 2
zone 1
off intensity on
color wheel rainbow icon
in.mix functions

1
too much water on display
wipe screen
This message appears when too much water is
detected on the touch screen. Simply wipe away
excess water.
installation error messages
Upon connecting the in.k1000 to your spa system you may see one of two error messages.
Please follow the instructions in the message or contact your dealer for more information.
Error messages on-screen list and definitions:
http://geckokeypads.com/k1000errormessages/
9919-101453-D Rev. 10-2017
www.geckoalliance.com
© Groupe Gecko Alliance Inc., 2017
All trademarks or registered trademarks are the property of their respective owners. Printed in Canada
/