Page is loading ...

EEI-6275
V1.15.01.23
Questions? Contact us!
609.256.9000 • [email protected]
www.modway.com
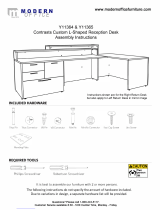
ASSEMBLY INSTRUCTIONS

Only use hand tools to assemble this item. Do not use power tools.
Do not tighten bolts or screws completely until all hardware is lined up
and inserted into the holes.
Do not over-tighten screws and bolts to avoid stripping the hardware
or cracking the item.
Assemble your item on a flat, carpeted area, with plenty of space to work.
This will prevent damage and scratches to your floors or the item while
you’re assembling the product.
Keep all components and packaging out of reach of children or animals
to avoid risk of choking or suffocation.
Approx. 60 minutes
assembly time
2 people recommended
for assembly
Care instructions are
listed in the last step
of this manual
Read through all of
the instructions
before starting
Make sure you have all
parts and components
before discarding any
packing materials
217PAGE OF
1Top Panel x1
2Bottom Panel x1
3 Side Panel - L x1
4 Side Panel - R x1
5Center Panel x1
6Middle Panel - 1 x2
7Middle Panel - 2 x1
8Middle Support x4
9Back Panel - L x1
Furniture components:
10 Back Panel - R x1
11 Shelf Panel x1
12 Drawer Front x2
13 Drawer Back x2
14 Drawer Side - L x2
15 Drawer Side - R x2
16 Drawer Bottom x2
17 Door Panel x1
Provided hardware:
Missing parts or hardware? Need assistance?
Contact us before returning your item. We're here to help!
609.256.9000 • [email protected]
A1 Cam Lock x32
A2 Minifix Screw x32
A3 Plastic Cap x32
B Wood Dowel M8 x 30mm x40
CCSK Cap Wood Screw
M6 x 50mm x8
DAllen Key M4 x1
E C.B Screw M3.5 x 16mm x56
F C.B Screw M4 x 25mm x6
G C.B Screw M4 x 38mm x16
HMetal Shelf Support x4
I PVC Handle 00036 x3
Let’s get started!
7
L2
L2
L1 L1
11
What You Need:
1
JSoft Closing 7/8 Hinges x2
K1 12" Drawer Slide - L/R x4
K2 12" Drawer Slide - L/R x4
L1 Nylon Castor x2
L2 Nylon Castor With Stopper x2
MTruss Head Screw
M5 x 25mm x4
NBracket x2
ORound Pipe x1
10
6
6
38
9
5
8
8
82
17
4
N
N
O
14
15
14
15
12
12
13
13
I
I
I
16
16
Phillips Head Screwdriver*
*Not included

Step 2
Step 1
HARDWARE
Minifix Screw x8
COMPONENTS
Top Panel x1
HARDWARE
Cam Lock x6
Minifix Screw x20
Wood Dowel M8 x 30mm x12
COMPONENTS
Side Panel - L x1
Side Panel - R x1
Center Panel x1
A2
x8
1
A1
x6
A2
B
x12
3
5
4
x20
A2
1
A1
A2
B
3
4
5
17PAGE OF3

HARDWARE
Cam Lock x12
Wood Dowel M8 x 30mm x12
COMPONENTS
Middle Panel - 1 x2
Middle Panel - 2 x1
x12
B
x10
A1
10
9
8
88
8
HARDWARE
Cam Lock x10
Wood Dowel M8 x 30mm x12
COMPONENTS
Middle Support x4
Back Panel - L x1
Back Panel - R x1
Step 3
Step 4
B
x12
A1
x12
6
6
7
A1
B
6
7
A1
B
8
9
10
17PAGE OF4

x6
E
First hole from the edge and
top second hole from the edge.
x3 x3
EE
Third hole from the edge.Small hole at the center.
K1(R)
K1(L)
K1(L)
34
5
Step 5
HARDWARE
Cam Lock x4
Minifix Screw x4
Wood Dowel M8 x 30mm x4
COMPONENTS
Drawer Front x2
Drawer Side - L x2
Drawer Side - R x2
A2
x4
x4
BA1
x4
14
15
15
12
12
14
HARDWARE
C.B Screw M3.5 x 16mm x12
12" Drawer Slide - L x2
12" Drawer Slide - R x1
COMPONENTS
Side Panel - L x1
Side Panel - R x1
Center Panel x1
Step 6
A1
A2
B
12
14
15
E
K1
K1
3
4
5
17PAGE OF5
Notes
12" Drawer Slide - L
12" Drawer Slide - R
K1
K1

K1(R)
x2
x1
x1
Second hole from the edge.
Big hole at the center.
E
E
E
E
Second hole from the edge and
top first hole from the edge.
5
HARDWARE
C.B Screw M3.5 x 16mm x4
12" Drawer Slide - R x1
COMPONENTS
Center Panel x1
Step 8
HARDWARE
C.B Screw M4 x 38mm x4
COMPONENTS
Middle Panel - 2 x1
Middle Support x2
G
x4
7
8
8
Step 7
E
K1
5
G
7
8
17PAGE OF6
Notes
12" Drawer Slide - RK1

G
x4
2
8
x6
A2 A1
x6
A3
3
6
9
7
Step 9
Step 10
HARDWARE
Plastic Cap x6
COMPONENTS
Side Panel - L x1
Middle Panel - 1 x1
Middle Panel - 2 x1
Back Panel - L x1
HARDWARE
C.B Screw M4 x 38mm x4
COMPONENTS
Bottom Panel x1
Middle Support x2
G
2
8
A3
3
6
9
17PAGE OF
7
7

x4
A2 A1
x4 A3
3
56
10
x6
A2 A1
x6 A3
5
7
6
9
3
Step 11
HARDWARE
Plastic Cap x6
COMPONENTS
Center Panel x1
Step 12
HARDWARE
Plastic Cap x4
COMPONENTS
Middle Panel - 1 x1
Back Panel - R x1
A3
5
A3
6
10
17PAGE OF
8

Step 13
Step 14
HARDWARE
Plastic Cap x4
COMPONENTS
Side Panel - R x1
x4
A1 A2
x4
A3
6
5
3
10 4
x8
A2
A1
x8
A3
1
4
5
3
10
A3
4
HARDWARE
Plastic Cap x8
COMPONENTS
Top Panel x1
1
A3
17PAGE OF
9

Step 15
Step 16
x8
C
D
2
10
4
3
5
x8
L2 E
x8
L1 E
24
5
3
HARDWARE
C.B Screw M3.5 x 16mm x16
Nylon Caster x2
Nylon Caster Stopper x2
HARDWARE
CSK Cap Wood Screw M6 x 50mm x8
COMPONENTS
Bottom Panel x1
C
2
L2
L1
E
17PAGE OF
10

Step 17
HARDWARE
Truss Head Screw M5 x 25mm x4
Bracket x2
Round Pipe x1
x4
M
O
N
1
4
5
3
2
Hx4
1
4
10
5
2
3
Step 18
HARDWARE
Metal Shelf Support x4
M
N
O
H
17PAGE OF
11

Step 19
Step 20
COMPONENTS
Shelf Panel x1
HARDWARE
C.B Screw M4 x 25mm x4
PVC Handle 00036 x2
COMPONENTS
Drawer Front x2
1
2
3
4
10
5
11
F
x4
I
I
12
12
11
F
I
12
17PAGE OF
12

Step 21
Step 22
COMPONENTS
Drawer Bottom x2
HARDWARE
C.B Screw M4 x 38mm x8
COMPONENTS
Drawer Back x2
Drawer Side - L x2
Drawer Side - R x2
G
x8
15
13
13
14
14
15
16
16
14
14
15
15
13
13
G
13
14
15
16
17PAGE OF
13

Step 23
x4
A2
A1
x4
A3
12
12
16
16
15
15
13
13
14
14
x4
E
x4
E
x4
E
Hole at the center.
Third hole from the edge. Third hole from the edge.
K2(L)
K2(L)
K2(R)
K2(R)
14
14
15
15
16
16
13
13
12
12
Step 24
HARDWARE
C.B Screw M3.5 x 16mm x12
12" Drawer Slide - L x2
12" Drawer Slide - R x2
HARDWARE
Plastic Cap x4
COMPONENTS
Drawer Front x2
A3
12
E
K2
K2
17PAGE OF
14
Notes
12" Drawer Slide - L
12" Drawer Slide - R
K2
K2

Step 25
Step 26
HARDWARE
C.B Screw M3.5 x 16mm x4
C.B Screw M4 x 25mm x2
PVC Handle 00036 x1
Soft Closing 7/8 Hinges x2
COMPONENTS
Door Panel x1
1
2
12 12
4
3
x4
J
E
F
x2
17
I
Put all the drawer in place along the drawer slides.
E
F
I
J
17
17PAGE OF15

Step 27
HARDWARE
C.B Screw M3.5 x 16mm x8
Fix hardware J into panel (4) by using hardware E.
(Repeat 4 times for each hardware.)
Tighten or loosen the screw to adjust
position of panel (17).
(Do only when needed.)
E
J
J
x4
E
J
x4
EJ
STEP 2
STEP 1
STEP 4
STEP 3
1
4
11
17
3
2
5
17PAGE OF16

Depending on use, it may be necessary
to tighten the hardware from time to
time, so please save the tools that
have been provided.
Not contract grade.
Clean using a non-abrasive cloth and
a mild cleaner.
CONNECT WITH US!
Tag us @modway_furniture and #modway
for a chance to be featured.
CARING FOR YOUR ITEM
Great job!
Your new kitchen cart is ready.
17PAGE OF
17
/