Page is loading ...

01
FABRIC 135CM 4 DRAWER BED
Assembly Instructions
VERSION: 190803 FUL001

02

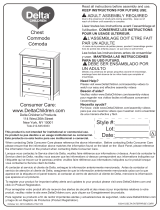
Hardware
Bolt M8 x 30mm
+Spring Washer
+Flat Washer
- 12 X
Already inserted into
Head & Foot Ends
1
Non-Slip Pads
- 4 X
2 3
Screw M5 x 50mm
- 8 X
Nut - 48 X
76 8 9
5
Allen Key (M5)
- 1 X
Screw M4 x 20mm
- 1 X
Screw M4 x 30mm
- 20 X
Parts
A
Headboard - 1 X
B C D
Footboard - 1 X Side Rail - 2 X Centre Rail - 1 X Centre Support Legs
- 3 X
E
Screw M5 x 50mm
- 48 X
Support Legs I - 4 X
F
Q S T U
K L
10
11
4
Drawer Front Panel I
- 2 X
Sprung Slat - 32 X
Drawer Side Panel
- 8 X
Drawer Front I - 2 X Drawer Bottom Panel
I - 2 X
Drawer Back Panel
I - 2 X
M O
12
Slat Cap - 32 X
Middle Cap For
Sprung Base - 16 X
Bolt M8 x 45mm
+Flat Washer
- 8 X
13
Non-Slip Pads
30 x 60mm - 4 X
Screw M5 x 70mm
- 3 X
face out
Bottom Support Rail
- 8 X
P
Wooden Foot - 4 X
14 15
Bolt M8 x 30mm
+Spring Washer
+Flat Washer
- 2 X
Screw M4 x 20mm
- 64 X
G H I J
Support Legs II - 1 X
Drawer Front Panel II
- 2 X
Drawer Front II
- 2 X
Drawer Back Panel
II - 2 X
Drawer Bottom Panel
II - 2 X
R
Wheel - 16 X
03

04

STEP 1
STEP 2
Please note that
the Bolt (1) x 12
are prefixed into
parts A & B
STEP 3
G
A
B
X12
1
5
E
E
E
D
E
D
05
X3
4
A
A
BB
G
G
G
3
3
9
9
9
9
X4 X2
X4 X2
A
B
C
C

STEP 4
face out
face out
ARROWS ON LABELS
POINT TO EACH OTHER
5
6
C
F
X 8
06
2
2
X 4 F
D
D
8
AA
STEP 6
STEP 5
face out
face out
face out
face out
B
B
I5
7
C
C
X2
B
B
I
I
A
D

X16
STEP 8
STEP 7
PUSH
11
11
H
H
10
X32
11
11
H
10
11 10
H
H
X16
PUSH
PUSH
07
face out

FOLLOW LINE ON BACK OF
DRAWER FACE PANEL
III III
K
X32
STEP 10 Positions For Castors.
08
Important:
Make sure when you fit the nuts
that the hole is in the correct
alignment.
STEP 9 Drawer Assembly.
(Large) x2
Part T x 2
S
M
K
SS
S
L
T
T
U
J
J
K
12
13
13
12
12 13
14 15

Important:
Make sure when you fit the nuts
that the hole is in the correct
alignment.
STEP 13
STEP 11 Drawer Assembly.
09
(Small) x2
face out
III
III
STEP 12 Positions For Castors.
FOLLOW LINE ON BACK OF
DRAWER FACE PANEL
X32
Part T x 2
T
T
S
S
S
S
P
PR
Q
U
P
O
O
12
13
13
12
12
13
14
15

10
5mm from the floor with the
product rather than dragging to ensure that the centre legs
do not become twisted and
added weight of the mattress and bedding. If the bed is to be moved, carefully lift the
buckle.
/