Page is loading ...

6 Stage Octopus RO/DI
Instruction &
Owners Manual
www.Aquariumwaterfilters.com
www.AquaFX.net
Phone 407-599-2123 Fax 407-599-2124
7208 Al oma Ave Suite 600 – Winter Park, FL 32792
1-877-256-3467
www.Aquariumwaterfilters.com
W h e n u s i n g C h lo r a m in e B la s t e r s y o u M U S T R i n s e t h e m b e f o r e u s in g t h e m ; b y d is c o n n e c t in g t h e f e e d t o
t h e m e m b r a n e a n d r u n n i n g w a t e r t h r o u g h t h e m u n t il t h e w a t e r r u n s c le a r , t h i s is a g o o d i d e a f o r a l l
c a r b o n s .
T h is i s n o t A H ig h P r e s s u r e F ilt e r , N O T t o b e u s e d w h e r e w a t e r p r e s s u r e s e x c e e d 6 0 P S I

Octopus Installation Instructions
Congratulations on your acquisition of the Octopus water treatment system from
Aqua Engineering & Equipment. We hope your system brings you many years of service and
Ultra Pure, Fresh, Clean water. There are a few basic steps we wanted to inform you about when
it comes to installation and maintenance of your water treatment system. If you should have any
difficulties or questions, please do not hesitate to contact us, we would be happy to help you in
any way we can. Your system was custom built to order, and it is now ready to be installed
after you follow a few easy steps. Please follow the steps below closely.
1) Unpack your unit completely. Inspect for any damage or broken parts as a result of
shipping.
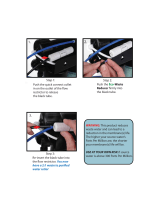
2) Unscrew the cap from the right side of the white horizontal canister(s) (RO Membrane
Housing), Remove the B
LU
E RO Membrane from the clear plastic wrapper and insert
the BLUE RO Membrane in the white horizontal membrane housing
, double O
-
Ring end
first. Repeat for each RO membrane if you have multiple membranes on your RO system.
*DO NOT REMOVE ANY OF THE WRAPPING FROM THE RO MEMBRANE ITSELF, ONLY
REMOVE THE RO MEMBRANE FROM THE CLEAR PLASTIC PROTECTIVE BAG*
3) Locate and connect the supply side of the equipment. This will be the right side as you
face the system.
Only feed the unit from the
C
OLD
water
supply
, DO NOT USE
HOT
WATER as this will melt your membrane
. Connect the (1/4”)
BLACK
tubing
to t
he
water supply
type
you have specified. (IE The Feed adaptor)
4) Locate the
Y
Y
Y
e
e
e
l
l
l
l
l
l
o
o
o
w
w
w
drain line, and
install on the
open T
coming
off of the
Y
Y
e
e
e
l
l
l
l
l
l
o
o
o
w
w
w
flush
loop on the drain exit of the
unit. Then
place
opposite end of the tube
in an appropriate
area for drainage
when the unit is operating
.
5) Connect
the
BLUE
(1/4)”
product line that
is
provide
d
,
in
to
the black High Pressure
switch that has a 2” length of Blue tube attached. Plug the opposite end of the pressure
switch into the
left most canister
f
or
your treated water
, When installing a RO, Octopus‟
(Not RO/DI) your High Pressure Switch will be installed and you will simply just plug
your product line into the High pressure switch.
You can
now
hook up the opposite end
of the BLUE line to an externa
l float or other method of flow control
(like a ball valve)
.
6) Once installed,
slowly turn on the water and check for leaks.
Then proceed to plug in the
power chord provided to an electrical outlet. T
he controller will
begin its operations
(discussed in d
etail below)
I
t is recommended
for RO/DI Octopus‟
that you remove the
DI from its canister and allow
the unit to run for
an initial
1
5
minutes,
(skip to step 7 at
this point to create RO product water, if you don‟t restrict the „T‟ valve you will not see
any product water!)
both RO and RO/DI Octopus‟ should
discard both the product and
the drain water
for the 15 minutes
(assuming you have removed your DI)
. You can then
reinstall the DI into its original position. The reason for this exercise is to prevent t
he DI
from premature exhaustion from the RO membranes
initial
manufacturers
preservative,
Sodium Meta-
Bisulfate.
7) IMPORTANT STEP: Locate the
Y
Y
Y
e
e
e
l
l
l
l
l
l
o
o
o
w
w
w
drain line flush loop again, on the
top of the
loop is a „T‟ flow restrictor, This valve will be mostly open as you see it
, slowly close
(restrict) the valve until either:
a) 80 psi is reached on the pressure gauge
*Or*
b) The 1:1 waste water ratio is reached.
The system should not be run at any pressure exceeding 80 psi. If the unit is run at any
pressure exceedi
ng 80 psi, this will void all
manufacturers‟
warranties.
8) You can now hook your unit into an Aqua Engineering & Equipment Float Valve or
other type of external control, and begin making
pure
water!

These instructions cover the most common set up configurations. If you ordered different colored
tubing or filter cartridge housings, you may not be able to follow these instructions completely. All
AquaFX systems come with a 3 year limited warranty. Please contact us if you have questions
or problems with your unit. The Customer is responsible for filter and membrane changes and
associated costs. AquaFX carries a complete line of parts and accessories for all of our systems
at www.aquariumwaterfilters.com or at 1877-256-3467, Thank you!
Octopus Microprocessor Controller Protocol:
As discussed in the above steps there are a few steps you will want to take before starting your
Octopus Reverse Osmosis Unit. Discussed below are the steps the microprocessor
will take after
you have started to filter water. Allow for the system to pressurize, check for any leaks. After 10
seconds of the feed being turned on, plug the AC plug (power chord) into your 110v outlet. The
controller will be behaving as described below after the power is connected.
You will want to
begin restricting the “T‟ flow restrictor after the initial Membrane flush to achieve your 80 psi, or
1:1 waste water ratio. (Whichever happens first!)
1) a) Power on Unit will countdown for 10 seconds and make sure the feed
pressure is
present
.
b) If Source Light flashes This is an indication that the
feed pressure
is either
too low or not present, Check that water supply is turned on.
c) When the Source Light is on
This tells us that the feed pressure is ok, and
now the unit will automatically flush itself for 30 seconds.
(This countdown is constantly monitored, such that if pressure is lost the Auto Flush will
stop) This is where you will begin to restrict the „T‟ flow restrictor. SEE STEP
7
ON
SYSTEM INSTALLATION.
2) a) Auto flush finishes “Aqua EE” Controller will check both „Low‟ and „High‟
pressure switches to assure pump can run safely.
b) Again if feed pressure is lost the Source Light will flash.
c) If pressure is ok the Octopus will begin
will produce clean water automatically.
3) When product line is full (via float valve or external shut off valve) the Unit will
light up
the “Full‟ light and begin to flush the RO membrane again.
4) TDS Reading - The Octopus controller will display the wat
er quality in parts per million
(ppm) in a 099ppm range. If the TDS exceeds 99ppm, the display will flash 099P.
5) The “Octopus” controller will close the incoming solenoid
until th
e High Pressure switch
has been
a
ctivated for 10 or more seconds. This is to eliminate any
false triggering of
the shut off.
If at any time the feed pressure is cut, than the unit will blink the source light until positive fee
d pressure is
reapplied.


Trouble Shooting Guide
Problem Solution
High TDS after
membrane
Clogged Pre-filters. Causing Pressure Drop. Insufficient pressure will
yield poor TDS rejection from RO membranes. Change Pre-Filters.
Low incoming water
pressure.
Incoming water pressure must be above 40 PSI, Add a booster pump if
below 40psi. Make sure Pre-Filters are not clogged causing low
pressure.
Reverse Osmosis
membrane has
exhausted/failed.
Average Membrane life is 2 to 3 years. Most common cause for
membrane failure is insufficient pre-filter maintenance. AquaFX Carbons
are rated for 3,750 gal @ 1.0 GPM of 2ppm Chlorine. Do not exclude
drain water from this capacity, as it is treated water. Very high TDS
(>550ppm) may also yield premature failure.
No water to drain.
Flow Restrictor is clogged, Replace Drain Flow Restrictor. (rare)
Check to see if water is turned on.
All water is going out
of the drain
With no back pressure, most of the water will exit out of the drain. Make
sure External Flow restrictor is present.
Very little/slow water
production
Reference units flow rate vs. actual production. Slow flow from RO is
normal. Cold water, low pressure and high contaminant levels will
contribute to decreasing the rate of water production. Heating water,
increasing pressure or additional pre-filtration will help to counteract
these adverse affects.
Drain Water
Continues After
Product line is full
The most common cause of a ‘continuing drain’ is a pressure leak on the
product side of the RO. If the pressure cannot build, the ASO will not
close. Check ASO with a ball valve right after RO. Close Ball valve then
wait 1-3 minutes. If drain continues, replace Automatic Shut-Off Valve. If
it stops, have the customer, find then stop pressure leak. If a float valve
is being used, it is more than likely the culprit.
The incoming feed
water TDS has
increased.
An increase in feed water TDS will also give an increase in Product
Water TDS.
R.O. (Dolphin) Users will see this rise in TDS.
RO/DI (Barracuda, Mako, Great White) Users will not see this rise, but
the DI will exhaust faster than
normal.
DI is exhausting very
fast
R.O. Membranes are manufactured with a preservative on them, if your
initial startup allows the membrane to ‘rinse’ into the DI; there will be
some immediate exhaustion, followed by normal exhaustion.
Chloramines Vs Chlorine – If the customers water is disinfected with
Chloramines (NH2CL) the compound will still be present post RO.
For R.O. (Dolphin) users, they may wish to purchase DI to remove the
compound. There will also be other methods discussed for during
training.
RO/DI (Barracuda, Mako, Great White) users will have the compound
removed by the DI. This will tax the DI, Chloramines appears in several
forms, so the decreased life would depend on the strain of Chloramine.
(mono, di or tri)

Aqua Engineering & Equipment, Inc.
Returned Goods Policy
Damaged
Merchandise:
Aqua Engineering & Equipment, Inc. cannot be held liable for damage to or loss of a shipment by
any carrier. Claims for damaged products, suspected damages, container shortages, or pilferage
within the container on delivery must be noted on the delivery receipt. The carrier’s claims
representative should then be notified immediately.
Returned Goods:
Aqua Engineering & Equipment, Inc. cannot assume responsibility for the error of others.
Merchandise ordered incorrectly cannot be returned without written authorization. Please contact
the Shipping/Receiving department for a Return Materials Authorization (RMA) number. Special
/Custom orders or items cannot be returned. Material must be new and in marketable condition.
We reserve the right to levy a restocking fee on all goods. We will assume all responsibility for
our own errors at no charge to the customer.
Shipping & Receiving
Phone: 407.599.2123
Fax: 407.599.2124
Cancellation or Order Changes:
Orders are processed as they are received. Internet and phone orders must cancel within 24
hours of order time. Any orders which require custom materials or components (i.e. custom
tanks, brackets, electrical components) cannot be cancelled once special material has been
ordered and/or production has begun.
Accessories
Drinking water kit: Turn your RO/DI system into a drinking and cooking water purifier for your home. Better
then bottled water because you control the process.
Handheld TDS Meters: The only true way to check the performance of your system. Check the TDS to
detect early membrane exhaustion. Checking the water after the DI cartridge will give you added peace of mind
that your reef/salt water system is receiving the quality of water you need.
RO/DI Water Storage Tanks: These tanks are used by many of our customers to store water or to save up
sufficient water to begin a new tank. They can be equipped with automatic shutoff valves to reduce waste water.
Membrane Flush Kits: Flush kits are used to extend the life of the membrane by rinsing debris that
accumulate over time.
Piggy Bank Membrane system: Add a membrane to your existing system to approximately double your
output! Conditions Permitting, call us for an assessment
Storage Tank(s):
Many times storage of water is needed or just desired. 40 gallon or larger food grade tanks
are available to automatically top off. We can design tanks to your needs!
When using Chloramine Blasters you MUST Rinse them before using them; by disconnecting the feed to
the membrane and running water through them until the water runs clear, this is a good idea for all
carbons.
This is not A High Pressure Filter, NOT to be used where water pressures exceed 60 PSI

NOTES
Installation Date_________________________
Initial Pressure _______________PSIG
Initial TDS ________________
1
ST
Scheduled Filter Change___________
1
St
Actually Filter Change___________
___________________________________________
___________________________________________
___________________________________________
___________________________________________
___________________________________________
___________________________________________
___________________________________________
___________________________________________
___________________________________________
___________________________________________
___________________________________________
___________________________________________
___________________________________________
___________________________________________
___________________________________________
___________________________________________
___________________________________________
___________________________________________
___________________________________________
/