Page is loading ...

Pure Blue H20, LLC
13813 Monroes Business Park
Tampa, FL 33635 USA
www.pureblueh2o.com
(844) 787-3148 • (844) PURE-1-4-U
2015.02.25 #8739 PAW
REVERSE OSMOSIS
WATER FILTRATION SYSTEM
MODEL PB-TLRO4H50T
INSTRUCTION MANUAL

Read this Manual BEFORE using this equipment.
This will not only familiarize you with the system, but it will help you determine the best location for
installation whether under a sink or in a remote location. Helpful diagrams follow. Keep this Manual for
future reference.
Operational Parameters
Installation must be in compliance with State and local plumbing regulations. Do not use with
microbiologically unsafe water or of unknown quality without adequate disinfection before or after
the system. System is intended to be installed using the cold water supply only.
21
Operating Temperatures: Maximum 100°F (37.8°C) Minimum 40°F (4.4°C)
Operating Pressure: Maximum 100 psi (7.0 kg/cm
2
) Minimum 40 psi (2.80 kg/cm
2
)
pH Parameters: Maximum 11 Minimum 2
Iron: Maximum 0.2 ppm
TDS (Total Dissolved Solids) < 1800 ppm
Turbidity < 5 NTU
Hardness
Maximum 10 Grains Per Gallon*
Hardness: Recommended hardness not to exceed 10 grains per gallon, or 170 parts per million.
Note: System will operate with hardness over 10 grains but the membrane life may be shortened. The
addition of a water softener may lengthen the membrane life.
Water Pressure: The operating water pressure in your home should be tested over, a 24 hour period to
attain the maximum pressure. If the incoming water pressure is above 80 psi then a water pressure
regulator is required. A booster pump is needed for incoming water pressure under 40psi.
Copper Tube: Reverse Osmosis water should not be run through copper tube as the purity of the water
will leach copper, which will cause an undesired taste in water and pin holes may form in the tube.
Note: Polytubing is recommended.
Maintenance of Filters for Model PB-TLRO4H50T:
Part Number Description Replacement
PB-TLRO4SEDT Stage 1 - Sediment Every 6 months
PB-TLRO4CB2T Stage 2 - Pre-Carbon Every 6 months
PB-TLRO4MC50T Stage 3 - RO Membrane Every 2-5 years
PB-TLRO4CB4T Stage 4 - Post-Carbon Every 1 year - Annually

REQUIRED TOOLS & MATERIALS
• Tape Measure • 1/8” & 1/4” Drill Bits • Phillips Head Screwdriver
• Center Punch • Adjustable Wrench • Safety Glasses
• Pencil • Masking Tape • Pan or Bucket
• Utility Knife
PACKAGE CONTENTS
22

PREPARE SITE FOR INSTALLATION
1 Prior to starting, close the cold water shut-off valve.
2
Temporarily place tank and filter assembly into cabinet to ensure adequate space and proper positioning.
3 Remove tank and filter assembly from cabinet and set aside.
Note: The Filter System should not be installed in a location susceptible to freezing.
INSTALLATION OVERVIEW
There are seven easy steps to installing your RO unit. They are as follows:
Step 1 - Install Angle Stop Adapter (water source for filter system)
Step 2 - Install RO Drain Connector
Step 3 - Install RO Filter Assembly
Step 4 - Install Water Storage Tank
Step 5 - Install RO Faucet
Step 6 - Connect Tubing
Step 7 - Sanitize, Pressure Test, Purge System
Notice: You must check and comply with all local plumbing codes.
If installing in a remote location, please refer to Step Seven on page 9.
STANDARD INSTALLATION
23

STEP ONE – INSTALL KITCHEN FAUCET ADAPTER
1 Identify the cold water line in the sink cabinet.
Turn off the cold water supply to the sink.
2 Turn on the kitchen faucet to release pressure and
allow water to completely drain from the line.
3 Disconnect the cold water line from the cold water angle stop valve.
Note: You may need a plumber to shorten the supply line pipe
using a hacksaw or pipe cutter to accommodate the Kitchen
Faucet Adapter if pipe is rigid.
4 Screw on Angle Stop Adapter to cold water
angle stop valve. Do not over tighten Angle
Stop Adapter. (See diagram to the right)
5 Screw the cold water supply line to the male
thread side of the Angle Stop Adapter.
Caution: Do not over tighten.
WARNING
Be sure that all electrical appliances and outlets are turned off
at the circuit breaker before working in the cabinet area.
!
STEP TWO – INSTALL RO DRAIN CONNECTOR
1 Identify drain outlet location.
2 Knock out center hole on foam seal (N).
3
Use hole in foam seal (N) as a template to
locate your drilling position above drain tap,
mark location with pencil.
4 At marked location, drill 1/4” hole through
wall of drain pipe. Be sure not to penetrate
opposite side of pipe.
5 Remove protective cover from back of foam
seal (N) and attach to front plate of drain
connector (K) in alignment with holes.
6 Begin to position the drain connector (K)
on sink drain pipe with Screws (L) and
Nuts (M), using your pencil (or a thin pen) in the drain connector (K) tube hole, to guide your location
over your drilled hole as you securely tighten Nuts (M) and Screws (L). Note: Remove pencil once
location is established.
CAUTION
!
Please wear safety glasses to protect eyes when drilling.
24

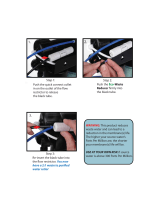
Filter Installation
1 Turn cartiridge to left until it releases. Gently pull down to remove from
head. Discard used cartridge.
Note: Place a bucket or pan under system to catch any water drips.
2 Hold new cartridge with front label facing left. The two nozzles on top of
cartridge should be toward the back of the Filter System, and the two
extended flanges should be out to each side.
Note: Part No. PB-TLRO4SEDT (Sediment) should be in stage 1, Part No. PB-TLRO4CB2T (Pre-Carbon)
should be in stage 2, Part No. PB-TLRO4MC50T (RO Membrane) should be in stage 3 and Part No.
PB-TLRO4CB4T(Post-Carbon) should be in stage 4.
3 Lift cartridge straight up into the manifold until the two nozzles seat into the
manifold ports, and the two extended flanges are flush with the manifold.
4 Turn the cartridge to the right until it stops.
5 Pressure test and check for leaks. More information can be found on page
10 of your 4 Stage System instruction manual.
STEP THREE – INSTALL RO FILTER ASSEMBLY
1 Select easily accessible area under sink to
mount system manifold. Note: Allow 4-6”
clearance below the filter to the floor to allow
ample space for filter changes.
2 Remove shroud from manifold and set aside.
3 Mark holes for mounting screws using built-in
bracket on back of manifold.
4 Drill two pilot holes for mounting brackets
using 1/8” drill bit.*
5 Insert mounting screws into the wall leaving
approximately 3/8” of each screw exposed.
6 Hang manifold on mounting screws.
CAUTION
!
Use caution not to drill
into anything beyond
the cabinet wall.
*
STEP FOUR – INSTALL WATER STORAGE TANK
1 On the nipple on top of the tank, apply 2-3 wraps of Teflon® tape.
2 Hand-tighten the tank connector onto the tank
nipple 3-4 times. Note: do not use wrench, cross-thread or over-tighten.
3 Using mount stand, place tank next to system assembly.
25
! !
Stage 1
Sediment Filter
Stage 2
Pre-Carbon CTO
Stage 3
50 GPD Membrane
Stage 4
Post-Carbon CTO

Metal Washer
STEP FIVE – INSTALL RO FAUCET
You will need a sink top hole of 1.25” in diameter.
Note: Drilling holes into solid surfaces or surfaces
made of stone should only be performed by a qualified
and certified installer.
1 Ensure faucet base will mount flat
against surface.
2 Ensure there is a sufficient length of
all three tubes between faucet body
and manifold 3/8” white drain tube,
1/4” red air gap tube and 3/8” blue
filtered water faucet tube.
3 Loosen locking nut on stem allowing
white “spacer” to slide down shank
and split washer to slide out and set
it aside (see faucet drawing in figure
1A on right).
4 Route 3 tubes on faucet from top of
sink through hole in sink. Make sure
all tubing is inserted through hole
without restriction.
5 Lower faucet body, making sure
rubber washer and escutcheon plate
fit properly over hole on sink.
6 Insert split washer above spacer and
begin to tighten faucet to sink base.
Make sure to check alignment of
rubber washer and escutcheon plate
to make sure they are centered
properly (refer to figure 1A).
7 If alignment proper, continue to
fasten faucet to sink base by
tightening locking nut enough to
hold the faucet base in place.
8 Adjust faucet body handle as
desired and complete tightening
faucet to sink base, making sure to
not over tighten.
26

Angle Stop
Adapter
F
STEP SIX – CONNECT TUBING
Note: For servicing, tubing lengths should allow
for removal of assembly from mount screws.
Install tubing for water supply line from kitchen
faucet adaptor to manifold inlet.
Notice: Do not bend or crimp tubing during this step.
1 Locate and identify 1/4” white tubing (Q) determine
length necessary to connect to manifold (A) where
it is labeled “INLET”.
Allow sufficient tubing to prevent line kinking.
2 With utility knife, cut the 1/4” white tubing squarely to
desired length needed to reach the Angle Stop Adapter (F).
3
With water, wet one end of tubing and push into the faucet
connection adaptor approximately 5/8” until it stops.
Note: make sure tube is fully inserted until it stops.
4 Wet other end of tubing and push into the manifold
“INLET” approximately 5/8” until it stops.
Note: It is not necessary to remove tubing for routine
maintenance and filter exchanges, however, it may easily be
disconnected if necessary. To disconnect, turn off water supply to
system and press in white collar around fitting while pulling
tubing out with other hand.
Install tubing for water supply line from manifold
outlet to faucet.
1 Locate 3/8” blue tubing already attached to faucet stem as
described in Step 2 on page 6.
2 Identify blue tubing coming down from faucet.
3 Measure length needed to connect to “manifold outlet” on
RO system.
4 If necessary, cut tubing to desired length, making sure to
leave enough tubing to freely assemble and attach. Make
sure to cut tubing squarely
and cleanly with no abrasive edges.
5 Wet end of blue tubing and insert into manifold outlet
labeled “faucet”.
Push firmly into fitting and then gently tug to make sure
connection is secure.
27

STEP SIX – CONNECT TUBING
(Continued)
Connect tubing from manifold to tank.
1 Use 4 ft. 3/8” white tubing (P), measure and identify length needed to
connect tank outlet labeled “TANK” on (A) manifold to (E) tank, plus
four to six inches (4” to 6”).
2 Cut white tubing square with a utility knife.
3 Wet tubing end and insert into compression nut of tank connector fitting
(connected to tank) all the way to the tube stop inside the fitting body.
If tubing does not enter the nut easily, loosen the nut one turn and
insert tubing all the way to the tube stop in the fitting body.
4 Hand-tighten the nut.
5 Insert other end of white tubing into outlet of manifold labeled
“TANK” approximately 5/8” until it stops.
Air gap from faucet to RO Assembly.
1 Locate membrane drain port on bottom of Stage 3 (50 GPD Membrane) filter.
2 By pushing down on the white collar while pulling plug with other hand,
remove plug from membrane filter drain port.
3 Identify 1/4” red tubing attached to faucet body.
4 Identify length necessary to connect to drain port on membrane vessel.
5 With utility knife, cut the 1/4” red tubing squarely to desired length.
6 Insert restrictor into end of red tubing. (See diagram to the right)
7 Insert red tubing into membrane drain filter approximately 5/8” until it stops.
8 Gently tug on red tubing to ensure it is firmly seated in fitting.
Note: Do not remove restrictor from tube.
Connect 3/8” tube from
faucet to drain adaptor.
1 Identify 3/8” white tubing
attached to faucet body.
2 Attach other end of tubing to
collet on sink drain connector.
3 Cut enough 3/8” white tubing to
route in as straight as possible
without any twists, kinks, loops
or valleys.
4 Cut end of 3/8” white tubing
squarely with utility knife.
5 Insert into fitting approximately
1” until it stops.
6 Gently tug on white tubing to
ensure it is firmly seated in fitting.
M
em
b
rane
D
rai
n P
o
r
t
P
l
ug
28

STEP SEVEN – OPTIONAL REMOTE
INSTALLATION PROCEDURE
(skip if doing standard under sink installation)
Install remote drain point and leave air gap. Running drain tubing to an existing drain is also an option but
may require longer tube lengths. Suitable drains include laundry tubs, floor drains or sumps. Check local
plumbing codes.
Note: To prevent water from backing up into system, be sure
to install air gap between drain point and end of hose.
1 Gently pull the 1/4” red tubing from the faucet body.
2 Determine if tubing is long enough to reach drain. If yes, insert restrictor in end of tubing and insert this
end into drain port on membrane filter. If no, replace red tubing with tubing of adequate length and
insert restrictor into end of tubing. Insert this end of tubing into drain port on membrane filter.
3 Run tubing to drain point securing at end with bracket (not supplied). Ensure 1-1/2” air gap is between
drain and end of tube.
4 Remove 3/8” white tubing from faucet body and discard.
5 Reinstall shroud with short side to the back by sliding shroud over manifold until it is snug.
Note: Faucet will not have 1/4” or 3/8” tubing attached to
air gap barbs in faucet body for remote installation.
29

STEP EIGHT – SANITIZE, PRESSURE TEST
& PURGE SYSTEM
Sanitize
Caution: Sanitization is recommended after RO Filter System filter changes and any
inner-part servicing. The person sanitizing should have clean hands during this process.
1 Shut off water supply to RO system.
2 Open faucet. If tank is not empty, allow to drain until empty.
3 Disconnect white tubing from tank by unscrewing nut from tank
connector fitting.
4 With included eyedropper, add 3ml household bleach (5.25%)
into open end of tank white tubing. Warning: Bleach needs to
be handled according to manufacturer’s instructions.
5 Reconnect tank and white tubing to tank connector fitting.
6 Sanitization will be completed during the following pressure
test and purge.
Warning: Bleach must be completely removed from system
before drinking water. See Purge instructions below.
Pressure Test
Warning: Complete sanitization prior to pressure test.
1 Open cold water supply valve to RO Filter System.
2 To purge air from the plumbing system, open kitchen faucet. Close faucet when water runs smooth.
3 Confirm RO faucet is closed.
4 Within approximately 2 hours, pressure will start to build in the RO Filter System. Carefully inspect all
connections and fittings while this pressure buildup occurs.
5
Check for leaks. If leaks are found, fix by ensuring all tubing is cut squarely and fully inserted. Also confirm
there are no scratches, dents or notches at tubing end. If there are, squarely cut 1” off and re-insert.
Note: When RO Filter System is first pressurized, water may project
from faucet air gap hole until air is passed from RO Filter System.
Purge
1 Open the RO faucet and leave it open until water begins to trickle out (this may take a few minutes, and
the water will come out slowly).
2 Close the RO faucet allowing the storage tank to fill with water. It may take 3 to 6 hours to fill the tank
completely depending on the production capability of the membrane, local water temperature and
water pressure.
Note: During the fill period, you may hear water trickling which is a normal occurrence.
3 After the storage tank has filled, open the RO faucet to flush the tank completely. You will know the tank
is empty when the flow rate from the RO faucet is down to a trickle. Repeat this step two more times.
The fourth tank can be used for drinking. The flushing process should take about a day to complete.
210

ADDITIONAL SYSTEM PERFORMANCE
INFORMATION
Non-potable Water Sources:
Warning: Do not use with water that is microbiologically unsafe or of unknown quality without adequate
disinfection before or after the system. Systems certified for cyst reduction may be used on disinfected water that
may contain filterable cysts.
Replacement of the reverse osmosis membrane cartridge:
This reverse osmosis system contains a replaceable component critical to the efficiency of the system.
Replacement of the reverse osmosis component should be with one of identical specifications, as defined by
the manufacturer, to ensure the same efficiency and contaminant reduction performance.
Arsenic Reduction:
Arsenic (As) is found naturally in some well water. Arsenic in water has no color, taste or odor. It must be
measured by a lab test. Public water utilities must have their water tested for arsenic. You can get the result
from your water utility. If you have your own well, you can have the water tested by an accredited lab. The
local health department or the state environmental health agency can provide a list of certified labs. Further
information about arsenic in water can be found through the EPA’s website at
www.epa.gov/sfaewater/arsenic.html.
There are two forms of arsenic: pentavalent arsenic (As (V)) and trivalent arsenic (As (III)). Special sampling
procedures are needed for a lab to determine what type and how much of each type of arsenic is in the
water. In well water, arsenic may be pentavalent, trivalent, or a combination of both. Reverse osmosis
membranes are effective at reducing pentavalent arsenic but not trivalent arsenic.
211
NOTE: See Product Data Sheet (PDS) for specications.

SYSTEM MAINTENANCE
Prefilter/Postfilter
Note: The pre-filter and post-filters are replaceable sediment and activated carbon cartridges located in stages 1,
2 and 4. It is recommended to replace stage 1 and 2 every 6 months, stage 3 every 2-5 years and stage 4 annually.
You may need to replace more often with high water usage or high sediment level. Replacing these cartridges
timely will protect the RO membrane from high levels of chlorine and/or sediment. As these filters build up with
sediment, you may notice slower water output.
RO Membrane Cartridge
The RO cartridge is located in stage 3. This membrane is a spiral wound membrane which reduces the
dissolved solids and organic matter. Cartridge life depends on pH and supply water hardness. Higher pH
shortens membrane life by causing pin-hole leaks. If pH is higher than 8.0, cartridge life may be as short as
6 months. If pH is under 7.5, cartridge life may last up to 24 months. When output water quality and
production rate decrease, it is time to replace the membrane cartridge. Lasts 2-5 years depending on
incoming water quality.
Flow rate and output are determined by 3 factors:
1 Incoming water temperature
2 Total dissolved solids (TDS) present in supply water
3 Incoming water pressure
Lower temperatures are directly proportional to slower flow rate. All membranes are tested at 77°F.
Incoming water temperature should not exceed 100°F. The RO Filter System should also not be installed in a
location susceptible to freezing.
The more TDS in the supply water, greater filter time is required. Incoming TDS should not exceed 1000 ppm.
Higher water pressure enables a higher flow rate. Pressure must be above 40 psi for proper system
operation. You may consider installing a permeate pump or booster pump if your pressure is below 40 psi.
RO Cartridge Replacement
1 Remove 1/4” drain tube from bottom of membrane cartridge.
2 Remove the pre-filter cartridges by turning each to the left and pulling down to first relieve pressure on
the RO filter.
3 Turn RO filter to the left while pulling down and remove.
4 Remove post-filter cartridge by turning to the left while pulling down.
5 Discard cartridges.
6 Install new cartridges in reverse order turning to the right to secure:
4 – Post-Carbon Block Cartridge
3 – RO Membrane Cartridge
2 – Pre-Carbon Block Cartridge
1 – Sediment Cartridge
7 Install 1/4” red tube into fitting at bottom of membrane cartridge. (Do not remove (I) flow restrictor)
8 Purge RO Filter System as outlined in Step Eight (page 10).
212

Bottom of Manifold
A
Top of Cartridges
Filter Replacement
1 Turn cartridge to left until unit releases.
Gently pull down to remove from head. Discard used cartridge.
Note: Place a bucket or pan under system to catch any water drips.
2 Hold new cartridge with label slightly facing left. The two nozzles on
top of cartridge should be toward the back of the Filter System, and
the two extended flanges should be out to each side.
Note: Part No. PB-TLRO4SEDT (Sediment) should be in stage 1, Part No.
PBTLRO4CB2T (Pre-Carbon) should be in stage 2, Part No. PB-TLRO4MC50T
(RO Membrane) should be in stage 3 and Part No. PB-TLRO4CB4T (Post-
Carbon) should be in stage 4.
3 Lift cartridge straight up into the manifold until the two nozzles seat
into the manifold ports, and the two extended flanges are flush with
the manifold.
4 Turn cartridge to the right until it stops.
5 Turn on cold water shut-off valve and RO faucet. Check for leaks.
6 Pressure test and Purge per Step Eight on page 10.
Sediment Filter
Stage 1
Pre-Carbon CTO
Stage 2
50 GPD Membrane
Stage 3
Post - Carbon CTO
Stage 4
213
Faucet Battery Replacement
1 Pull out battery drawer located on faucet
handle.
2 Install battery.
3
Reset: Install battery, blue light should be
flashing, followed by the red light.
4 Install into faucet canopy.
5 Open filtered water with blue signal.
LED Function:
1 Timer and LED display function built in.
2 The blue light flashes during normal
operation indicating filters are good. If the
operation time exceeds 6 months and/or
the red light flashes change the
appropriate filters and battery.
Reverse of battery
Positive plate
on the PCB
N
egative plate
o
n the PCB
C
R
2
0
3
2
+
3
V
O
L
T
S
C
R
2
0
3
2
C
R
2
0
3
2
+
3
V
O
L
T
S
Red Light
B
lue Light
Blue Light
54
1
2 3
Sediment Filter
Stage 1
Pre-Carbon CTO
Stage 2
50 GPD Membrane
Stage 3
Post - Carbon CTO
Stage 4

214
LIMITED WARRANTY
This warranty applies to the system and not to the replaceable filter cartridges where life expectancy of the filter
can vary depending on incoming water conditions. This warranty covers defects in materials and workmanship for
the model listed above from the original date of purchase. During the warranty period, we will replace or repair any
part which is deemed to be defective, if product has not been subjected to tampering, alteration or improper use
after delivery, and has not been repaired by the manufacturer. Our obligation does not include the cost of
transportation. We are not responsible for damage in transit, and claims for such damage should be presented to
the carrier by the customer. The product is not warranted against misuse, use in abnormal operation temperature
conditions, conditions outside listed operating parameter, use in commercial operations or any other manner
outside the “Operational Parameters” set forth in the instruction manual. This warranty is voided if cartridge filters
are not replaced on the recommended maintenance schedule. Stage 1 & 2 every six months, Stage 3 every 2-5
years and Stage 4 annually or more frequently depending on incoming water conditions. Failure to do so may cause
damage to the system, which will void warranty coverage.
WE MAKE NO WARRANTIES, EXPRESSED OR IMPLIED, INCLUDING, WITHOUT LIMITATION, ANY WARRANTIES OF
FITNESS OR MERCHANTABILITY, EXCEPT AS EXPRESSLY SET FORTH ABOVE. WE SHALL NOT BE LIABLE FOR ANY
ANTICIPATED OR LOST PROFITS, INCIDENTAL DAMAGES, CONSEQUENTIAL DAMAGES, COSTS, TIME CHARGES
OR OTHER LOSSES INCURRED IN CONNECTION WITH THE PURCHASE, INSTALLATION, REPAIR OR OPERATION OF
PRODUCT/SYSTEM, AND WE DO NOT AUTHORIZE ANYONE TO ASSUME FOR US ANY LIABILITY IN CONNECTION
WITH THE PRODUCT/SYSTEM OR ANY PART THEREOF.
For servicing under this warranty, return any defective part to the
address listed below within 3 years from date of purchase.
PureBlueH2O, LLC • 13813 Monroes Business Park • Tampa, FL 33635
Drain Flow Restrictor
The restrictor is vital for proper operation of the RO membrane cartridge as it keeps water flowing through
the membrane at the proper rate ensuring the water produced is the best quality. It is recommended the
restrictor assembly be periodically inspected to be sure it is clean and unrestricted. If service is required on
the drain flow assembly, disassemble and reassemble as outlined in Step Six on page 8.

Pure Blue H20, LLC
13813 Monroes Business Park
Tampa, FL 33635 USA
www.pureblueh2o.com
(844) 787-3148 • (844) PURE-1-4-U
/