NETGEAR, Inc.
350 East Plumeria Drive
San Jose, CA 95134, USA
© NETGEAR, Inc., NETGEAR and the NETGEAR
Logo are trademarks of NETGEAR, Inc. Any
non‑NETGEAR trademarks are used for reference
purposes only.
March 2022
NETGEAR INTERNATIONAL LTD
Floor 1, Building 3,
University Technology Centre
Curraheen Road, Cork,
T12EF21, Ireland
Installation Guide
Insight Cloud Managed WiFi 6 AX3600 Access Point
Model WAX620
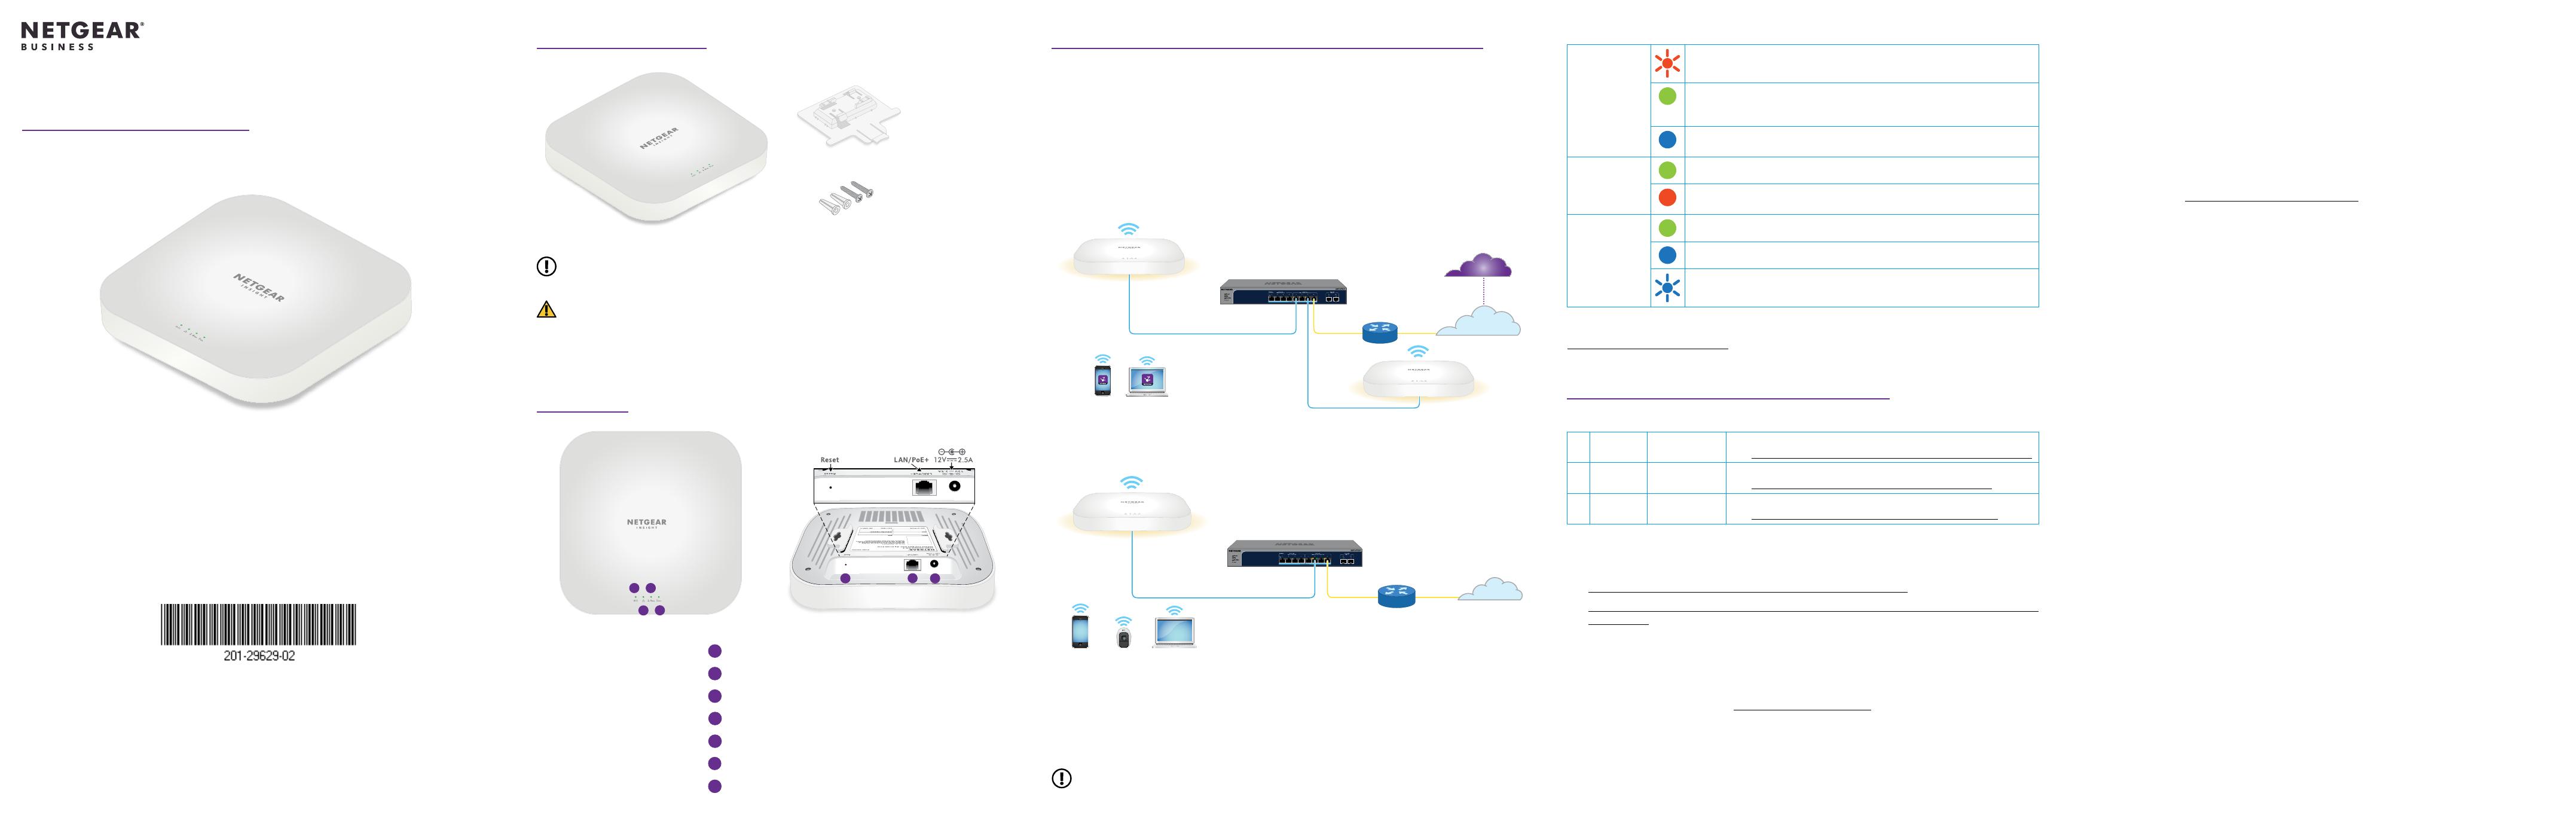
Access Point Model WAX620
Mounting bracket
with screw holes for
mounting to a solid
ceiling or 15/16in.
(23.8mm) T-bar.
Package contents
Two screws and
anchors for ceiling
or wallmounting
CAUTION: Terms of Use
This device must be professionally installed. It is the installer’s responsibility to follow local
country regulations including operations within legal frequency channels, output power
and DFS requirements. Vendor or Reseller or Distributor is not responsible for illegal
wireless operations. Please see Device’s Terms and Conditions for more details.
Overview
Power/Cloud LED
2LAN LED
32.4 GHz WLAN LED
45 GHz WLAN LED
5Reset button
LAN/PoE+ port
DC power connector
NOTE: You can power up your WAX620 by connecting it to a PoE+ switch. As an option,
you can purchase a power adapter.
2
4
6
1. Connect the access point to a PoE+ switch
Power up the WAX620 access point (AP) by connecting the LAN/PoE+ port to a PoE+ switch that
supplies 802.3at (PoE+) power.
Make sure that the AP has Internet connectivity:
• If you connect the AP to a switch, make sure that the switch has Internet connectivity.
• If you use a power adapter to provide power, use an Ethernet cable to connect the
LAN/PoE+ port on the AP to a router or other network device on a network with Internet
connectivity.
After starting up and during setup, the AP’s LEDs can light in these colors:
Power/Cloud Slow blinking amber: The AP is starting, the rmware is being
upgraded, or the AP is trying to get an IP address.
Solid green: The AP started up, and functions either as a standalone
AP or as an Insight‑discovered AP that is not currently connected to
the Insight cloud.
Solid blue: The AP functions in Insight mode and is connected to the
Insight cloud.
LAN
(one of two
speed options)
Solid green: The LAN 1 port detects a speed of 2.5 Gbps.
Solid amber: The LAN 1 port detects a speed of less than 2.5 Gbps,
such as 1 Gbps (which is a common speed).
2.4 GHz WLAN
5 GHz WLAN
Solid green: The radio is operating without clients.
Solid blue: The radio has at least one connected client.
Blinking blue: The radio is processing trafc.
For more information about the LEDs, see the user manual, which you can download by visiting
netgear.com/support/download.
A. Congure the AP with the NETGEAR Insight Cloud Portal
1. Make sure that the AP is connected to the Internet.
2. On a computer or tablet, visit https://insight.netgear.com/.
3. Enter the email address and password for your NETGEAR account and click the NETGEAR
Sign In button.
If you do not already have a NETGEAR account, you can create an account now.
4. Only if you are an Insight Pro user, select the organization to which you want to add the AP.
5. Select the location to which you want to add the AP.
6. Click the + (Add Device) button.
NOTE: If you are an Insight Pro user, you can either add a single device or you can add
multiple Insight managed devices by uploading a device list as a CSV le.
7. In the Add New Device pop‑up page, enter the AP’s serial number, and then click Go.
8. After Insight veries that the AP is a valid product, you can optionally change the device
name of the AP, and then click Next.
When the AP is successfully added to the portal, a page displays a conrmation that setup is
in progress.
NOTE: If the AP is online but Insight does not detect the AP, the rewall at the physical
location where the AP is located might prevent communication with the Insight cloud.
In that situation, add port and DNS entries for outbound access to the rewall. For more
information, see https://kb.netgear.com/000062467.
The AP automatically updates to the latest Insight rmware and Insight location
conguration. This might take up to 10 minutes, during which time the AP will restart.
The AP is now an Insight managed device that is connected to the Insight cloud‑based
management platform. If the Power/Cloud LED was solid green, it now lights solid blue.
9. Use the Insight Cloud portal or Insight app to congure and manage the AP.
2. Congure and manage the AP
To congure and manage the AP, use one of the methods described in the following table.
A. Remotely Cloud/remote
mode
NETGEAR Insight Cloud Portal
See A. Congure the AP with the NETGEAR Insight Cloud Portal
B. Remotely Cloud/remote
mode
NETGEAR Insight app
See B. Congure the AP with the NETGEAR Insight app
C. Locally Standalone
mode
Web browser
See C. Congure the AP as standalone in a web browser
Insight remote management offers additional features and add‑on services that are not available
in standalone mode. Your new Insight‑manageable device comes with Insight included. For
more information, visit the following pages:
• https://www.netgear.com/business/services/insight/subscription/
• https://kb.netgear.com/000061848/How‑do‑I‑use‑NETGEAR‑s‑one‑year‑of‑Insight‑included‑
subscription
B. Congure the AP with the NETGEAR Insight app
1. Connect your mobile device to the AP’s setup SSID (WiFi network name).
The setup SSID is on the AP label on the bottom of the AP and is shown in the format
NETGEARxxxxxx‑SETUP, where xxxxxx are the last six digits of the AP’s MAC address. The
default WiFi passphrase is sharedsecret.
2. Open the NETGEAR Insight app.
If you do not already have a NETGEAR account, you can create an account now.
3. Enter the email address and password for your account and tap LOG IN.
4. Select an existing network location, or, to create a new network location, tap the Next
button, and then tap OK.
The device admin password that you entered for the new network location replaces the
existing admin password on all devices that you add to the network location.
In most situations, Insight detects the AP automatically, which can take several minutes.
5. To add the AP to your network location, do one of the following:
• If the AP is automatically detected and listed in the Insight Manageable Devices section,
tap the AP icon, and then tap the ADD DEVICE button.
• If the AP is not automatically detected, or you prefer to use another method to add the
AP, tap the + icon in the top bar, and do one of the following:
-Tap the SCAN BARCODE OR QR CODE button, and then scan the AP’s code.
-Tap the Enter Serial Number link, and then manually enter the AP’s serial number.
6. If prompted, name the AP and tap the Next button.
The AP automatically updates to the latest Insight rmware and Insight location
conguration. This might take up to 10 minutes, during which time the AP will restart.
The AP is now an Insight‑managed device that is connected to the Insight cloud‑based
management platform. If the Power/Cloud LED was solid green, it now lights solid blue.
7. Use the Insight app or Insight Cloud portal to congure and manage the AP.
Sample connections for a standalone setup
WAX620
2.5 Gbps PoE+ switch
Router
WiFi clients
Internet
If connected to 2.5 Gbps equipment, the WAX620 LAN/PoE+ port supports Ethernet speeds up
to 2.5 Gbps within your LAN. The preceding gures show a NETGEAR MS510TXUP switch, which
supports speeds of 2.5 Gbps and higher, as well as PoE+. If your Internet connection, modem,
router, and switch support a speed of 2.5 Gbps, the AP’s Internet connection also functions at
2.5Gbps. Otherwise, the Internet connection functions at 1 Gbps, which is a common speed.
NOTE: The AP receives an IP address from a DHCP server (or a router that functions as a
DHCP server) in your network. If your network does not include a DHCP server, the AP uses
its default IP address: 192.168.0.100.
Sample connections for a NETGEAR Insight setup
WAX620
2.5 Gbps PoE+ switch
Router
WiFi clients with Insight Cloud
Portal or Insight app access
Internet
Insight cloud
WAX620

