VANCE HINES 16533 User manual

Category
Wall & ceiling mounts accessories
Type
User manual

VANCE HINES 16533: The ultimate exhaust system for your 2021 Harley-Davidson Pan America, designed for enhanced performance, quality, and style. Experience improved power, a throaty exhaust note, and a sleek look that complements your motorcycle's aesthetics. Installation is a breeze with the included hardware and detailed instructions. Unleash the true potential of your Pan America with VANCE HINES 16533.

VANCE HINES 16533: The ultimate exhaust system for your 2021 Harley-Davidson Pan America, designed for enhanced performance, quality, and style. Experience improved power, a throaty exhaust note, and a sleek look that complements your motorcycle's aesthetics. Installation is a breeze with the included hardware and detailed instructions. Unleash the true potential of your Pan America with VANCE HINES 16533.

INSTALLATION INSTRUCTIONS:
STAINLESS ADVENTURE HI-OUTPUT 450 SLIP-ON
2021 HARLEY-DAVIDSON PAN AMERICA
PART# 16533
Page 1 of 5 D578IN RevB
READ ALL INSTRUCTIONS BEFORE BEGINNING INSTALLATION
Congratulations, you have purchased the nest exhaust system available for your motorcycle. Your Vance & Hines exhaust
is designed and crafted for performance, quality, and style. Please follow the instructions below, check exhaust system for
missing or damaged parts and if you need any assistance please contact our technical support line (562) 921-7461.
Fits 2021 Harley-Davidson Pan America Models
Qualied Manufacturer Declared Replacement Part for 2021 Harley-Davidson Pan America Models.
1
3
2
4
ITEM NO.
PART NO.
DESCRIPTION
QTY.
1
D533RB-S
MUFFLER CAN ASSEMBLY WITH BADGE
1
2
D530RB
MID-PIPE ASSEMBLY
1
3
1245
MOUNT BRACKET
1
4
D530HP
HEAT SHIELD
1
5
A195HW
DOGBONE NUT PLATE
1
6
A561HW
CUSTOM 1/4-20 SCREW
3
7
A240HW
5/16"-18 X 5/8" FB
2
8
A716R-S
2.0 INCH LOUVER WRAPPED BAFFLE ASSEMBLY
1
9
A260SP
SPRING PULLER
1
10
A115SP
DIRT SPORT SPRING
2
11
A276HW
1.81-2.75IN SS HOSE CLAMP
2
SCALE 1:4
SHEET 1 OF 1
WT. LBS.
REV
PART #
SIZE
B
01
TITLE
UNLESS OTHERWISE SPECIFIED
INTERPRET DIMENSIONS
AND TOLERANCES
PER ANSI Y14.5M
THIRD ANGLE PROJECTION
MATERIAL
BRUSHED, SEE INDIV. DWGS
SEE INDIV. DWGS
APPROVED
5/14/2021
5/11/2021
DATE
NAME
DRAWN
CHECKED
J. NATIVIDAD
DIMENSIONS ARE INCHES
TOLERANCES ARE:
FRACTIONAL:
1/16"
ANGULAR:
2
X.X
0.030"
X.XX
0.015"
X.XXX
0.010"
FINISH
SLIP-ON ASSEMBLY
R. HORN
SANTA FE SPRINGS, CA
BROWNSBURG, IN
www.vanceandhines.com
PROJECT
16533
2021 HD PANAMERICA SLIP-ON
THE INFORMATION CONTAINED IN THIS DRAWING IS THE SOLE PROPERTY OF VANCE & HINES AND SHALL NOT BE REPRODUCED, USED, OR
DISCLOSED TO OTHERS FOR MANUFACTURE OR FOR ANY OTHER PURPOSE, UNLESS SPECIFICALLY AUTHORIZED, IN WRITING, BY VANCE & HINES.
11.768
CAD
J. NATIVIDAD 5/10/2021
= CRITICAL FEATURE
A A
B B
C C
D D
8
8
7
7
6
6
5
5
4
4
3
3
2
2
1
1
PARTS LIST
ITEM
NO.
PART
NO.
Description Qty.
1D533RB-S Mufer Can Assembly 1
2D530RB Mid-pipe Assembly 1
31245 Mount Bracket 1
4D530HP Heat Shield 1
5A195HW Dogbone Nut Plate 1
ITEM
NO.
PART
NO.
Description Qty.
6A240HW 5/16”-18 X 5/8” FB 2
7A115SP Spring 2
8A337HW 2.625” Torca Clamp 1
9A276HW 1.18-2.75” SS Clamp 2
10 A260SP Spring Puller 1
11 A852HW M8x1.25 Flange Nut 1
Page 2 of 5 D578IN RevB
REMOVAL OF STOCK EXHAUST
1. Remove the center stand and the right side foot controls. NOTE: support brake cylinder and
lever with a cable tie or wire. Do not allow the controls to hang by the brake hose.
2. Remove the stock heat shield from the OEM mufer by removing the mounting screw and a
loosening the heat shield clamp.
3. Loosen the clamp holding the stock mufer to the resonator chamber, then remove the bracket
screw mounting the mufer to the frame. Slide the stock mufer off of the resonator chamber.
NOTE: Set aside the bracket mounting screw for installation of the Vance and Hines Hi-Output
Slip-on.
4. Loosen the clamp holding the resonator chamber to the head pipes and remove the mounting
screw holding the resonator to the frame. Slide the resonator chamber rearward to remove
from the head pipes and the rubber mounting bung.
5. Reinstall the center stand and right side foot controls. Tighten to manufacturer’s recommended
torque settings.
TOOLS REQUIRED
Combination Wrench:
5/16”, 1/2”, 9/16”,
12mm
3/8” Drive Ratchet w/ 4” ex-
tension, 5/16” & 1/2” Sockets,
15mm Deep Socket, T40 Torx
Socket
Flat Head Screwdriver Ft-lb Torque Wrench
T27, T40 Torx Wrench
HARDWARE
8
9
5
6
10
7
11
SCALE 1:2
SHEET 2 OF 2
WT. LBS.
REV
PART #
SIZE
B
01
TITLE
UNLESS OTHERWISE SPECIFIED
INTERPRET DIMENSIONS
AND TOLERANCES
PER ANSI Y14.5M
THIRD ANGLE PROJECTION
MATERIAL
BRUSHED, SEE INDIV. DWGS
SEE INDIV. DWGS
APPROVED
5/14/2021
5/11/2021
DATE
NAME
DRAWN
CHECKED
J. NATIVIDAD
DIMENSIONS ARE INCHES
TOLERANCES ARE:
FRACTIONAL:
1/16"
ANGULAR:
2
X.X
0.030"
X.XX
0.015"
X.XXX
0.010"
FINISH
SLIP-ON ASSEMBLY
R. HORN
SANTA FE SPRINGS, CA
BROWNSBURG, IN
www.vanceandhines.com
PROJECT
16533
2021 HD PANAMERICA SLIP-ON
THE INFORMATION CONTAINED IN THIS DRAWING IS THE SOLE PROPERTY OF VANCE & HINES AND SHALL NOT BE REPRODUCED, USED, OR
DISCLOSED TO OTHERS FOR MANUFACTURE OR FOR ANY OTHER PURPOSE, UNLESS SPECIFICALLY AUTHORIZED, IN WRITING, BY VANCE & HINES.
0.634
CAD
J. NATIVIDAD
5/10/2021
A A
B B
C C
D D
8
8
7
7
6
6
5
5
4
4
3
3
2
2
1
1
= CRITICAL FEATURE
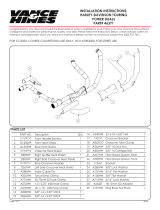
VANCE & HINES EXHAUST INSTALLATION
1. Install the 1245 mufer bracket (supplied) onto the mufer can assembly using the
A195HW dogbone nut plate and 2x A240HW 5/16”-18 x 5/8” ange head bolts (Figure
2). NOTE: Hand tighten only at this time.
2. Install the A337HW Torca band clamp (supplied) over the front of the D530RB mufer
mid-pipe so that the bolt and the clamping nut is facing outward (Figure 3). NOTE: New
Torca band clamps are supplied, do not use the old clamps.
3. Slide mid-pipe over the stock exhaust head pipe. NOTE: Do not tighten the Torca
clamp at this time.
4. Slide mufer can assembly onto the mid-pipe, then align the mufer bracket with the
frame bracket and secure using the stock mounting bolt and the supplied M8 nut and
washer. Adjust the position of the mufer on the bracket so that the distance between
the spring clips is 2.0” (Figure 4) and then tighten the 5/16”-18 x 5/8” ange bolts on the
mounting bracket.
5. Align the mid-pipe and mufer so that there is approximately 3/8” clearance between
the swing arm and the mid-pipe and then tighten the Torca Band Clamp to 45 ft/lbs.
6. Install the 2x A276HW SS Hose Clamps onto the heat shield, orienting the screw heads
so that they are facing downwards (Figure 5).
7. Install the heat shield onto the mid-pipe. Adjust the position of the heat shield so that
the notch is aligned with the lower edge of the swing arm and tighten the clamps
(Figure 6).
8. Using the supplied A260SP Spring Puller, install the 2x A115SP mufer springs onto the
spring clips (Figure 4).
9. After installation and before starting motorcycle, completely clean pipes and mufers
with cleaning solvent and a clean, soft cloth that will not leave a residue. NOTE: Any
residue, oil, or ngerprints may cause discoloration when the metal heats up.
11. Be sure to tighten all hardware before starting your motorcycle.
12. IMPORTANT: AFTER TEST RIDE LET PIPES COOL DOWN AND RE-TORQUE TORCA MUFFLER
BAND CLAMP.
Page 3 of 5 D578IN RevB
FIGURE 4
FIGURE 2FIGURE 1
FIGURE 3
Page 4 of 5 D578IN RevB
Install 1245 BracketInstall 1245 Bracket
Install Torca band clamp with opening Install Torca band clamp with opening
downwards and nut to the outsidedownwards and nut to the outside
OpeningOpening
Torca Band Clamp NutTorca Band Clamp Nut
Orientation of clampsOrientation of clamps
2.0” between spring clips2.0” between spring clips
FIGURE 5 FIGURE 6
Notch in heatshieldNotch in heatshield
For Printing on WHITE ONLY-KNOCKOUT
VERSION-BIZ CARDS
13861 ROSECRANS AVENUE / SANTA FE SPRINGS, CA 90670
SALES: (562) 921-5388
TECHNICAL: (562) 926-5291
FAX: (562) 802-0110
Page 5 of 5
Emissions Notice:
In California, in order to meet Air Resources Board emissions requirements, certain aftermarket part applications
have been identied as replacements, and others have received ARB Executive Orders. All other emissions
related aftermarket parts are for competition use only. A list of replacement parts and EO parts, and
corresponding
tment is provided at vanceandhines.com/california.
Warranty:
All Vance & Hines products are warranted against defects in material and workmanship for a period of 90 days.
This warranty does not cover discoloration or rust. This warranty shall be limited to the repair or replacement of
the product, which may be proven defective under normal use. Vance & Hines will not warranty any system
that has been abused, misused, improperly installed or modied.
Dealers or distributors are not authorized to make dispositions binding upon Vance & Hines. Vance & Hines will
not be responsible for any labor charges incurred in removing or replacing any system under warranty. A return
authorization number and a copy of the original purchase invoice must accompany all returns. Parts returned
without a return authorization may be refused.
  • Page 1 1
  • Page 2 2
  • Page 3 3
  • Page 4 4
  • Page 5 5

VANCE HINES 16533 User manual

Category
Wall & ceiling mounts accessories
Type
User manual

VANCE HINES 16533: The ultimate exhaust system for your 2021 Harley-Davidson Pan America, designed for enhanced performance, quality, and style. Experience improved power, a throaty exhaust note, and a sleek look that complements your motorcycle's aesthetics. Installation is a breeze with the included hardware and detailed instructions. Unleash the true potential of your Pan America with VANCE HINES 16533.

Ask a question and I''ll find the answer in the document

Finding information in a document is now easier with AI