VANCE HINES 17387 User manual

Category
Motorcycle Accessories
Type
User manual

VANCE HINES 17387, the Pro Pipe, is an exhaust system designed to enhance performance, quality, and style for your Harley-Davidson Softail Street Bob. Crafted with precision, this system promises an exhilarating riding experience. Its sleek design complements your motorcycle's aesthetics, while its optimized engineering unleashes improved power and a throaty exhaust note. Prepare to elevate your riding experience with the VANCE HINES 17387 Pro Pipe.

VANCE HINES 17387, the Pro Pipe, is an exhaust system designed to enhance performance, quality, and style for your Harley-Davidson Softail Street Bob. Crafted with precision, this system promises an exhilarating riding experience. Its sleek design complements your motorcycle's aesthetics, while its optimized engineering unleashes improved power and a throaty exhaust note. Prepare to elevate your riding experience with the VANCE HINES 17387 Pro Pipe.

PART NO. Description Qty.
1 D1108FC Header Assembly 1
2 D1108HC/D1308HP Front Heat Shield 1
3 D1109HC/D1309HP Rear Heat Shield 1
4 A210HC/A215HP Collector Heat Shield 1
5 D734HC/D739HP Mufer Heat Shield 1
6D830RC-S/D745RP-S Mufer Assembly 1
7 1133-P Mounting Bracket 1
8 1103-P Bracket Spacer 1
9 A240HW 5/16”-18 x 5/8” Hex Bolt 2
10 A260HW 3/8”-16 x 1” Hex Bolt 2
INSTALLATION INSTRUCTIONS:
2018 HARLEY-DAVIDSON SOFTAIL STREET BOB
PRO PIPE
PART# 17387 / 47387
Page 1 of 7 D997IN RevF
Congratulations, you have purchased the nest exhaust system available for your motorcycle. Your Vance & Hines exhaust
is designed and crafted for performance, quality, and style. Please follow the instructions below, check exhaust system for
missing or damaged parts and if you need any assistance please contact our technical support line (562) 921-7461.
PARTS LIST
11 A826HW 3/8”-16 x 2-1/4” SHCS 2
12 A739HW 5/16”-24 x 1-1/4 BHCS 1
13 A195HW Dog Bone Nut Plate 1
14 A740ST-P 1-1/4” x 3/4” Spacer 2
15 A745HW-P 3/4” Spacer 1
16 A644ST 18-12mm O2 Adapter 2
17 A106HW 3/8” Flat Washer 2
18 A270HW .81-1.75” Hose Clamp 9
19 A273HW No. 44 2.31-3.25” Hose Clamp 1
20 A274HW No. 56 3.06-4.06” Hose Clamp 1
21 A337HW 2-5/8” Torca Band Clamp 1
7
2
1
3
8
54
6
19
20
18
17
21
11 12 13 14 15 16 22
ITEM NO.
PART NUMBER
DESCRIPTION
Instructions Page
1/QTY.
1
D825RC
MUFFLER CAN ASSEMBLY, WELDED,
CHROME
1
2
A515R-S
BAFFLE, WRAPPED
1
3
A235HW 1_4-20 x 1_2
BHCS
1/4-20 x 1/2 BHCS 2
4
A210HC
COLLECTOR HEAT SHIELD
1
4
D1108HC
HEAT SHIELD ASSY, FRONT
1
5
D1109HC
HEAT SHIELD ASSY, REAR
1
6
D1108FC
WELDED HEADER ASSEMBLY
1
8
D734HC
MEGAPHONE HEAT SHIELD
1
7
1133-P
MOUNT BRACKET, POWDER
COATED
1
8
1103-P
BRACKET SPACER
1
11
A195HW
DOGBONE NUT PLATE
1
12
92323A534
5/16"-18 X 5/8" FHS
2
13
90128A633
3/8"-16 X 2.25" PT SHCS
2
14
A740ST-P
SPACER
2
15
91255A387
5/16-24 X 1.25 IN BHCS
1
16
A745HW-P
.323 ID X .750 O.D. X .325 WASHER
1
17
A270HW
.81-1.75 IN SS HOSE CLAMP NO#20
9
18
A337HW
2.625 DIAMETER TORCA BAND
1
19
A273HW
2.31 - 3.25 IN SS #44 HOSE CLAMP
1
20
A274HW
3.06-4.06 IN SS HOSE CLAMP #56
1
21
A644ST 18-12MM
ADAPTOR
18-12MM O2 ADAPTOR
2
22
92979A348
FL. HEAD HEX BOLT, 3/8"-16UNC X 1
1/4"LG.
2
A A
B B
4
4
3
3
2
2
1
1
SEE INDIV. DWGS
PRO-PIPE
CHROME
DO NOT SCALE DRAWING
17587_Instructions
SHEET 1 OF 2
UNLESS OTHERWISE SPECIFIED:
SCALE: 1:24
WEIGHT: 16.948
REV
DWG. NO.
B
SIZE
TITLE:
NAME
DATE
COMMENTS:
Q.A.
MFG APPR.
ENG APPR.
CHECKED
DRAWN
CHROME, SEE INDIV. DWGS
FINISH
MATERIAL
INTERPRET GEOMETRIC
TOLERANCING PER:
DIMENSIONS ARE IN INCHES
TOLERANCES:
FRACTIONAL
ANGULAR: MACH
BEND
TWO PLACE DECIMAL
THREE PLACE DECIMAL
APPLICATION
USED ON
NEXT ASSY
PROPRIETARY AND CONFIDENTIAL
THE INFORMATION CONTAINED IN THIS
DRAWING IS THE SOLE PROPERTY OF
<INSERT COMPANY NAME HERE>. ANY
REPRODUCTION IN PART OR AS A WHOLE
WITHOUT THE WRITTEN PERMISSION OF
<INSERT COMPANY NAME HERE> IS
PROHIBITED.
TOOLS REQUIRED
Page 2 of 7 D997IN RevF
HARDWARE
Ft./Lbs.
Flat blade screwdriver
5/16” Nutdriver
1/2”, 9/16”, & 14mm
Combination Wrenches
Snap ring Pliers
Ft.Lb. Torque Wrench
Ratchet & Extentions
1/2”, 19mm or 3/4”
Sockets
9/16” & 15mm deep
sockets
5/32”, 3/16”, & 5/16”
Allen Wrench
16
9
19 20
18
11
14
12
15
10
21
13 17
NOTE: UNLESS OTHERWISE SPECIFIED
1.
REVISIONS
REV.
ECO
DESCRIPTION
REVISED BY
DATE
APPROVED
01
--
SCALE 1:24
SHEET 1 OF 1
WT. LBS.
REV
PART #
SIZE
B
01
TITLE
UNLESS OTHERWISE SPECIFIED
INTERPRET DIMENSIONS
AND TOLERANCES
PER ANSI Y14.5M
THIRD ANGLE PROJECTION
MATERIAL
CHROME, SEE INDIV. DWGS
SEE INDIV. DWGS
APPROVED
2/1/2018
1/22/2018
DATE
NAME
DRAWN
CHECKED
T. LEWIS
DIMENSIONS ARE INCHES
TOLERANCES ARE:
FRACTIONAL:
1/16"
ANGULAR:
2
X.X
0.030"
X.XX
0.015"
X.XXX
0.010"
FINISH
PRO-PIPE CHROME
S. GUTIERREZ
SANTA FE SPRINGS, CA
BROWNSBURG, IN
www.vanceandhines.com
PROJECT
17587
2018 SOFTAIL STREET BOB PRO-PIPE
THE INFORMATION CONTAINED IN THIS DRAWING IS THE SOLE PROPERTY OF VANCE & HINES AND SHALL NOT BE REPRODUCED, USED, OR
DISCLOSED TO OTHERS FOR MANUFACTURE OR FOR ANY OTHER PURPOSE, UNLESS SPECIFICALLY AUTHORIZED, IN WRITING, BY VANCE & HINES.
= CRITICAL FEATURE
22.798
CAD
T. LEWIS
12/15/2017
A A
B B
C C
D D
8
8
7
7
6
6
5
5
4
4
3
3
2
2
1
1
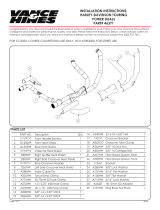
Page 3 of 7 D997IN RevF
STOCK EXHAUST SYSTEM REMOVAL
1. Locate the rear O2 sensor connector. Remove the two bolts holding the right side
cover in place and gently pull cover off bike. NOTE: Pay attention to the wire routing
for re-installation.
2. Locate the front O2 sensor connector. Unplug the sensor and feed the end of the wire
through the frame, freeing it from the motorcycle.
3. On oor-board models, loosen the right-hand oor board mounting bolts to gain
clearance for the exhaust removal and installation.
4. On mid-mount models, remove the forward brake rod bolt and remove the mid mount
foot peg bracket.
5. On forward control models, loosen mounting bolts to gain clearance for exhaust
removal and installation.
6. Loosen the heat shield clamps on both the front and rear exhaust pipes.
7. Remove the two mounting nuts from each head pipe, located at the cylinder head.
8. Remove the bolts attaching the mufers to the mounting bracket.
9. Remove the entire exhaust system and set it aside.
10. Remove the stock mounting bracket. (If mounting bracket is equipped with a
passenger foot peg, remove foot peg and foot peg mount from stock bracket.)
11. Carefully remove the O2 sensors from the stock head pipes and save for re-use with the
new system.
12. Carefully remove the exhaust port anges and circlips from the stock exhaust system
using the snap ring pliers. NOTE: Replace bent or damaged circlips.
VANCE & HINES EXHAUST INSTALLATION
1. Install 1133-P bracket and 1103-P bracket spacer onto frame using two 3/8-16” x 1” hex
bolts (supplied) along with the the 3/8” at washer (supplied) (Figure 1). Note: 1103-P
bracket spacer ts between 1133-P bracket and frame. Heritage Deluxe with Harley
Davidson P&A saddlebags and Sport Glide models will require purchase of VH Part # -
21946 Saddlebag Relocation Mount that will replace 1103-P bracket spacer.
2. Remove head pipes and heat shields from protective packaging. Place each heat
shield on a non-abrasive surface such as a blanket or carpet. For chrome use a felt tip
pen and for black, use a pencil, to mark the outside edge of each heat shield to show
the location of the hose clamp mounting clips (Figure 5).
3. Lay header assembly into front and rear heat shields and loosely install the #20 hose
clamps (supplied) into mounting clips. Screw heads should be accessible when the
system is installed on motorcycle for adjustment purposes (Figure 5).
4. Apply a small amount of anti-sieze compound to the threads of the oxygen sensors
and install supplied 18mm to 12mm oxygen sensor adapter then install 12mm oxygen
sensors. NOTE: Be careful not to get anti-sieze on sensor tip, as it may affect sensor
function.
5. Install anges and circlips from stock system onto the new header pipes.
6. Using stock ange nuts, carefully install the header assembly onto the motorcycle.
NOTE: Finger tighten only at this time.
Page 4 of 7 D997IN RevF
VANCE & HINES EXHAUST INSTALLATION CONTINUED
7. Install torca band clamp with bolt facing down (supplied) onto the end of the mufer
body (Figure 4).
8. Install mufer assembly onto rear of header assembly.
9. Slide the nut plate (supplied) into the bracket that is welded to the back side of the
mufer. Loosely install two 5/16” ange head bolts (supplied) through the 1133-P
bracket onto the nut plate.
10. Install collector heat shield onto header by sliding it on from the rear (Figure 3). NOTE:
Do not force collector heat shield directly onto header from the side. Damage to the
collector heat shield will result. Attach collector heat shield with two #20 hose clamps
(supplied). Finger tighten only at this time.
11. Slip the mufer body heat shield (stamped D734HC or D739HP) from front to back
onto the mufer body and secure with a #44 hose clamp in the front and a #56 hose
clamp in the rear (Figure 5). NOTE: Use a low tack tape (painters tape or equivalent)
to protect the transition on the mufer body between tapered section and 4.5” round
end section. Do not tighten at this time.
12. Tighten the exhaust port ange nuts, 5/16” ange head bolts, and tighten the torca
band clamps.
13. Tighten hose clamps securing header heat shields and collector heat shield making
sure that they are ush (Figure 3).
14. Tighten mufer body heat shield and leave about 1/16” even gap on the rear between
heat shield and mufer body. Make sure top edge of heat shield is aligned with
centerline of mufer body to maintain acceptable clearance.
15. Route O2 sensor wires away from hot areas of the motorcycle. Plug the O2 sensor wires
back into the wiring harness.
16. Re-install right side cover.
17. On oor-board models, tighten the oor board mounting bolts to OEM torque
specications.
18. On mid-mount models, re-install mid-mount foot peg with spacers (A740ST-P) and bolts
(A826HW). Additionally, place spacer (A745HW-P) in between the brake rod and lever.
Fasten with the supplied button head cap screw, A739HW (Figure 2).
19. On forward control models, tighten the mounting bolts to OEM torque specications.
20. For models with passenger foot peg attached to the stock exhaust bracket, re-install
the left and right side passenger foot pegs into the upper mounting holes (Figure 6).
21. Be sure to tighten all hardware before starting your motorcycle. After installation and
before starting the motorcycle, completely clean pipes and mufers with soap and
water and a clean soft cloth. NOTE: Any residue, oil, or ngerprints will stain the chrome
when the metal heats up.
Page 5 of 7 D997IN RevF
EXHAUST CARE
1. When installing a new set of chrome pipes, make sure your hands are clean and free of
oil. After installation, thoroughly clean pipes with a soft cloth and cleaning solvent that
will leave no residue before starting the motorcycle.
2. Avoid long periods of idling as this can cause discoloration.
3. Intake leaks can cause the engine to run lean and overheat, this could lead to
discoloration.
4. Make sure there are no exhaust leaks at the junction of the exhaust pipes and cylinder
head. We recommend replacing gaskets if they are worn.
EXHAUST CARE (BLACK)
1. When installing a new set of black pipes, make sure your hands are clean and free of
oil. After installation, thoroughly clean pipes with a warm soapy water and a soft cloth.
Dry with a clean towel to remove any residue before starting the motorcycle. Do NOT
use anything abrasive to clean the pipes.
2. Avoid long periods of idling as this can cause discoloration.
3. Intake leaks can cause the engine to run lean and overheat, this could lead to
discoloration.
4. Make sure there are no exhaust leaks at the junction of the exhaust pipes and cylinder
head. We recommend replacing gaskets if they are worn.
Page 6 of 7 D997IN RevF
FIGURE 1 FIGURE 2
FIGURE 3
HEAD PIPE HEAT SHIELD
HEAD PIPE
POSITION FRONT EDGE OF COLLECTOR HEAT SHIELD
AT REAR EDGE OF COLLECTOR COLLAR WELD
AND SLIDE FORWARD
SLIDE FORWARD AND DOWN (MAY REQUIRE SOFT MALLET) COLLECTOR HEAT SHIELD
HEAT SHIELDS SHOULD BE FLUSH
HEAT SHIELD CLIP
HOSE CLAMP
ALIGMENT CLIP
COLLECTOR
1. HEADER
COLLECTOR
5. MUFFLER BODY
HEATSHIELD
4. COLLECTOR HEATSHIELD
2. MUFFLER
BODY
3. TORCA BAND
CLAMP
FIGURE 4
For Printing on WHITE ONLY-KNOCKOUT
VERSION-BIZ CARDS
13861 ROSECRANS AVENUE / SANTA FE SPRINGS, CA 90670
SALES: (562) 921-5388
TECHNICAL: (562) 926-5291
FAX: (562) 802-0110
Page 7 of 7
Emissions Notice:
In California, in order to meet Air Resources Board emissions requirements, certain aftermarket part applications
have been identied as replacements, and others have received ARB Executive Orders. All other emissions
related aftermarket parts are for competition use only. A list of replacement parts and EO parts, and
corresponding tment is provided at vanceandhines.com/california.
Warranty:
All Vance & Hines products are warranted against defects in material and workmanship for a period of 90 days.
This warranty does not cover discoloration or rust. This warranty shall be limited to the repair or replacement of
the product, which may be proven defective under normal use. Vance & Hines will not warranty any system
that has been abused, misused, improperly installed or modied.
Dealers or distributors are not authorized to make dispositions binding upon Vance & Hines. Vance & Hines will
not be responsible for any labor charges incurred in removing or replacing any system under warranty. A return
authorization number and a copy of the original purchase invoice must accompany all returns. Parts returned
without a return authorization may be refused.
FIGURE 5
#20
#20 #20 #20
#20
#20
#20
#20
#44 #56
NOTE: UNLESS OTHERWISE SPECIFIED
1.
REVISIONS
REV.
ECO
DESCRIPTION
REVISED BY
DATE
APPROVED
01
-
-
SCALE 1:24
SHEET 1 OF 1
WT. LBS.
REV
PART #
SIZE
B
01
TITLE
UNLESS OTHERWISE SPECIFIED
INTERPRET DIMENSIONS
AND TOLERANCES
PER ANSI Y14.5M
THIRD ANGLE PROJECTION
MATERIAL
CHROME, SEE INDIV. DWGS
SEE INDIV. DWGS
APPROVED
2/1/2018
1/22/2018
DATE
NAME
DRAWN
CHECKED
T. LEWIS
DIMENSIONS ARE INCHES
TOLERANCES ARE:
FRACTIONAL:
1/16"
ANGULAR:
2
X.X
0.030"
X.XX
0.015"
X.XXX
0.010"
FINISH
PRO-PIPE CHROME
S. GUTIERREZ
SANTA FE SPRINGS, CA
BROWNSBURG, IN
www.vanceandhines.com
PROJECT
17587
2018 SOFTAIL STREET BOB PRO-PIPE
THE INFORMATION CONTAINED IN THIS DRAWING IS THE SOLE PROPERTY OF VANCE & HINES AND SHALL NOT BE REPRODUCED, USED, OR
DISCLOSED TO OTHERS FOR MANUFACTURE OR FOR ANY OTHER PURPOSE, UNLESS SPECIFICALLY AUTHORIZED, IN WRITING, BY VANCE & HINES.
= CRITICAL FEATURE
16.129
CAD
T. LEWIS
12/15/2017
A A
B B
C C
D D
8
8
7
7
6
6
5
5
4
4
3
3
2
2
1
1
#20
FIGURE 6
  • Page 1 1
  • Page 2 2
  • Page 3 3
  • Page 4 4
  • Page 5 5
  • Page 6 6
  • Page 7 7

VANCE HINES 17387 User manual

Category
Motorcycle Accessories
Type
User manual

VANCE HINES 17387, the Pro Pipe, is an exhaust system designed to enhance performance, quality, and style for your Harley-Davidson Softail Street Bob. Crafted with precision, this system promises an exhilarating riding experience. Its sleek design complements your motorcycle's aesthetics, while its optimized engineering unleashes improved power and a throaty exhaust note. Prepare to elevate your riding experience with the VANCE HINES 17387 Pro Pipe.

Ask a question and I''ll find the answer in the document

Finding information in a document is now easier with AI