Page is loading ...

7
2
1
4
3
6
5
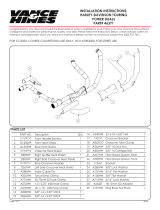
INSTALLATION INSTRUCTIONS:
HARLEY-DAVIDSON SOFTAIL
BIG RADIUS 2-INTO-2
PART# 46079
Page 1 of 8 46079IN
Congratulations, you have purchased the nest exhaust system available for your motorcycle. Your Vance & Hines exhaust
is designed and crafted for performance, quality, and style. Please follow the instructions below, check exhaust system for
missing or damaged parts and if you need any assistance please contact our technical support line (562) 921-7461.
PARTS LIST
NO. Part NO. Description Qty.
1 D438FP Front Head Pipe 1
2D439FP Rear Head Pipe 1
3D438HP Front Heat Shield 1
4D439HP Rear Heat Shield 1
5 D322HP-S Front Mufer Heat Shield 1
6D323HP-S Rear Mufer Heat Shield 1
7352-P Mount Bracket 1
8A272HW 1.31-2.25 In. Hose Clamp 4
9A270HW .81-1.75 In. Hose Clamp 5
10 A285HW 1/2-20 x 3 In. SHCS 1
11 A101HW 3/8-16 x 2.5 In. SHCS 1
12 A195HW Dog Bone Nut Plate 2
13 D101ST-P Footpeg Spacer 1
14 D110ST-P Spacer 1
15 A290HW 3/8-16 x 3/4 Flange Screw 2
16 A240HW 5/16-18 x 5/8 Flange Screw 4

17
9
16
15
11
8
10
13
14
12
19
18
TOOLS REQUIRED
Page 2 of 8 46079IN
HARDWARE
Ft./Lbs.
Flat blade screwdriver
#3 Phillips Head
5/16” Nutdriver
1/2”, 9/16”, 3/4”, 7/8”
or 22mm Combination
wrenches
3/16” Allen wrench
T45 & T50 Torx Wrenches
Snapring pliers
Ft./Lb. Torque wrench
3/8” Ratchet &
Extentions, 1/2” & 9/16”
3/4” Deep Socket

Page 3 of 8 46079IN
STOCK EXHAUST REMOVAL
1. Rear O2 sensor, locate the O2 sensor connector, unplug the connector from the main harness
and feed the wire through the frame to free it from the motorcycle. Pay attention to the wire
routing for reinstallation. NOTE: For 2007 to 2009 models the connector is located under the oil
tank, on the right side.
2. Front O2 sensor, Locate the O2 sensor connector at the front of the motorcycle, unplug
connector from harness, and free the sensor lead from the motorcycle. NOTE: For 2007 to 2009
Models, open the plastic cover above the rectier to gain access to the sensor plug. Cut the
cable ties holding the sensor wire to frame.
3. On models with oor boards, loosen the right hand oor board mounting bolts to gain
clearance for exhaust removal and installation.
4. On FLSTF, FXS and FLSTN and FXSTD, you will need to remove the right side passenger footpeg
and hanger, as this is attached to the exhaust mount bracket. Leave the footpeg and hanger
off, additional reinstallation instructions to follow.
5. Unbolt the carriage bolt and clamp attached to the bracket located under the right side
transmission cover.
6. Loosen the heat shield clamps on both front and rear exhaust pipes.
7. Remove the two mounting nuts from each head pipe.
8. Remove the nuts attaching the exhaust mounting bracket to the frame.
9. Remove the exhaust system and set it aside. Assistance may be required.
10. Carefully remove the O2 sensors from the stock head pipes.
11. Remove the stock mounting bars, brackets and/or studs.
A. PRE 2000 Models: Remove the lower mounting bar. Remove the right side 1/4” bolt which
holds the lower fender in place to allow removal of the right passenger foot peg. Place the
motorcycle on its side stand and loosen the swing arm pivot bolt nut. Position a oor jack under
the right hand frame tube just below the swing arm pivot bolt. Using assistance, carefully raise
the jack just enough to take the weight off the swing arm bolt and remove the swing arm pivot
bolt and the stock upper mounting bar. Replace the swing arm pivot bolt and torque to 135
FT/LB. Re-install the right passenger foot peg using the 1/2”x3” capscrew with the 1 5/8” spacer
and 1/4” bolt to secure fender.
B. 2000 & Later Models: Using a T50 Torx driver, remove the three mounting bolts and mounting
bar. Two of the T50 bolts are visible, the third also attaches the right hand passenger peg and
is accessed by removing the foot peg. Re-install the foot peg using the 3/8”x2 1/2” capscrew
with the 3/4” spacer.
12. Carefully remove exhaust port anges and circlips from the stock exhaust system using snapring
pliers. NOTE: Replace bent or damaged circlips.
13. Check condition of exhaust gaskets and replace if worn or damaged.

Page 4 of 8 46079IN
VANCE & HINES EXHAUST INSTALLATION
1. Install bracket (stamped 352-P) (supplied) using the two lower holes in the frame below the
right passenger footpeg, using two 3/8” x 3/4” ange bolts (supplied) (Figure 1).
2. Remove head pipes and heat shields from protective packaging. Place each heat shield on a
non-abrasive surface such as a blanket or carpet. Using a pencil only, mark the outside edge
of each heat shield to show the location of the hose clamp mounting clips (Figure 3).
3. Lay head pipes into head pipe heat shields (Figure 2) and loosely install the #20 hose clamps
(supplied) into mounting clips (Figure 3). NOTE: Screw head should be accessible when system
is installed on motorcycle for adjustment purposes (Figure 4). Do not tighten at this time.
4. Apply a small amount of anti-seize compound to the threads of the O2 sensors removed from
the stock head pipes and install them into the new pipes. NOTE: 2007 to 2009 models or models
using 18mm wideband oxygen senors install sensor directly into the head pipe. All models not
using xoygen sensors install 18mm plug with the copper crush washer #16925 sold separately.
5. Install circlips and anges from stock system onto both new head pipes (Figure 5).
6. Using stock ange nuts, carefully install head pipes onto motorcycle. Do not tighten at this time.
7. Use the nut plates and 5/16” x 5/8” ange bolts (supplied) to attach the pipes to the bracket
(Figure 6). Do not tighten at this time.
8. Align pipes on motorcycle so the gap between the two mufer bodies is consistent from front
to rear (Figure 7). Tighten the exhaust port ange nuts, 5/16” x 5/8” ange head bolts (supplied)
and the 3/8”x 3/4” ange head bolts (supplied) attaching the bracket to the frame.
9. Using the #28 hose clamps (supplied) install the mufer heat shields beginning with the D322HP
on the front head pipe followed by the D323HP (Chrome badge) on the rear head pipe. Screw
heads should be accessible for adjusment purposes (Figure 4). Do not tighten at this time.
10. Adjust all heat shields for the best alignment at the seam where they meet (Figure 8) and
tighten all the hose clamps.
11. Route O2 senor wires away from hot areas of the motorcycle. Plug the O2 sensor wires
back into the wiring harness. For 2007 to 2009 models, feed the wire for the front oxygen
sensor around and into the plastic holder on the frame. Plug the sensor into the stock wiring
connector. Snap the plastic holder closed to hold the connector in place. Install a new nylon
cable tie to hold the wires onto the frame in the original location. Feed connector for the rear
oxygen sensor around the frame under the oil tank on the right hand side. Plug the sensor into
the stock wiring connector.
12. Re-tighten oor board mounting bolts on models equipped.
13. Be sure to tighten all hardware before starting motorcycle.
14. After installation and before starting the motorcycle, completely clean pipes and mufers with
warm soapy water and a clean soft cloth that will not leave a residue. NOTE: Any residue, oil, or
ngerprints will stain the chrome when the metal heats up.

Page 5 of 8 46079IN
FIGURE 1
EXAUST CARE
1. When installing a new set of black pipes, make sure your hands are clean and free of oil. After
installation, thoroughly clean pipes with warm soapy water and a soft cloth. Dry with clean
towel to remove any residue before starting the motorcycle. Do NOT use anything abrasive to
clean pipes.
2. Avoid long periods of idling as this can cause discoloration.
3. Intake leaks can cause the engine to run lean and overheat, this could lead to discoloration.
4. Make sure there are no exhaust leaks at the junction of the exhaust pipes and cylinder head.
We recommend replacing gaskets if they are worn.
FIGURE 2
Lay head pipes
into heat shields
Install 352-P
Bracket
FIGURE 3
Install hose
clamps
Mark mounting clip
locations

Page 6 of 8 46079IN
FIGURE 4
FIGURE 5
FIGURE 6
Arrows indicate screw head direction
Install circlips and anges
Install nut plates Install nut
plates

Page 7 of 8 46079IN
FIGURE 7
FIGURE 8
Align pipes to have a consistent gap
Check for good alignment at the seam
Align pipes to have a consistent gap
Check for good alignment at the seams

For Printing on WHITE ONLY-KNOCKOUT
VERSION-BIZ CARDS
13861 ROSECRANS AVENUE / SANTA FE SPRINGS, CA 90670
SALES: (562) 921-5388
TECHNICAL: (562) 926-5291
FAX: (562) 802-0110
Page 8 of 8
Emissions Notice:
In California, in order to meet Air Resources Board emissions requirements, certain aftermarket part applications
have been identied as replacements, and others have received ARB Executive Orders. All other emissions
related aftermarket parts are for competition use only. A list of replacement parts and EO parts, and
corresponding tment is provided at vanceandhines.com/California.
Warranty:
All Vance & Hines products are warranted against defects in material and workmanship for a period of 90 days.
This warranty does not cover discoloration or rust. This warranty shall be limited to the repair or replacement of
the product, which may be proven defective under normal use. Vance & Hines will not warranty any system
that has been abused, misused, improperly installed or modied.
Dealers or distributors are not authorized to make dispositions binding upon Vance & Hines. Vance & Hines will
not be responsible for any labor charges incurred in removing or replacing any system under warranty. A return
authorization number and a copy of the original purchase invoice must accompany all returns. Parts returned
without a return authorization may be refused.
Connect. Tune. Ride.
From the team that brought you The Fuelpak FP3, the
best-selling ECU tuner in the world for Harley-Davidson
motorcycles, the Vance & Hines FP4 is the most
intuitive tuning tool on the market, giving you the
power to control your motorcycle’s tune and offers
the best-in-industry support from our FP4 technicians,
all from your smartphone.
●Download and Flash Maps
●Live Data Viewing
●Autotune Feature for Map Customization
Visit vanceandhines.com to learn more about FP4.
Qualified Manufacturer Declared 49-state Federal
Emissions Compliant Part.
/