Page is loading ...

#200084 (0460) Tow Hitch
Installation and Set-Up Instructions
Otter II Towing Hitch
Fits X-Large Sled
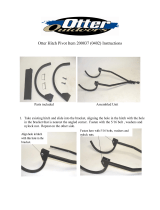
Parts Identification Checklist
Side Tube
(Qty 2)
2
1
Hitch Coupler
(Qty 1) 3U-Shaped Sled Bracket,
(For Old Style Sled Only)
(Qty 1)
5/16 Washer
(Qty 16)
7
65/16 x 3
Hex Bolt
(Qty 2)
Hitch Pin with Spring Clip
(Qty 2)
5/16 Nylon
Hex Lock Nut
(Qty 8)
4
55/16 x 1
Hex Bolt
(Qty 6)
8
N
Instructions - 70779

2 in.
3
57
8
7
Tools Required: Towing Hitch Instructions for the Following Sled:
1/2 Box End Wrenc
1/2 Socket and Rachet Otter Pro X-Large Sled
Drill
3/8 bit
Straight Edge & Marker
Adjustable Crescent Wrench
Installation for Sleds:
1. Layout all parts.
2. Turn the sled upside down.
3. With a straight edge, mark a line towards the front of sled 2 inches above the sled lip on both sides.
4. Line up the U-Shaped sled bracket (Item 3) on the line marked as shown below. Bracket should be tight against the
front of the sled.
5. Mark all 6 holes and remove the bracket, then drill with the 3/8 bit.
6. Attach the U-Shaped sled bracket (Item 3) with the fasteners shown.

Otter Outdoors Inc.
411 W Congress St. • Maple Lake, MN 55358
Phone 320-963-6480 • www.otteroutdoors.com
Installation Continued:
7. Lay side tubes (Item 1) on ground to form an “A” shape.
8. Attach side tubes (Item 1) to hitch coupler (Item 2) with 5/16 x 3 hex bolts (Item 6), washers (Item 7), and lock nuts
(Item 8).
9. Assemble towing hitch assembly to U-Shaped Sled Bracket (Item 3)
with hitch pins (Item 4) and secure hitch pins with spring clips.
Towing Hitch
January, 2008
X-Large Sled
(Sold Separately)
6
1
2
7
8
4
3
/