ADSL2/2+ Router
Copyright Statement
is the registered trademark of Shenzhen Tenda
Technology Co., Ltd. All the products and product names
mentioned herein are the trademarks or registered
trademarks of their respective holders. Copyright of the
whole product as integration, including its accessories and
software, belongs to Shenzhen Tenda Technology Co., Ltd.
Without prior expressed written permission from
Shenzhen Tenda Technology Co., Ltd, any individual or
party is not allowed to copy, plagiarize, reproduce, or
translate it into other languages.
All photos and product specifications mentioned in
this manual are for references only. Upgrades of software
and hardware may occur; Tenda reserves the right to
revise this publication and to make changes in the content
hereof without obligation to notify any person or
organization of such revisions or changes. If you would
like to know more about our product information, please
visit our website at
www.tenda.cn
-1 -

ADSL2/2+ Router
Table of Contents
COPYRIGHT STATEMENT.............................................................- 1 -
CHAPTER 1 PRODUCT OVERVIEW..............................................- 5 -
1.2 PACKAGE CONTENTS.............................................................- 7 -
CHAPTER 2 HARDWARE OVERVIEW ..........................................- 8 -
2.1 FRONT PANEL ...........................................................................- 8 -
2.1 BACK PANEL OVERVIEW ...........................................................- 10 -
CHAPTER 3 QUICK SETUP FOR INTERNET CONNECTION.....- 12 -
3.1 CONFIG TCP/IP SETTINGS ON PC ............................................- 12 -
3.2 LOGGING ON TO WEB MANAGER USING THE SETUP WIZARD.........- 15 -
3.3 LOGGING ON TO WEB MANAGER VIA WEB BROWSER ...................- 16 -
CHAPTER 4 ADVANCED SETTINGS...........................................- 26 -
4.1 STATUS ...................................................................................- 27 -
4.1.1 General......................................................................... - 27 -
4.1.2 ADSL ......................................................................... - 28 -
4.1.3 LAN .............................................................................. - 28 -
4.1.4 WAN ............................................................................. - 29 -
4.1.5 Wireless........................................................................ - 29 -
4.1.6 ADSL Traffic Statistics................................................... - 30 -
4.2 QUICK SETUP..........................................................................- 30 -
4.3 NETWORK ...............................................................................- 36 -
4.3.1 LAN .............................................................................. - 37 -
4.3.2 WAN Settings ............................................................... - 37 -
-2 -

ADSL2/2+ Router
4.3.3 MAC Address Clone ..................................................... - 43 -
4.3.4 DHCP ........................................................................... - 44 -
4.3.4 ADSL Settings .............................................................. - 47 -
4.4 WIRELESS...............................................................................- 47 -
4.4.1. Basic Settings.............................................................. - 48 -
4.4.2 Security ........................................................................ - 52 -
4.4.3 MAC-based Wireless Access Control ........................... - 54 -
4.3.4 WDS ............................................................................. - 56 -
4.3.5 Connection Status ........................................................ - 59 -
4.5 ADVANCED APPLICATIONS .........................................................- 60 -
4.5.1 System Mode................................................................ - 60 -
4.5.2 IPTV ............................................................................. - 62 -
4.5.3 Bandwidth Control ........................................................ - 66 -
4.5.4 Connection List............................................................. - 67 -
4.5.5 DDNS ........................................................................... - 67 -
4.5.6 Virtual Server................................................................ - 69 -
4.5.7 DMZ Host ..................................................................... - 72 -
4.5.8 UPNP ........................................................................... - 73 -
4.6 SECURITY ...............................................................................- 74 -
4.6.1 MAC Address Filter....................................................... - 75 -
4.6.2 CLIENT FILTER....................................................................- 77 -
4.6.3 URL Filter ..................................................................... - 80 -
4.6.4 Remote Web-based Management ................................ - 81 -
4.7 TOOLS ....................................................................................- 83 -
4.7.1 Logs ........................................................................... - 83 -
4.7.2 Time ........................................................................... - 84 -
4.7.3 Change Password/User Name ..................................... - 85 -
4.7.4 Backup....................................................................... - 88 -
4.7.5 Restore ...................................................................... - 89 -
-3 -

ADSL2/2+ Router
4.7.6 Firmware Upgrade........................................................ - 91 -
4.7.7 Restore to Factory Default Settings.............................. - 93 -
A PPENDIX 1.................................................................................- 94 -
1. CONFIG PC’S TCP/IP MANUALLY ................................................- 94 -
2. INITIATE A DIALUP ON PC.............................................................- 95 -
APPENDIX 2 .................................................................................- 99 -
1. TROUBLESHOOTING ...................................................................- 99 -
2. VERIFY CONNECTIVITY BETWEEN THE DEVICE AND YOUR PC.......- 100 -
3. FAQS...................................................................................- 102 -
APPENDIX 3 EMC STATEMENT ................................................- 106 -
CONTACT INFORMATION ...............................................................- 109 -
-4 -

ADSL2/2+ Router
Chapter 1 Product Overview
Note:
This user guide applies to Tenda wireless N ADSL2+
modem routers both W300D and W150D. W300D is used as an
example throughout this user guide for demonstration and explanation.
These two products differ in the following ascpects: the former is
equipped with 2 antennas and delivers up to 300Mbps wireless rate;
while the latter is equipped with 1 antenna and delivers up to 150Mbps
wireless rate. Functions and operations are subject to vary depending
on different software versions; please refer to the actual product you
purchase.
Thanks for purchasing this W300D/ W150D! It is an easy-to- install
g
ateway device with a user-friendly and most intuitive Web utility, letting
you config the device for Internet access in minutes. The product is an
all-in-one device that combines the function of an ADSL2+ Modem,
wireless router, wired router and switch, allowing you to connect to your
ISP using a telephone cable or an Ethernet cable. Based on 11n
technology while staying backward compatible with 11b/g devices, the
product offers a collection of advanced functionalities and features
including wireless security, IP/MAC filter guarding your network from
malicious attacks, IPTV that lets you enjoy videos on TV set while
surfing Internet, DHCP server that auto-configs your LAN PCs, virtual
server, DDNS that allows you to host web servers without worrying
about a changing IP address, remote web management that makes
managing the product anywhere from Internet a reality.
-5 -

ADSL2/2+ Router
1.1 Features
¾ Web based easy-to-install utility allows quick and simple settings
for Internet connection
¾ Complies with IEEE802.11b/g/n, IEEE802.3, IEEE802.3u, ADSL,
ADSL2, ADSL2+ standards etc
¾ Connect to Internet through DSL line or Ethernet cable
¾ Bridge, PPPoE, PPPoA, dynamic IP and static IP, Internet
connection types
¾ Combines the function of an ADSL2+ Modem, wireless router,
wired router and switch
¾ Up to 24Mbps ADSL downstream rate and up to 1Mbps upstream
rate
¾ Compatible with mainstream DSLAM equipments
¾ Up to 300Mbps wireless rate, 6x faster than a common 54Mbps
product
¾ WPA and the latest WPA2
¾ Auto-selects wireless channel
¾ FDM to enable telephoning, faxing and surfing activities to
proceed simultaneously without mutual interference
¾ Supports IPTV service
¾ Backup current settings to local hard drive for future use
¾ Setup wizard guides through the whole process of configuration
¾ Lightning proof design up to 6000 voltage
¾ Firewall to protect your network from malicious attacks
-6 -

ADSL2/2+ Router
1.2 Package Contents
Unpack the package and check the following items. If any of the listed
items below is missing or damaged, contact your Tenda reseller for
immediate replacement.
¾ Power Adapter
¾ ADSL Splitter
¾ Ethernet Cable
¾ Telephone Lines
¾ Quick Installation Guide
¾ CD-ROM
¾ Detachable antenna
-7 -

ADSL2/2+ Router
Chapter 2 Hardware Overview
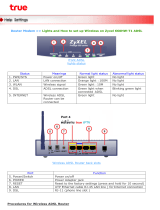
2.1 Front Panel
W300D’s Front Panel
9 LED indicators are located on the device’s front panel. They indicate
the device’s working status. Below table lists detailed description of
each such LED:
LED
Color Status Description
Always
On
Device is properly powered.
Power Green
OFF
Power adapter is improperly
connected to power outlet or
damaged.
-8 -

ADSL2/2+ Router
SYS Green Flashing Device functions normally
Flashing Transferring data
WLAN Green
OFF Wireless radio is deactivated
Slow
Flashing
A
ADSL connection is not
established
Fast
Flashing
ADSL connection is being
established
DSL Green
Always
On
connection has already been
established
OFF Unconnected
Flashing Transferring data
1/itv2
34/wan
Green
Always
On
Device has been connected to the
computer
OFF
Device has not been connected to
Internet
INTERN
ET
Green
Flashing
Device has been connected to
Internet
-9 -

ADSL2/2+ Router
2.1 Back Panel Overview
Back Panel Overview (W300D)
ON/OFF Power switch.
RESET: Pressing and holding it for over 8 seconds restores
factory default settings.
POWER: Power receptacal. Note that using a power adapter with
a different voltage rating than the one included with the device will
cause damage to the product.
LAN For connection to LAN hubs, switches or PCs. Note: If
IPTV is activated, LAN port 1 is used for connection to a set-top
box, allowing you to enjoy online videos on your TV set while
surfing Internet. In wireless router mode, LAN port 4 functions as a
WAN port for Internet connection.
DSL RJ11 port for telephone line
Follow the diagram below to connect your network devices if you
plan to use DSL uplink mode (namely, telephone line).
- 10 -

ADSL2/2+ Router
Follow the diagram below to connect your network devices if you
plan to use Ethernet uplink mode (namely, Ethernet cable).
-11 -

ADSL2/2+ Router
Chapter 3 Quick Setup for Internet Connection
You can log into the device web utility: either via a web browser or
Setup Wizard on the included CD-ROM.
Before configuring the device, you need to config your PC’s TCP/IP
settings.
3.1 Config TCP/IP Settings on PC
If you are using Windows 7, follow steps below to config your PC’s
TCP/IP settings:
a) Click the “Network” icon on your computer’s desktop, select
“Properties” and then click “Open Network and Sharing Center”.
b) Click “Change adapter settings” on the left side of the
window.
- 12 -

ADSL2/2+ Router
c) Right click “Local Area Connection” and select “Properties”.
d) Select” Internet Protocol Version 4(TCP/IPv4)"and then click
“Properties”.
-13-

ADSL2/2+ Router
e) Select “Obtain an IP address automatically” and “Obtain
DNS server address automatically”. Click “OK” to save the
configurations.
- 14 -

ADSL2/2+ Router
f) Click OK in the “Local Area Connection Properties” window.
Note: Certainly you can also config your PC’s TCP/IP manually. For
more info, refer to Appendix 1-1.
3.2 Logging on to Web Manager using the Setup Wizard
To access device web manager via the Setup Wizard, do as follows:
1. Insert the included CD-ROM into your PC’s drive.
2. If the CD does not run automatically, click to display
below screen and then follow on-screen instructions.
- 15 -

ADSL2/2+ Router
3.3 Logging on to Web Manager via Web Browser
Before accessing Web utility verify the connectivity between the device
and your computer. To do so, follow steps below:
1. Click the Start icon on the bottom left corner of your computer
desktop.
2. Input “cmd” in the “Search programs and files” box and press “Enter”.
- 16 -

ADSL2/2+ Router
3. Enter “ping 192.168.1.1”, and press Enter. If your screen
displays the following results, it indicates your computer has been
successfully connected to the device.
Now follow steps below to log on to device web-based utility:
1. Open the IE Browser as below.
2. Input
http://192.168.1.1 in the address field and press “Enter”.
3. You will come to the screen below:
- 17 -

ADSL2/2+ Router
Enter “admin” in both password and user name fields. You will
enter following screen:
- 18 -

ADSL2/2+ Router
Setup Internet Connection
We have just explained how to log on to the router above. And in this
section, it illustrates you how to setup your Internet connection quickly.
Now check whether you have the screen below, if not, please re-log on
to the device.
The device provides two access types: DSL Uplink (using telephone
line) and Ethernet Uplink (using Ethernet cable). If you are using
Ethernet Uplink for Internet access, please click on the “Advanced”
button for more settings and refer to Ethernet uplink configuration in
Chapter 4.
If you are using DSL Uplink, then you need to configure below
settings:
1. VPI/VCI settings
- 19 -

ADSL2/2+ Router
VPI/VCI values vary depending on different countries and area.
The device has integerated common VPI/VCI values of some countries
and areas. So you can just select your country and area, the VPI/VCI
values (if included) for that specific area in your country will be
populated automatically. However if you don’t find the VPI/VCI values
suiting you area or your ISP uses special VPI/VCI, consult your ISP and
then enter them manually.
2. Internet Connection Type
Internet Connection Type: PPPOE,IPOE,IPOA,PPPOA are
provided. Select one that suit yourself. Here in the example below we
use the PPPOE. For methods of configuring other types, refer to 4.3.2.
User name: Enter the user name provided by your ISP.
Password: Enter the password provided by your ISP.
Note: This information is given by an Internet service provider when you
subscribe the DSL service. If you are not sure of it, contact your service
provider for help.
- 20 -
Page is loading ...
Page is loading ...
Page is loading ...
Page is loading ...
Page is loading ...
Page is loading ...
Page is loading ...
Page is loading ...
Page is loading ...
Page is loading ...
Page is loading ...
Page is loading ...
Page is loading ...
Page is loading ...
Page is loading ...
Page is loading ...
Page is loading ...
Page is loading ...
Page is loading ...
Page is loading ...
Page is loading ...
Page is loading ...
Page is loading ...
Page is loading ...
Page is loading ...
Page is loading ...
Page is loading ...
Page is loading ...
Page is loading ...
Page is loading ...
Page is loading ...
Page is loading ...
Page is loading ...
Page is loading ...
Page is loading ...
Page is loading ...
Page is loading ...
Page is loading ...
Page is loading ...
Page is loading ...
Page is loading ...
Page is loading ...
Page is loading ...
Page is loading ...
Page is loading ...
Page is loading ...
Page is loading ...
Page is loading ...
Page is loading ...
Page is loading ...
Page is loading ...
Page is loading ...
Page is loading ...
Page is loading ...
Page is loading ...
Page is loading ...
Page is loading ...
Page is loading ...
Page is loading ...
Page is loading ...
Page is loading ...
Page is loading ...
Page is loading ...
Page is loading ...
Page is loading ...
Page is loading ...
Page is loading ...
Page is loading ...
Page is loading ...
Page is loading ...
Page is loading ...
Page is loading ...
Page is loading ...
Page is loading ...
Page is loading ...
Page is loading ...
Page is loading ...
Page is loading ...
Page is loading ...
Page is loading ...
Page is loading ...
Page is loading ...
Page is loading ...
Page is loading ...
Page is loading ...
Page is loading ...
Page is loading ...
Page is loading ...
Page is loading ...
/