Page is loading ...

INSTALLATION GUIDE
1135 Wireless Siren
Description
The Model 1135 Wireless Siren provides up to 110 decibels of annunciation and
comes with a wall and cover tamper, survey LED, and two batteries. Multiple
sirens can be activated simultaneously by the panel via the Trip with Panel Bell
feature.
Included Components
• One 1135 Wireless Siren
• Two 3.0V Lithium CR123A batteries
• Hardware pack and serial number labels
Programming the Siren in the Panel
Refer to the panel programming guide as needed. In Output Information, enter
an output number, output name, eight-digit serial number, supervision time,
and set the Trip with Panel Bell option to YES. Outputs operate with a 3 second
response time when used with the 1135.
Installing the Siren
Tamper Switches
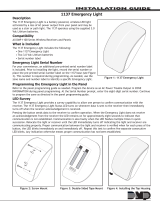
The 1135 is equipped with a case tamper and a wall tamper. See Figure 2. A two position header is provided to disable
the wall tamper. See Figure 3. To disable the wall tamper, place the jumper across the two pins of the header. Disable
the wall tamper if mounting using the supplied double-sided tape.
100/110 Decibel Jumper
The siren is equipped with a 100/110 decibel (dB) jumper and a two-position header to
change the decibel output. The siren is shipped at the 110 dB output level with the jumper
placed on one pin for storage. If the 100 dB setting is required, place the jumper over both
header pins. See Figure 3.
Selecting a Location
The 1135 siren's LED survey capability allows one person to conrm communication with the
receiver. The PCB Red Survey LED turns on brightly whenever data is sent to the receiver
then immediately turns off when the receiver acknowledgement is processed. See Figure 3.
Press the tamper switch to send data to the receiver to conrm operation. When the 1135
does not receive an acknowledgement from the receiver, the survey LED
remains on for 8 seconds to signal that communication is not established.
Communication is also faulty when the LED ashes brightly multiple times in
quick succession. Relocate the siren or receiver until the LED immediately
turns off when tampered. Proper communication between the siren and
receiver is veried when for each press or release of the tamper switch, the
LED blinks immediately on and immediately off.
Note: Mount the siren away from metal objects. Do not install the 1135
within 4 feet of the panel as the RF gain of the transmitter may inhibit proper
communication.
Mounting the Siren
1. Remove the locking screws from the top and bottom of the siren housing
and lift the cover from the bottom to remove.
2. Install the included two 3.0V Lithium CR123A batteries. See Figure 3.
3. Mount the 1135 on a at wall. Use the supplied screws in the mounting
hole locations shown in Figure 3, and insure the wall tamper makes
proper contact with the wall. Or, if using the supplied double-sided tape
to attach the siren to the wall, be sure to disable the wall tamper.
4. Set the cover back into place and replace the locking screws.
Siren Battery Power
When setting up a wireless system, it is recommended to program the siren's
output number in the panel and connect the receiver before installing the
siren's batteries. Battery life expectancy for the 1135 wireless siren is 3 years
when the siren is operated for ve minutes once a month.
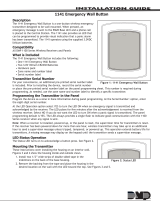
Figure 1: 1135 Wireless Siren
Figure 2: Wall Tamper
Wall Tamper
Mounting Holes
Mounting Holes
Red Survey LED
100/110 dB
Header
Wall Tamper
Header
Figure 3: Mounting Holes and
PCB Features

800-641-4282
INTRUSION • FIRE • ACCESS • NETWORKS
www.dmp.com 2500 North Partnership Boulevard
Designed, Engineered and
Manufactured in Springfield, Missouri
Springeld, Missouri 65803-8877
LT-1106 1.06 © 2016 Digital Monitoring Products, Inc.
16293
DMP wireless equipment uses two-way communication to extend battery life. To extend battery life further, operate
the siren infrequently and extend supervision time in panel programming. Multiple on/off siren operations and extreme
hot or cold environments will reduce battery life.
Observe polarity when installing the batteries. Use only 3.0V Lithium batteries, DMP Model CR123, or the equivalent
battery from a local retail outlet. For UL installations, only use #123 batteries manufactured by Energizer.
Replacing the Siren Batteries
1. Remove the locking screws from the top and bottom of the siren housing and lift the cover from the bottom to
remove.
2. Remove the old batteries and dispose of them properly. Always replace both batteries at the same time.
Caution: Do not recharge, disassemble, heat above 212°F (100°C), or incinerate the batteries. There is a risk
of re, explosion, and burns with improper disposal.
3. Place the two CR123 batteries in the holders and press into place. See Figure 3 for the battery locations.
4. Set the cover back into place and replace the locking screws.
FCC Information
This device complies with Part 15 of the FCC Rules. Operation is subject to the following two conditions:
(1) This device may not cause harmful interference, and
(2) this device must accept any interference received, including interference that may cause undesired operation.
The antenna used for this transmitter must be installed to provide a separation distance of at least 20 cm (7.874 in.) from all persons. It must not be
located or operated in conjunction with any other antenna or transmitter.
Changes or modications made by the user and not expressly approved by the party responsible for compliance could void the user’s authority to
operate the equipment.
Note: This equipment has been tested and found to comply with the limits for a Class B digital device, pursuant to part 15 of the FCC Rules. These
limits are designed to provide reasonable protection against harmful interference in a residential installation. This equipment generates, uses and
can radiate radio frequency energy and, if not installed and used in accordance with the instructions, may cause harmful interference to radio
communications. However, there is no guarantee that interference will not occur in a particular installation. If this equipment does cause harmful
interference to radio or television reception, which can be determined by turning the equipment off and on, the user is encouraged to try to correct
the interference by one or more of the following measures:
• Reorient or relocate the receiving antenna.
• Increase the separation between the equipment and receiver.
• Connect the equipment into an outlet on a circuit different from that to which the receiver is connected.
• Consult the dealer or an experienced radio/TV technician for help.
Industry Canada Information
This device complies with Industry Canada Licence-exempt RSS standard(s). Operation is subject to the following two conditions: (1) this device may
not cause interference, and (2) this device must accept any interference, including interference that may cause undesired operation of the device.
Le présent appareil est conforme aux CNR d’Industrie Canada applicables aux appareils radio exempts de licence. L’exploitation est autorisée
aux deux conditions suivantes : (1) l’appareil ne doit pas produire de brouillage, et (2) l’utilisateur de l’appareil doit accepter tout brouillage
radioélectrique subi, même si le brouillage est susceptible d’en compromettre le fonctionnement.
Listed Compliance Specications
Commercial Burglary - The wall tamper must be enabled for commercial burglary applications. Install only on non-conductive surfaces.
Household Fire - Supervision Time must be 3 minutes for re applications.
Specications
Battery
Life Expectancy 3 Years
Type 3.0V Lithium CR123A
See Siren Battery Power for full details.
Frequency Range 905-924 MHz
Decibel Level 110 dB at 3 ft.
Dimensions 4.5” L x 4.5” W x 1.25” H
Color White
Housing Material Flame retardant ABS
Accessories
CR123 3.0V Lithium Battery
Patents
U. S. Patent No. 7,239,236
Certications
FCC Part 15 CCKPC0123R8
Industry Canada 5251A-PC0123R8
ANSI/UL 1023 Household Burglar Alarm System Units
ANSI/UL 1610 Central Station Burglar Alarm Units
ANSI/UL 985 Household Fire Warning System
/