Page is loading ...

1
MX-LOCare
BR1
MobilMAX
USER MANUAL
Thank you for purchasing the MX-LOCare® BR1 Bracelet
GPS Locator and/or MX-Beacon1. This manual shows how
to operate the device correctly. Make sure to read this
manual carefully before using this product. Please note
that specification and information are subject to change
without prior notice. Any change will be integrated in the
latest release. The manufacturer assumes no responsibility
for any errors and omissions in this document.
The content of your package includes:

2
- 1. MX-LOCare® BR1
- 2. MX-PowerEXT®
- 3. MX-Beacon®
- 4. USB cable
- 5. Charger
- 6. Warranty cards (for MX-LOCare® BR1Bracelet and
MX-Beacon® each): Bracelet ID, Telephone number for
bracelet, beacon ID and beacon serial number.
- 7. SIM card has been pre-installed
- 8. MX-LOCare® BR1 Torx Screw driver

3
Contents
1.
GENERAL INFORMATION ...................................5
1.1 HARDWARE DESCRIPTION ..................................5
1.2 LED LIGHT DEFINITION.......................................7
2.
GETTING STARTED...........................................10
2.1 FUNCTIONS.....................................................10
2.2 BATTERY AND CHARGER...................................10
3.
STARTUP.........................................................12
4.
MX-CLOUD
®
SERVER AND WEB ........................13
4.1 Registration and Login ............................. 13
4.2 Locator Management............................... 15
4.3 MX-Beacon® Management...................... 19
4.4 Real-time Tracking ................................... 20
4.5 History .....................................................21
4.6 Cursers and icons ..................................... 23
4.7 Member Center .......................................24
5.
MX-LOCATE® APP ............................................26
5.1 Registration and Log In ............................ 26
5.2 Add New Locators.................................... 28
5.3 MX-Beacon® and System Configure......... 29
5.4 Overview of Locator................................. 31
5.5 History .....................................................36
6. HOW TO USE GPS LOCATOR DEVICE .................38
7.
SAFETY INFORMATION ....................................38


5
1. General Information
The Bracelet works on existing GSM/GPRS network and
satellites. This product can locate and monitor any wearer
by SMS or GPRS.
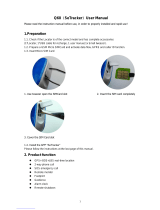
1.1 Hardware Description
Front Face Back Side
MX-LOCare® Locator Description
1. Link LED Light (Blue)
2. MXConn
®
connector
3. SOS/ON Button
4. Power LED Light (Red)
5. GPS LED Light (Green)
6. Back Cover (SIM Cover)
7. Proximity Sensor
8. PowerOff Button

6
MX-PowerEXT® Description
1. Hook structure (to connect to the locator)
2. LED indicators
3. USB Connector
4. MXConn
®
Connector
Power Button Definition
Function Description
1. SOS/ON
Button
- Power On: Press 3 seconds to Power On
the device (The LED light “Red”, “Green”
and “Blue” will flash sequentially twice)
- SOS: Under Power On status, hold down
the button 3 seconds, all three LED lights
will flash until the locator sends out the
SOS Warning.
(Please refer to section 4.1.1 or 5.1 to
register from a web browser or
MX-Locate® APP respectively.)
2. Power Off
Button
The PowerOff button is a hole located in
the back of the Bracelet. Insert a small
paperclip in the hole in order to power off

7
the locator
1.2 LED Light Definition
1.2.1 Locator LED
LED Light Status definition
1. Link LED Light
(Blue)
Link status:
- Network Linked: light “ON” for 2
seconds and shuts “OFF” in 10 seconds.
- SIM Card Error or GSM Network
Failed: light flashes 3 times and shuts
“OFF” in 2 seconds.
- Network Searching: light “ON” in 0.5
seconds and shuts “OFF” in 2 seconds.
- Data Network Failed: light flashes 2
times and shuts “OFF” in 2 seconds.
2. GPS/Beacon
LED Light
(Green)
GPS status:
- Searching GPS Satellites: light “ON” in
0.5 seconds and shuts “OFF” in 2
seconds.
- Beacon Search Succeed
: light flashes 3
times and shuts “OFF” in 2 seconds.
- Positioning Succeed: light will turn
“ON” in 5 seconds after positioning
success and will keep flashing for 2
seconds and then will shut “OFF” in 10
seconds.

8
3. Power LED
Light (Red)
Battery status:
- Low Battery: light turns “ON” for 2
seconds and then shuts “OFF” for 10
seconds
- Charging: light flashes every 1 second.
- Fully Charged: light shows “ON”.
1.2.2 MX-PowerEXT® LED
LED Light Status definition
1. Charge LED
Light (White)
USB connected:
- When the battery of MX-PowerEXT®
itself is NOT fully charged: the 4 white
LEDs will flash sequentially from right
to left.
- When the battery of MX-PowerEXT®
itself is full: all the 4 white LEDs will be
on constantly.
USB NOT connected:
- When MX-PowerEXT® is connected to
the MX-LOCare® Bracelet: light will be
“ON” constantly, NOT all the 4 white
LEDs are “ON” the same time. The
number of LED’s on will indicate the
battery level remaining in the
MX-PowerEXT®.
- When MX-PowerEXT® is NOT
connected to the MX-LOCare® Bracelet
:

9
4 white LEDs are “OFF".
2. Discharge
LED Light (Red)
When the MX-PowerEXT is Connected
to MX-LOCare® Bracelet:
- When the battery level of
MX-LOCare® Bracelet is Not fully
charged: the Red LED will be “ON”.
- When the battery level of
MX-LOCare® Bracelet is full: the Red
LED will be “OFF”
*Important - Please note that although
the Bracelet is IP-67 waterproof rated
the charging bank is not. At no time
should the MX-PowerEXT® be exposed
to any water or an
y liquid will void the
warranty.
When the MX-PowerEXT is NOT
connected to MX-LOCare® Bracelet:
the Red LED on the power pack will be
“OFF”

10
2. Getting started
2.1 Functions
Periodic reporting or real time tracking functions are
generated from web or MX-Locate® downloadable
APP.
Location and activity history is easily accessed and
stored to check past records.
SOS Button sends out an emergency signal.
Up to 10 inbound/outbound GeoFences. Can be in
forms of circle, rectangle and polygon.
Detach alert using light laser when detached from
user.
G-sensor alert for impact and fall incidents
Indoor location aware technology with the aid of
MX-Beacon®
Safe zone boundaries further defined with the aid of
MX-Beacon®
MX-PowerEXT® (800mAh) extends the standby mode
and recharges the Bracelet easily without taking it off
the wearer
IP-67 waterproof design
2.2 Battery and Charger
For initial use charge the MX-PowerEXT® and the Bracelet
for 2 hours. To charge
the Bracelet, use the
charger and
MX-PowerEXT® at the
same time. Plug in the
power cable to the
MX-PowerEXT® and

11
lock the MX-PowerEXT® to the Bracelet tightly and the
charging will start.
After the initial charge remove the MX-PowerEXT® from
the Bracelet. When the Bracelet power gets low, snap the
MX-PowerEXT® back onto the Bracelet to recharge. When
not using the MX-PowerEXT®, plug it into the charger to
keep it charged for next use. (Please note- additional
MX-PowerEXT® are sold separately if a spare charged unit
is required.)
Remember in low battery mode, the power LED light (Red)
will flash “ON” for 0.5 second and then “OFF” for 0.5
second intermittently until either a charge is connected or
the battery completely is depleted.
There is also a power safe feature which preserves enough
battery life to allow for an emergency connection if the
battery is in a critical state.
Important: Please use the MX-PowerEXT® and charger
provided by the manufacturer.
NOTE:
- The Li-ion battery contains harmful chemicals and may
burst. Avoid bumping or puncturing the battery and
keep it away from fire.
- Always charge the battery timely to keep it working
properly.


13
4. MX-Cloud
®
Server and Web
The MX-Cloud® server controls and records the actions of
the Bracelets. The server can be accessed by using a
computer, tablet, smartphone’s web browser or the
downloaded APP for Android or iOS Smartphones known
as MX-Locate®.
Use MX-Locate® as the interface to communicate with the
MX-Cloud® server. This will allow the user to control and
monitor the Bracelet(s).
The link to access and control the Bracelet is as follows:
http://MXLocate.mobilmax.com/
4.1 Registration and Login
4.1.1 Registration
The distributor/dealer you purchased your product from
will provide your login credentials and temporary
password.
4.1.2 Login
Validate your account
- Registration is now completed and verified.
- Check your email and click on the link in the “MX
Locate Confirmation email”.

14
Login
- Please fill in the User ID and password then press
“Login” button. Enter the Captcha Code.
- If the account is not verified, the message “This
account is not verified yet” will appear. Please go
to the email mailbox that was used to register the
Bracelet and verify it so it will appear. Please
press “Authentication again” to complete the
process.
Authentication again
- If you did not receive the confirmation email, click
on the Authentication Again” on the upper right
corner shown in below image.

15
Forgot Password
- Click on “Forgot Password?” and enter the user
name and email address to obtain a new
password.
- The password will be sent out to the email account
that was used to register the device. Please reset
the password and write it down.
4.2 Locator Management
To manage the Locator/Locators, please go to the “Locator
Management” page and fill in all the necessary relative
information as outlined below.
4.2.1 Set Up
To add or delete a Bracelet, or to discontinue services,
contact the dealer/distributor where the device was
initially purchased.
To modify the data settings of the Bracelet, go to the
“Locator Management” Setup page and if necessary,
choose the appropriate Bracelet from the list on the left
column of the dashboard. Please see below:

16
- To Change the portrait of the Bracelet, click on the
portrait of the Bracelet on the page, as in the red circle
in above figure, and choose a new image from a
computer file and replace it.
- For Tracking Mode, this section defines the frequency
of how often Bracelet is to report location:
High: reports every 30 minutes periodically
Regular: reports every 60 minutes
periodically
Warning only: reports only when warning
alert occurs.
- Fill in ALL the information and make sure you choose
what options you want and then press “Submit”. This
will then save the information to the Server.
- Four extra SMS (text message) numbers and emails are
used to inform additional caregivers when alerts occur.
- Once all of the setup information is submitted, the
words “Configuring On Going …” may be seen under
the portrait of the Bracelet. If the Bracelet stays on the
“Configuring On Going …” message, please check to
see that the Locator has been charged and has the
power light “ON”.

17
4.2.2 Geofence
Now it is time to create safe zone boundaries known as
Geofences. You can use different shapes and sizes such as
a rectangle, circle and/or polygon. The size and shape of
the Geofences can also can be rotated to be a better
conform to the specific geographic safe zone area needed.
Up to ten (10) Geofences can be set up and selected.
To set the Geofence settings, go to Locator page and click
on “Geofence”:
1) Press “location” in the popup box and input the
address for the Geofence. This will move the
map to the area where the Geofence will be
set.
2) Click on the map the shape and size of the
Geofence desired. Also select Alert Types,
Exiting and/or Entering when the Bracelet
crosses the safe zone boundary.
3) Choose Always On/Always Off/Period to start/stop
Geofence activity.
Please note - when leaving the GeoFence, the Bracelet will
send an alert to the caregiver/caregiver’s with the time
and location report. The system allows more than one
GeoFence active at the same time.

18
4.2.3 MX-Beacon®
This System allows the user to apply indoor location aware
notification beacons, known as the MX-Beacon®. These
devices are used for indoor locations or the creation of
other types of safe zones.
On the dashboard, please go to the page called Beacon
Management as indicated in the diagram below. In this
section the user will create/setup one or all the Beacons
required. These Beacons will be defined for each Locator.
Beacon Function
In Safe Beacon mode, the Bracelet will NOT report as it is
within the Safe Beacon zone.
In the Location mode, the Bracelet will report the location.
Please note that this will be the default option.

19
Reference the next section for more details and setting
up multi-Beacon safe zones.
4.3 MX-Beacon® Management
This section is used to allow the user to create a list of
Beacons that are desired to create a safe boundary for the
wearer/wearers of the Bracelet(s). The user can decide
to use his/her own MX-Beacon or connect to another
person’s MX- Beacon that would extend the safety areas.
Setting up multiple Beacons:
Please go to the MX-Beacon Management Tab of
dashboard. It will give a list of registered MX-Beacon’s
being used.
Press the “ ” icon to add a new Beacon.
Input the Beacon-ID, which is indicated on the product
label of the Beacon or on the box of that Beacon, and the
password, which is defaulted as 12345.
Give a nickname to the Beacon, such as “Living Room”, and
tell the system it’s your “Own Beacon”. We called it
“Own Beacon” if it is initial Beacon or an extra Beacon you
purchase from your distributor/dealer, otherwise
“Reference Beacon”.
To delete a Beacon. Check the appropriate Beacon from
the list and press the “ ” to delete that beacon.
If it is the user’s own beacon, click on the beacon and it’ll
pop up a window with map as following. The nickname or

20
address can be changed to define the location of that
Beacon. The cursor on the map can be moved to do the
same thing.
4.4 Real-time Tracking
On the dashboard, please go to “Real-time Tracking”.
If there are multiple Bracelets that are being monitored,
please select the Bracelt that the user wants to locate on
the left bar of the dashboard. The system will then
automatically display the latest location record of the
Bracelet.
The user can also click on the corresponding “Current
Location” button, as indicated in the red circle in the
/