Page is loading ...

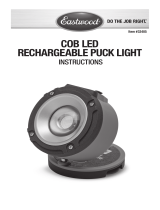
COB LED
RECHARGEABLE WORK LIGHT
INSTRUCTIONS
Item #32406

2 Eastwood Technical Assistance: 800.343.9353 >> techelp@eastwood.com
The EASTWOOD COB LED RECHARGEABLE WORKLIGHT utilizes the latest COB LED technology to
provide highly efficient, energy saving lighting. A three-position switch allows instant switching from
the high-intensity COB LED to the focused flashlight LED. A lightweight polymer housing with shock
resistant protection provides tactical level reliability. The convenient swiveling and pivoting, dual-mag-
netic mount design allows for maximum flexibility and the 120VAC or 12VDC, dual charging capability
offers go anywhere capability.
CONTENTS
(1) Eastwood COB LED Rechargeable Worklight and auxiliary integral
LED flashlight on an adjustable magnetic base and housing
(1) Wall Charger: 120V input, 9.0VDC, 500ma output wall charger
with 67” [1.7m] cord
(1) 12VDC Vehicle power port connection with 67” [1.7m] cord
SPECIFICATIONS
• 3.7 Volt, 2200mAh, Li-ion 18650 type Integral Rechargeable Battery
• 300 Lumens light output (High-Intensity COB LED), 60 Lumens light output (Flashlight)
• 2.5 hours working time (High-Intensity COB LED), 6 hours working time (Flashlight)
• 4 hour charge time
• Moisture resistant to IP-20 rating
FEATURES
• Three function Switch (FIG 1)
- Press once and release,
On: High-Intensity COB
LED Illumination
- Press again and release:
Flashlight Illumination
- Press again and release: Off
• Battery power display function:
RED flashing LED indicates low
battery
• Magnets at Base and Housing with
360° swiveling and 180° pivoting
adjustment (FIG 1)
• Retractable Hook in rear of Housing
FIG. 1
✓
Switch
✓
Battery
Indicator
360°
Rotation
180°
Rotation

To order parts and supplies: 800.343.9353 >> eastwood.com 3
LITHIUM BATTERIES STORE A LARGE AMOUNT OF ENERGY AND WILL ERUPT
IN FLAMES OR VIOLENTLY EXPLODE IF NOT PROPERLY HANDLED.
READ INSTRUCTIONS
• Thoroughly read and understand this manual before using.
• Save for future reference.
SERIOUS INJURY, FIRE & EXPLOSION HAZARD!
• Keep Dry. Do Not open unit, drop, short circuit, incinerate,
expose to temperatures greater than 140°F [60°C].
• Do Not charge or use if damaged.
• Do Not submerge lamp.
• Do Not operate in explosive atmospheres such as explosive vapors,
flammable liquids, gasses or dust.
• Not a toy. Keep out of the reach of children.
• Charge lamp only according to these instructions.
EYE INJURY HAZARD!
• DO NOT allow LED lamp to project directly into eyes.
Temporary blindness may occur.
DANGER indicates a hazardous situation which, if not avoided, will result in death or serious injury.
WARNING indicates a hazardous situation which, if not avoided, could result in death or serious injury.
CAUTION used with the safety alert symbol, indicates a hazardous situation which, if not avoided,
could result in minor or moderate injury.
NOTICE is used to address practices not related to personal injury.
SAFETY INFORMATION
The following explanations are displayed in this manual, on the labeling, and on all other information
provided with this product:

© Copyright 2018 Easthill Group, Inc. 7/18 Instruction item #32406Q Rev 1
If you have any questions about the use of this product, please contact
The Eastwood Technical Assistance Service Department: 800.343.9353 >> email: techelp@eastwood.com
PDF version of this manual is available at eastwood.com
The Eastwood Company 263 Shoemaker Road, Pottstown, PA 19464, USA 800.343.9353 eastwood.com
OPERATION
• Grip the lamp housing and rotate Magnetic Base through 360° in the vertical and
180° horizontally on the pivoting Base (FIG 1).
• Place the base or rear of housing against any ferrous metal surface for magnetic attachment.
• Release Retractable Swivel Hook to hang from overhead objects.
• Depress and release round Button located at front of Housing once for High-Intensity
COB LED Illumination and a 2nd time for the Flashlight (FIG 1).
• Depress Button once again to turn off.
Batteries will slowly discharge without use and must be charged every
3 months even if the light has not been used.
Do Not charge batteries in temperatures below 40°F [4.4°C].
CHARGING
• When the LED power indictor located at the
front of the Housing flashes RED, the battery
requires charging.
- Flip up rubber seal and plug the barrel
terminal of the included 120VAC Charger
cord or 12VDC power cord into the barrel
connection port at the rear of the
housing (FIG 2).
- Plug the 120VAC Charger cord into a
120VAC wall outlet or the 12VDC Connector
into a vehicle 12 power port.
- Plug wall unit into properly grounded 120 VAC, 60 Hz. outlet
- Allow 4 hours for full charge.
- The indicator LED at the front of the Housing will illuminate RED while charging then
change to GREEN indicating full charge (FIG 1).
- Close Charging Port Cover to maintain IP-20 rating.
FIG. 2
/


