MULTIPLEX FB081AF Operating instructions

Category
Ice cube makers
Type
Operating instructions

MULTIPLEX FB081AF is a professional-grade beverage dispenser designed to provide a wide range of blended and frozen drinks. With its advanced features and user-friendly interface, it's an ideal choice for businesses looking to expand their beverage offerings. Create delicious smoothies, shakes, and frozen cocktails with ease using the intuitive touchscreen controls. The FB081AF boasts a compact design, making it suitable for even the most space-constrained environments. Its efficient operation and easy maintenance ensure a smooth and profitable beverage service.

MULTIPLEX FB081AF is a professional-grade beverage dispenser designed to provide a wide range of blended and frozen drinks. With its advanced features and user-friendly interface, it's an ideal choice for businesses looking to expand their beverage offerings. Create delicious smoothies, shakes, and frozen cocktails with ease using the intuitive touchscreen controls. The FB081AF boasts a compact design, making it suitable for even the most space-constrained environments. Its efficient operation and easy maintenance ensure a smooth and profitable beverage service.

Instruction Sheet Subject: FreshBlender Annual Planned Maintenance
SCOPE: 7-11 AUSTRALIA - FB081AF & FB081AP
1 of 14
Document Number: 020009182 June 15, 2022
MULTIPLEX
645 PARK EAST BLVD SUITE 5, NEW ALBANY, IN 47150
FRESH BLENDS AUSTRALIA CONTACT NUMBER: 0460-430-392
WWW.MULTIPLEXBEVERAGE.COM
Refreshing the Experience
Important
Only a qualified service technician must perform
service of this equipment. This includes all instructions
and procedures in this document.
Overview
Time: 3-4 Hours
Wash & sanitise your hands regularly, wear gloves at
all times.
All left and right references are based from standing
in front of the FreshBlender.
This program is based on a unit that has been well
maintained and has been cleaned as outlined in
Welbilt Literature and FreshBlender Manual.
Total technician time is calculated assuming the aid of
store personnel as needed.
All used PM parts removed from the unit need to be
left with the Store Manager.
This is not a troubleshooting visit. Any repairs to
be done to unit are at additional costs and are not
calculated in this PM Program. If any additional
problems exist that need to be resolved, a follow up
visit should be scheduled.
TOOLS REQUIRED
Universal Screwdriver
Cut Resistant Gloves
Disposable Gloves
O-ring Pick
Oetiker Pliers (00681815)
Digital Scale (Capable of weighing in ounces)
Step Ladder*
FreshBlender Ice Dump Chute* (020007989)
Door Key* (WBL-95-136)
Food Grade O-ring Grease
Sanitiser, Shaker Jug & Sanitiser Solution Spray Bottle*
Cleaning Hose*
Clean & Sanitised Towels/Cloths*
2 - 5 Gal (18 liter) Buckets*
Cleaning Cup*
Insulation Tape
Various Flexible Bottle Brushes to Clean out all Drains
* These items provided at store location
PARTS REQUIRED
020008349 Drain Cleaner
000006036 Manitowoc Ice Maker Descaler
020009161 PM Parts Kit (contents listed below):
QTY Description Part Number
2 O-Rings (Waterline & CIP Hose) MCP00262
1 Front Door Clear Blender Cover WBL-33-064-FRU
4 Dispense Head Screws WBL-99-097
1 Blender Shaft Bushing O-ring 3235170
1 Ice Evaporator Orange O-ring 000008940
1 Instruction 020009182
SUGGESTED PARTS
These parts may be required in addition to the above parts.
Use the PM Checklist to survey. With store approval, the parts
should be changed and charged separately to the store.
QTY Description Part Number
1 Blender Shaft 020008753
2 Sanitation Fitting Latch WBL-94-050
2 Sanitation Fittings WBL-33-065-FRU
1 Shuttle Assembly WBL-33-014-FRU
1 Door Lock Support WBL-94-026
1 Door Lock Cover WBL-94-027
1 Shuttle Rail WBL-92-203
1 Water Pressure Regulator 3547784
1 Dispense Head Assembly WBL-33-050-FRU
2Solenoid Valve White 020007658
2Solenoid Valve Black 020007655
2Solenoid Valve Brown 020007656
2Solenoid Valve Green 020007657
1 LMS Valve Kit (12 pcs) WBL-96-107-FRU
1Dump Valve WBL-97-031
1 Duck Bills (pack of 16) WBL-96-060B-FRU
1 Refrigerator Door Gasket WBL-95-013
Important
Contact Fresh Blends Australia: 0460-430-392 if you
have any questions or concerns.
SUPPLEMENTAL DOCUMENTATION & VIDEOS
Additional FreshBlender documentation and videos can be
found on-line at multiplexbeverage.com
2 of 14
Document Number: 020009182 June 15, 2022
Subject: FreshBlender Annual Planned Maintenance
OBSERVE UNIT & FUNCTION
Note any known performance or damage issues before beginning
Planned Maintenance (PM). Most damaged parts can be replaced
while Zone 4 Descale is being performed. Take pictures before
and after cleaning:
Picture of unit in location
Inspect dispense head
Clear Splash Shield & Shuttle
Scale/product build up
Condenser Filter at rear of unit
(“See AIR FILTER” on page 4)
Drain at the front, side and rear of machine.
Tundish at the rear of unit
Verify the evaporator (center rear) drain isn’t blocked
Check product dispense area silicone seals.
Blender cup cover/EcoBlend holder for cleanliness
Any other photos that show issues with the unit’s
appearance and operation.
1. Check for leaks.
A. Remove Left & Right side panel and check for
leaks. Specifically, the water inlet in the back to
the regulator, lines to the float, and CIP pump
connection to the manifold.
NOTE: Top front door needs to be halfway open for RIGHT
side panel to be removed.
B. Verify 35psi during water flow on the regulator,
adjust as needed. See “WATER REGULATOR” on
page 8.
2. Check all output functions.
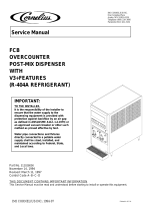
A. Access the SERVICE MENU, from start screen, touch
the three corners in the order shown to access the
password screen. Enter the password for SERVICE
MENU then press ENTER.
1 2
3
NOTE: If the TOUCH TO START or OUT OF SERVICE screen
is not currently displaying on the machine you must first
enter a Flavor Selection screen then double tap the BACK
button to bring the TOUCH TO START screen back up.
A. Go to Service Outputs, choose Dispense & Blend.
Then operate each output one at a time noting any
failures. Be sure to have a cup in the dispense area
when operating product motors. Note any spray
nozzles valves or motors not operating properly.
B. Using the screen controls, move the shuttle
between dispense and blend, note of it’s properly
aligned at each position. Inspect the shuttle rail
and calibrate the shuttle if needed.
C. Using the screen controls, move the blender up &
down. With the door closed turn on the blender
blade rinse and operate the blender blade.
D. Go to Service Outputs> Cleaning and operate the
Water Inlet, CIP Pump, Ice maker Water, Ice maker
Dump Valve, and all CIP Valves 1-8. Place a cup
in the dispense area when testing the CIP valves.
While dispensing with the CIP valves observe the
function of the dispense head.“See DISPENSE
HEAD” on page 7
NOTE: If the dump valve won’t open to empty water from the
float it will need to be manually drained with the water line
disconnected and then cleaned or replaced. Zone 2 & 4 cleaning
cannot be performed until all valves operate correctly. “See
WATER VALVE OPERATION” on page 8.
E. Run Ice Maker Dump Valve or Water Dispense in
Service mode to check and set water pressure while
water is running or dispensing.
F. Replace any failed valve, disconnect water (turn off)
and dump out all water, then shutdown to change
any valves. If the dispense head, sanitation fitting,
shuttle, blender, or stepper motor needs changing, it
can wait till the Zone 4 Descale is being performed.
See “SANITATION FITTINGS” on page 5.
G. Inspect main drain line on right hand side then
remove and clean out in 3 basin sink at store.
“See Drain Inspection” on page 4
H. Pull machine out if not already, place bucket under
drain, and inspect the middle evaporator drain. Make
sure its not pinched or clogged, if so correct before
pushing back into place over store/floor drain.
I. Replace O-rings. See “O-RING REPLACEMENT.” on
page 4.
J. Inspect product bins and condition. See “PRODUCT
BINS” on page 5.
3. Update PM Checklist Inspection Form.
A. Make notes on checklist of anything observed to
this point.
4. Identify software versions
A. Press SUBSYSTEM VERSION INFO button & note
software versions on checklist.
B. Run any updates if needed prior to Zone 4 or 2 cleaning.
3 of 14
Document Number: 020009182 June 15, 2022
Subject: FreshBlender Annual Planned Maintenance
5. Manually flush product lines
A. Once all valves are working, manually flush all
beverage lines in the Outputs> Cleaning screen with
the CIP valves until only water is being dispensed.
6. Perform Zone 4 Ice maker Descale/Sanitise.
DESCALE & SANITISE ICE MAKER COMPONENTS
A. Follow the steps for manually descaling the ice
maker components. See Page 9
B. Access the SERVICE MENU then press CLEANING
INSTRUCTIONS.
C. Press START CLEANING button under ICE DESCALE.
NOTE: Follow on screen instructions for descaling and sanitizing.
D. Make notes on PM Checklist. If machine has heavy
scale build up? See “Water Filtration” on page 8.
E. Zone 4 Descale should take 50 minutes or less
to complete.
NOTE: Ice maker will make ice for 30 minutes before
returning to Drink Menu.
F. While Descale is being performed, replace any
dispense head, sanitation fitting, shuttle, blender,
stepper motor or other water component now. See Pg
5, Pg 6, & Pg 7 for details.
G. Use some of the supplied descaler and/or Lime-
a-way/CLR to remove any scale from the dispense
area, rinse nozzles, blender and any black plastic
parts that it may appear.
H. Change out refrigerator cabinet door seal if
required. “See DOOR GASKET REPLACEMENT” on
page 5
7. Check Blender Motor and Blender Assembly.
(See “BLENDER CUP COVER / ECO BLEND ASSEMBLY”
on page 5. & See “BLENDER SHAFT” on page 6.)
8. Perform Zone 2 Weekly Cleaning.
A. Access SERVICE MENU.
B. Press CLEANING INSTRUCTIONS.
C. Press START CLEANING button under WEEKLY
CLEANING.
D. Follow on screen instructions.
E. Check Shuttle, Shuttle Rail & Clear Splash Shield.
See “SHUTTLE, RAIL & Clear SPLASH SHIELD” on
page 7.
NOTE: Follow directions on drain cleaner and use when
instructed during Weekly Cleaning process.
CONFIRM OPERATION
1. Unit should look like it has been professionally cleaned.
2. Inspect unit for water leaks in upper area and in
refrigerated cabinet around sanitation fittings.
3. After PM is finished, put unit back into operation.
A. Replace both side panels.
B. Close and lock door.
C. Push unit back into place.
D. Confirm drain line is connected to drain.
E. Press BACK or LOGOUT on screen to return to Drink
Menu if needed.
4. Make a blended drink (smoothie or shake) to confirm
operation.
5. Check drink to make sure it is blended correctly and all
levels are correct.
6. Perform Ice, Water and/or Product calibration as
necessary. (See FreshBlender Calibration video on line
at multiplexbeverage.com)
PM CHECKLIST & CLAIMS
1. Fill out all areas of the PM Checklist.
2. Give copy of PM CHECKLIST store manager if parts/
labor was done outside the base PM scope.
3. Completed checklist MUST be emailed to Fresh Blends
Australia (FBA) at the following address:
FURTHER ACTIONS
Contact Fresh Blends Australia: 0460-430-392 if you have
any questions or concerns.
4 of 14
Document Number: 020009182 June 15, 2022
Subject: FreshBlender Annual Planned Maintenance
DRAIN INSPECTION
1. Inside right side of unit locate drain line.
2. Inspect drain line for obstructions, collapse or pinch.
3. Remove clamp and take drain line to 3 compartment
sink to clean and sanitise. Use flexible bottle brush to
remove buildup and debris.
4. Reinstall drain line.
5. If drain line found deficient, advise store manager and
provide quote for replacement.
NOTE: Liquid drain cleaner will be used at end of weekly
cleaning towards end of this PM.
6. Turn OFF power to the unit.
7. Remove fridge compartment evaporator cover and
inspect drain pan under evaporator for excess water
and or ice build-up. Make note if ice build-up and or
drain is blocked in report. Verify Cabinet Set Point is set
to 36°C (2°F), adjust if needed.
8. Blow out or use a wet vacuum cleaner to clean the
refrigeration cabinet evaporator drain from the inside/
outside and clean the refrigeration cabinet evaporator
drain from the inside evaporator area and flush with
warm water until clear and clean.
9. Reinstall evaporator cover.
10. Turn Power back ON to the unit.
11. Check position of rear drain lines and adjust if needed.
12. Verify no kinks in drain lines inside and out of the
refrigerated cabinet.
13. Clean drain pan and drain areas at rear of unit.
14. Tape two (2) tubing entry points into refrigeration
cabinet with insulation tape if needed.
AIR FILTER
1. Locate and remove air filter from rear of unit.
IMPORTANT!
Take note of the airflow
arrows on the side
of the filter when re-
installing
2. Take to 3-compartment sink to wash and rinse to
remove any built-up dust and debris.
Inspect for damage. If damaged, advise store manager and
quote replacement.
ORING REPLACEMENT.
CIP HOSE
1. Locate Clean in Place (CIP) hose.
O-ring
Mesh Filter CIP Hose
2. Using an O-ring pick tool, remove the black O-ring from
the tip of the male quick connect fitting and replace
with new one provided in PM Parts Kit.
NOTE: Use food grade o-ring lubricant on new o-ring.
3. Visually inspect the CIP Hose for cuts or leaks.
4. Visually inspect Mesh Filter on CIP Hose for damage.
5. If either are found deficient, advise store manager and
quote replacement.
5 of 14
Document Number: 020009182 June 15, 2022
Subject: FreshBlender Annual Planned Maintenance
DOOR GASKET REPLACEMENT
1. Inspect door gasket and replace if required.
2. Warm the new door gasket in a sink of hot water. This
ensures conformity to the door and frame.
3. Pull/peel the existing gasket out of the door channel.
Be sure to remove all the gasket.
4. Clean the channel in the door by wiping it down with
cleaner/sanitizer.
5. Press the new gasket, if required, into place.
6. Ensure that when the door closes the gasket seals
completely.
SANITATION FITTINGS
1. Inspect the eight (8) Sanitation Fittings and
corresponding lines in and out for any discoloration or
signs of product build up. Symptoms and problems to
look for:
A. Constant dripping of water from sanitation fitting
when there is not a product bag pump connected.
B. Product line is not purged of product during
rinsing, cleaning, or sanitizing the line during
weekly cleaning.
C. Product back flows out of sanitation fitting when
product bag pump is removed.
D. Product leaks out of product bag pump elbow when
motor runs and little to no product dispenses.
2. If there is buildup in Sanitation Fittings inform Store
Manager. Machine has not been maintained correctly.
3. If parts found deficient, advise store manager and
provide quote for replacement.
PRODUCT BINS
1. Verify the lower refrigeration cabinet has all eight (8)
Product Bins in place.
2. Inspect the bins for cracks or other damage.
3. Make sure the bins slide IN/OUT of the lower
refrigerations cabinet properly.
If bins are found deficient or missing, advise store manager
and quote replacement.
BLENDER CUP COVER / ECO BLEND ASSEMBLY
1. Lift cup cover up and take pictures of area underneath
cup cover. Lower cup cover and take pictures of rear side.
2. Point out this area to store manager.
3. Clean and sanitise blender cup cover assembly.
6 of 14
Document Number: 020009182 June 15, 2022
Subject: FreshBlender Annual Planned Maintenance
BLENDER SHAFT
1. Is there erratic blending (drink turns for a bit then stops
and starts again)?
Does the unit not blend? You should see the drink in
the cup rapidly turning like a tornado.
Do you hear a rattle or see the blades dip below
the housing?
Is there abnormally loud noise from the blender
module during blend?
Does the blender properly submerge in cup during
blending?
Are the drinks blended completely or are large ice
chunks left in the drink?
,CAUTION
BE CAREFUL WITH BENDER SHAFT, BLADES ARE SHARP!
Important
Do not use tools on blender shaft.
1. Make sure unit is powered OFF.
2. Remove Blender Shaft.
A. Push the blender cup cover all the way up by
reaching into the chamber, carefully raising the
blender cup cover and lifting upward.
B. With cup cover in this position grasp the bottom of the
blender shaft and rotate the blender shaft assembly to
the right. Rotate Blender Shaft until it disengages from
the motor. It is left hand threaded. This may take time
to completely unscrew from the motor.
C. Once free from the motor, tilt and remove through
the blender chamber door opening.
3. Visually inspect Blender Shaft by these steps:
A. Turn the blades in the bell housing by twisting the
orange end of the shaft.
Can you turn the blades?
Are the blades seized and/or not turning at all?
Does the rubber seal in the bell housing appear
pushed out and/or pushing out grease?
B. Turn the shaft upside down, does it leak any
product/fluid?
C. Shake the blender shaft. Does it rattle at all?
4. If Blender Shaft found deficient, advise store manager
and provide quote for replacement.
5. Remove blend chamber bushing and replace O-ring.
Clean and sanitise area around bushing.
NOTE: Use food grade o-ring lubricant on new o-ring.
6. Check the 3 x cup cover guide rods are tight and not
loose from the top with a small crescent (shifter) as this
will cause vibration when blending a drink.
7. Check the 3 x cup cover guide rod springs are all
connected and functioning.
8. Install Blender Shaft.
A. Shafts thread to the left into the bottom of the
motor. Use caution not to cross thread. Do not use
tools on blender shaft.
Right side view of
blender shaft inserting
into blender motor
with side panel
removed.
9. Power unit ON.
10. Record the number of Blend Cycles on PM Checklist.
A. Access the SERVICE MENU. See Page 2
B. Press USAGE STATS.
C. Scroll down to BLENDER CYCLES.
11. Check that the linear actuator range up and down
movement properly submerges the blender into a cup
during blend.
12. If drinks are not being blended completely and it is
leaving ice chunks in drinks:
A. Check drink fill levels
B. Check product bags
C. Check calibration
D. Check alignment of blender in empty cup when it
is in the down position to make sure it is located in
the center if the cup. Adjust assembly if required
NOTE: It is recommended to change Blender Shaft above
18,000 cycle counts. If this does not resolve drinks not
blending, there is likely a blender motor issue. Contact Technical
Support for assistance.
7 of 14
Document Number: 020009182 June 15, 2022
Subject: FreshBlender Annual Planned Maintenance
DISPENSE HEAD
1. Locate dispense assembly.
2. Place an empty cup in the dispense area.
3. Access SERVICE MENU. See Page 2.
4. Press SERVICE OUTPUTS then press DISPENSE & BLEND.
5. Select one Product Motor at a time and then press GO at
bottom of screen.
6. Observe each product as it dispenses. Test all motors.
7. While unit door is open, visually inspect the valves
A. If valves are dirty, take proper actions to clean and
sanitise them. Do NOT use sharp objects to poke or
scrub valves. Wrap a paper towel around end of finger
to gently clean.
B. If valves show signs of damage or if dispense issues
cannot be resolved by cleaning, advise store manager
and quote replacement of Dispense Head Assembly or
LMS Valves.
8. Remove 4 screws from dispense assembly and lower
down to access.
9. Clean top of dispense area and dispense assembly with
small cleaning brush to remove debris and build up.
Wipe down area with sanitised cloth
NOTE: DO NOT use sharp objects to poke or scrub valves.
10. Re-install Dispense Head and use 4 x new screws
supplied in the PM Kit to put back into position.
SHUTTLE, RAIL & CLEAR SPLASH SHIELD
1. Visually inspect shuttle to determine if feet on bottom
look worn. Make sure all 5 magnets are intact on
bottom of shuttle.
NOTE: If parts found deficient, advise store manager and
provide quote for replacement.
2. Visually inspect rail for wear or damage.
3. Replace Clear Blender Splash Shield.
A. With upper door open, push in clip and push clear
blender splash shield outward.
4. Install new Clear Splash Shield included in PM Parts Kit.
5. If the Shuttle and/or Rail show any damage or wear
that hinders operation, advise store manager and
quote replacement.
6. Access SERVICE MENU.
7. Press CALIBRATION.
8. Press Shuttle Calibration. Follow on screen instructions.
8 of 14
Document Number: 020009182 June 15, 2022
Subject: FreshBlender Annual Planned Maintenance
WATER REGULATOR
1. Verify Water Regulator is working properly by making
sure it is at 35 psi under flow.
Left side view
with side panel
removed.
2. Dispense water.
A. Access the SERVICE MENU then press SERVICE
OUTPUTS the DISPENSE & BLEND. Toggle WATER
DISPENSE ON/OFF.
3. Adjust regulator, while dispensing water, to 35 psi if
necessary.
WATER FILTRATION
1. If there are signs of excessive scale, trace water line and
confirm it is connected to stores water filtration system.
2. Note findings on PM Checklist.
WATER VALVE OPERATION
NOTE: Make sure there is a product bag or pump in place at
each product slot in the refrigeration cabinet or water will
flood the cabinet when operating the CIP Valve outputs.
1. Access the SERVICE MENU. See Page 2.
2. Select SERVICE OUTPUTS then CLEANING.
3. Toggle “ON/OFF” each solenoid output one at a time
and observe function.
4. If any solenoid fails to OPEN/CLOSE properly, advise
store manager and quote replacement.
Left side view
with side panel
removed.
5. To Locate and Replace any failed solenoid(s):
A. Disconnect incoming water line.
B. Drain water from the system by toggling the Ice
Maker Dump Valve to ON in the Outputs Screen
then power down the unit.
C. The top block contains 7 valves, only 6 are
currently used. From top to bottom:
M6-S1 = White NO Water Inlet
M6-S2 = Black NC Not Used
M6-S3 = Black NC Blender Rinse
M6-S4 = Black NC Water Dispense
M6-S5 = Black NC Shaft Rinse
M6-S6 = Green NC Dispense Rinse
M6-S7 = Brown NO Ice Maker Water
D. The bottom block contains 8 valves for Clean In
Place (CIP) From top to bottom:
M8-S1 = Black NC Line 1 Rinse
M8-S2 = Black NC Line 2 Rinse
M8-S3 = Black NC Line 3 Rinse
M8-S4 = Black NC Line 4 Rinse
M8-S5 = Black NC Line 5 Rinse
M8-S6 = Black NC Line 6 Rinse
M8-S7 = Black NC Line 7 Rinse
M8-S8 = Black NC Line 8 Rinse
9 of 14
Document Number: 020009182 June 15, 2022
Subject: FreshBlender Annual Planned Maintenance
MANUAL DESCALING OF ICE MAKER COMPONENTS
1. Evacuate all water from the reservoir and evaporator by
entering the Service screen> Service Outputs> Cleaning
and toggling the Ice Maker Dump Valve ON until all water
has been emptied from the system then toggle OFF.
2. With water supply still connected and turned ON, fill and
dump the reservoir through the screen 4 times and evacuate
any ice from the bin using the ice dump chute and ice dump
cycle in the menu. This option is found in the Service Home,
Service Outputs, Dispense & Blend screen.
3. Turn Off or Isolate Water supply to the machine and then
complete one more Ice Maker Dump Valve ON until all
water has been emptied from the system then toggle OFF.
4. Mix approved Manitowoc Ice Descaling Solution and
Sanitiser to the correct ratio for descaling and sanitizing
ice maker parts.
DESCALER
Amount of Luke Warm
Water
Amount of Descaler
5 gallons (20 Liters) Manitowoc Metal Safe part number
000006036 use 16oz/5 gal
(473ml/19L)
SANITISER
Amount of Luke Warm
Water
Amount of Sanitiser
5 gallons (20 Liters)
(10 gallons (40 Liters)
may be needed to full
submerse removed parts)
Approved QUAT (Quaternary
Ammonium) sanitiser solution
providing 300 ppm minimum such
as clean quick® mixed 1.5 oz per 5
gallons or Solution that provides
100 ppm available Chlorine
minimum, consult manufacturer’s
instructions for ratio or 1/4 ounce
(15 ml) household bleach per
gallon.
5. Fill Spray bottle with portion of sanitiser solution from
the bucket. Set aside for later use.
6. Set the power rocker switch on the top right of the unit
to the OFF position, disconnect power.
7. Remove top cover from the water reservoir by pulling it up
and off.
8. Spray and wipe down the reservoir , float assembly, float switch
assembly and lid inside and out with sanitizing solution.
9. Using a clean pitcher/cup fill reservoir with sanitizing solution
from the bucket. Remainder of solution will be used for
manual sanitizing of other parts.
10. Remove ice dispense motor assembly from the top of the
bin by removing six (6) thumbscrews, four (4) on the top
cross member and two (2) that secure it to the bin lid.
11. Loosen the two (2) floating nuts on the clear ice chute
cover and remove the clear ice chute cover.
12. Using a clean pitcher/cup pour the sanitiser solution into
the top of the evaporator unit full, any excess will exit
through the overflow tube in the reservoir.
NOTE: Once the evaporator is full fill the pitcher/cups one more
time and set aside for later use.
10 of 14
Document Number: 020009182 June 15, 2022
Subject: FreshBlender Annual Planned Maintenance
13. Remove the ice wiper nut, strainer, ice damper flap, and
set aside.
14. Loosen the large wing clamp that secures the ice chute
to the evaporator.
15. Pull the ice chute up and out of the ice bin lid.
NOTE: The chute can be rotated to the side and does not
need to be completely removed.
16. Remove ice bin cover and auger dispense assembly
including the dispense wheel at the bottom, then
remove any remaining ice in the bin manually.
17. Wipe away any visible debris and soak the following parts
in descaler then sanitiser solution for 10 minutes each;
nWarning
If descale solution is left on these parts too long,
they will rust.
Auger (make sure each end is submersed)
Dispense Wheel & Housing
Ice Wiper Nut
Strainer
Ice damper flap
18. With a bottle brush, clean the ice nozzle at bottom of
ice bin with sanitiser solution, rinse and wipe dry.
19. Clean the Ice Bin Drain out with a long flexible bottle
brush to clean any debris build up. Flush drain out with
warm water to make sure all debris has been removed.
20. Thoroughly spray the inside walls and floor of the ice
bin down with sanitiser solution spray bottle, then wipe
down so no sanitiser is left visibly wet in the bin.
21. Spray and wipe down the ice bin lid inside and out,
making sure to thoroughly sanitise the ice chute opening.
22. Spray and wipe down the ice chute and clear cover
that was moved in step 15 inside and out with sanitiser
solution, making sure to thoroughly sanitise the each end
of the ice chute.
23. Remove the soaking parts from sanitizing solution,
spray with sanitiser solution and wipe them down.
11 of 14
Document Number: 020009182 June 15, 2022
Subject: FreshBlender Annual Planned Maintenance
24. Replace all cleaned parts in their correct positions:
Assembled Dispense Wheel & Housing
Important
Make sure FRONT Arrow on housing is pointing to
the front of the unit or ice will not dispense when
reassembled.
Auger
Bin Cover
Motor and six (6) thumbscrews
Important
Make sure the motor mates up with the auger
shaft or the thumbscrews will not align and ice
will not dispense when reassembled.
25. Sanitise new Ice Evaporator Orange O-ring and install
onto the top of the evaporator. Lubricate with Food
Grade O-ring Grease.
26. Reassemble the ice chute by placing it back into the
bin lid opening, pushing it back on to the top of the
evaporator and tightening the large wing clamp
loosened in step 14.
27. Put ice damper flap and the ice chute strainer back into
place, then tighten the ice wiper nut down on to the
top of the evaporator.
28. Spray and wipe down the ice chute assembly with
sanitiser solution.
29. Secure the clear ice chute cover on to the ice chute,
removed in step 11, with the two (2) floating cover nuts.
30. Plug unit back into power source and power ON the unit
by moving the power rocker switch to the ON position.
12 of 14
Document Number: 020009182 June 15, 2022
Subject: FreshBlender Annual Planned Maintenance
Planned Maintenance Checklist for Multiplex FreshBlenders
All claims for service MUST be submitted online MultiplexBeverage.com CPS (Claims Processing System): www.multiplexbeverage.com/Service/Warranty#Claims-Processing-System
Completed checklist MUST be emailed to rise.callc[email protected] AND attached to Multiplex CPS claim.
Customer: Contact Name: Phone:
Address: City: ST: Zip:
Date: Model #: Serial #: ASA:
Circle one: 6-Month Annual
Note any known service or performance issues before beginning Planned Maintenance (PM).
FAS to inspect and provide quote to customer for additional parts & labor to address deficiencies identified during PM
(excluding PM parts). If parts replaced, provide information on parts below and charge customer.
Qty
Part Number
Description
Replaced
Yes/No
Comments
Technician Signature
Store Manager Print
Store Manager Signature
13 of 14
Document Number: 020009182 June 15, 2022
Subject: FreshBlender Annual Planned Maintenance
Planned Maintenance Checklist for Multiplex FreshBlenders
All claims for service MUST be submitted online MultiplexBeverage.com CPS (Claims Processing System): www.multiplexbeverage.com/Service/Warranty#Claims-Processing-System
Completed checklist MUST be emailed to rise.callc[email protected] AND attached to Multiplex CPS claim.
All required parts are to be on-hand with technician during PM. As the PM Activities are completed, fill out the
"Complete" column. Note additional comments in the "Comments" section. Signatures are required on all pages.
PM Activities
Additional Detail
Complete
Yes/No
Comments
Operation
Make drink & observe functions.
Software
Check software & note current versions in table below.
Door Key & Lock
Inspect Door Lock Cover & locate Door Key. If lost or
damaged, advise customer & quote replacement.
Drain Line Clean
Physically remove drain line, clean & sanitize, and reinstall.
Air Filter and Door
Inspect & wash air filter. If found deficient, advise
customer & quote replacement.
O-Ring
Replace O-Ring on incoming water line & CIP Hose per PM
instructions. Inspect CIP Hose & Mesh Filter. If found
deficient, advise customer & quote replacement.
Refrigerated Cabinet
Replace Door Gasket per PM instructions.
Sanitation Fittings
Inspect Sanitation Fittings. If found deficient, advise
customer & quote replacement.
Evaporator
Inspect for standing water and drain line condition.
If found deficient, advise customer & quote replacement.
`
Wearables
Inspect wearables (see Inspections Checklist) for items
found deficient, advise customer & quote replacement.
Clear Blender Door
Splash Shield
Replace Clear Blender Door Splash Shield per PM
instructions.
Water and Valve
Operation
Run diagnostics on solenoids & regulators. If found
deficient, advise customer & quote replacement.
Ice Maker Descale &
Sanitize (Zone 4)
Descale, & Sanitize Ice Maker Bin & related components.
Weekly Cleaning
(Zone 2)
Complete Zone 2 Weekly Cleaning.
Confirm Operation
Complete Zone 2 Weekly Cleaning.
Calibration
Calibrate unit if needed.
Blender Cycle
Checked blender cycle counts.
Record blender cycles:
Is machine connected to water filtration system? Circle one: YES NO
If yes, record type of water filtration system:
Software
AUX
SRB
MIXER
UI
MOTOR
UTB
VMC
MENU
CLEANING
MACHINE ID
Parts required to be replaced or used during PM.
All used PM parts removed from the unit need to be left with the store manager.
Qty
Part Number
Description
Comments
1
WBL-95-013
Refrigerator Door Gasket
2
MCP00262
O-Ring
1
WBL-33-064-FRU
Front Door Clear Blender Cover Splash Shield
Technician Signature
Date
Store Manager Print
Store Manager Signature Date
14 of 14
Document Number: 020009182 June 15, 2022
Subject: FreshBlender Annual Planned Maintenance
Planned Maintenance Checklist for Multiplex FreshBlenders
All claims for service MUST be submitted online MultiplexBeverage.com CPS (Claims Processing System): www.multiplexbeverage.com/Service/Warranty#Claims-Processing-System
Completed checklist MUST be emailed to rise.callc[email protected] AND attached to Multiplex CPS claim.
Parts & Supplies
Tools Required
Store to Supply
Universal Screwdriver
Door Key
Gloves (cut resistant)
FreshBlender Ice Dump Chute (PN 020007989)
O-ring Pick
Sanitizer, Shaker Jug & Sanitizer Solution Spray Bottle
Oetiker Pliers (PN 00681815)
Clean & Sanitized Towels/Cloths
Digital Scale (Capable of weighing in ounces)
5 Gallon Bucket for drain line
5 Gallon Bucket (clean & sanitized) for Ice Descale
Cleaning Cup
Additional Parts
These parts may be needed in addition to parts included in the PM Scope & should be carried on the service vehicle for
the PM Service. Use checklist below to inspect wearables. With store approval, the parts should be changed & charged to the store. Removed
parts should be left with the manager.
Part Number
Description
QTY
Notes
3239824
Blender Shaft
1
WBL-94-050
Sanitation Fitting Latch
2
WBL-33-065-FRU
Sanitation Fittings
2
WBL-33-014-FRU
Shuttle Assembly
1
WBL-94-027
Door Lock Cover
1
WBL-92-203
Shuttle Rail
1
3547784
Water Pressure Regulator
1
WBL-33-050-FRU
Dispense Head Assembly
1
020007658
Solenoid Valve White
2
020007655
Solenoid Valve Black
2
020007656
Solenoid Valve Brown
2
020007657
Solenoid Valve Green
2
WBL-96-107-FRU
LMS Valve Kit (12 pcs)
1
Wearables Inspection Checklist
Part Number
Description
QTY
Notes
3547914
CIP Hose Mesh Strainer
WBL-97-098
Air Filter
WBL-95-136
Door Key
WBL-33-036-FRU
Assembly Front Door Latch
WBL-94-027
Door Lock Cover
WBL-93-033-FRU
Door Display Bezel
WBL-33-065-FRU
Sanitation Fittings
Up to 8
WBL-94-050
Sanitation Fitting Latch
Up to 8
3239824
Blender Shaft
WBL-33-050-FRU
Dispense Head Assembly
WBL-33-014-FRU
Shuttle Assembly
WBL-33-064-FRU
Front Door Clear Blender Window
WBL-92-203
Shuttle Rail
3547784
Water Pressure Regulator
WBL-94-056
Product Bins
Up to 8
3547846
Dump Valve
  • Page 1 1
  • Page 2 2
  • Page 3 3
  • Page 4 4
  • Page 5 5
  • Page 6 6
  • Page 7 7
  • Page 8 8
  • Page 9 9
  • Page 10 10
  • Page 11 11
  • Page 12 12
  • Page 13 13
  • Page 14 14

MULTIPLEX FB081AF Operating instructions

Category
Ice cube makers
Type
Operating instructions

MULTIPLEX FB081AF is a professional-grade beverage dispenser designed to provide a wide range of blended and frozen drinks. With its advanced features and user-friendly interface, it's an ideal choice for businesses looking to expand their beverage offerings. Create delicious smoothies, shakes, and frozen cocktails with ease using the intuitive touchscreen controls. The FB081AF boasts a compact design, making it suitable for even the most space-constrained environments. Its efficient operation and easy maintenance ensure a smooth and profitable beverage service.

Ask a question and I''ll find the answer in the document

Finding information in a document is now easier with AI