Page is loading ...


User’s Guide
Creative Broadband Blaster DSL Router 8015U
Information in this document is subject to change without notice and does not represent a commitment on the part of Creative
Technology Ltd. The software described in this document is furnished under a license agreement and may be used or copied only in
accordance with the terms of the license agreement. It is against the law to copy the software on any other medium except as
specifically allowed in the license agreement. The licensee may make one copy of the software for backup purposes. No part of this
manual may be reproduced or transmitted in any form or by any means, electronic or mechanical, including photocopying and
recording, for any purpose without the written permission of Creative Technology Ltd.
Copyright © 2004 Creative Technology Ltd. All rights reserved.
Version 1.0
April 2004
Broadband Blaster is a trademark of Creative Technology Ltd.
IBM is a registered trademark of International Business Machines Corporation.
Intel and Pentium are registered trademarks of Intel Corporation
Microsoft, MS-DOS, Windows, and the Windows logo are registered trademarks of Microsoft Corporation.
Netscape Communicator is a trademark of Netscape Communications Corporation and may be registered outside the U.S.
All other products are trademarks or registered trademarks of their respective owners.

Contents

vii
Contents
Introduction
DSL Router information............................................................................................................................... v
Package Contents........................................................................................................................................... v
System requirements.................................................................................................................................... vi
Using Ethernet connection............................................................................................................... vi
Using USB connection........................................................................................................................ vi
Using this document.................................................................................................................................... vii
1 Installing your DSL Router
Setting up your DSL Router................................................................................................................... 1-3
Using the Ethernet port................................................................................................................. 1-3
Using the USB port......................................................................................................................... 1-5
2 Configuring Your Network Interface Card
Before You Begin ...................................................................................................................................... 2-1
In Windows XP/Windows 2000........................................................................................................... 2-1
In Windows Me/Windows 98 SE......................................................................................................... 2-4
3 Installing the USB Driver
Installing the USB Driver......................................................................................................................... 3-1
In Windows XP................................................................................................................................ 3-1
In Windows 2000............................................................................................................................ 3-4

viii
In Windows Me................................................................................................................................ 3-7
In Windows 98 SE........................................................................................................................... 3-9
4 Configuring your DSL Router
Understanding DSL Router configurations........................................................................................ 4-1
Connecting to your DSL Router’s Home Page............................................................................... 4-2
Configuring your DSL Router................................................................................................................ 4-3
PPPoA/PPPoE Configuration........................................................................................................ 4-3
RFC 1483 Routed............................................................................................................................ 4-6
RFC 1483 Bridged IP Configuration.......................................................................................... 4-9
Disabling the Proxy Server................................................................................................................... 4-11
Using Internet Explorer............................................................................................................... 4-11
Using Netscape Communicator................................................................................................ 4-12
Disconnecting from the Internet........................................................................................................ 4-13
In PPPoA and PPPoE Mode........................................................................................................ 4-13
In RFC 1483 Routed Mode........................................................................................................ 4-13
Checking your DSL Router’s Status.................................................................................................. 4-13
5 Configuring Advanced Features
Upgrading Firmware................................................................................................................................. 5-1
Changing Password................................................................................................................................... 5-2
IP Address Filter......................................................................................................................................... 5-3
DMZ.............................................................................................................................................................. 5-4
Port Forwarding......................................................................................................................................... 5-5
LAN Client Table....................................................................................................................................... 5-6
MAC Address Filtering............................................................................................................................ 5-7

ix
Appendixes
A Technical Specifications
B Troubleshooting
Connection to your DSL Router’s home page................................................................................ B-1
Connection to the Internet.................................................................................................................... B-2
LED Status.................................................................................................................................................... B-3
Normal Setup Status....................................................................................................................... B-3
Difficulties In Windows XP.................................................................................................................... B-5
C Frequently Asked Questions
D Glossary

Introduction

Introduction v
Introduction
Thank you for purchasing Creative Broadband Blaster DSL Router 8015U.
Developed with the most advanced Digital Subscriber Line (DSL) today, the DSL
Router provides you with high-speed broadband Internet connection using an
existing phone line. Enjoy speedy file transfers, watch Internet movies, video-
conference, and view videos without any long waits. You can also surf the Internet
and make a phone call at the same time!
Your DSL Router can be connected to your computer using a USB or Ethernet port.
Compliant with both ITU G.Lite and G.DMT, your DSL Router is capable of DSL
full-rate operation up to 12 Mbps downstream and 1 Mbps upstream, depending on
your subscription with your Internet Service Provider.
DSL Router
information
Before you begin, write down your DSL Router’s model and serial numbers found
at the bottom of your DSL Router.
Package
Contents
❑ Creative Broadband Blaster DSL Router 8015U
❑ USB cable
❑ Straight Ethernet cable
❑ RJ-11 phone cable
❑ Power adapter
❑ Installation CD
❑ Quick Start Leaflet
❑ Microfilter

Introduction vi
System
requirements
In order for your DSL Router to operate properly, be sure that your computer
meets the following minimum system requirements:
Using Ethernet
connection
❑ Compatible with all operating systems.
❑ 20 MB of free hard disk space
❑ 32 MB RAM
❑ Installed Network Interface Card (NIC)
❑ CD-ROM drive for software installation
❑ Microsoft
®
Internet Explorer version 5.0 or later/Netscape Communicator
TM
version 4.68 or later
Using USB
connection
❑ Intel
®
Pentium
®
II 300 MHz or equivalent processor
❑ Microsoft Windows
®
XP, 2000, Me (Millennium Edition) or 98 SE (Second Edition)
❑ 20 MB of free hard disk space
❑ 32 MB RAM
❑ USB port
❑ CD-ROM drive for software installation
❑ Microsoft Internet Explorer version 5.0 or later/Netscape Communicator version
4.68 or later
You will need a hub if
you wish to connect
more than 2 computers
to your DSL Router.
Depending on your
computer’s
configurations, you can
choose to install your
router using the
Ethernet or USB port.

Introduction vii
Using this
document
These icons highlight useful or urgent information:
❍ Tip. This tells you about shortcuts or hints relating to a feature.
❍ Note. This highlights additional or important information about a
feature.
❍ Caution! This highlights proper usage of your device. Use this
information to avoid situations involving risk.
❍ Warning! This warns you of possible hazards to yourself or your device,
which may result in injury or damage.

Installing your DSL Router

Installing your DSL Router 1-1
Installing your DSL Router
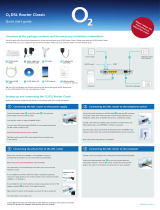
This section will guide you through the process of setting up your DSL Router.
Place your DSL Router in front of you as you go through this section to help you to
identify the various components of your modem.
LED Indication
POWER
LED lights up when your DSL Router is connected to a power source.
READY
LED flashes when your DSL Router is initializing the DSL connection. LED
lights up when DSL connection is ready.
LINK
LED lights up when the Ethernet or USB port is connected to your
computer.
ACTIVITY LED flashes when there is data transfer to or from the Internet.
Figure 1-1: Front view of your DSL Router
Ready
LED
Activity
LED
Link
LED
Power
LED

Installing your DSL Router 1-2
Port/Connector Indication
PHONE PORT Connects to the telephone via a microfilter.
DSL LINE PORT
Connects to the telephone wall outlet using the
provided RJ-11 phone cable.
ETHERNET PORT
Connects to the Ethernet port on your computer
using the Straight Ethernet cable.
If you are connecting your DSL Router using the
Ethernet port, do not connect the USB port on the
same computer.
USB PORT
Connects to the USB port on your computer using
the USB cable.
If you are connecting your DSL Router using the
USB port, do not connect the Ethernet port on the
same computer.
RESET BUTTON
Resets your DSL Router’s settings to the factory
default settings.
POWER CONNECTOR
Connects to the power outlet using the provided
power adapter.
Figure 1-2: Back view of your DSL Router
DSL LINE
port
Ethernet
port
Reset button
Power
connector
USB
port
Phone
port

Installing your DSL Router 1-3
Setting up your
DSL Router
Depending on your computer’s configurations, you can choose to install your DSL
Router using the Ethernet or USB port on the same computer. Do not install your
DSL Router using both connections on the same computer.
Using the Ethernet
port
Before setting up your DSL Router, be sure that the Network Interface Card in your
computer is installed and functioning properly.
Use Figure 1-3 as a reference when following these instructions to set up your DSL
Router.
1. Connect the straight Ethernet cable to the Ethernet ports on your computer
and DSL Router.
DO NOT use the USB
port on your DSL
Router if you are using
the Ethernet port on
the same computer.
If you want more than
2 computers to have
access to your DSL
Router through a hub,
you may need to use a
crossed Ethernet cable
to connect your DSL
Router to the hub.
Consult your hub’s
manual for details.
Figure 1-3: Setting up your DSL Router using the Ethernet port
Telephone wall
outlet
RJ-11 cables
Power adapter
Ethernet
port
Ethernet port
Straight
Ethernet
cable
DSL LINE port
Power connector
Phone Port
Reset button
USB port
Microfilter

Installing your DSL Router 1-4
2. Locate a telephone wall outlet and unplug any telephone cable that is
connected to it.
3. Connect one end of the RJ-11 phone cable provided into the telephone wall
outlet.
4. Connect the other end into the DSL LINE port of your DSL Router.
5. Connect the small round plug of the power adapter provided to the DSL
Router’s power connector and plug your power adapter into a power outlet.
6. Turn on the power supply.
7. If you have telephones and fax machines sharing the same phone line,
connect them to the telephone wall outlet or DSL LINE port with microfilters as
shown below. The microfilters will help to ensure voice and data quality.
8. Before using your DSL Router, you will need to configure your Network
Interface Card. For detailed instructions, refer to Chapter 2, "Configuring Your
Network Interface Card".
Figure 1-4: Connecting a telephone to the telephone wall outlet
Telephone Wall
outlet
RJ-11
phone cable
Microfilter
Tele pho ne

Installing your DSL Router 1-5
Using the USB
port
Use Figure 1-5 as a reference when following these instructions to set up your DSL
Router.
1. Connect the USB cable to the USB ports on your computer and DSL Router.
2. Locate a telephone wall outlet and unplug any telephone cable that is
connected to it.
3. Connect one end of the RJ-11 phone cable provided into the telephone wall
outlet.
4. Connect the other end into the DSL LINE port of your DSL Router.
DO NOT use the
Ethernet port on your
DSL Router if you are
using the USB port on
the same computer.
Figure 1-5: Setting up your DSL Router using the USB port
USB port
USB cable
Tele phon e
Wall outlet
Power adapter
Ethernet port
DSL LINE port
Power connector
Reset button
USB port
RJ-11 cables
Phone port
Microfilter

Installing your DSL Router 1-6
5. Connect the small round plug of the power adapter provided to the DSL
Router’s power connector and plug your power adapter into a power outlet.
6. Turn on the power supply.
7. If you have telephones and fax machines sharing the same phone line,
connect them to the telephone wall outlet or DSL modem phone port with
microfilters as shown below. The microfilters will help to ensure voice and data
quality.
Before using your DSL Router, you will need to install the USB driver. For detailed
instructions, refer to Chapter 3, "Installing the USB Driver".
Figure 1-6: Connecting a telephone to the telephone wall outlet
Telephone Wall
outlet
RJ-11
phone cable
Microfilter
Tele phon e

Configuring Your Network
Interface Card

Configuring Your Network Interface Card 2-1
Configuring Your Network Interface Card
Before You
Begin
Before using your DSL Router, you need to configure your Network Interface Card.
In Windows
XP/Windows
2000
1. After setting up your DSL Router, turn on
your computer.
2. In Windows XP, click Start -> Settings ->
Control Panel and double click the
Network Connections icon. In Windows
2000, click Start -> Control Panel and
double click the Network and Dial Up
Connections icon.
3. When the window similar to Figure 2-1
appears, right-click the Local Area
Connection icon, and then click
Properties.
If you are connecting
your DSL Router using
the USB port, skip this
chapter and go to
"Installing the USB
Driver" on page 3-1.
Figure 2-1

Configuring Your Network Interface Card 2-2
4. When the dialog box similar to Figure
2-2 appears, be sure that the name of
your network card is displayed in the
first box.
5. In the list below the box, click the
Internet Protocol (TCP/IP) check
box to select it.
6. Click the Properties button.
Figure 2-2
/