Page is loading ...

INSTALLATION INSTRUCTIONS
Accessories
1226369-2-A
1 of 6
Questions? Problems? For additional assistance, please contact KALLISTA’s Customer
Service Department at 1-888-4-KALLISTA (1-888-452-5547) or kallista.com.
©2013 KALLISTA
P34701P34700
P34702 P34706
P34708

INSTALLATION INSTRUCTIONS
Accessories
1226369-2-A
2 of 6
Questions? Problems? For additional assistance, please contact KALLISTA’s Customer
Service Department at 1-888-4-KALLISTA (1-888-452-5547) or kallista.com.
ThANk YOU FOR ChOOSINg kALLISTA
We appreciate your commitment to Kallista quality products. Please take a moment to review this manual
before you install your Kallista product. If you encounter any installation or performance problems, please do
not hesitate to contact us at the phone number listed at the bottom of the page.
BeFORe YOU BegIN
Observe all local building codes.
Prior to installation, unpack the new product and inspect it for damage. Return the product to its protective
carton until you are ready to install it.
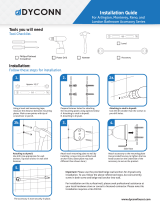
TOOLS ANd MATeRIALS
Drill Phillips Screwdriver Hex Wrench
LevelPencilTape MeasureSafety Glasses

INSTALLATION INSTRUCTIONS
Accessories
1226369-2-A
3 of 6
Questions? Problems? For additional assistance, please contact KALLISTA’s Customer
Service Department at 1-888-4-KALLISTA (1-888-452-5547) or kallista.com.
ROUghINg-IN INFORMATION
P34708P34706
P34702 = 12" (305 mm)
P34701 = 18" (457 mm)
P34700 = 24" (610 mm)
P34702 = 14-5/16" (364 mm)
P34701 = 20-5/16" (516 mm)
P34700 = 26-5/16" (668 mm)
3-1/4"
(83 mm)
1-3/4"
(44 mm)
6-5/8"
(168 mm)
5-7/16"
(138 mm)
1-3/4"
(44 mm)
1-3/4"
(44 mm)
2-5/16"
(59 mm)
2-11/16"
(68 mm)
1-3/4"
(44 mm)

INSTALLATION INSTRUCTIONS
Accessories
1226369-2-A
4 of 6
Questions? Problems? For additional assistance, please contact KALLISTA’s Customer
Service Department at 1-888-4-KALLISTA (1-888-452-5547) or kallista.com.
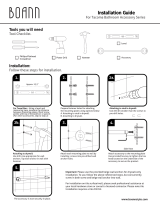
1. INSTALL The TOweL BAR
P34702 = 13-3/16" (335 mm)
P34701 = 19-3/16" (487 mm)
P34700 = 25-3/16" (640 mm)
Nail
Drywall Anchors
Tile Anchors
Setscrew
Mounting Plate
Inside Hole
Outside Hole
Towel Bar
Escutcheon
Inside Hole
Outside Hole
Measure and mark the outside hole locations for the mounting plates (to the outside edge of the towel bar
escutcheon) based on the dimensions shown.
Align the wall plates with the marked outside hole locations and mark the inside hole for each wall plate (to
the inside edge of the towel bar escutcheon).
Make sure that the mounting plates will be level when mounted.
NOTe: Anchors have been supplied for both drywall and tile applications. If anchors are needed, select the
correct anchors for the wall material used.
If drilling into a stud, drill pilot holes for the wood screws. If there is not a stud behind the mounting plate
location, drill holes to accommodate the anchors.
Install the anchors, if using. Attach the mounting plates to the nished wall with the wood screws.
Use the setscrews to secure the towel bar assembly to the mounting plates.

INSTALLATION INSTRUCTIONS
Accessories
1226369-2-A
5 of 6
Questions? Problems? For additional assistance, please contact KALLISTA’s Customer
Service Department at 1-888-4-KALLISTA (1-888-452-5547) or kallista.com.
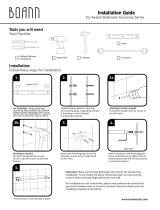
2. INSTALL The hOOk
Tile Anchors
Drywall Anchors
Nail
Setscrew
Mounting Plate
Determine the location of the mounting plate.
Mark the location of the mounting plate holes on the nished wall, making sure that the mounting plates will
be level when mounted.
NOTe: Anchors have been supplied for both drywall and tile applications. If anchors are needed, select the
correct anchors for the type of wall material.
If drilling into a stud, drill pilot holes for the wood screws. If there is not a stud behind the mounting plate
location, drill holes to accommodate the anchors.
Install the anchors, if using. Attach the mounting plate to the nished wall with the wood screws.
Secure the hook assembly to the mounting plate with the setscrews.

INSTALLATION INSTRUCTIONS
Accessories
1226369-2-A
6 of 6
Questions? Problems? For additional assistance, please contact KALLISTA’s Customer
Service Department at 1-888-4-KALLISTA (1-888-452-5547) or kallista.com.
3. INSTALL The TISSUe hOLdeR
Mounting Plate
Setscrew
Nail
Drywall Anchors
Tile Anchors
Determine the location of the mounting plate for the xed tissue holder arm assembly.
Mark the location of the mounting plate holes on the nished wall, making sure that the mounting plates will
be level when mounted.
NOTe: Anchors have been supplied for both drywall and tile applications. If anchors are needed, select the
correct anchors for the type of wall material.
If drilling into a stud, drill pilot holes for the wood screws. If there is not a stud behind the mounting plate
location, drill holes to accommodate the anchors.
Install the anchors, if using. Attach the mounting plate to the nished wall with the wood screws.
Secure the xed tissue holder arm assembly to the mounting plate with the setscrews.
/