Page is loading ...

INSTALLATION INSTRUCTIONS
Shower Arms
1193441-2-A
1 of 3
Questions? Problems? For additional assistance, please contact KALLISTA’s Customer
Service Department at 1-888-4-KALLISTA (1-888-452-5547) or FAX 1-888-272-3094.
P21520 P21521
P21522 P21523

INSTALLATION INSTRUCTIONS
Shower Arms
1193441-2-A
2 of 3
Questions? Problems? For additional assistance, please contact KALLISTA’s Customer
Service Department at 1-888-4-KALLISTA (1-888-452-5547) or FAX 1-888-272-3094.
THANK YOU FOR CHOOSING KALLISTA
We appreciate your commitment to KALLISTA quality products. Please take a moment to review this manual
before you install your KALLISTA product. If you encounter any installation or performance problems, please do
not hesitate to contact us at the phone number listed at the bottom of the page.
IMPORTANT IMFORMATION
Observe all local plumbing and building codes.
Shut off the main water supply.
The appearance of your product may differ from what is shown in these instructions, however, the
installation procedure is the same.
KALLISTA reserves the right to make revisions in the design of products without notice, as specifi ed in the
Price Book.
TOOLS AND MATERIALS
Strap Wrench Sealant Tape

INSTALLATION INSTRUCTIONS
Shower Arms
1193441-2-A
3 of 3
Questions? Problems? For additional assistance, please contact KALLISTA’s Customer
Service Department at 1-888-4-KALLISTA (1-888-452-5547) or FAX 1-888-272-3094.
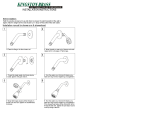
INSTALL THE SHOWER ARM
Shower Ell (Wall)
Escutcheon (Not Provided)
Shower Arm
Showerhead
(Not Provided)
Apply thread
sealant tape.
Shower Ell
(Ceiling)
Escutcheon
(Not Provided)
Shower Arm
CAUTION: Risk of product damage. To avoid plugging the showerhead spray outlets, use thread sealant tape
on the shower arm threads. Do not use thread sealant compound (pipe dope).
NOTE: The showerhead and escutcheon are not provided.
Remove the temporary nipple from the shower ell.
Slide the escutcheon onto the end of the shower arm that will be closest to the wall/ceiling.
Apply thread sealant tape to the shower arm threads closest to the wall/ceiling.
Thread the showerarm into the shower ell.
Carefully tighten the shower arm with a clean strap wrench.
With the showerhead off, turn on the water to fl ush out the system.
Check connections for leaks. Repair as needed.
Turn off the water.
Install the showerhead according to the showerhead manufacturer’s instructions.
/