Kallista P22731-LV-AD Installation guide

Category
Sanitary ware
Type
Installation guide
INSTALLATION INSTRUCTIONS
Basin Set
1133090-2-E
1 of 6
Questions? Problems? For additional assistance, please contact KALLISTA’s Customer
Service Department at 1-888-4-KALLISTA (1-888-452-5547) or kallista.com.
P22731, P24031, P24600,
P24601
©2015 KALLISTA
INSTALLATION INSTRUCTIONS
Basin Set
1133090-2-E
2 of 6
Questions? Problems? For additional assistance, please contact KALLISTA’s Customer
Service Department at 1-888-4-KALLISTA (1-888-452-5547) or kallista.com.
THANK YOU FOR CHOOSING KALLISTA
We appreciate your commitment to KALLISTA quality products. Please take a moment to review this manual
before you install your KALLISTA product. If you encounter any installation or performance problems, please do
not hesitate to contact us at the phone number listed at the bottom of the page.
IMPORTANT INFORMATION
Prior to installation, unpack the new faucet and inspect it for damage. Return the faucet to its protective
carton until you are ready to install it.
Observe all local plumbing and building codes.
Shut off the water supply.
Inspect the drain and supply tubing. Replace if necessary.
If possible, assemble the faucet to the lavatory before installing the lavatory.
The appearance of your product may differ from what is shown in these instructions, however, the
installation procedure is the same.
KALLISTA reserves the right to make revisions in the design of products without notice, as speci ed in the
Price Book.
TOOLS AND MATERIALS
Silicone
Sealant
Phillips
Screwdriver
Adjustable
Wrench
Thread
Sealant
Plumbers
Putty
Supply
Hoses
INSTALLATION INSTRUCTIONS
Basin Set
1133090-2-E
3 of 6
Questions? Problems? For additional assistance, please contact KALLISTA’s Customer
Service Department at 1-888-4-KALLISTA (1-888-452-5547) or kallista.com.
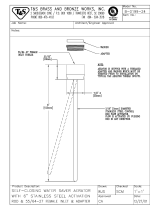
1. INSTALL THE SPOUT AND HANDLES
Spout
Shank
Washer
Rubber
Washer
Gasket
Nut
Handle
Assembly
Valve
Assembly
Tee
Assembly
Washer
Ring
Screws
P22731 Only
Gaskets
Check
Valve
Check
Valve
Rubber
Washers
Install the Spout
Remove the tee assembly, nut, and washer from the spout shank.
Ensure that the O-ring is installed to the underside of the spout.
Fit the spout shank through the top of the lavatory.
Install the washer and nut onto the spout shank. Securely wrench tighten the nut.
Insert the rubber washer and gasket into the tee. Thread the tee onto the spout shank.
Hold the spout in position and tighten the tee securely. Do not overtighten.
For P22731 only: Install the rubber washers, gaskets, and check valves onto the tee assembly.
If desired, apply a bead of silicone sealant or caulk around the base of the spout.
Install the Handle Assemblies
Partially thread the screws into the ring.
Ensure that the O-ring is installed to the underside of the COLD handle assembly.
Fit the valve assembly through the top of the lavatory.
Install the washer and ring onto the valve assembly. Thread the ring most of the way up the valve assembly.
Tighten the screws. Do not overtighten.
If desired, apply a bead of silicone sealant or caulk around the base of the handle assembly.
Repeat the procedure to install the HOT handle assembly.
INSTALLATION INSTRUCTIONS
Basin Set
1133090-2-E
4 of 6
Questions? Problems? For additional assistance, please contact KALLISTA’s Customer
Service Department at 1-888-4-KALLISTA (1-888-452-5547) or kallista.com.
2. CONNECT THE HOSES
Valve
Hose
Valve
Hose
Thread the male ends of the hoses into the valves. Do not overtighten.
Thread the female ends of the hoses onto the tee.
3. INSTALL THE DRAIN
Drain Body
Nut
Washer
Gasket
Flange
Apply plumbers putty.
Remove the protective cover from the ange.
Apply a ring of plumbers putty or other sealant to the underside of the ange according to the
manufacturer’s instructions.
Assemble the nut, at washer, and tapered gasket (tapered side up) fully onto the drain body.
From the underside of the xture, insert the drain body up into the drain hole.
From the top of the xture, securely handtighten the ange onto the drain body.
Make sure the drain body seal hole is facing the back of the xture, and securely tighten the nut.
Remove any excess putty or sealant.
INSTALLATION INSTRUCTIONS
Basin Set
1133090-2-E
5 of 6
Questions? Problems? For additional assistance, please contact KALLISTA’s Customer
Service Department at 1-888-4-KALLISTA (1-888-452-5547) or kallista.com.
4. COMPLETE THE DRAIN INSTALLATION
Tailpiece
Body
Stopper
Stopper Rod
Flange
Nut
Rod
Link
Nut
Clip
Thumbscrew
Apply thread sealant.
Insert the stopper into the ange.
For regular installations, insert the short end of the rod into the body seal hole and under the stopper.
For vandal-resistant installations, t the rod through the hole in the stopper.
Handtighten the body nut.
Remove and adjust the stopper as needed so it lifts about 3/8” (10 mm) when opened. To adjust, rotate the
threaded stopper rod in or out as needed. Retighten the stopper nut.
Apply thread sealant tape to the tailpiece threads, and thread the tailpiece to the body. Tighten the tailpiece
securely. Slide one end of the clip onto the rod. Slide the link onto the rod with the thumbscrew facing the
back of the xture.
5. COMPLETE THE CONNECTIONS
Cold
Hot
Supply Hoses
(Not Provided)
Install the lavatory according to the lavatory manufacturer’s instructions.
Connect the supply hoses (not provided) to the supply stops. (Left is hot; right is cold.)
Tighten all connections with an adjustable wrench.
INSTALLATION INSTRUCTIONS
Basin Set
1133090-2-E
6 of 6
Questions? Problems? For additional assistance, please contact KALLISTA’s Customer
Service Department at 1-888-4-KALLISTA (1-888-452-5547) or kallista.com.
6. COMPLETE THE INSTALLATION
Aerator
Aerator
Key
Connect the P-trap (not supplied) to the tailpiece.
Ensure all connections are watertight.
Remove the aerator by turning it counterclockwise. Use the supplied key if required for removal of your
aerator.
Open the drain. Turn on the water supply and check for leaks. Repair as needed.
Open both the hot and cold valves.
Run water through the spout for 1 minute to remove any debris.
Turn off the valves.
Reinstall the aerator. Retain the key for future use.
  • Page 1 1
  • Page 2 2
  • Page 3 3
  • Page 4 4
  • Page 5 5
  • Page 6 6

Kallista P22731-LV-AD Installation guide

Category
Sanitary ware
Type
Installation guide

Ask a question and I''ll find the answer in the document

Finding information in a document is now easier with AI