Page is loading ...

JL18RBDSINS - REV 3 07/09/18 Page 1
DESTROYER
REAR
BUMPER
WEB FILE: http://lodoffroad.com/
assets/pdfs/JL18RBDSINS.pdf
*PLEASE READ THROUGH
THE INSTRUCTIONS BEFORE
BEGINNING ANY PART OF THE
INSTALLATION PROCESS*
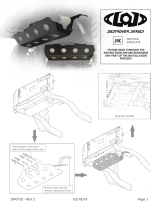
This diagram shows both brackets (both sides) that hold the stock Jeep Wrangler Sport bumper in place. Using a 5/8”
socket, remove both bolts at locations (A) and (B), you can remove the bumper from the vehicle.
A
B
A
B
Remove three (3) 8mm
bolts to remove the trim,
on either side
(Using an 18mm socket, take off the stock hitch.)
(Disconnect the wire license plate light and parking sensor harness before removing
from the vehicle)
Important:
JL

JL18RBDSINS - REV 3 07/09/18 Page 2
Before continuing, install the parking sensors into the bumper if your Jeep came with them.
See the ‘Parking Sensor Install’ instructions.
STOP!
Place the bumper up to the
rear of the vehicle.
We used a scissor type jack.
Driver side mount attachment.
Slide the bumper towards the vehicle until the two mount holes
line up with the threaded holes in the frame.

JL18RBDSINS - REV 3 07/09/18 Page 3
Insert the provided M14 bolts/washers labelled “A” into holes labelled “A.” Tighten with a
22mm socket.
A
A
A
B
A
The passenger side vertical holes marked as “B” will require M14 hardware installed
(bolt+washers+nuts supplied) as there are no weld nuts inside the frame. Tighten thoroughly.
B
B B
Grind any drippy welds, as they may
cause the bumper to not sit level.

JL18RBDSINS - REV 3 07/09/18 Page 4
Attach and tighten down the foglight bezels with screws labelled “C” using an allen key.
Plug the sensor holes (if you don’t have sensors) with the provided caps and you’re all set!
C
D
C
D
Place the 4” bolts, washers, and nuts labelled “E” into the outside holes, attach using provided
hardware. Insert the 4.5” bolts labelled “F” in the middle, through the safety chain plate.
E F
F
E
E
F

JL18RBDSINS - REV 3 07/09/18 Page 5
Re-install the stock trailer plug socket that was removed from the OE bumper. Use wash-
ers, bolts, and nuts labelled “G”
G
G

JL18RBDSINS - REV 3 07/09/18 Page 6

JL18RBDSINS - REV 3 07/09/18 Page 7
JL Jeep
Destroyer Series
Rear Bumpers
Shipping Slip
Packaged by:
________________________
On:
________________________
Install Instruction Booklet
Bumper
Flush Mount
Light Bezels
D Series
Light Bezels
Round Halogen
Light Bezels
Blank
Light Bezels
Hardware Kit
(Contents may vary)

JL18RBDSINS - REV 3 07/09/18 Page 8
M14-1.5x35mm HexBolt
M14-1.5mm
Hex Nut
Plastic Sensor
Hole Plug
(8)
(2)
(4)
1/2-13 Hex Nut
1/4-20 x 0.5” Buttonhead
Socket Cap Screw
(2)
(4)
JL Jeep
Destroyer Series
Rear Bumpers
Hardware Sheet
Packaged by:
________________________
On:
________________________
BA
B
CD
E F

JL18RBDSINS - REV 3 07/09/18 Page 9
1/2” Flat Washer
(18)
BA
E F

JL18RBDSINS - REV 3 07/09/18 Page 10
LoD Logo Plate Safety Chain Plate
- packaged separate if bumper is bare steel
(1) (1)
1/2-13 x 4” Hex Bolt
(2)
1/2-13 x 4.5” Hex Bolt
3/8-16 x 1”
Hex Bolt
3/8” Washer
3/8-16” Hex Nut
(2)
(2)
(4)
(2)
E
F
G
G
G
/