Page is loading ...

Copyright © 2016 Ruckus Wireless, Inc. Page 1 of 4
Published September 2016, Part Number 800-71078-001 Rev B
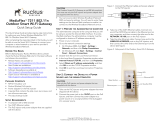
Unleashed
TM
R310 Access Point
Quick Setup Guide
This Quick Setup Guide provides step-by-step instructions on how to set up
your Ruckus Wireless Unleashed R310 access point.
After completing the
steps described in this Guide, the Unleashed Master Access Point
(Master AP) will be created. Additional Unleashed access points can be
added to the network for additional coverage and capacity
.
BEFORE YOU BEGIN
Before deploying your Ruckus Wireless device, please check the Ruckus
Wireless Web site for the latest software and release documentation.
• User Guides and Release Notes are available at
http://support.ruckuswireless.com/documents
• Product Limited Warranty documents are available at
http://support.ruckuswireless.com/warranty
• Online Training Resources are available at
https://training.ruckuswireless.com
PACKAGE CONTENTS
• One Unleashed R310 access point
• Two mounting screws and plastic wall anchors
• One T8 5mm M2.5 Torx locking security screw
• One unit removal pin
• Regulatory flyer
• Product warranty statement
• Declaration of conformity, if required
•This Quick Setup Guide
CONFIGURING THE AP
• Step 1: Collecting Setup Requirements, Hardware, and Tools
• Step 2: Connect the AP to Power and Your Computer Network
• Step 3: Log In and Run the Setup Wizard
• Step 4: Customize Your Wireless LANs
• Step 5: Deploy Additional Unleashed Access Points
Figure 1. Unleashed R310 AP - top view
Step 1: Collecting Setup Requirements, Hardware,
and Tools
• A computer with Ethernet adapter running Windows 7 or equivalent,
with Firefox or equivalent web browser.
• One Cat 5e (or better) Ethernet cable.
• T8 Torx screwdriver.
• An AC-to-12VDC power adapter (sold separately)
--OR--
an 802.3af-compliant Power over Ethernet (PoE) switch or PoE
injector.
Step 2: Connect the AP to Power and Your
Computer Network
A After removing your Unleashed AP from its package, connect it to your
network switch or router using an Ethernet cable.
B Connect the AC power adapter (sold separately) to the 12VDC AP
port, and plug the AC power adapter into a convenient and protected
AC power source.
• Alternatively, connect the POE IN port to a PoE injector or PoE
switch for both power and network connectivity.
Figure 2. AP rear panel
C After bootup, verify that the PWR LED on the AP is a steady green.
Step 3: Log In and Run the Setup Wizard
A As soon as the Unleashed AP is powered on and connected to the local
network, it boots up and begins broadcasting a temporary unencrypted
WLAN named “Configure.Me-[xxxxxx]” from the 2.4 GHz radio only.
B Using your client’s WiFi configuration settings, select and associate to
the “Configure.Me-[xxxxxx]” WLAN.
Figure 3. Connect to the “ConfigureMe” WLAN
\
C Launch a web browser and enter the following into the browser’s URL
bar: unleashed.ruckuswireless.com
, and press Enter.
D Select Create New Unleashed Network, and click Start to
begin.
Figure 4. Select “Create New Unleashed Network”
E The “Configuring Unleashed Master” progress screen displays the
progress. Wait until the initialization process completes.
.
F Once initialization is complete, ensure that you are still connected to
the “Configure.Me” WLAN, and click Next.
G You will be redirected to the Setup Wizard. Complete the steps in the
Setup Wizard and click Finish.
Note: Do NOT disconnect the power or network cable from the
device during the setup process.

Copyright © 2016 Ruckus Wireless, Inc. Page 2 of 4
Published September 2016, Part Number 800-71078-001 Rev B
Figure 5. Complete the Setup Wizard to set up your Unleashed network
H Once the Setup Wizard is finished, a “Configuring system settings and
rebooting” progress screen appears. Wait until the process is
complete.
Figure 6. Configuring system settings and rebooting
I Connect to the WLAN that you configured in the Setup Wizard, and
click OK to reconnect. You will be redirected to the
unleashed.ruckuswireless.com
login screen.
J Enter your Admin Name and Password to login.
Figure 7. The Login page
K Upon successful login you will be presented with the Unleashed
Dashboard, which displays an overview of your Ruckus Unleashed
network.
Figure 8. : The Unleashed Dashboard
L The first time you log in, you will be presented with a “Registration”
screen prompting you to register your Unleashed AP with Ruckus. This
step is optional, and you can choose to skip the registration and
register your Unleashed APs later, at any time, if you prefer.
Figure 9. Registration page
Step 4: Customize Your Wireless LANs
Once the Unleashed Master AP has been initialized, you can fine-tune the
settings of your first WLAN (that you created during the setup wizard), and
create any additional WLANs needed prior to attaching additional
Unleashed member APs. Then, when you deploy additional member APs in
whatever order you prefer, they will automatically retrieve all WLAN
configuration settings (and any other settings you have configured) from
the Unleashed Master AP.
A From the Dashboard, click anywhere in the WiFi Networks section to
expand the display of your deployed WLANs.
B On the left side of the screen, select the WLAN box for the WLAN you
would like to configure, and click the Edit button to edit the
configuration; or click Create to create a new WLAN.
C If you made any changes to the original WLAN, you will be
disconnected and will need to reconnect once the changes have been
deployed on the AP radios.
Congratulations! Your Unleashed network is now configured and ready for
use. You may now proceed to Step 5: Deploy Additional Unleashed
Access Points.
Step 5: Deploy Additional Unleashed Access Points
Deploying additional Unleashed member APs is simply a matter of
connecting them to the same Layer 2 network (subnet) and providing
power. They will discover the Unleashed Master and join automatically. No
additional steps are necessary.
For More Information
For more information on managing your Unleashed network, refer to the
Ruckus Wireless Unleashed Access Point Online Help
, available from
https://support.ruckuswireless.com.
INSTALLING THE AP
The AP can be mounted on a flat surface, on a drop-ceiling T-bar, or on a
pole or flat surface. Refer to the following sections:
• Mounting on a Flat Surface
• Removing the AP from Flat-Surface Mounting Screws
• Mounting the AP on a Drop-Ceiling T-Bar
• Removing the AP from a Drop-Ceiling T-Bar
• Mounting the AP on a Flat Surface or Pole Using the Optional
Secure Mounting Bracket
• Removing the AP from the Optional Secure Mounting Bracket
Mounting on a Flat Surface
The factory-supplied mounting screws and plastic wall anchors allow you
to attach the AP to a wall or ceiling.
A Use the Mounting Template on the last page of this guide to mark the
locations for two drill holes on the mounting surface.
B Use a 4.75mm (3/16”) drill bit to drill holes approximately 25mm (1”)
deep into the mounting surface.
C Insert the factory-supplied anchors (A in Figure 10
) and mounting
screws (B) into the mounting surface, leaving approximately 6 mm
(1/4”) of the screw heads protruding from the surface.
Figure 10. Mounting the AP on a flat surface
A
B
C

Copyright © 2016 Ruckus Wireless, Inc. Page 3 of 4
Published September 2016, Part Number 800-71078-001 Rev B
D Place the AP onto the mounting screws so that the screw heads enter
the keyholes on the AP enclosure (C), and gently press down on the AP
until the locking tab in the upper AP keyhole locks the AP onto the top
mounting screw.
Removing the AP from Flat-Surface Mounting
Screws
A To remove the AP from the factory-supplied mounting screws, gently
press the unit removal pin (A in Figure 11) into the access hole on the
end of the AP to release the bracket locking tab in the upper keyhole.
Figure 11. Removing the AP from the screw heads
B Push the AP up and pull it away from the mounting screw heads.
Mounting the AP on a Drop-Ceiling T-Bar
A Orient the AP so that the T-bar is positioned between the T-bar clips
as shown in Figure 12, then rotate the AP until the third T-bar clip
catches the T-bar and the latch locks the T-bar in place (Figure 13).
Figure 12. Initial position
Figure 13. Final position
B (OPTIONAL, for added security.) Using a Torx T8 screwdriver, insert the
locking screw (A) into the hole near the latch to lock the AP in place.
Removing the AP from a Drop-Ceiling T-Bar
• To remove the AP, first remove the security screw, then depress the
latch while rotating the AP so that the T-bar clips disengage the T-bar.
Mounting the AP on a Flat Surface or Pole Using the
Optional Secure Mounting Bracket
The customer-ordered Ruckus Wireless secure mounting bracket kit
(ordering part number 902-0120-0000) includes a metal mounting bracket
and provides greater security when attaching the AP to flat surfaces (walls
and ceilings) and to poles.
• If you are mounting the AP on a flat surface, then you will also need an
electric drill with a 4.75mm (3/16”) drill bit, and the four No. 6 zinc
plated screws and plastic wall anchors included with the kit.
• If you are mounting the AP on a truss or pole, then you will also need
the two customer-supplied stainless steel pipe clamps.
Continue with the following:
A If you are mounting the AP on a flat surface, then use the secure
mounting bracket as a template to mark the locations for four drill
holes on the mounting surface. There are four screw holes available on
the secure mounting bracket.
Fasten the bracket to the flat surface using four mounting screws and
plastic wall anchors and continue with Step C
.
B If you are mounting the AP on a pipe or pole, then feed the two
customer-supplied stainless steel clamps through the slots on the
secure mounting bracket. Use common hand tools to tighten the
clamps around the pipe or pole.
After the bracket is attached, continue with Step C
.
Figure 14. Attaching the AP to the secure mounting bracket
C Insert the two studs on the secure mounting bracket (A) into the
keyholes on the bottom of the AP.
D Slide the AP toward the Ethernet port until the locking tab in the upper
AP keyhole locks the AP onto the top mounting bracket stud.
A
A
A

Copyright © 2016 Ruckus Wireless, Inc. Page 4 of 4
Published September 2016, Part Number 800-71078-001 Rev B
Removing the AP from the Optional Secure
Mounting Bracket
A Gently press the unit removal pin (A in Figure 15) into the access hole
on the end of the AP to release the bracket locking tab in the upper
keyhole.
Figure 15. Removing the AP from the secure mounting
bracket
B Slide the AP toward the unit removal pin and remove the AP from the
bracket.
TROUBLESHOOTING
• If required, you can reset the AP to its factory default settings by using
a straightened paper clip to press and hold the reset button located
between the POE IN and 12VDC ports, for six or more seconds.
CAUTION: DO NOT DO THIS UNLESS SO INSTRUCTED. (Doing this
resets the AP to its factory default settings.)
• Refer to the Ruckus Wireless Unleashed Access Point Online Help for
information on configuring and operating the AP. This document is
available at
https://support.ruckuswireless.com
Mounting Template:
A
82.6mm
3.25in
/