Page is loading ...

97-06 JEEP TJ HIGH CLEARANCE SKID PLATE
92112600
Thank you for choosing Rough Country for your suspension needs.
Please read Information below!!
Motor mount kit Part # 1156 & 1 1/4” Body Lift Part # 1157 is needed to install this high clearance transfer
case skid plate. Failure to install these kits could result in damage to the vehicle created by lack of clearance
between the motor / transmission to the body. Rough Country insists installing these kits before the high
clearance skid plate is installed to gain clearance and avoid damage to components.
Please note if this skid plate is used with Rough Country’s Long arm kit, longer bolts will be needed to se-
cure the skid plate to the frame.
If installing on a Rubicon, part # 1123 is required to remount the compressor to the skid plate.
Rough Country recommends a certified technician installs this system. In addition to these instructions, professional
knowledge of disassemble/reassembly procedures as well as post installation checks must be known. Attempts to
install this system without this knowledge and expertise may jeopardize the integrity and/or operating safety of the
vehicle. Please read all the instructions before beginning the installation. Check the kit hardware against the kit con-
tents. Be sure you have all the needed parts and understand where they go. Also please review the tools needed
list and make sure you have needed tools. If you have any questions please call us at 800-222-7023..
NOTICE TO DEALER AND VECHICLE OWNER
If installing on a vehicle equipped with a long arm suspension only, please be advised this kit fits only the
Rough Country Long Arm suspension due to the mounting points of the control arm mounting brackets. Any
vehicle equipped with any Rough country product must have the “Warning to Driver” decal installed on the sun visor
or dash. The decal is to act as a constant reminder for whoever is operating the vehicle of its unique handling char-
acteristics. INSTALLING DEALER—It is your responsibility to install the warning decal and to forward these installa-
tion instructions on to the vehicle owner for review and to be kept in the vehicle for its service life.
TOOLS NEEDED:
13mm Socket / Wrench
3/4” Socket / Wrench OR
18mm Socket / Wrench
9/16” Socket
TORQUE SPECS:
Size Grade 5 Grade 8
3/8” 30 ft/lbs 35 ft/lbs
1/2” 65 ft/lbs 90 ft/lbs
9/16” 95 ft/lbs 130 ft/lbs
KIT CONTENTS
Skid Plate
Transmission Mount Plate
Poly Bag Containing:
3/8” x 1” Bolts (4)
1/2” x 1 1/2 Bolts (6) For 97-02 Models
(03-UP Models use stock bolts)
1/2” Flat Washer (6)

1. After the motor mount kit and 1 1/4” Body lift is installed, proceed to high clearance skid plate installation.
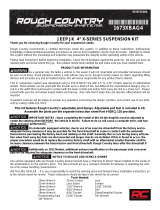
2. Remove the transmission hardware that secures the transmission to the stock skid plate. See Photo 1. Retain the
stock hardware.
3. Make sure to support the transmission and transfer case with a floor jack or jack stand.
4. Remove the skid plate from the frame rail as shown in Photo 2 using a 3/4” wrench for 97-02 and 18mm for 03-
06. Retain the factory hardware for the 03-06 models as it will be reused. New bolts are supplied for the 97-02
models.
5. Lower the transfer case skid plate down and remove from the vehicle.
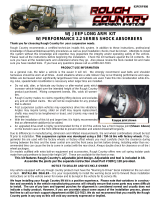
6. The skid plate has two sets of holes for the transmission mounting bracket. See Photo 4.To identify which set of
holes to use, the skid plate and bracket will need to be trial fit on the vehicle.
7. Align the hole on the frame rail and the holes on the transmission mounting plate. After noting which set of holes
to use, remove the skid plate and mounting plate and secure the transmission mounting plate to the skid plate
with the supplied 3/8” x 1” bolts. Tighten using a 9/16” socket / wrench. See Photo 3.
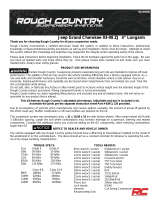
8. Reinstall the skid plate and mounting bracket back on the frame rail and secure the transmission to the plate us-
ing the factory hardware. See Photo 5.
9. Install the plate on the frame rail with the supplied 1/2” x 1 1/2” bolts / washers for the 97-02 Models. On 03-06
models the factory hardware will be reused. See Photo 6.
POST INSTALLATION
• All components must be retightened after 500 miles, and every three thousand miles after installation.
INSTALLATION INSTRUCTIONS
PHOTO 1 PHOTO 2
PHOTO 3 PHOTO 4
PHOTO 5 PHOTO 6
REMOVE THE TRANSMISSION NUTS REMOVE THE FRAME RAIL BOLTS
MOUNT TRANSMISSION PLATE TO SKID TIGHTEN HARDWARE
REINSTALL TRANSMISSION HARDWARE
/