Page is loading ...

Performance Spoken Fluently
Instruction Manual
3.8Liter V6 GEN-2 Intercooled
Supercharger Drive System
Jeep Wrangler JK
Automatic and Manual Transmission

RIPP Supercharger GEN-2 Stage 2 JEEP Wrangler 3.8 Rev10
C
Co
op
py
yr
ri
ig
gh
ht
t
R
RI
IP
PP
P
S
Su
up
pe
er
rc
ch
ha
ar
rg
ge
er
rs
s
2
20
01
10
0
a
al
ll
l
r
ri
ig
gh
ht
ts
s
r
re
es
se
er
rv
ve
ed
d
1
INSTALLER: Read and understand entire instruction manual
before starting installation of system.
Take note of the following before proceeding:
1. Proper installation of this supercharger kit requires general automotive mechanic knowledge and experience.
Please browse through each step of this instruction manual prior to beginning the installation to determine if you
should refer the job to a professional installer/technician. Please contact your RIPP or Vortech dealer for possible
installers in your area.
2. This product was designed for use on stock (un-modified, OEM) vehicles. The PCM (computer), engine,
transmission, drive axle ratios and tire O.D. must be stock (unless kits have been designed otherwise such as Jeep
Wrangler kits). If the vehicle or engine has been modified in any way, check with RIPP or Vortech prior to
installation and use of this product.
3. Use only premium grade fuel with a minimum of 91octane (R+M/2).
4. Always listen for any sign of detonation (knocking/pinging) and discontinue hard use (no boost) until the problem
is resolved.
5. RIPP is not responsible for any clutch, transmission and/or drive-line/engine damage.
Exclusions from RIPP/Vortech warranty coverage consideration includes, but not limited to:
1. Neglect, abuse, lack of maintenance, abnormal operation or improper installation.
2. Continued operation with an impaired vehicle or sub-system.
3. The combined use of RIPP components with other modifications such as, but not limited to, exhaust headers,
aftermarket camshafts, nitrous oxide, third party PCM programming or other such changes.
All rights reserved. No part of this publication may be reproduced, transmitted, transcribed, or translated
into another language in any form, by any means without written permission of RIPP Superchargers.
Transmission (Auto/6spd)
• 6SPD: Extreme care must be taken when driving a supercharged vehicle with the stock clutch. If clutch slippage is
detected, discontinue hard use. RIPP recommends replacing the stock clutch with a higher capacity unit if slippage
occurs.
• Automatic transmission: Auto transmissions may not up shift at full throttle when driving in “D” (drive) mode,
THIS IS a Direct product of OEM programming and not the provided tuning. In order to shift at full throttle, end users
may either “lift to shift” by raising the accelerator slightly (partially). RIPP makes no claims as to the reliability of the
transmission with the supercharger installed.
Cruise Control:
Please take note – the factory Cruise Control cannot be programmed with any custom mapping. It is a normal
condition to feel a slight surge during some CC functions. It’s best to manually clear and reset when this
happens.
INSTALLER: Read and understand entire instruction manual
before starting installation of system.

RIPP Supercharger GEN-2 Stage 2 JEEP Wrangler 3.8 Rev10
C
Co
op
py
yr
ri
ig
gh
ht
t
R
RI
IP
PP
P
S
Su
up
pe
er
rc
ch
ha
ar
rg
ge
er
rs
s
2
20
01
10
0
a
al
ll
l
r
ri
ig
gh
ht
ts
s
r
re
es
se
er
rv
ve
ed
d
2
INSTALLER: Read and understand entire instruction manual
before starting installation of system.
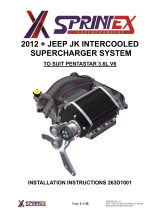
Introduction:
Congratulations on your investment into the RIPP Supercharger Drive System
(SDS) designed for the 2007-2011 JEEP Wrangler equipped with the 3.8L V6
engine. With proper installation, use and maintenance you will enjoy many
happy trouble-free miles. The following instructions will include steps for both
six speed manual and automatic Jeeps.
RIPP Supercharger Systems are a simple but effective way of increase your
engine’s total output, without compromising its integrity. Intended for off road
use only, but designed to be daily driven, its superior ingenuity is what makes it
all worth it. These instructions are a necessary guide to the proper installation
and maintenance of your RIPP Supercharger system.
The SDS is intended to be installed by a professional technician and should not
be attempted by the hobbyist. We feel its best to source out a local performance
oriented shop before attempting to install your system. Without proper
knowledge of fuel and ignition mapping, permanent damage can and will occur.
Whenever adding more power to any vehicle, the steering, braking and handling
of the vehicle will differ from standard passenger vehicle’s and trucks. Avoid
unnecessary abrupt maneuvers, sudden stops, or over sharp turns. If larger tires
are installed your speedometer will read lower than the vehicles actual speed,
we highly recommend a speedometer calibrator (included in some kits)
BE LAWFUL, TREAD-LIGHTLY, DRIVE WITH CARE,
REDUCE SPEED AND WEAR SEAT BELTS AT ALL TIMES.
INSTALLER: Read and understand entire instruction manual
before starting installation of system.

RIPP Supercharger GEN-2 Stage 2 JEEP Wrangler 3.8 Rev10
C
Co
op
py
yr
ri
ig
gh
ht
t
R
RI
IP
PP
P
S
Su
up
pe
er
rc
ch
ha
ar
rg
ge
er
rs
s
2
20
01
10
0
a
al
ll
l
r
ri
ig
gh
ht
ts
s
r
re
es
se
er
rv
ve
ed
d
3
Index
Step Page Motion
1 Notes
2 Introduction
3 Index
4 Tools & Recommendations
1 5 Disconnect Battery
2 5 Remove Air Box
3 5 Spark Plug Installation
4A 6 Fluids and Hoses
4B 6 Heater Hose Modification
5 7-8 Removal of Upper Intake Plenum
6A 8 Removing Factory Injectors
6B 8-9 Installing Injectors
6C 10 Reinstalling Upper Intake Plenum
7 10 Install PCV Valve
8A 11 Install Supercharger with Main Bracket
8B 11-13 Install Supercharger with Supporting Brackets
9A 14 Preparing for Air to Air Front Mount Intercooler
9B 15 Installation of Air to Air Front Mount Intercooler
9C 16-17 Intercooler Piping Installation
10 18 Vacuum Line Installation
11 18 Installing Air Filter
12 19 Installing Supercharger Gear Case Vent
13 19 Wrapping it up
14-15 19 Starting the Vehicle for the First Time
19-23 Diablo Programming
24 Maintenance
25 Trouble Shooting Guide
26 Optional Equipment and recommendations
27-28 SMOG Legal Documents CARB E.O# D-705
Diagrams
12 Belt Diagram
12 Bolt Diagram
15 Intercooler Piping Diagram
29 Intercooler Cut-Out
RIPP Supercharger kits feature products from these manufactures; we also recommend using them for
routine service there after.
:

RIPP Supercharger GEN-2 Stage 2 JEEP Wrangler 3.8 Rev10
C
Co
op
py
yr
ri
ig
gh
ht
t
R
RI
IP
PP
P
S
Su
up
pe
er
rc
ch
ha
ar
rg
ge
er
rs
s
2
20
01
10
0
a
al
ll
l
r
ri
ig
gh
ht
ts
s
r
re
es
se
er
rv
ve
ed
d
4
The following is a list of tools recommended by RIPP Modifications for proper
installation of your.
Air or electric impact tools
Air saw or metal saw
Basic mechanics tools (Metric tools will be required)
Recommendations:
It is essential to start with a cold vehicle.
Secure any radio or alarm codes before hand.
Disconnect any large audio systems until AFTER fuel/ignition
computers have calibrated.
Confirm the end user’s oil grade and type (synthetic or conventional)
and change oil and filter at this time. We recommend Castrol GTX
and a premium oil filter.
New oil filter
Spark plugs should be changed to brand plugs, one heat range
colder than stock and gapped to .030-.032” (some kits come supplied
with proper plugs, however they are not gapped see instructions for
gapping).
INSTALLER: Read and understand entire instruction manual
before starting installation of system.
Reverse out any and all performance tuners FROM Vehicle before
disconnecting battery. Including speedometer correction deviser, gear
correction or performance tuners.

RIPP Supercharger GEN-2 Stage 2 JEEP Wrangler 3.8 Rev10
C
Co
op
py
yr
ri
ig
gh
ht
t
R
RI
IP
PP
P
S
Su
up
pe
er
rc
ch
ha
ar
rg
ge
er
rs
s
2
20
01
10
0
a
al
ll
l
r
ri
ig
gh
ht
ts
s
r
re
es
se
er
rv
ve
ed
d
5
Step: 1 Disconnect battery.
Disconnect the power and ground from battery to avoid any electrical shock during install:
Using a 10mm open end loosen and take battery leads off from battery
Step 2: Remove air filter box from vehicle
Pull air temp sensor from factory air tube.
Note: pull slowly and straight as it will break coming out
Step 3: Install Spark plugs
This kit comes with NGK Spark Plugs in a one step colder configuration they will need to be gapped
down.
Attention: When pulling spark plug wires off, they will be sealed and in some cases glued in place.
The integrity of the wire should be checked prior to re-installing
Remove old spark plugs (clean area of dirt and grim before removal)
Gap new plugs to .032” with spark plug gapping tool
Apply anti-seize to new spark plugs
Reinstall new plugs
Note: Inspect spark plug well first, if there is excessive dirt or sand clean before removing spark plugs
to avoid dirt or sand falling into the engine.

RIPP Supercharger GEN-2 Stage 2 JEEP Wrangler 3.8 Rev10
C
Co
op
py
yr
ri
ig
gh
ht
t
R
RI
IP
PP
P
S
Su
up
pe
er
rc
ch
ha
ar
rg
ge
er
rs
s
2
20
01
10
0
a
al
ll
l
r
ri
ig
gh
ht
ts
s
r
re
es
se
er
rv
ve
ed
d
6
Step (4A): Fluids and hoses
Draining the coolant is needed in removing and modifying the upper heater hose.
Drain coolant via coolant drain plug located in the lower side of radiator
Note one half gallon should do.
Step (4B): Heater hose modifications
Upper heater hose will need to be cut approximately three inches (3”) from the tip to make room for
bracket, cut and reinstall.
Route hose above oil filler cap (see pictures below).
You can then reinstall and route the hose as imaged
Remove the hose holder to make room for later steps
The lower Heater hose circled in the above image will remain in the stock location

RIPP Supercharger GEN-2 Stage 2 JEEP Wrangler 3.8 Rev10
C
Co
op
py
yr
ri
ig
gh
ht
t
R
RI
IP
PP
P
S
Su
up
pe
er
rc
ch
ha
ar
rg
ge
er
rs
s
2
20
01
10
0
a
al
ll
l
r
ri
ig
gh
ht
ts
s
r
re
es
se
er
rv
ve
ed
d
7
Step: (5) Remove Intake Manifold
Removal of the factory upper Intake Plenum is necessary for proper installation of the supplied
fuel injectors.
Note: there is a locking clip that will need to be pulled back before it actually unplugs
Unplug MAP sensor located at rear of intake manifold.
Twist Map sensor counter clockwise (towards the firewall) and set aside, this will be replaced is later
steps with supplied unit.
Unclip both main breather hoses in the intake plenum (Hoses Have Later Steps)
1. 2.
Unscrew the EGR tube following the sequences above & below (1-4)
3. 4.
View through passenger side fender well
Note: Inner fender well cover will need to be bent back to access this (PIC 4)
Note: You can also
gently bend the
EGR tube out of the
way and slip the
intake plenum out
to avoid having to
take the EGR tube
off. CAREFULLY

RIPP Supercharger GEN-2 Stage 2 JEEP Wrangler 3.8 Rev10
C
Co
op
py
yr
ri
ig
gh
ht
t
R
RI
IP
PP
P
S
Su
up
pe
er
rc
ch
ha
ar
rg
ge
er
rs
s
2
20
01
10
0
a
al
ll
l
r
ri
ig
gh
ht
ts
s
r
re
es
se
er
rv
ve
ed
d
8
Unplug TPS sensor to remove intake manifold in one piece.
Unscrew eight 10mm bolts holding the upper intake plenum to the lower casting.
Before totally removing the intake from the vehicle be sure to remove Brake Booster hose located at rear of
plenum.
Hint: Intake can also be flipped over to the driver’s side for this step, leaving Brake Booster Line in place.
Step: (6A) Removing Factory Injectors
Once the Plenum is out it exposes the fuel rail and six primary injectors
NOTE: Tape lower plenum to avoid contamination or lost bolts
Push Red locking clip out to unplug injectors
Unplug all injectors keeping a keen eye on injector plug location, mark if needed.
Unscrew four 10mm bolts holding
Pull fuel rail and injectors out

RIPP Supercharger GEN-2 Stage 2 JEEP Wrangler 3.8 Rev10
C
Co
op
py
yr
ri
ig
gh
ht
t
R
RI
IP
PP
P
S
Su
up
pe
er
rc
ch
ha
ar
rg
ge
er
rs
s
2
20
01
10
0
a
al
ll
l
r
ri
ig
gh
ht
ts
s
r
re
es
se
er
rv
ve
ed
d
9
Use a flat-head screwdriver to pull back injector’s locking clip
Remove injector and set aside, you will replace these in a later step
NOTE: The locking clip will unexpectedly launch itself, be prepared to keep an eye on it. This is less likely to
happen if you pry the clip slowly and with control.
The factory injector seal will likely remain in the rail; use a small screwdriver to remove it. The
supplied injectors have new seals.
Step: (6B) Installing supplied Injectors
Install supplied injectors into factory fuel rail by applying a small amount of grease or oil on the
injector seal to help it slip in.
Press firmly into place until you are sure they have hit bottom
Reinstall locking clips removed from old injectors
Reinstall rail with newly installed injectors back into lower intake manifold using all the previously
removed hardware.

RIPP Supercharger GEN-2 Stage 2 JEEP Wrangler 3.8 Rev10
C
Co
op
py
yr
ri
ig
gh
ht
t
R
RI
IP
PP
P
S
Su
up
pe
er
rc
ch
ha
ar
rg
ge
er
rs
s
2
20
01
10
0
a
al
ll
l
r
ri
ig
gh
ht
ts
s
r
re
es
se
er
rv
ve
ed
d
10
Step: (6C) Reinstall Intake Plenum
At this point you will reinstall the upper intake plenum, reversing the removal procedures. Two
changes will be made once securely installed.
NOTE: Be sure the Brake Booster Line is reinstalled or otherwise uninterrupted in any way to avoid
possible harm to you or others.
Install supplied MAP sensor in place of the factory unit previously removed using supplied
Phillips-head screws. Plug in and press in locking clip.
Plug in TPS sensor and press in locking clip
Reinstall EGR Tube; Start by placing the lowest most part of the tube in place first. Use a
small amount of anti-seize, grease or oil to help the lower (rusty) hardware rethread.
Check the integrity of the EGR Gasket; this has been a sneaky place for a vacuum leak
Step (7): Installing 30psi PCV Valve (Attention Critical Step)
The PCV valve is a ONE WAY check valve and is critical to the proper running of your
kit. It stops boost from entering the crank-case, but allows vacuum to travel back in
for proper crank-case ventilation.
Note: this valve can be installed anywhere in this line
The supplied PCV valve installs in the crank case hose located behind the throttle
body and slip in place.
Simply cut the hose as shown
Install the supplied PCV Valve with arrow pointing towards the intake manifold (in
the line. The Valve should open in vacuum and close in boost. This valve stops boost
from entering the crank case via the valve cover. Simply blowing through it will help
you determine the direction as well (boost should not go in the valve cover/crank
case)

RIPP Supercharger GEN-2 Stage 2 JEEP Wrangler 3.8 Rev10
C
Co
op
py
yr
ri
ig
gh
ht
t
R
RI
IP
PP
P
S
Su
up
pe
er
rc
ch
ha
ar
rg
ge
er
rs
s
2
20
01
10
0
a
al
ll
l
r
ri
ig
gh
ht
ts
s
r
re
es
se
er
rv
ve
ed
d
11
STEP (8A): Installing Supercharger bracket
Installing the supercharger bracket requires you to remove the factory water pump pulley.
To do so use a 3/8th ratchet and insert it into the tensioner adjustment slot.
Pull up with the ratchet to create more tension to stop pulleys from moving.
Using a 13mm box wrench, loosen bolts on water pump pulley.
Next press down on the tensioner and remove the factory belt and set aside.
Note holes where bracket will be mounted, clean thread prior to installing bracket
STEP (8B): Installing Supercharger bracket
Pulley side faces engine block, air intake faces radiator
DO THIS NOW - To save a step you can pre-install the Cast Aluminum air filter housing (Step11).
However be careful not to rest the assembly on the sensor located on the passenger side of the
radiator.

RIPP Supercharger GEN-2 Stage 2 JEEP Wrangler 3.8 Rev10
C
Co
op
py
yr
ri
ig
gh
ht
t
R
RI
IP
PP
P
S
Su
up
pe
er
rc
ch
ha
ar
rg
ge
er
rs
s
2
20
01
10
0
a
al
ll
l
r
ri
ig
gh
ht
ts
s
r
re
es
se
er
rv
ve
ed
d
12
Install main SDS bracket using supplied bolts
Be sure to align supplied shim hole
Attention Critical Step: For your convenience the supercharger belt comes pre-installed on the SDS.
When mounting SDS to the engine block, be sure both left and right sides of the belt - with slotted side
facing the power steering pulley. See Belt Routing Diagram in next page.
BOLT DIO – Be sure to use Wave Washers on all bolts -

RIPP Supercharger GEN-2 Stage 2 JEEP Wrangler 3.8 Rev10
C
Co
op
py
yr
ri
ig
gh
ht
t
R
RI
IP
PP
P
S
Su
up
pe
er
rc
ch
ha
ar
rg
ge
er
rs
s
2
20
01
10
0
a
al
ll
l
r
ri
ig
gh
ht
ts
s
r
re
es
se
er
rv
ve
ed
d
13
Install support bracket as pictured using supplied bolts
Install rear support bracket as pictured using supplied bolts and spacer
o Use a screw driver to help lock up the bolts on the water pump pulley
o Secure Braided Oil Drain line to chassis using Zip-Ties
Note: This line will need to be accessible for draining oil from supercharger. Vortech requires this oil change every
7000 miles. DO NOT OVER FILL BLOWER EVER! Do not kink the line it will leak causing irreversible damage to your
supercharger (a $2500.00 item)

RIPP Supercharger GEN-2 Stage 2 JEEP Wrangler 3.8 Rev10
C
Co
op
py
yr
ri
ig
gh
ht
t
R
RI
IP
PP
P
S
Su
up
pe
er
rc
ch
ha
ar
rg
ge
er
rs
s
2
20
01
10
0
a
al
ll
l
r
ri
ig
gh
ht
ts
s
r
re
es
se
er
rv
ve
ed
d
14
Step: (9A) Air To Air Intercooler Preparation
Installing the Front Mounted Air to Air Intercooler (FMIC) will cool the boosted air produced by the supercharger. This
intercooler has been specially designed to both cool the air passing through it and be as little as a restriction as possible
to the cooling system.
Remove factory radiator grill via the locking clips
Once all clips are out pull firmly on the grill, there are a series of press is clips located along the bottom
of the grill, they should all come loose easily.
Once grill is removed locate the soft plastic flaps located on either side of the radiator.
Using a clip tool or a flathead screwdriver pry the push tabs loose
Use an Razor Knife or Razor Blade to cut the plastic as shown is the above picture
Using supplied template – align the two corresponding holes (LAST PAGE)
Use an air saw or dermal-tool to open area and make room for piping to pass
For a cleaner look use a file to clean sharp edges or plastic

RIPP Supercharger GEN-2 Stage 2 JEEP Wrangler 3.8 Rev10
C
Co
op
py
yr
ri
ig
gh
ht
t
R
RI
IP
PP
P
S
Su
up
pe
er
rc
ch
ha
ar
rg
ge
er
rs
s
2
20
01
10
0
a
al
ll
l
r
ri
ig
gh
ht
ts
s
r
re
es
se
er
rv
ve
ed
d
15
Step: (9B) Air To Air Intercooler Installation
Rotate the Lower coolant hose clamp counter clockwise towards radiator to make room for piping.
Mount intercooler as close to center (Left to right) as possible in open radiator space
Using the supplied “L” brackets and hardware, simply rest intercooler on lower radiator support and bolt into
place as pictured.
A properly installed intercooler should have a half inch+/- between the intercooler and condenser.
TIP: For a neater look you can paint these brackets black to make them more esthetically pleasing
NOTE: Some vehicles are equipped with outside air temp sensors located on the driver’s side lower radiator
support. Simply lift out of way when working in this area.
NOTE: Please make sure the intercooler is not interfering in any way with the condenser or radiator behind
it. It will wear a hole and render the condenser useless.

RIPP Supercharger GEN-2 Stage 2 JEEP Wrangler 3.8 Rev10
C
Co
op
py
yr
ri
ig
gh
ht
t
R
RI
IP
PP
P
S
Su
up
pe
er
rc
ch
ha
ar
rg
ge
er
rs
s
2
20
01
10
0
a
al
ll
l
r
ri
ig
gh
ht
ts
s
r
re
es
se
er
rv
ve
ed
d
16
Step: (9C) Air To Air Intercooler Installation Piping
Loosen 10mm bolt holding Power Steering Reservoir in place and set aside
1. Install 90* 2.75-2.50” Coupler facing the front of the vehicle towards previously cut hole
2. Install Pipe-1 starting from Superchargers outlet into FMIC using 2.5 straight coupler
3. Install 2.5” Straight Coupler and Pipe-2 on the outlet side of the FMIC
Continue next page

RIPP Supercharger GEN-2 Stage 2 JEEP Wrangler 3.8 Rev10
C
Co
op
py
yr
ri
ig
gh
ht
t
R
RI
IP
PP
P
S
Su
up
pe
er
rc
ch
ha
ar
rg
ge
er
rs
s
2
20
01
10
0
a
al
ll
l
r
ri
ig
gh
ht
ts
s
r
re
es
se
er
rv
ve
ed
d
17
1. Install Pipe-3 to Pipe-2 using straight 2.5” coupler
2. Install Pipe-4 with Blow Off Valve Attached into Pipe-3 and 45* Throttle-body coupler
3. Run the 5/32” x 8” vacuum line to the open nipple teeing in from the 5/16TH 20” hose running from
the intake manifold to the EVAP, this line is outlined in green in an earlier step and in the vacuum
diagram on page .
4. Make sure to reinstall the air temp sensor previously removed and plug it in
Install supplied clamps
Align all piping, once you are certain the pipes are not interfering start tightening the clamps.
NOTE: For a cleaner look, install all the clamps in the same direction
NOTE: Please make sure the intercooler is not interfering in any way with the condenser or radiator behind it.
It will wear a hole and render the condenser useless.

RIPP Supercharger GEN-2 Stage 2 JEEP Wrangler 3.8 Rev10
C
Co
op
py
yr
ri
ig
gh
ht
t
R
RI
IP
PP
P
S
Su
up
pe
er
rc
ch
ha
ar
rg
ge
er
rs
s
2
20
01
10
0
a
al
ll
l
r
ri
ig
gh
ht
ts
s
r
re
es
se
er
rv
ve
ed
d
18
Step: (10) Vacuum Line (Attention Critical Step)
Locate main vacuum line leading to EVAP valve behind throttle body.
Cut as pictured below
Use supplied Tee fittings and line
Route vacuum line to By Pass Valve as pictured
Zip-Tie line to upper coolant hose to avoid interference with drive belt
Step (11): Installing Air Filter
Locate Cast Aluminum Air Filter Plenum with clamp pre-installed
Note: a small amount of lubricant can be applied to either supercharger’s inlet tube or the Cast Plenums inner
surface to help this slip over. Be careful not to rest the assembly on the sensor located on the passenger side of the radiator.
Squeeze Plenum in-between radiator and Supercharger until centered with air inlet
Wiggle and/or turn it into place (This is tight) be sure to leave clamp accessible for future service
Leave facing up
Install air filter - be sure to leave clamp accessible for future service
Locate hose coming from passenger side valve cover and connect to hose coming from center of
supplied air filter.

RIPP Supercharger GEN-2 Stage 2 JEEP Wrangler 3.8 Rev10
C
Co
op
py
yr
ri
ig
gh
ht
t
R
RI
IP
PP
P
S
Su
up
pe
er
rc
ch
ha
ar
rg
ge
er
rs
s
2
20
01
10
0
a
al
ll
l
r
ri
ig
gh
ht
ts
s
r
re
es
se
er
rv
ve
ed
d
19
Step (12): Install Supplied Supercharger Gear Case Vent:
The supercharger came with a tag and fitting attached to it
This is the Gear-Case Vent, Remove shipping plug and save for future service or sale.
NOTE: If this is not installed you will blow the seals out of the blower, leaking oil and causing
irreversible damage to the unit. Vortech will instantly know this wrong and void any warranties
expressed or implied.
Step (13): Wrapping it up (Attention Critical Step)
Going over all your bolts, clamps, hoses, tie wraps, and fluids twice (Don’t skip this step).
Refill your engine oil with fresh oil and filter
Make sure you followed the oil breather instructions for self contained blowers
Check oil level in self contained units before starting the vehicle
Refill your coolant (as per the factory guide lines)
Make sure all plug connections are solid and no wires are exposed
Go over vacuum line and make sure all lines are attached
Make sure all hoses are tight
Make sure all ignition wires are tight and clicked in
Step (14): Diablo Sport Predator Instruction Steps
2007-2011 JK Diablo’s are Pre- Programmed
During the file writing process your dash board will flash and ring several times.
Please follow the tools steps, using this pictorial as a guideline
/