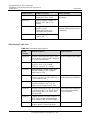
Huawei IDS2000 Dual-Row Aisle Containment Installation guide
- Category
- Security door controllers
- Type
- Installation guide

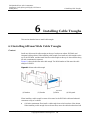
IDS2000 Dual-Row Aisle Containment
V200R002
Installation Guide (Split-type
Skylight, Old-Version Sliding
Door)
Issue
02
Date
2015-06-30
HUAWEI TECHNOLOGIES CO., LTD.

Issue 02 (2015-06-30)
Huawei Proprietary and Confidential
Copyright © Huawei Technologies Co., Ltd.
i
Copyright © Huawei Technologies Co., Ltd. 2015. All rights reserved.
No part of this document may be reproduced or transmitted in any form or by any means without prior
written consent of Huawei Technologies Co., Ltd.
Trademarks and Permissions
and other Huawei trademarks are trademarks of Huawei Technologies Co., Ltd.
All other trademarks and trade names mentioned in this document are the property of their respective
holders.
Notice
The purchased products, services and features are stipulated by the contract made between Huawei and
the customer. All or part of the products, services and features described in this document may not be
within the purchase scope or the usage scope. Unless otherwise specified in the contract, all statements,
information, and recommendations in this document are provided "AS IS" without warranties, guarantees or
representations of any kind, either express or implied.
The information in this document is subject to change without notice. Every effort has been made in the
preparation of this document to ensure accuracy of the contents, but all statements, information, and
recommendations in this document do not constitute a warranty of any kind, express or implied.
Huawei Technologies Co., Ltd.
Address:
Huawei Industrial Base
Bantian, Longgang
Shenzhen 518129
People's Republic of China
Website:
http://e.huawei.com

IDS2000 Dual-Row Aisle Containment
Installation Guide (Split-type Skylight, Old-Version
Sliding Door)
About This Document
Issue 02 (2015-06-30)
Huawei Proprietary and Confidential
Copyright © Huawei Technologies Co., Ltd.
ii
About This Document
Purpose
This document describes how to install dual row aisle containment for the IDS2000 data
center (IDS2000 for short).
Intended Audience
This document is intended for:
Hardware installation engineers
Commissioning engineers
Maintenance engineers
Technical support engineers
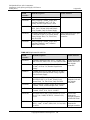
Symbol Conventions
The symbols that may be found in this document are defined as follows.
Symbol
Description
Indicates an imminently hazardous situation which, if not
avoided, will result in death or serious injury.
Indicates a potentially hazardous situation which, if not
avoided, could result in death or serious injury.
Indicates a potentially hazardous situation which, if not
avoided, may result in minor or moderate injury.
Indicates a potentially hazardous situation which, if not
avoided, could result in equipment damage, data loss,
performance deterioration, or unanticipated results.
NOTICE is used to address practices not related to personal
injury.
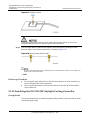
Calls attention to important information, best practices and tips.
NOTE is used to address information not related to personal

IDS2000 Dual-Row Aisle Containment
Installation Guide (Split-type Skylight, Old-Version
Sliding Door)
About This Document
Issue 02 (2015-06-30)
Huawei Proprietary and Confidential
Copyright © Huawei Technologies Co., Ltd.
iii
Symbol
Description
injury, equipment damage, and environment deterioration.
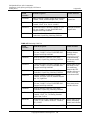
Change History
Changes between document issues are cumulative. The latest document issue contains all the
changes made in earlier issues.
Issue 02 (2015-06-30)
Updated the skylight, sliding door, and cross-pillar aisle containment installation methods
Issue 01 (2014-12-20)
This issue is the first official release.

IDS2000 Dual-Row Aisle Containment
Installation Guide (Split-type Skylight, Old-Version
Sliding Door)
Contents
Issue 02 (2015-06-30)
Huawei Proprietary and Confidential
Copyright © Huawei Technologies Co., Ltd.
iv
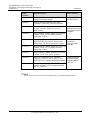
Contents
About This Document .................................................................................................................... ii
1 Installation Preparations ............................................................................................................. 1
1.1 Tools and Meters ........................................................................................................................................................... 1
1.2 Installation Process ....................................................................................................................................................... 3
1.3 Installation Scenarios .................................................................................................................................................... 4
2 Installing Cabinets ........................................................................................................................ 6
2.1 Removing the Cabinet from the Pallet .......................................................................................................................... 6
2.2 Placing and Securing Cabinets...................................................................................................................................... 9
2.3 Installing Adaptive Frames ......................................................................................................................................... 12
2.3.1 Overview of Adaptive Frames ................................................................................................................................. 12
2.3.2 Installing PDU8000 Adaptive Frames ..................................................................................................................... 13
2.3.3 Installing NetCol5000-C Enclosure Frames ............................................................................................................ 18
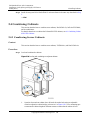
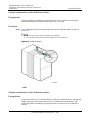
2.4 Combining Cabinets ................................................................................................................................................... 20
2.4.1 Combining Server Cabinets ..................................................................................................................................... 20
2.4.2 Combining Air Conditioners .................................................................................................................................... 21
2.5 Installing Cabinet Accessories .................................................................................................................................... 28
2.5.1 Installing Cabinet Sealing Plates ............................................................................................................................. 28
2.5.2 Removing Rack Power Distribution Unit ................................................................................................................ 29
3 Installation Scenarios in Dual Row Aisle Containment ..................................................... 31
3.1 Installation Flowchart ................................................................................................................................................. 31
3.2 Installing Skylights ..................................................................................................................................................... 31
3.3 Installing Cabinet Sealing Plates ................................................................................................................................ 45
3.4 Installing End Doors ................................................................................................................................................... 46
3.4.1 Installing a Sliding Door .......................................................................................................................................... 47
3.4.2 Installing a Double Revolving Door (Compatible with Access Control Components) ............................................ 60
4 Installation Scenarios with Pillars ........................................................................................... 74
4.1 Installation Scenarios .................................................................................................................................................. 74
4.2 Installation Flowchart ................................................................................................................................................. 76
4.3 Installing Sealing Components in the Scenarios with a Column ................................................................................ 77
4.3.1 Installing Sealing Plates and Skylight Connective Plates ........................................................................................ 77
4.3.2 Installing Adjustable Skylight Ceilings.................................................................................................................... 78

IDS2000 Dual-Row Aisle Containment
Installation Guide (Split-type Skylight, Old-Version
Sliding Door)
Contents
Issue 02 (2015-06-30)
Huawei Proprietary and Confidential
Copyright © Huawei Technologies Co., Ltd.
v
4.3.3 Securing Beams to Holder Sides.............................................................................................................................. 82
4.3.4 Installing a PC Plate on the Top of the Skylight ...................................................................................................... 82
4.3.5 Installing Side Pressure Plates ................................................................................................................................. 84
4.3.6 Installing a Cable Trough Support Plate .................................................................................................................. 85
5 Installing Cable Trays ................................................................................................................ 87
5.1 Installing 390 mm High Cable Trays (for 2 m and 2.2 m High Cabinets) .................................................................. 87
5.2 Installing 190 mm High Cable Trays (for 2.2 m High Cabinets) ................................................................................ 91
5.3 Installing Cable Trays in Scenarios with Columns ..................................................................................................... 92
6 Installing Cable Troughs ........................................................................................................... 93
6.1 Installing 600 mm Wide Cable Troughs ..................................................................................................................... 93
6.2 Installing 300 mm Wide Cable Troughs ..................................................................................................................... 98
6.3 Installing 800 mm Wide Cable Troughs ..................................................................................................................... 99
6.4 Installing Cable Troughs on the Top of In Row Air Conditioners Inside the Modular Data Center ......................... 100
6.5 Installing End Panels for Cable Troughs .................................................................................................................. 100
7 Installing the Access Control System .................................................................................... 102
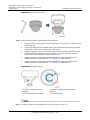
7.1 Installing Magnetic Locks and Magnets ................................................................................................................... 103
7.2 Installing a Card Reader ........................................................................................................................................... 109
7.3 Installing an Access Control Box .............................................................................................................................. 112
7.4 Installing Switches .................................................................................................................................................... 115
8 (Optional) Installing the Lighting System ........................................................................... 119
8.1 Installing Aisle Lights ............................................................................................................................................... 119
8.2 Installing an In-cabinet Light .................................................................................................................................... 123
9 Installing Auxiliary Devices ................................................................................................... 127
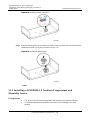
9.1 Installing Monitoring Components ........................................................................................................................... 127
9.1.1 Installing the RH2288 ............................................................................................................................................ 127
9.1.2 Installing a LAN Switch ........................................................................................................................................ 130
9.1.3 Installing a CCU Collector .................................................................................................................................... 131
9.1.4 Installing an ECC Collector ................................................................................................................................... 134
9.1.5 Installing an NVR .................................................................................................................................................. 135
9.1.6 Installing and Connecting Monitoring Components .............................................................................................. 135
9.1.7 Installing a Camera ................................................................................................................................................ 137
9.1.8 Installing a Smoke Detector ................................................................................................................................... 139
9.1.9 Installing a WS302M2A-5 Ambient Temperature and Humidity Sensor ............................................................... 140
9.1.10 Installing an Infrared Sensor ................................................................................................................................ 142
9.1.11 Installing a WLDS900 Water Sensor ................................................................................................................... 143
9.1.12 Installing the WCON-22Z Skylight Ceiling Controller ....................................................................................... 146
9.1.13 Installing a WCON-14Z Skylight Controller ....................................................................................................... 147
9.1.14 Installing the Lighting Control Box ..................................................................................................................... 148
10 Cable Layout ............................................................................................................................ 149

IDS2000 Dual-Row Aisle Containment
Installation Guide (Split-type Skylight, Old-Version
Sliding Door)
Contents
Issue 02 (2015-06-30)
Huawei Proprietary and Confidential
Copyright © Huawei Technologies Co., Ltd.
vi
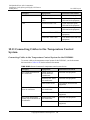
10.1 Cable Routing for the Dual-row Aisle Containment Scenario ................................................................................ 149
10.2 Installation Positions and Cable Routing for Monitoring Components .................................................................. 152
10.3 Connecting Cables to the Double Door Electromagnetic Locks and Emergency Door Release Button ................. 155
10.4 Cable Routing for the Cabinet Lighting .................................................................................................................. 158
10.5 Cable Routing for the Aisle Lighting System ......................................................................................................... 159
10.6 Cable Routing for Skylight Magnetic Locks .......................................................................................................... 162
10.7 Routing Power Cables ............................................................................................................................................ 163
10.8 Grounding Cabinets ................................................................................................................................................ 165
10.9 Routing Signal Cables ............................................................................................................................................ 166
10.10 Installing Cables for the Power Supply and Distribution System ......................................................................... 167
10.10.1 Connecting Cables to Battery Cabinets ............................................................................................................. 167
10.10.2 Connecting Cables to the Power Supply and Distribution System .................................................................... 190
10.11 Connecting Cables to the Temperature Control System ........................................................................................ 191
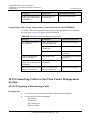
10.12 Connecting Cables to the Data Center Management System ................................................................................ 192
10.12.1 Preparing a Monitoring Cable ............................................................................................................................ 192
10.12.2 Port Description for the CCU Collector ............................................................................................................. 195
10.12.3 Port Description for the ECC Collector ............................................................................................................. 202
10.12.4 Connecting a Monitoring Cable to a CCU Collector ......................................................................................... 204
10.12.5 Connecting a Monitoring Cable to the ECC Collector ...................................................................................... 205
10.12.6 Connecting a Monitoring Cable to a LAN Switch ............................................................................................. 206
10.12.7 Connecting a Monitoring Cable to an RH2288.................................................................................................. 207
10.12.8 Cable Connection for the NetEco ...................................................................................................................... 207
10.12.9 Connecting Monitoring Cables to a WCON-22Z Skylight Controller ............................................................... 208
10.12.10 Connecting a Monitoring Cable to a WCON-14Z Skylight Ceiling Controller ............................................... 211
10.12.11 Connecting a Monitoring Cable to a Camera ................................................................................................... 214
10.12.12 Connecting a Monitoring Cable to a Door Status Sensor ................................................................................ 215
10.12.13 Connecting a Monitoring Cable for the SD-09A-HWA Current-Type Smoke Sensor ..................................... 216
10.12.14 Connecting a Monitoring Cable to the SDLH-94R Dry Contact-Type Smoke Sensor .................................... 217
10.12.15 Connecting a Monitoring Cable to a WS302M2A-5 Ambient Temperature and Humidity Sensor ................. 218
10.12.16 Connecting a Cable to the WLDS900 Water Sensor ........................................................................................ 219
10.12.17 Connecting Cables to the SJ535A Water Sensor .............................................................................................. 220
10.12.18 Connecting a Monitoring Cable to a Point Water Sensor ................................................................................ 222
10.12.19 Connecting a Monitoring Cable to a Hydrogen Sensor ................................................................................... 223
10.12.20 Connecting a Monitoring Cable to an Access Controller in a Modular Data Center ....................................... 223
10.12.21 Connecting a Monitoring Cable to the MS899 Electronic Door Lock ............................................................. 225
10.12.22 Installing the SMS Modem .............................................................................................................................. 227
10.12.23 Connecting Monitoring Cables to a Lighting Control Box .............................................................................. 228
10.12.24 (Optional) Connecting a Monitoring Cable to an NVR ................................................................................... 229
10.12.25 Connecting a Monitoring Cable to an ACRD502 Air Conditioner .................................................................. 230
10.12.26 Connecting a Monitoring Cable to a PEX Air Conditioner ............................................................................. 231
10.12.27 Connecting a Monitoring Cable to a CRV Air Conditioner ............................................................................. 233
10.12.28 Connecting a Monitoring Cable to a DataMate3000 Air Conditioner (Method One) ...................................... 234

IDS2000 Dual-Row Aisle Containment
Installation Guide (Split-type Skylight, Old-Version
Sliding Door)
Contents
Issue 02 (2015-06-30)
Huawei Proprietary and Confidential
Copyright © Huawei Technologies Co., Ltd.
vii
10.12.29 Connecting a Monitoring Cable to a DataMate3000 Air Conditioner (Method Two) ..................................... 236
10.12.30 Connecting a Monitoring Cable to a NetCol5000-C025 .................................................................................. 237
10.12.31 Connecting a Monitoring Cable to a NetCol5000-C030 .................................................................................. 238
10.12.32 Connecting a Monitoring Cable to a NetCol5000-A ....................................................................................... 239
10.12.33 Connecting a Monitoring Cable to a NetCol8000-A ....................................................................................... 239
10.12.34 Connecting a Monitoring Cable to a HIPULSE-NXL UPS ............................................................................. 239
10.12.35 Connecting a Monitoring Cable to a HIPULSE U UPS................................................................................... 240
10.12.36 Connecting a Monitoring Cable to a Galaxy7000 UPS ................................................................................... 240
10.12.37 Connecting a Monitoring Cable to a Delta 120 kVA UPS ............................................................................... 241
10.12.38 Connecting a Monitoring Cable to a Riello UPS ............................................................................................. 241
10.12.39 Connecting a Monitoring Cable to a UPS2000-G ............................................................................................ 242
10.12.40 Connecting a Monitoring Cable to a UPS5000-E ............................................................................................ 242
10.12.41 Connecting a Monitoring Cable to a UPS8000-D ............................................................................................ 243
10.12.42 Connecting a Monitoring Cable to a YD2010 Coulometer .............................................................................. 244
10.12.43 Connecting a Monitoring Cable to a PD800 Coulometer ................................................................................ 245
10.12.44 Connecting a Monitoring Cable to a PD510 Coulometer ................................................................................ 246
10.12.45 Connecting a Monitoring Cable to a DIRISA20 Coulometer .......................................................................... 246
10.12.46 Connecting a Monitoring Cable to an ABB OTM ATS ................................................................................... 247
10.12.47 Connecting a Monitoring Cable to a TU520A ATS ......................................................................................... 248
10.12.48 Connecting a Monitoring Cable to a PDU8000-0250ACV4-SCA005 ............................................................ 249
10.13 Connecting Cables to the Fire Extinguishing System ........................................................................................... 250
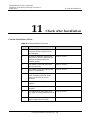
11 Check after Installation .......................................................................................................... 252
A Appendix ................................................................................................................................... 255
A.1 Combining Liebert APM UPS Cabinets .................................................................................................................. 255
A.2 Installing Skylight Sealing Kits (for Double Doors) ................................................................................................ 257
A.3 (Optional) Installing Double-Swing Doors .............................................................................................................. 259
A.4 (Optional) Connecting Linkage Cables Between the Gas Extinguishing Controller and ATS ................................. 262
A.5 (Optional) Connecting Linkage Cables Between the Fire Extinguishing System and Access Controller................ 264
A.6 Cable List ................................................................................................................................................................. 265

IDS2000 Dual-Row Aisle Containment
Installation Guide (Split-type Skylight, Old-Version
Sliding Door)
1 Installation Preparations
Issue 02 (2015-06-30)
Huawei Proprietary and Confidential
Copyright © Huawei Technologies Co., Ltd.
1
1 Installation Preparations
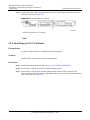
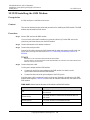
1.1 Tools and Meters
You need to prepare the tools and meters required for installation.
Table 1-1 Tools and meters
Name, Specifications, and Appearance
Protective gloves
Marker
Measuring tape (5
m)
Level
Ladder (2 m)
Phillips screwdriver
(M4, M6, and M8)
Phillips screwdriver
(M4, less than 100
mm long)
Flat-head
screwdriver (2-5
mm)
Adjustable wrench
(6'')
Socket wrench (M6,
M8, and M12)
Hexkey
Box-end wrench
(M6, M8, and M12)
Electric screwdriver
Hand drill (Φ3,
Φ3.7, Φ4, Φ4.5, Φ5,
Φ6, Φ10, and Φ12
drill bit)
Hammer drill (Φ16
drill bit)
Heat gun

IDS2000 Dual-Row Aisle Containment
Installation Guide (Split-type Skylight, Old-Version
Sliding Door)
1 Installation Preparations
Issue 02 (2015-06-30)
Huawei Proprietary and Confidential
Copyright © Huawei Technologies Co., Ltd.
2
Name, Specifications, and Appearance
Pressure gauge
Electrician's knife
Impact tool
Polyvinyl chloride
(PVC) insulation
tape
Needle-nose pliers
Diagonal pliers
RJ11 crimping tool
Crimping tool
Wire stripper
Hydraulic pliers
Wire clippers
Nylon cable ties
Multimeter
Electroprobe
Brush
Claw hammer
Vacuum cleaner
Hacksaw
Handsaw
Right angle
heat-shrink tubing
NA
NA
NA
NA
NA
NA
This preceding table only lists the common tools for installation and cable connection. For more
information about other required tools, see the documentation for each component.

IDS2000 Dual-Row Aisle Containment
Installation Guide (Split-type Skylight, Old-Version
Sliding Door)
1 Installation Preparations
Issue 02 (2015-06-30)
Huawei Proprietary and Confidential
Copyright © Huawei Technologies Co., Ltd.
3
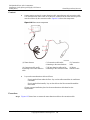
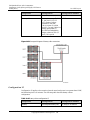
1.2 Installation Process
Figure 1-1 shows the flowchart for installing dual row aisle containment.
Figure 1-1 Flowchart for installing dual row aisle containment
To protect your hands from being hurt by mechanical parts, wear gloves during the entire process of
installing mechanical parts.
This installation flowchart is for reference only. Adjust the sequence of the steps during the
installation process based on the actual conditions.
Cabinets with different heights are configured in this project, and this guide only takes a 2000 mm
high cabinet as an example to explain the cabinet installation.
Collect and store the fittings from the packages during the installation process. The fittings are
required in the subsequent steps.

IDS2000 Dual-Row Aisle Containment
Installation Guide (Split-type Skylight, Old-Version
Sliding Door)
1 Installation Preparations
Issue 02 (2015-06-30)
Huawei Proprietary and Confidential
Copyright © Huawei Technologies Co., Ltd.
4
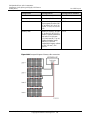
1.3 Installation Scenarios
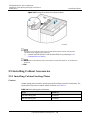
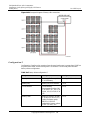
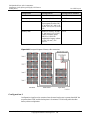
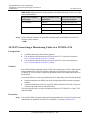
Figure 1-2 shows the IDS2000 dual-row aisle containment scenario. Table 1-2 lists the
components to be installed.
Figure 1-2 Dual-row aisle containment
Table 1-2 Installation components for the dual-row aisle containment
No.
Component
BOM No.
1
300 mm wide cable trough
21500560
600 mm wide cable trough
21500551
800 mm wide cable trough
21500702
2
End panel for a cable trough
21500561
3
Server cabinet
02002553, 02002554, 02002555, 02002556,
02002557, 02002558, 02002559, 02002560
Network cabling cabinet
02002562, 02002563, 02002564, 02002565,
02002566, 02002567, 02002568, 02002569
Battery cabinet
02001981, 02001982, 02001983
4
Sliding door
21500911
Upper frame of a sliding door
21500912, 21500945

IDS2000 Dual-Row Aisle Containment
Installation Guide (Split-type Skylight, Old-Version
Sliding Door)
1 Installation Preparations
Issue 02 (2015-06-30)
Huawei Proprietary and Confidential
Copyright © Huawei Technologies Co., Ltd.
5
No.
Component
BOM No.
Mounting kit of a sliding door
21500913, 21500914
Double revolving door
21050388, 21500946
Upper frame of a double
revolving door
21500716, 21500950
5
Rear frame of a PDU8000
21500952
Rear frame of a UPS
21500951
Rear frame of a
NetCol5000-A035
21500642
Rear frame of a
NetCol5000-A020
52271152
6
Cable ladder
21151136
7
Control skylight
21500918, 21500944
Rotating skylight
21500915
Flat skylight
21500915, 21500916, 21500917
Skylight connective plate
21500919, 21500921, 21500922

IDS2000 Dual-Row Aisle Containment
Installation Guide (Split-type Skylight, Old-Version
Sliding Door)
2 Installing Cabinets
Issue 02 (2015-06-30)
Huawei Proprietary and Confidential
Copyright © Huawei Technologies Co., Ltd.
6
2 Installing Cabinets
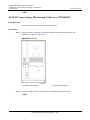
2.1 Removing the Cabinet from the Pallet
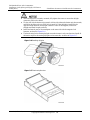
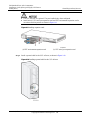
Context
The 2000 mm high cabinet and 2200 mm high cabinet are secured to pallets in different
manners, so they are removed from pallets also in different ways.
To avoid personal injury, three to four persons need to cooperate with each other when
moving a cabinet.
An open door helps move a cabinet, but you need to prevent the door from falling off.
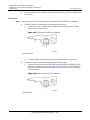
Procedure
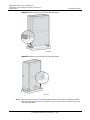
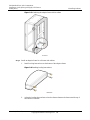
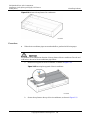
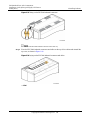
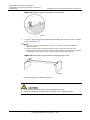
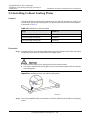
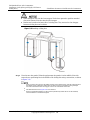
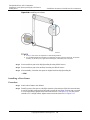
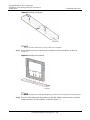
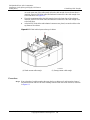
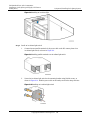
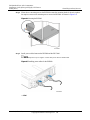
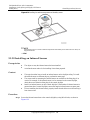
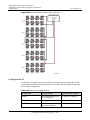
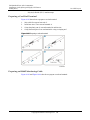
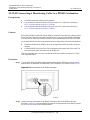
Step 1 After the packed IT cabinet arrives onsite, unpack the cabinet. Figure 2-1 shows an unpacked
2000 mm high cabinet, and Figure 2-2 shows an unpacked 2200 mm high cabinet.
Do not damage the cabinet exterior.

IDS2000 Dual-Row Aisle Containment
Installation Guide (Split-type Skylight, Old-Version
Sliding Door)
2 Installing Cabinets
Issue 02 (2015-06-30)
Huawei Proprietary and Confidential
Copyright © Huawei Technologies Co., Ltd.
7
Figure 2-1 Unpacked 2000 mm high cabinet
Figure 2-2 Unpacked 2200 mm high cabinet
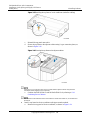
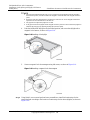
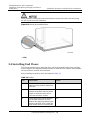
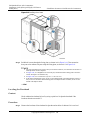
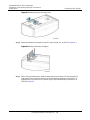
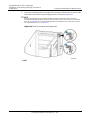
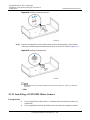
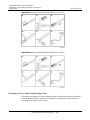
Step 2 Remove the screws that secure the cabinet to the pallet.

IDS2000 Dual-Row Aisle Containment
Installation Guide (Split-type Skylight, Old-Version
Sliding Door)
2 Installing Cabinets
Issue 02 (2015-06-30)
Huawei Proprietary and Confidential
Copyright © Huawei Technologies Co., Ltd.
8
Figure 2-3 Removing screws from the 2000 mm high cabinet
Figure 2-4 Removing screws from the 2200 mm high cabinet
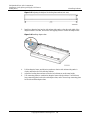
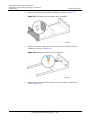
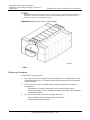
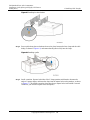
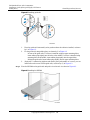
Step 3 Raise the anchor screws for the 2000 mm high cabinet, which facilitates sliding the cabinet
removed from the pallet. Figure 2-5 shows how to raise anchor screws. Skip this step for the
2200 mm high cabinet.

IDS2000 Dual-Row Aisle Containment
Installation Guide (Split-type Skylight, Old-Version
Sliding Door)
2 Installing Cabinets
Issue 02 (2015-06-30)
Huawei Proprietary and Confidential
Copyright © Huawei Technologies Co., Ltd.
9
Figure 2-5 Raising anchor screws for a 2000 mm high cabinet
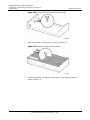
Step 4 Remove the cabinet from the pallet.
----End
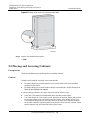
2.2 Placing and Securing Cabinets
Prerequisites
Check the installation space and fittings before installing cabinets.
Context
Cabinets can be installed in secured or non-secured mode.
For details about how to install cabinets in non-secured mode, refer to the procedure
described in this section.
For details about how to install NetHos cabinets in secured mode, see the description in
Bases for the IDS2000 User Manual.
A cabinet can be positioned in two ways: draw lines and use a laser locator.
Draw lines. This method is recommended and is described in this chapter.
Use a laser locator. If a laser locator is used, determine the position, height, and levelness
for the front cabinet in one row based on the floor texture or the outlines of floor tiles.
Then determine the position for the front cabinet in the other row. Determine positions
for the other cabinets in sequence based on the positions of the two front cabinets. Check
that the cabinets level with each other using a laser locator.

IDS2000 Dual-Row Aisle Containment
Installation Guide (Split-type Skylight, Old-Version
Sliding Door)
2 Installing Cabinets
Issue 02 (2015-06-30)
Huawei Proprietary and Confidential
Copyright © Huawei Technologies Co., Ltd.
10
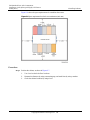
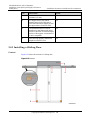
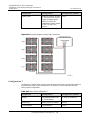
Figure 2-6 shows the space requirements for a modular data center.
Figure 2-6 Space requirement for a dual-row containment (unit: mm)
Procedure
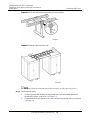
Step 1 Position the cabinet, as shown in Figure 2-7.
1. Use a level to check the floor levelness.
2. Measure the distances by using a measuring tape, and mark lines by using a marker.
3. Check the cabinet levelness by using a level.

IDS2000 Dual-Row Aisle Containment
Installation Guide (Split-type Skylight, Old-Version
Sliding Door)
2 Installing Cabinets
Issue 02 (2015-06-30)
Huawei Proprietary and Confidential
Copyright © Huawei Technologies Co., Ltd.
11
Figure 2-7 Marking cabinet positions
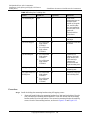
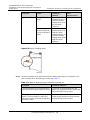
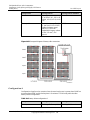
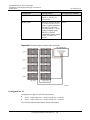
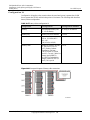
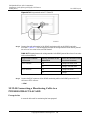
Step 2 Mark the array cabinet position in a containment scenario according to the dimensions shown
in Figure 2-8 and the equipment room space.
Figure 2-8 Modular data center layout (left) and position for installing a cabinet (right) (unit: mm)
(1) Cabinet door

IDS2000 Dual-Row Aisle Containment
Installation Guide (Split-type Skylight, Old-Version
Sliding Door)
2 Installing Cabinets
Issue 02 (2015-06-30)
Huawei Proprietary and Confidential
Copyright © Huawei Technologies Co., Ltd.
12
When positioning a NetCol5000-C, ensure that its front frame is aligned with that of the adjacent
cabinet.
If a double-swing door is installed, check that the doorheads are 1200 mm away from each other.
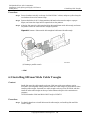
Step 3 Mark the position of the other array cabinet.
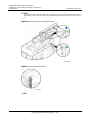
Step 4 Use the PDU8000 as the reference and place cabinets one by one according to the engineering
layout drawing.
Use the PVC pipe for the control skylight (BOM number: 21500918 or 21500944) to check the aisle
width.
If the aisle width is not 1200 mm, adjust the cabinet positions to ensure a 1200 mm wide aisle.
The distance checked by the PVC pipe is the distance between the two front doors of the cabinets on
both sides of the aisle.
Do not throw away the PVC pipe after use. You need to use it when installing skylights.
Figure 2-9 Checking the aisle width (unit: mm)
----End
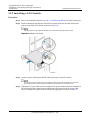
2.3 Installing Adaptive Frames
2.3.1 Overview of Adaptive Frames
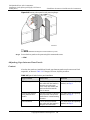
Table 2-1 provides information about adaptive frames.
Table 2-1 Adaptive frames
Adaptive Frame
BOM No.
Description
NetCol5000-C enclosure
frame
21500710
Configured if the number of
NetCol5000-Cs is odd. The
item is used to increase the
Page is loading ...
Page is loading ...
Page is loading ...
Page is loading ...
Page is loading ...
Page is loading ...
Page is loading ...
Page is loading ...
Page is loading ...
Page is loading ...
Page is loading ...
Page is loading ...
Page is loading ...
Page is loading ...
Page is loading ...
Page is loading ...
Page is loading ...
Page is loading ...
Page is loading ...
Page is loading ...
Page is loading ...
Page is loading ...
Page is loading ...
Page is loading ...
Page is loading ...
Page is loading ...
Page is loading ...
Page is loading ...
Page is loading ...
Page is loading ...
Page is loading ...
Page is loading ...
Page is loading ...
Page is loading ...
Page is loading ...
Page is loading ...
Page is loading ...
Page is loading ...
Page is loading ...
Page is loading ...
Page is loading ...
Page is loading ...
Page is loading ...
Page is loading ...
Page is loading ...
Page is loading ...
Page is loading ...
Page is loading ...
Page is loading ...
Page is loading ...
Page is loading ...
Page is loading ...
Page is loading ...
Page is loading ...
Page is loading ...
Page is loading ...
Page is loading ...
Page is loading ...
Page is loading ...
Page is loading ...
Page is loading ...
Page is loading ...
Page is loading ...
Page is loading ...
Page is loading ...
Page is loading ...
Page is loading ...
Page is loading ...
Page is loading ...
Page is loading ...
Page is loading ...
Page is loading ...
Page is loading ...
Page is loading ...
Page is loading ...
Page is loading ...
Page is loading ...
Page is loading ...
Page is loading ...
Page is loading ...
Page is loading ...
Page is loading ...
Page is loading ...
Page is loading ...
Page is loading ...
Page is loading ...
Page is loading ...
Page is loading ...
Page is loading ...
Page is loading ...
Page is loading ...
Page is loading ...
Page is loading ...
Page is loading ...
Page is loading ...
Page is loading ...
Page is loading ...
Page is loading ...
Page is loading ...
Page is loading ...
Page is loading ...
Page is loading ...
Page is loading ...
Page is loading ...
Page is loading ...
Page is loading ...
Page is loading ...
Page is loading ...
Page is loading ...
Page is loading ...
Page is loading ...
Page is loading ...
Page is loading ...
Page is loading ...
Page is loading ...
Page is loading ...
Page is loading ...
Page is loading ...
Page is loading ...
Page is loading ...
Page is loading ...
Page is loading ...
Page is loading ...
Page is loading ...
Page is loading ...
Page is loading ...
Page is loading ...
Page is loading ...
Page is loading ...
Page is loading ...
Page is loading ...
Page is loading ...
Page is loading ...
Page is loading ...
Page is loading ...
Page is loading ...
Page is loading ...
Page is loading ...
Page is loading ...
Page is loading ...
Page is loading ...
Page is loading ...
Page is loading ...
Page is loading ...
Page is loading ...
Page is loading ...
Page is loading ...
Page is loading ...
Page is loading ...
Page is loading ...
Page is loading ...
Page is loading ...
Page is loading ...
Page is loading ...
Page is loading ...
Page is loading ...
Page is loading ...
Page is loading ...
Page is loading ...
Page is loading ...
Page is loading ...
Page is loading ...
Page is loading ...
Page is loading ...
Page is loading ...
Page is loading ...
Page is loading ...
Page is loading ...
Page is loading ...
Page is loading ...
Page is loading ...
Page is loading ...
Page is loading ...
Page is loading ...
Page is loading ...
Page is loading ...
Page is loading ...
Page is loading ...
Page is loading ...
Page is loading ...
Page is loading ...
Page is loading ...
Page is loading ...
Page is loading ...
Page is loading ...
Page is loading ...
Page is loading ...
Page is loading ...
Page is loading ...
Page is loading ...
Page is loading ...
Page is loading ...
Page is loading ...
Page is loading ...
Page is loading ...
Page is loading ...
Page is loading ...
Page is loading ...
Page is loading ...
Page is loading ...
Page is loading ...
Page is loading ...
Page is loading ...
Page is loading ...
Page is loading ...
Page is loading ...
Page is loading ...
Page is loading ...
Page is loading ...
Page is loading ...
Page is loading ...
Page is loading ...
Page is loading ...
Page is loading ...
Page is loading ...
Page is loading ...
Page is loading ...
Page is loading ...
Page is loading ...
Page is loading ...
Page is loading ...
Page is loading ...
Page is loading ...
Page is loading ...
Page is loading ...
Page is loading ...
Page is loading ...
Page is loading ...
Page is loading ...
Page is loading ...
Page is loading ...
Page is loading ...
Page is loading ...
Page is loading ...
Page is loading ...
Page is loading ...
Page is loading ...
Page is loading ...
Page is loading ...
Page is loading ...
Page is loading ...
Page is loading ...
Page is loading ...
Page is loading ...
Page is loading ...
Page is loading ...
Page is loading ...
Page is loading ...
Page is loading ...
Page is loading ...
Page is loading ...
Page is loading ...
Page is loading ...
Page is loading ...
Page is loading ...
Page is loading ...
Page is loading ...
Page is loading ...
Page is loading ...
Page is loading ...
Page is loading ...
Page is loading ...
Page is loading ...
-
 1
1
-
 2
2
-
 3
3
-
 4
4
-
 5
5
-
 6
6
-
 7
7
-
 8
8
-
 9
9
-
 10
10
-
 11
11
-
 12
12
-
 13
13
-
 14
14
-
 15
15
-
 16
16
-
 17
17
-
 18
18
-
 19
19
-
 20
20
-
 21
21
-
 22
22
-
 23
23
-
 24
24
-
 25
25
-
 26
26
-
 27
27
-
 28
28
-
 29
29
-
 30
30
-
 31
31
-
 32
32
-
 33
33
-
 34
34
-
 35
35
-
 36
36
-
 37
37
-
 38
38
-
 39
39
-
 40
40
-
 41
41
-
 42
42
-
 43
43
-
 44
44
-
 45
45
-
 46
46
-
 47
47
-
 48
48
-
 49
49
-
 50
50
-
 51
51
-
 52
52
-
 53
53
-
 54
54
-
 55
55
-
 56
56
-
 57
57
-
 58
58
-
 59
59
-
 60
60
-
 61
61
-
 62
62
-
 63
63
-
 64
64
-
 65
65
-
 66
66
-
 67
67
-
 68
68
-
 69
69
-
 70
70
-
 71
71
-
 72
72
-
 73
73
-
 74
74
-
 75
75
-
 76
76
-
 77
77
-
 78
78
-
 79
79
-
 80
80
-
 81
81
-
 82
82
-
 83
83
-
 84
84
-
 85
85
-
 86
86
-
 87
87
-
 88
88
-
 89
89
-
 90
90
-
 91
91
-
 92
92
-
 93
93
-
 94
94
-
 95
95
-
 96
96
-
 97
97
-
 98
98
-
 99
99
-
 100
100
-
 101
101
-
 102
102
-
 103
103
-
 104
104
-
 105
105
-
 106
106
-
 107
107
-
 108
108
-
 109
109
-
 110
110
-
 111
111
-
 112
112
-
 113
113
-
 114
114
-
 115
115
-
 116
116
-
 117
117
-
 118
118
-
 119
119
-
 120
120
-
 121
121
-
 122
122
-
 123
123
-
 124
124
-
 125
125
-
 126
126
-
 127
127
-
 128
128
-
 129
129
-
 130
130
-
 131
131
-
 132
132
-
 133
133
-
 134
134
-
 135
135
-
 136
136
-
 137
137
-
 138
138
-
 139
139
-
 140
140
-
 141
141
-
 142
142
-
 143
143
-
 144
144
-
 145
145
-
 146
146
-
 147
147
-
 148
148
-
 149
149
-
 150
150
-
 151
151
-
 152
152
-
 153
153
-
 154
154
-
 155
155
-
 156
156
-
 157
157
-
 158
158
-
 159
159
-
 160
160
-
 161
161
-
 162
162
-
 163
163
-
 164
164
-
 165
165
-
 166
166
-
 167
167
-
 168
168
-
 169
169
-
 170
170
-
 171
171
-
 172
172
-
 173
173
-
 174
174
-
 175
175
-
 176
176
-
 177
177
-
 178
178
-
 179
179
-
 180
180
-
 181
181
-
 182
182
-
 183
183
-
 184
184
-
 185
185
-
 186
186
-
 187
187
-
 188
188
-
 189
189
-
 190
190
-
 191
191
-
 192
192
-
 193
193
-
 194
194
-
 195
195
-
 196
196
-
 197
197
-
 198
198
-
 199
199
-
 200
200
-
 201
201
-
 202
202
-
 203
203
-
 204
204
-
 205
205
-
 206
206
-
 207
207
-
 208
208
-
 209
209
-
 210
210
-
 211
211
-
 212
212
-
 213
213
-
 214
214
-
 215
215
-
 216
216
-
 217
217
-
 218
218
-
 219
219
-
 220
220
-
 221
221
-
 222
222
-
 223
223
-
 224
224
-
 225
225
-
 226
226
-
 227
227
-
 228
228
-
 229
229
-
 230
230
-
 231
231
-
 232
232
-
 233
233
-
 234
234
-
 235
235
-
 236
236
-
 237
237
-
 238
238
-
 239
239
-
 240
240
-
 241
241
-
 242
242
-
 243
243
-
 244
244
-
 245
245
-
 246
246
-
 247
247
-
 248
248
-
 249
249
-
 250
250
-
 251
251
-
 252
252
-
 253
253
-
 254
254
-
 255
255
-
 256
256
-
 257
257
-
 258
258
-
 259
259
-
 260
260
-
 261
261
-
 262
262
-
 263
263
-
 264
264
-
 265
265
-
 266
266
-
 267
267
-
 268
268
-
 269
269
-
 270
270
-
 271
271
-
 272
272
-
 273
273
-
 274
274
-
 275
275
-
 276
276
-
 277
277
-
 278
278
-
 279
279
-
 280
280
-
 281
281
-
 282
282
-
 283
283


Huawei IDS2000 Dual-Row Aisle Containment Installation guide
- Category
- Security door controllers
- Type
- Installation guide
Ask a question and I''ll find the answer in the document
Finding information in a document is now easier with AI
Related papers
-
Huawei FusionModule800 Maintenance Manual
-
Huawei DDSU666-H User manual
-
-
-
-
Huawei UPS2000-G-6KRTLL User guide
-
Huawei 21501112-003 Installation guide
-
-
Huawei NetCol8000 User manual
-
Other documents
-
Enwork Proxi 2.0 & Proxi Plus User guide
-
Vitek VT-1205A-D4B User manual
-
-
ATEN EA1442 Quick start guide
-
-
 Furniture of America IDF-AC534 Installation guide
-
 AC-Safe AC-202 Operating instructions
-
IDEAL Security SK606 Operating instructions
-
Ventev 14x12x6 NEMA 4X User manual
-
Velux FSCC 3046 1158 Operating instructions

