Page is loading ...


ii
INSTALLATION GUIDE 433831
COPYRIGHT
Copyright 2011 by Tandberg Data. All rights reserved. This item and the information
contained herein are the property of Tandberg Data. No part of this document may be
reproduced, transmitted, transcribed, stored in a retrieval system, or translated into any
language or computer language in any form or by any means, electronic, mechanical,
magnetic, optical, chemical, manual, or otherwise, without the express written
permission of Tandberg Data.
DISCLAIMER
Tandberg Data makes no representation or warranties with respect to the contents of
this document and specifically disclaims any implied warranties of merchantability or
fitness for any particular purpose. Further, Tandberg Data reserves the right to revise
this publication without obligation of Tandberg Data to notify any person or organization
of such revision or changes.
TRADEMARK
NOTICES
Tandberg Data StorageLibrary, StorageLoader, SecureService, DPS1000 Series, DPS
2000, VXA, SLR, RDX QuikStor, RDX QuikStation, AccuVault, and AccuGuard are
trademarks of Tandberg Data. RDX is a registered trademark of Tandberg Data S.a.r.l.
All other product names are trademarks or registered trademarks of their respective
owners.
PART NUMBER
REVISION HISTORY
433831 Revision 6
N
OTE: The most current information about this product is available at Tandberg Data’s web
site (www.tandbergdata.com).
PRODUCT
WARRANTY
CAUTION
The StorageLibrary T40+ Series by Tandberg Data Corporation is warranted to be free
from defects in materials, parts, and workmanship and will conform to the current
product specification upon delivery. For the specific details of your warranty, refer to
your sales contract or contact the company from which the library was purchased.
The warranty for the library shall not apply to failures caused by:
Physical abuse or use not consistent with the operating instructions or product
specifications.
Repair or modification by any one other than Tandberg Data’s personnel or agent
in a manner differing from the maintenance instructions provided by Tandberg
Data.
Removal of the Tandberg Data identification label(s).
Physical abuse due to improper packaging of returned library.
If problems with the library occur, contact your maintenance organization; do not void
the product warranty by allowing untrained or unauthorized personnel to attempt
repairs
CONTACTING
TANDBERG DATA
CORPORATION
Visit the Support section of the Tandberg Data web site (http://www.tandbergdata.com)
for information on contacting Technical Support.
Revision Date Description
6 October 2011 New version of the Installation Guide. The previous version
was titled "Pass-thru Installation Manual" and only included
rackmount instructions. This Installation Guide provides
installation instructions for a standalone T40+ library and for
T40+ pass-thru library systems.

OCTOBER 2011 STORAGELIBRARY T40+ SERIES
iii
Magnum 44 8 LTO Libra ry Product Man ual i
CONTENTS
About This Manual . . . . . . . . . . . . . . . . . . . . . . . . . . . . . . . v
1 Preparing for Installation. . . . . . . . . . . . . . . . . . . . . . . . . 1
Choosing a Location . . . . . . . . . . . . . . . . . . . . . . . . . . . . . . . . . . . . . . 2
Obtaining Tools . . . . . . . . . . . . . . . . . . . . . . . . . . . . . . . . . . . . . . . . . 2
Gathering Network Information . . . . . . . . . . . . . . . . . . . . . . . . . . . . . 2
Unpacking the Library . . . . . . . . . . . . . . . . . . . . . . . . . . . . . . . . . . . . 3
Unpacking Pass-thru Magazines . . . . . . . . . . . . . . . . . . . . . . . . . . . . . 3
Obtaining Additional Components . . . . . . . . . . . . . . . . . . . . . . . . . . . 4
2 Rackmounting the Library . . . . . . . . . . . . . . . . . . . . . . . . 7
Preparing the Rack Rails . . . . . . . . . . . . . . . . . . . . . . . . . . . . . . . . . . . 8
Adjusting the rails (if necessary) . . . . . . . . . . . . . . . . . . . . . . . . . . 9
Determining Correct Rail Placement. . . . . . . . . . . . . . . . . . . . . . . . . 10
Attaching the Rails for a Standalone (or Master) Library . . . . . . . 11
Attaching the Rails for Add-on Libraries. . . . . . . . . . . . . . . . . . . 13
Removing the Library Pass-thru Cover Plates. . . . . . . . . . . . . . . . . . . 14
Sliding the Library into the Rack . . . . . . . . . . . . . . . . . . . . . . . . . . . . 16
Removing the Magazines . . . . . . . . . . . . . . . . . . . . . . . . . . . . . . . . . 16
Removing the Shipping Lock Screws . . . . . . . . . . . . . . . . . . . . . . . . . 17
Attaching the Mounting Ears . . . . . . . . . . . . . . . . . . . . . . . . . . . . . . . 18

iv
INSTALLATION GUIDE 433831
3 Installing the Library . . . . . . . . . . . . . . . . . . . . . . . . . . . 19
Installing One or More Tape Drives (if necessary) . . . . . . . . . . . . . . . 20
Re-inserting the Magazines for a Standalone Library . . . . . . . . . . . . . 22
Replacing the Magazines for Pass-Thru Systems . . . . . . . . . . . . . . . . 22
Connecting the Ethernet Cables . . . . . . . . . . . . . . . . . . . . . . . . . . . . 23
Connecting the Tape Drive Cables . . . . . . . . . . . . . . . . . . . . . . . . . . 24
Connecting Fibre Channel Tape Drive Cables . . . . . . . . . . . . . . 24
Connecting SAS Tape Drive Cables. . . . . . . . . . . . . . . . . . . . . . 25
Connecting SCSI Tape Drive Cables . . . . . . . . . . . . . . . . . . . . . 25
Connecting the Power to the Library . . . . . . . . . . . . . . . . . . . . . . . . 26
4 Configuring the Library . . . . . . . . . . . . . . . . . . . . . . . . . 27
Using the Front Panel Interface . . . . . . . . . . . . . . . . . . . . . . . . . . . . 28
Configuring a Standalone T40 Library. . . . . . . . . . . . . . . . . . . . . . . . 28
Recommended Guidelines for Configuring Pass-thru Systems . . . . . . 29
Configuring Add-on Libraries . . . . . . . . . . . . . . . . . . . . . . . . . . . . . . 29
Configuring the Master Library . . . . . . . . . . . . . . . . . . . . . . . . . . . . . 32
Troubleshooting. . . . . . . . . . . . . . . . . . . . . . . . . . . . . . . . . . . . . . . . 35
5 Verifying Installation . . . . . . . . . . . . . . . . . . . . . . . . . . . 37
Attaching Barcode Labels . . . . . . . . . . . . . . . . . . . . . . . . . . . . . . . . . 38
Loading Tape Cartridges for Cycle Test. . . . . . . . . . . . . . . . . . . . . . . 38
Running a Cycle Test . . . . . . . . . . . . . . . . . . . . . . . . . . . . . . . . . . . . 39
Index . . . . . . . . . . . . . . . . . . . . . . . . . . . . . . . . . . . . . . . . . . 41

OCTOBER 2011 STORAGELIBRARY T40+ SERIES
V
ABOUT THIS MANUAL
ABOUT THIS MANUAL
This manual describes how to rackmount, connect, and initially configure the
StorageLibrary T40+ Series by Tandberg Data Corporation.
You can use this manual for installing a T40 standalone library or for installing
a T40+ pass-thru library system (T80, T20, T160, and T200).
This manual contains the following chapters:
Chapter 1 provides information on preparing for library installation.
Chapter 2 provides rackmounting instructions.
Chapter 3 provides library installation instructions.
Chapter 4 provides configuration instructions.
Chapter 5 provides post-installation information, such as correct placement
for attaching bar code labels and installation verification tests.
RELATED PUBLICATIONS
For additional information about the library, refer to the following
publications, which are available at www.tandbergdata.com.
StorageLibrary T40+ Series
StorageLibrary T40+ Series Product Manual, 433599
StorageLibrary T40+ Series SCSI Reference, 433489
Tandberg Data Bar Code Label Specification for LTO Ultrium Cartridges,
1004080-000

VI
INSTALLATION GUIDE 433831
ABOUT THIS MANUAL
CONVENTIONS USED IN THIS MANUAL
This manual uses the following conventions:
Note: Notes provide additional information or suggestions about the topic or
procedure being discussed.
! Important
Read text marked by the “Important” icon for information that
will help you complete a procedure or avoid extra steps.
Caution
Read text marked by the “CAUTION” icon for information you must know to avoid
damaging the library, the tape drives, or losing data.
!
Warning
Read text marked by the “WARNING” icon for information you must know to avoid
personal injury.

OCTOBER 2011 STORAGELIBRARY T40+ SERIES
1
1
PREPARING FOR INSTALLATION
The Tandberg StorageLibrary T40+ Series tape library is a professional backup
and data protection solution, providing maximum performance and scalable
capacities. With the library’s pass-thru feature, you can stack up to five
StorageLibrary T40+ units, increasing the number of slots from 40 to 77, 114,
151, or 188 slots.
This chapter contains the following sections:
Applicable to T40
Standalone?
Applicable to T80,
T120, T160, or
T200 systems?
Installation Preparation Task Go to...
Choosing a location page 2
Obtaining tools for installation page 2
Gathering network information page 2
Unpacking the library page 3
N/A Unpacking pass-thru magazines page 3
Obtaining additional components page 4

2
INSTALLATION GUIDE 433831
CHAPTER 1—PREPARING FOR INSTALLATION
CHOOSING A LOCATION
A T40+ pass-thru system library must be installed in a 4-post rack. A standard
EIA-310 rack is recommended. Each T40 library uses 4 units (4U) of rack space.
Follow these guidelines when choosing an appropriate installation location.
Select an appropriate operating temperature environment. The maximum
recommended ambient temperature for the StorageLibrary T40+ Series is
40° C (104° F). Install the appliance in an environment compatible with this
temperature limit.
Allow for proper ventilation and space. Make sure the location is in a clean,
dust-free area. Use a ventilated rack to ensure the library receives adequate
air flow. Leave a minimum of 60 cm (24 inches) of unobstructed space
around the front and back of the library to allow for operating and
maintaining the library.
Select an appropriate power source. Place the library near a grounded
power outlet (110V/220V). Plug the library’s two power cords into a
high-quality power strip that offers protection from electrical noise and
power surges. An uninterupptable power supply is recommended.
Ensure that the work area is free from conditions that could cause
electrostatic discharge (ESD). Discharge static electricity from your body by
touching a known grounded surface, such as a computer’s metal chassis.
OBTAINING TOOLS
Obtain the following items to install the library in a rack:
Phillips screwdriver
Small, flat-head screwdriver (or similar object)
Tape measure
GATHERING NETWORK INFORMATION
The StorageLibrary T40+ Series supports both static and dynamic (DCHP) IP
addressing. For pass-thru configurations, Tandberg Data recommends that
you use static IP addresses to prevent any inadvertent address changes to the
libraries. (If the IP addresses change dynamically, you will have to reconfigure
the pass-thru system.)
Gather the following information for each T40 library (the Master unit and any
Add-on units):
A valid, unique, static IP address
Network mask
Default gateway address

OCTOBER 2011 STORAGELIBRARY T40+ SERIES
3
UNPACKING THE LIBRARY
Complete the following steps when you remove the library from its shipping
box:
1. With two people, lift the library by its sides and place on a stable, flat work
surface.
2. Remove packing foam and antistatic bag from the library.
3. Remove accessories.
4. Verify that the library’s two power switches are in the OFF position.
5. Save all packing materials and the box in case you need to ship the library
later.
UNPACKING PASS-THRU MAGAZINES
Note: If you have a standalone T40 library, skip this section.
1. Unpack each pass-thru magazine box that shipped separately from the
libraries.
2. Verify that each box contains:
One pass-thru magazine with 9 slots
One pass-thru box
3. Save all packing materials in case you need to ship one or more magazine
cartridges later.
!
Warning
The library weighs 84 pounds (38 kg) when installed with two full-height tape
drives, power supply, and magazines. Two people are needed to move or lift
the library.
!
Warnung
Die Library wiegt 38 kg. Es sind mindestens 2 Personen erforderlich, um die
Library zu bewegen oder zu heben.
!
Advertencia
La libreria montada sobre bastidor pesa 38 kg Se necesitan dos personas para
mover o levantar la libreria.
If you have a ... You will have this number of pass-thru
magazine boxes
T80 library One
T120 library Two
T160 library Three
T200 library Four

4
INSTALLATION GUIDE 433831
CHAPTER 1—PREPARING FOR INSTALLATION
OBTAINING ADDITIONAL COMPONENTS
The following items are not supplied with the library but are required to
perform tape backups.
Additional Components
Host server with
adapter card installed
For Fibre Channel configurations: A Fibre Channel host bus adapter
card with external LC multi-mode
connection ports supporting 2, 4,
or 8 gigabytes.
For SCSI configurations (only
applicable to LTO-3 and LTO-4):
An Ultra320 SCSI host bus adapter
card with external LVD
connections for each tape drive.
For SAS configurations: Refer to Tandberg Knowledge Base
article #2091 (available at
www.tandbergdata.com) for a list
of SAS host bus adapters that are
compatible to use with the T40+
Library.
Fibre Channel Cable No Fibre Channel cables are included with the library. The number of
optical fiber cables required for attaching the library to a Fibre Channel
network depends on how many tape drives are installed.
Use either 50-micron or 62.5-micron multi-mode optical fiber cables
with dual single-channel (LC) connectors.
50-micron multi-mode optical fiber cables must comply with the
400-M5-SN-I classification as specified in the Fibre Channel standard
(FC-PI-2).
62.5-micron multi-mode optical fiber cables must meet the
400-M6-SN-I classification.
Note: The length of 62.5 micron multi-mode cables should not exceed
70 meters.

OCTOBER 2011 STORAGELIBRARY T40+ SERIES
5
SAS Cable No SAS cables are included with the library. The number external of SAS
cables required for attaching the library to a SAS host depends on how
many tape drives are installed.
Library (tape drive) connector SAS Host connector
Mini-SAS (SFF-8088) cable plug
connector
Varies with the type of host bus
adapter that is used. Most likely,
it will be:
a Mini-SAS (SFF-8088) cable
plug connector
or
an InfiniBand (SAS-8470) cable
plug connector
Refer to your HBA vendor
documentation for more
information.
SCSI Hybrid Cable Library (tape drive) connector Host connector
One high-density (HD), wide
(68-pin), 2-meter LVD SCSI cable is
provided with a SCSI-version
library.
Varies with the type of SCSI
controller card that is used.
If you have an HD connector, use
the supplied HD-68 LVD cable.
HD Connector
If you have a VHDCI connector,
you need to obtain a VHDCI LVD
cable.
VHDCI Connector
Backup software Refer to Tandberg Data’s software compatibility matrix available from
the Support section of the Tandberg Data web site
(www.tandbergdata.com) for backup applications that are compatible
with the StorageLibrary T40+ Series.
Power cord (for use
outside of North
America or Europe)
You must supply your own power cords if you plan to use the library
outside of North America or Europe. The power cords must have a
grounded attachment plug of the proper type, rating, and safety
approval for the intended country. The cords must also have an IEC
320/EN60320 female connector on one end.
Additional Components (continued)

6
INSTALLATION GUIDE 433831
CHAPTER 1—PREPARING FOR INSTALLATION
Data Cartridges Use only Ultrium data cartridges that are compatible with the LTO
Ultrium tape drive in use. The LTO tape drives support the following LTO
Ultrium cartridges.
Tape Drive Supported Cartridges
Native
Capacity
LTO-5
Ultrium 5 1.5 TB
Ultrium 4 800 GB
Ultrium 3 (READ Only) 400 GB
WORM 1.5 TB
LTO-4
Ultrium 4 800 GB
Ultrium 3 400 GB
Ultrium 2 (READ only) 200 GB
WORM 800 GB
LTO-3
Ultrium 3 400 GB
Ultrium 2 200 GB
Ultrium 1 (READ only) 100 GB
WORM 400 GB
For maximum capacity, use Ultrium 5 data cartridges with Ultrium 5
(LTO-5) tape drives, Ultrium 4 data cartridges with Ultrium 4 (LTO-4)
tape drives, and Ultrium 3 data cartridges with Ultrium 3 (LTO-3) tape
drives.
Use only LTO Ultrium cleaning cartridges
To purchase Ultrium data and cleaning cartridges, contact your
Tandberg Data Partner, or contact Sales via the Tandberg Data web
site (www.tandbergdata.com).
Additional Components (continued)

OCTOBER 2011 STORAGELIBRARY T40+ SERIES
7
2
RACKMOUNTING THE LIBRARY
This chapter provides step-by-step instructions for installing the
StorageLibrary T40+ Series library in a rack.
This chapter contains the following sections:
Applicable to
T40 Standalone?
Applicable to
T80, T120,
T160, or T200
systems?
Rackmounting Task Go to...
Preparing the rack rails page 8
Determining correct rail placement page 10
Attaching the rails page 11
N/A Attaching the rails for Add-on units page 13
N/A Removing the library pass-thru cover plates page 14
Sliding the library into the rack page 16
Removing the magazines page 16
Removing the shipping lock screws page 17
Attaching the library mounting ears page 18
! Important
For pass-thru systems, rackmount the Master library first, then
rackmount each subsequent Add-on library one at a time. The
Master library is always located at the bottom of the stack. Review
Figure 2-1 on page 10 for correct rack rail placement and
Figure 2-6 on page 14 to make sure you have removed the correct
pass-thru cover plates for each library.

8
INSTALLATION GUIDE 433831
CHAPTER 2—RACKMOUNTING THE LIBRARY
The StorageLibrary T40+ Series library is designed for installation in a
standard 4-post rack. The rack that you use must adhere to one of the
following standards: EIA-310, CEA-310, or IEC-60297. Each stackable T40
library uses four units (4U) of rack space.
Before you begin, make sure you review the Choosing a Location and
Obtaining Tools sections on page 2.
The rackmount kit contains the following items:
PREPARING THE RACK RAILS
1. Remove the mounting screws that are attached to the front and back of
each rail. Set them aside.
2. If necessary, adjust the rail length (see page 9).
Rackmount Item What the item is used for
8 flat-head M3x4 mm screws To attach the mounting ears to the library
2 M6x12 mm pan-head
screws
To secure the mounting ears to the rack.
Note: These screws are shipped attached to the
rails.
8 M6x12 mm flat-head
screws
To attach the rails to the front and back of the
rack. Note: These screws are shipped attached
to the rails.
4 mounting template labels To ensure the correct hole-set location for
attaching the rack rails, because rack holes are
not evenly spaced on a standard rack.
2 rack rails To mount to the rack.
2 mounting ears To attach to the front of the library and secure
the library into the rack.
Back of Rail
Front of Rail
back mounting screws
front mounting screws

OCTOBER 2011 STORAGELIBRARY T40+ SERIES
9
ADJUSTING THE RAILS (IF NECESSARY)
1. Measure the inside distance from the front mounting holes to the back
mounting holes on one side of your rack.
2. From the inside of the rail, use a screwdriver to loosen the screws that
secure the side rail assembly hardware, which consists of a plastic washer,
a star washer and nut. Remove the assembly hardware and set it aside.
Note: The rails are measured to a standard rack depth at the factory. If you
need to adjust the rail, you will need to remove one or both sets of
screws.
3. Adjust the rail length to the same distance as the rack depth, which you
measured in step 1.
4. From the inside of the rail, thread the rail screws through the rail in
corresponding sets as shown in the next figure. If you removed both sets of
rail assembly hardware, be sure to replace the hardware far enough apart
to stabilize the rail.
5. Thread a plastic washer, a star washer and nut onto each screw from the
outside of the rail. Tighten the screw from the inside of the rail. Do not
tighten the screws completely.
Rail assembly hardware
Securing the hardware far apart provides better rail stability.

10
INSTALLATION GUIDE 433831
CHAPTER 2—RACKMOUNTING THE LIBRARY
DETERMINING CORRECT RAIL PLACEMENT
To determine correct rail placement, use the mounting template labels that are
included in your accessory kit and follow these guidelines:
The holes in a standard 4-post rack are vertically spaced in a repeating
pattern of three holes. This pattern equates to spacing for one rack unit (1U).
Each 1U-hole pattern is separated by 0.5 inches (12.7 mm) (see Figure 2-1).
Note: In some standard racks, there is not a middle hole. In this case, only
two holes (the top and bottom) exist in the 1U-pattern.
The bottom hole of the T40+ rail must align with the bottom hole in a
1U-pattern set. If you align the bottom rail home with either the middle or
top hole of the 1U-pattern, the pass-thru system will fail (see Important
below).
! Important
If you are installing a T40+ pass-thru library, it’s crucial that the
rack rails are attached to the correct set of rack post holes. If the
rails are mounted incorrectly for the Master unit, the subsequent
Add-on unit cannot be rackmounted flush against the top of the
Master unit. If there is even a 3 mm gap between the Master and
Add-on unit, the pass-thru mechanism will malfunction.
Figure 2-1 Standard rack hole spacing
44.45
1U
1.75”
7"
177.8
4U, T40
12.7mm/0.5”
15.88 mm/.625”
15.88 mm/.625”
rack post
T40+ mounting
template
Rail delivered
with T40+ library

OCTOBER 2011 STORAGELIBRARY T40+ SERIES
11
ATTACHING THE RAILS FOR A STANDALONE (OR MASTER) LIBRARY
To attach the rails to the rack:
1. Peel the template label from its adhesive backing.
2. Place the template label on one of the front rack posts. Make sure that you
align the bottom template hole with a bottom hole in a 1U-rack pattern as
described in “Determining Correct Rail Placement” on page 10.
3. Place a template label on the other front rack post, making sure that you
position the bottom marker hole at the same vertical distance as the
previous label.
! Important
If your rack does not follow the spacing pattern shown in
Figure 2-1, it is non-standard 19” rack, and you cannot use it to
assemble the T40+ library in a stacked configuration (T80, T120,
T160, or T200).
Figure 2-2 Placing the template label on the rack post
! Important
If you cannot see the entire hole marker through each rack post
hole, you did not align the bottom rail hole with a bottom hole in a
in a 1U-rack pattern (see Figure 2-1).

12
INSTALLATION GUIDE 433831
CHAPTER 2—RACKMOUNTING THE LIBRARY
4. Orient the rail so that the rail shelf is facing the inside of the rack.
5. Place the rail behind the rack flange so that the bottom hole on the rail aligns
with the bottom hole of the template label (see Figure 2-1 on page 10).
6. Thread two of the M6x12 mm flat-head screws (that you set aside in
“Preparing the Rack Rails” on page 8) through the bottom and middle rail
holes.
7. Use the mounting template labels to line up the rail with the back
placement holes in the rack. Secure the rail with the remaining two M6x12
mm flat-head screws.
8. If necessary, adjust the rail so that it fits snugly into the rack. Tighten the
two sets of rail screws to prevent the rail from sliding.
9. Repeat the above steps for the opposite rack rail.
! Important
Make sure you use the supplied flat-head screws to attach the rail.
The screws are designed to center the rail properly in the rack.
Figure 2-3 Correct screw placement in rack
Figure 2-4 Attaching the rail to the rack
bottom rail hole
middle rail hole
top rail hole is reserved
for the library mounting ear

OCTOBER 2011 STORAGELIBRARY T40+ SERIES
13
ATTACHING THE RAILS FOR ADD-ON LIBRARIES
Note: If you have a standalone T40 library, skip this section.
1. Position the template label for the Add-on library directly above the
template label for the Master library.
2. Repeat the process described in “Attaching the Rails for a Standalone (or
Master) Library” for each subsequent Add-on library.
Figure 2-5 Attaching the rail for the Add-on library

14
INSTALLATION GUIDE 433831
CHAPTER 2—RACKMOUNTING THE LIBRARY
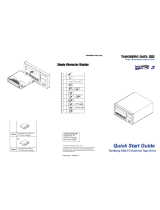
REMOVING THE LIBRARY PASS-THRU COVER PLATES
These instructions apply only to T80, T120, T160, and T200 pass-thru library
systems. In these systems, you must remove the pass-thru cover plates to
allow the library’s robotic arm to pass tape cartridges from one library unit to
another.
! Important
If
If you are installing a standalone T40 library, do not remove the
library’s pass-thru cover plates; If removed, they cannot be
re-attached. Skip this step and proceed to the next section, “Sliding
the Library into the Rack” on page 16.
Figure 2-6 Removing cover plates in a pass-thru system
T80 T120
T160
T200
Master Library 2 Library 3
Library 4 Library 5
Legend
Remove bottom
Remove bottom
Remove top
Remove top Remove top Remove top
Remove top Remove top
Remove top
Remove top Remove top
Remove top
Remove bottom
Remove bottom
Remove bottom
Remove bottom
Remove bottom
Remove bottom
Remove bottom Remove bottom
!
Warning
The library weighs 84 pounds (38 kg) when installed with two full-height tape
drives, power supply, and magazines. To prevent possible damage to the unit,
have another person help you move the library onto its side to remove a bottom
pass-thru cover plate.
!
Warnung
Die Library wiegt 38 kg. Zur Vermeidung von Personenschäden oder Schäden an
der T40, solten Sie die T40 niemals alleine auf die Seite legen, um die Aufkleber
zu entfernen.
!
Advertencia
La libreria montada sobre bastidor pesa 38 kg. Para evitar posibles daños a la T40
hay que otra persona le ayudan a mover la T40 a su lado para remover la placa
pass-thru.
/