Page is loading ...

Installation & User Guide
Installation & User Guide
Auralex® Acoustics, Inc.
1-800-959-3343 | 317-842-2600 | Auralex.com
9955 Westpoint Drive, Suite 101, Indianapolis IN USA 46256
Auralex® Acoustics, Inc.
1-800-959-3343 | 317-842-2600 | Auralex.com
9955 Westpoint Drive, Suite 101, Indianapolis IN USA 46256
SonoFiber™
SonoFiber™
1721-1018.SonoFiber User Guide (01/13/2020 - 1:17 PM)
1721-1018.SonoFiber User Guide (01/13/2020 - 1:17 PM)
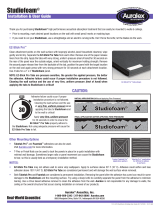
Tubetak Pro™ Adhesive & Foamtak™ Spray Adhesive
• Tubetak Pro: Requires a caulking gun for application. Refer to the diagrams to the right for recommended application patterns.
Temporarily press the panel to the wall with moderate pressure to flatten out the adhesive. Remove from the wall, wait for several
minutes (typically 2 to 5 minutes) for the adhesive to tack (test occasionally with a knuckle) and reapply the panel to the wall. If the
adhesive seems to take a while to dry (cure time can be dependent on humidity and other environmental factors), you may consider
supporting the panel in place with a T-pin or finish nail. Visit Auralex.com for more information.
• Foamtak: Aerosol spray can (US only). Hold the can 3” to 5” away from the SonoFiber and apply in a uniform manner (see Image
at right). For best results apply to both surfaces, allow approximately 60 to 75 seconds to tack (test occasionally with a knuckle)
and then apply. For a more temporary bond apply the Foamtak to one surface only. Visit Auralex.com for more information.
Other Mounting Options
• T-Pins or Finish Nails can be used to tack the panels in place for a quick installation with minimal wall damage. Sometimes larger
nails or panel movement can cause the foam to tear, so this is usually best as a temporary installation method.
NOTE: Wall Installations only.
• SonoFiber can be mounted to a backing (such as pegboard, Corex, cardboard, plastic, plywood, etc.) before installing it on a wall.
This approach allows for added durability when relocating/repurposing SonoFiber panels.
• Both Tubetak Pro and Foamtak are considered a permanent installation. Removing the panel after the adhesive has cured
can result in some damage to the SonoFiber and the mounting surface. Try using a sharp knife to carefully separate the panel
from the adhesive to minimize tearing. Use a citrus based adhesive remover to clean the adhesive from the wall. Auralex is not
responsible for any damage to walls, the ceiling or the overall structure that occurs during installation or removal of our products.
Thank you for purchasing Auralex® SonoFiber™ high performance acoustical absorption treatment.
• Prior to mounting, mark desired panel locations on the wall with small pencil marks or masking tape.
• If you need to cut your SonoFiber™ use a sharp pair of scissors or a utility knife.
Thank you for purchasing Auralex® SonoFiber™ high performance acoustical absorption treatment.
• Prior to mounting, mark desired panel locations on the wall with small pencil marks or masking tape.
• If you need to cut your SonoFiber™ use a sharp pair of scissors or a utility knife.
Application of Auralex®
Foamtak™ shown
Application of Auralex®
Foamtak™ shown
Typical Tubetak™
pattern
Tubetak™ application
for difficult to adhere
to surfaces
Typical Tubetak™
pattern
Tubetak™ application
for difficult to adhere
to surfaces
/
