Page is loading ...

INSTALLATION
Ovation Dispensers
OPERATION

November 2008 Part No. 920559 Rev H
READ THIS MANUAL BEFORE YOU BEGIN
Dispensers have both electricity and a hazardous, flammable and potentially explosive liquid.
Failure to follow the below precautions and the Warning and Caution instructions in this manual
may result in serious injury. Follow all rules, codes and laws that apply to your area and installa-
tion.
SAFETY PRECAUTIONS - INSTALLATION AND MAINTENANCE
Always make sure ALL power to the dispenser is turned OFF before you open the dispenser cab-
inet for maintenance. Physically lock, restrict access to, or tag the circuit breakers you turn off
when servicing the dispenser. Be sure to trip (close) the emergency valve(s) under the dispenser
BEFORE beginning maintenance.
Make sure that you know how to turn OFF power to the dispenser and submersible pumps in an
emergency. Have all leaks or defects repaired immediately.
EQUIPMENT PRECAUTIONS
Be sure to bleed all air from product lines of remote dispensers and prime suction pumps before
dispensing product, otherwise, damage to the equipment may occur. Always use the approved
method for lifting the dispenser. Never lift by the nozzle boot, sheet metal, valance, etc., other-
wise equipment damage or personal injury may occur.
HOW TO CONTACT WAYNE
Technical questions related to the installation of the dispenser should be referred to Wayne
Technical Support (1-800-926-3737). Customers needing help with the operation of the dis-
penser should call the Wayne Help Desk (1-800-289-2963).
INDICATORS AND NOTATIONS
Danger indicates a hazard or unsafe practice which, if not avoided, will result in severe injury
or possibly death.
Warning indicates a hazard or unsafe practice which, if not avoided, may
result in severe
injury or possibly death.
Caution indicates a hazard or unsafe practice which, if not avoided, may
result in minor injury.
NOTE:
Important information to consider, otherwise, improper installation and/or damage to compo-
nents may occur.
DANGER
DANGER
WARNING
CAUTION

November 2008 Part No. 920559 Rev H
Ovation Series
Dispensers
Installation & Operation

November 2008 Part No. 920559 Rev H

Table of Contents
Title Page
iii
November 2008 Part No. 920559 Rev H
1 INTRODUCTION . . . . . . . . . . . . . . . . . . . . . . . . . . . . . . . . . . . . . . . . . . . . . . . . . . . . . . . . . . . . . . 1
1.1 Dispensers Covered . . . . . . . . . . . . . . . . . . . . . . . . . . . . . . . . . . . . . . . . . . . . . . . . . . . . . 1
1.2 Local, State, and Federal Codes . . . . . . . . . . . . . . . . . . . . . . . . . . . . . . . . . . . . . . . . . . . . 2
1.3 Safety Precautions . . . . . . . . . . . . . . . . . . . . . . . . . . . . . . . . . . . . . . . . . . . . . . . . . . . . . . 3
2 INSTALLATION . . . . . . . . . . . . . . . . . . . . . . . . . . . . . . . . . . . . . . . . . . . . . . . . . . . . . . . . . . . . . . . 5
2.1 Inspect the Equipment . . . . . . . . . . . . . . . . . . . . . . . . . . . . . . . . . . . . . . . . . . . . . . . . . . . . 5
2.2 Island Construction, Dispenser Anchoring, and Piping . . . . . . . . . . . . . . . . . . . . . . . . . . . 5
2.3 Emergency Shut-off Valves . . . . . . . . . . . . . . . . . . . . . . . . . . . . . . . . . . . . . . . . . . . . . . . . 6
2.4 Vapor Return Piping . . . . . . . . . . . . . . . . . . . . . . . . . . . . . . . . . . . . . . . . . . . . . . . . . . . . . 6
2.5 Lifting and Installing the Dispenser . . . . . . . . . . . . . . . . . . . . . . . . . . . . . . . . . . . . . . . . . . 7
2.6 Electrical Wiring . . . . . . . . . . . . . . . . . . . . . . . . . . . . . . . . . . . . . . . . . . . . . . . . . . . . . . . . . 8
2.6.1 General. . . . . . . . . . . . . . . . . . . . . . . . . . . . . . . . . . . . . . . . . . . . . . . . . . . . . . . . . . 8
2.6.2 Dispenser to Control System Wiring Required . . . . . . . . . . . . . . . . . . . . . . . . . . . . 8
2.6.3 Field Wiring for Dispensers Without a Junction Box. . . . . . . . . . . . . . . . . . . . . . . . 9
2.6.4 Full Service (Stand-Alone) Dispenser Wiring . . . . . . . . . . . . . . . . . . . . . . . . . . . . 11
2.6.5 Multiple Dispenser Wiring. . . . . . . . . . . . . . . . . . . . . . . . . . . . . . . . . . . . . . . . . . . 11
2.6.6 Optional Equipment . . . . . . . . . . . . . . . . . . . . . . . . . . . . . . . . . . . . . . . . . . . . . . . 12
2.6.7 Veeder-Root Vapor Flow Meter . . . . . . . . . . . . . . . . . . . . . . . . . . . . . . . . . . . . . . 12
2.6.8 Non-Dispenser Equipment . . . . . . . . . . . . . . . . . . . . . . . . . . . . . . . . . . . . . . . . . . 12
2.7 Hose and Hose Retractor . . . . . . . . . . . . . . . . . . . . . . . . . . . . . . . . . . . . . . . . . . . . . . . . 13
2.8 Bleeding Product Lines (Remote Dispensers). . . . . . . . . . . . . . . . . . . . . . . . . . . . . . . . . 13
2.9 iMeter or Xflo™ Calibration . . . . . . . . . . . . . . . . . . . . . . . . . . . . . . . . . . . . . . . . . . . . . . . 14
2.10 Balance Vapor Recovery System Installation Requirements . . . . . . . . . . . . . . . . . . . . . 16
2.10.1 Dynamic Back Pressure Test . . . . . . . . . . . . . . . . . . . . . . . . . . . . . . . . . . . . . . . . 16
2.10.2 Back Pressure System Check List . . . . . . . . . . . . . . . . . . . . . . . . . . . . . . . . . . . . 16
2.10.3 Nozzles Approved for Balance System . . . . . . . . . . . . . . . . . . . . . . . . . . . . . . . . 17
2.11 Wayne Vac Vapor Recovery System Installation Requirements . . . . . . . . . . . . . . . . . . 18
2.11.1 Dispenser Vacuum Decay . . . . . . . . . . . . . . . . . . . . . . . . . . . . . . . . . . . . . . . . . . 18
2.11.2 Wayne Pressure/Vacuum Tester . . . . . . . . . . . . . . . . . . . . . . . . . . . . . . . . . . . . . 18
3 START-UP . . . . . . . . . . . . . . . . . . . . . . . . . . . . . . . . . . . . . . . . . . . . . . . . . . . . . . . . . . . . . . . . . . 19
3.1 Initial Checkout . . . . . . . . . . . . . . . . . . . . . . . . . . . . . . . . . . . . . . . . . . . . . . . . . . . . . . . . 19
3.2 IR Remote Control . . . . . . . . . . . . . . . . . . . . . . . . . . . . . . . . . . . . . . . . . . . . . . . . . . . . . . 19
3.3 Logical Nozzle/Hose Position . . . . . . . . . . . . . . . . . . . . . . . . . . . . . . . . . . . . . . . . . . . . . 20
3.4 Setting the Clock . . . . . . . . . . . . . . . . . . . . . . . . . . . . . . . . . . . . . . . . . . . . . . . . . . . . . . . 23
3.5 Setting Unit Prices . . . . . . . . . . . . . . . . . . . . . . . . . . . . . . . . . . . . . . . . . . . . . . . . . . . . . . 23
3.6 Setting Blend Ratios . . . . . . . . . . . . . . . . . . . . . . . . . . . . . . . . . . . . . . . . . . . . . . . . . . . . 25
3.7 Setting Fueling Point ID . . . . . . . . . . . . . . . . . . . . . . . . . . . . . . . . . . . . . . . . . . . . . . . . . . 27
3.8 Authorizing the Dispenser . . . . . . . . . . . . . . . . . . . . . . . . . . . . . . . . . . . . . . . . . . . . . . . . 28
3.9 Initial Delivery . . . . . . . . . . . . . . . . . . . . . . . . . . . . . . . . . . . . . . . . . . . . . . . . . . . . . . . . . 28
3.10 Disable Stand-alone Operation . . . . . . . . . . . . . . . . . . . . . . . . . . . . . . . . . . . . . . . . . . . . 28

Table of Contents (continued)
Title Page
iv
Part No. 920559 Rev H November 2008
3.11 Totalizer Readings . . . . . . . . . . . . . . . . . . . . . . . . . . . . . . . . . . . . . . . . . . . . . . . . . . . . . 29
3.11.1 Totalizer Readings by Product Position . . . . . . . . . . . . . . . . . . . . . . . . . . . . . . 29
3.11.2 Totalizer Volume Readings by Meter Position . . . . . . . . . . . . . . . . . . . . . . . . . . 30
3.11.3 Electro-Mechanical Totalizer Operation . . . . . . . . . . . . . . . . . . . . . . . . . . . . . . . 31
3.12 Nozzle Boot Switch Check . . . . . . . . . . . . . . . . . . . . . . . . . . . . . . . . . . . . . . . . . . . . . . . . 32
3.13 Annunciator Check. . . . . . . . . . . . . . . . . . . . . . . . . . . . . . . . . . . . . . . . . . . . . . . . . . . . . .32
3.14 QCAT Dispensers Self-test and CAT Address. . . . . . . . . . . . . . . . . . . . . . . . . . . . . . . . . 32
3.15 iX™ Pay Secure Payment Module. . . . . . . . . . . . . . . . . . . . . . . . . . . . . . . . . . . . . . . . . . 32
3.16 Wayne Vac Motor Operation . . . . . . . . . . . . . . . . . . . . . . . . . . . . . . . . . . . . . . . . . . . . . . 32
3.17 Audit Report Display Mode (For Weights & Measures Officials/Service Purposes Only) 33
3.18 IDPOS Dispensers. . . . . . . . . . . . . . . . . . . . . . . . . . . . . . . . . . . . . . . . . . . . . . . . . . . . . . 33
3.19 iX™ CAT Dispensers Self-test and CAT Address . . . . . . . . . . . . . . . . . . . . . . . . . . . . . . 33
3.20 Bill Acceptor (BAC) Operation . . . . . . . . . . . . . . . . . . . . . . . . . . . . . . . . . . . . . . . . . . . . . 33
4 OPERATION. . . . . . . . . . . . . . . . . . . . . . . . . . . . . . . . . . . . . . . . . . . . . . . . . . . . . . . . . . . . . . . . 35
4.1 Safety Items You Should Know . . . . . . . . . . . . . . . . . . . . . . . . . . . . . . . . . . . . . . . . . . . 35
4.1.1 Portable Tanks and Containers . . . . . . . . . . . . . . . . . . . . . . . . . . . . . . . . . . . . . 35
4.1.2 Health Note . . . . . . . . . . . . . . . . . . . . . . . . . . . . . . . . . . . . . . . . . . . . . . . . . . . . . 35
4.2 How To Get Service On Your Dispenser . . . . . . . . . . . . . . . . . . . . . . . . . . . . . . . . . . . . 35
4.3 Basic Dispenser Requirements . . . . . . . . . . . . . . . . . . . . . . . . . . . . . . . . . . . . . . . . . . . . 36
4.4 Operating the Dispenser . . . . . . . . . . . . . . . . . . . . . . . . . . . . . . . . . . . . . . . . . . . . . . . . . 36
4.5 Restarting After Power Failure or Shutdown . . . . . . . . . . . . . . . . . . . . . . . . . . . . . . . . . . 37
4.6 Cycling Power to Clear Faults . . . . . . . . . . . . . . . . . . . . . . . . . . . . . . . . . . . . . . . . . . . . 37
4.7 Error Codes . . . . . . . . . . . . . . . . . . . . . . . . . . . . . . . . . . . . . . . . . . . . . . . . . . . . . . . . . . 38
4.8 Resetting After All Stop . . . . . . . . . . . . . . . . . . . . . . . . . . . . . . . . . . . . . . . . . . . . . . . . . . 39
4.9 Stand-alone Operation . . . . . . . . . . . . . . . . . . . . . . . . . . . . . . . . . . . . . . . . . . . . . . . . . 39
4.10 Printer Paper . . . . . . . . . . . . . . . . . . . . . . . . . . . . . . . . . . . . . . . . . . . . . . . . . . . . . . . . . . 40
4.10.1 Changing Paper . . . . . . . . . . . . . . . . . . . . . . . . . . . . . . . . . . . . . . . . . . . . . . . . . . 40
4.10.2 Paper Specification . . . . . . . . . . . . . . . . . . . . . . . . . . . . . . . . . . . . . . . . . . . . . . . . 40
4.10 Hazardous Zone Area Classifications for Dispensers . . . . . . . . . . . . . . . . . . . . . . . . . . . 42
5 OPERATOR MAINTENANCE . . . . . . . . . . . . . . . . . . . . . . . . . . . . . . . . . . . . . . . . . . . . . . . . . . 43
5.1 Preventive Maintenance. . . . . . . . . . . . . . . . . . . . . . . . . . . . . . . . . . . . . . . . . . . . . . . . . 43
5.2 Filter/Strainer . . . . . . . . . . . . . . . . . . . . . . . . . . . . . . . . . . . . . . . . . . . . . . . . . . . . . . . . . . 44
5.3 Dispenser Cleaning Procedures . . . . . . . . . . . . . . . . . . . . . . . . . . . . . . . . . . . . . . . . . . 45
5.4 Vapor Recovery . . . . . . . . . . . . . . . . . . . . . . . . . . . . . . . . . . . . . . . . . . . . . . . . . . . . . . . .47
5.4.1 Wayne Vac . . . . . . . . . . . . . . . . . . . . . . . . . . . . . . . . . . . . . . . . . . . . . . . . . . . . . . 47
5.4.2 Balance . . . . . . . . . . . . . . . . . . . . . . . . . . . . . . . . . . . . . . . . . . . . . . . . . . . . . . . . . 47
5.5 Meter Maintenance Issue. . . . . . . . . . . . . . . . . . . . . . . . . . . . . . . . . . . . . . . . . . . . . . . . . 47
APPENDIX A1 QCAT SELF-TEST PROCEDURE . . . . . . . . . . . . . . . . . . . . . . . . . . . . . . . . . . . . . . . 49
APPENDIX A2 iX CAT SELF-TEST PROCEDURE . . . . . . . . . . . . . . . . . . . . . . . . . . . . . . . . . . . . . . 57
APPENDIX B INSTALLATION DRAWINGS . . . . . . . . . . . . . . . . . . . . . . . . . . . . . . . . . . . . . . . . . . . 59
APPENDIX C LOCAL AUTHORIZE/STAND-ALONE OPERATION. . . . . . . . . . . . . . . . . . . . . . . . . 73
APPENDIX D DISPENSER / BACKROOM INTERCONNECTIONS . . . . . . . . . . . . . . . . . . . . . . . . . 75

1
November 2008 Part No. 920559 Rev H
1 INTRODUCTION
This revision of the manual includes new installation footprint drawings. These drawings show the location
of the conduits for entering the new smaller junction box. The smaller junction box will be standard on pro-
duction Ovation dispensers in November 2008. This junction box gives the installation personnel more
room to make inlet and conduit connections, and it also allows for bottom entry of conduits coming up out-
side of the containment box.
1.1 Dispensers Covered
Ovation series dispenser models use the iGEM computer and, either the iMeter assembly with the Wayne
Intelligent Pulser (WIP), or the new Xflo
™ meter assembly with the XWIP. Models with the new Xflo
meter assembly have the letter X in the model number after the second / in the number, for example,
B23/4220D1/JKX/L. There is no difference in the installation and startup of these dispensers, with the only
exception being a one inch change in the location of the field conduit on those models that do not have a
junction box. On those models, the primary conduit location is moved from 1.37 to 2.37 inches off the cen-
ter line towards the front of the dispenser. Components in a typical Xflo dispenser are shown in Figure 1-1.
E85 Ovation models have the letter E at the very beginning of the model number and use the Xflo meter
assembly. In addition to the noted change above for Xflo models, internal parts such as the Xflo meter, prod-
uct tubes, and outlet castings, as well as external parts, such as pipes, pipe nipples, hoses, nozzles, break-
aways and swivels that come into contact with the Ethanol fuel must be Ethanol compatible; they must be
either nickel-plated or stainless steel. Pipe nipples at the meter inlets need to be made of stainless steel.
Replacement filters should be 1 micron. The recommended filter for Wayne Ethanol dispensers is Cim-Tek's
Bio-Tek, 1 Micron filter. Standard gasoline dispensers commonly use filters rated at 10 microns.
The iGEM computer runs on software that can be downloaded by a laptop. Dispenser models with the Xflo
meter and XWIP use iGEM rev 46 or later pump software; servTerm version 5.4.2 or later is required for
servicing (loading the computer software or dispenser configuration template), however, this is not required
for installation/startup of the dispenser. If it becomes necessary to reload pump software, always use the lat-
est version. Note: The XWIP case is blue and the iMeter WIP case is black; they are not interchangeable.
Computer function settings that are necessary for Ovation dispenser startup and operation, such as prices,
blending ratios, fueling point number, etc., are included in this manual. If additional information on function
settings and statistics is required, refer to the Ovation Dispenser Service manual, part number 920525-002.
Any questions concerning installation and operation of the dispenser that are not covered in this manual
should be referred to Wayne Technical Support (1-800-926-3737).
Figure 1-1 Location of Components in Lower Section. MGD, three Xflo Meters, side 2.
Proportional
Valve and Coil
Check Valves underneath
Cover Plates
Xflo Meter Dome
XWIP
Pulser
Filter
Product Inlet

2
Part No. 920559 Rev H November 2008
1.2 Local, State, and Federal Codes
All tanks (both underground and above ground), piping and fittings, foot valves, leak detectors, cor-
rosion protection devices, wiring, venting systems, etc., must be installed in accordance with the
manufacturer’s instructions and in compliance with local and regional building codes and require-
ments pertaining to service stations (or other locations where the dispenser may be installed).
These requirements may include references to the National Electrical Code (NFPA 70), Automotive
and Marine Service Station Code (NFPA 30A); Flammable and Combustible Liquids Code (NFPA
30); Code of Federal Regulations, Title 40, Section 280 (40 CFR 280); United States Environmental
Protection Agency (U.S. EPA) Technical Regulations of 9-23-88 and U.S. EPA Financial Responsibil-
ity Regulations of 10-26-1988.
Where local requirements do not specify applicable codes, Wayne recommends using the codes
listed above. These codes are comprehensive and detailed, often requiring interpretation to cover
unusual situations, and, therefore, the associated handbooks (where applicable) should also be con-
sulted. (The handbooks are also available from the same sources.)
Due to the variety of locations encountered, further information on installation cannot be dealt with
in this document except as the codes relate directly to the installation of the dispenser. Therefore, it
is strongly recommended that a qualified engineer or contractor familiar with local regulations
and practices be consulted before starting installation.
Sources for various codes are listed on the following page.

3
November 2008 Part No. 920559 Rev H
Pertinent information and codes are available from the following sources:
NOTE: Other regulatory codes may apply. Consult your local and regional code requirements to
determine which codes are applicable for your location.
Association for Composite Tanks (ACT)
North State Street
Suite 720
Chicago, IL 60602
(301) 355-1307 (for information requests)
American Petroleum Institute (API)
1220 L Street, N.W.
Washington, DC 20005
(202) 682-8000
Fiberglass Petroleum Tank and Pipe Institute
One SeaGate, Suite 1001
Toledo, OH 43604
(419) 247-5412
National Assoc. Corrosion Engineers
(NACE)
Box 218340
Houston, TX 77218
(713) 492-0535
National Fire Protection Association (NFPA)
One Batterymarch Park
Quincy, MA 02269-9101
(617) 770-3000
National Leak Prevention Association
(NLPA)
685 Fields Ertel Road
Cincinnati, OH 45241
(513) 489-9844 or 1-(800) 543-1838
Petroleum Equipment Institute (PEI)
Box 2380
Tulsa, OK 74101
(918) 494-9696
Steel Tank Institute
P. O. Box 4020
Northbrook, IL 60065
(312) 498-1980
Underwriters Laboratories Inc.
333 Pfingsten Road
Northbrook, IL 60062
(312) 272-8800
Underwriters Laboratories of Canada
7 Crouse Road
Scarsborough, Ontario, Canada N1R3A9
(416) 757-3611
United States Environmental Protection Agency
Office of Underground Storage Tanks
401 M St., SW (05-400WF)
Washington, DC 20640
(703) 308-8850 (Underground Storage Tanks)
Western Fire Chiefs Association
5360 South Workman Mill Road
Whittier, CA 90601
(213) 699-0541
U. S. Department of Labor,
Occupational Safety and Health Administration (OSHA)
Washington, DC 20402
• Call OSHA at (202) 523-8148 to determine specific needs; OSHA rules
are covered by Title 29 of the Code of Federal Regulations (29 CFR.)
• Order OSHA publications from:
Government Printing Office (GPO)
Washington, DC 22304
(202) 783-3238

4
Part No. 920559 Rev H November 2008
1.3 SAFETY PRECAUTIONS
NFPA 30A states that:
“When maintenance to Class I dispensing devices becomes necessary and such maintenance may
allow the accidental release or ignition of liquid, the following precautions shall be taken before
such maintenance is begun:
• Only persons knowledgeable in performing the required maintenance shall perform the work.
• All electrical power to the dispensing device and pump serving the dispenser shall be shut off at
the main electrical disconnect panel.
• The emergency shut-off valve at the dispenser, if installed, shall be closed.
• All vehicle traffic and unauthorized persons shall be prevented from coming within 20 ft.(6 m)
of the dispensing device.
1
”
WARNING
Electric shock hazard! More than one disconnect switch may be required to de-energize the
dispenser for maintenance and servicing. Use a voltmeter to make sure ALL circuits in the
dispenser are de-energized. Failure to do so may result in serious injury.
Lockout/Tagout requirements of the U. S. Dept. of Labor, Occupational Safety and Health Adminis-
tration (OSHA) may also apply. Refer to Title 29, Part 1910 of the Code of Federal Regulations
(29CFR1910), Control of Hazardous Energy Source (Lockout/Tagout).
NOTE: To prevent damage to components located in the hydraulic cabinet, dispenser doors should be
in place during rainy and/or icy weather conditions. Also, check the nozzle boot flipper for
freedom of movement. If ice has formed on the flipper, it should be cleared to prevent
unnecessary damage.
1. Reprinted with permission from NFPA 30A-90, Automotive and Marine Service Station Codes, Copyright
©1990, National Fire Protection Association, Quincy MA 02269. This reprinted material is not the complete
and official position of the National Fire Protection Association on the referenced subject, which is repre-
sented only by the standard in its entirety.

5
November 2008 Part No. 920559 Rev H
2 INSTALLATION
2.1 Inspect the Equipment
Examine the shipment immediately upon arrival to make certain there has been no damage or loss in
transit. Make sure that all the component parts, including keys and optional equipment (if any), are
accounted for. Check and save the Packing Slip, Bill of Lading, Invoice, and all other documents
included in the shipment. Damaged or lost equipment must be reported to the carrier. Any damage or
loss that may occur in transit is not covered under the Wayne/Dresser Warranty.
2.2 Island Construction, Dispenser Anchoring, and Piping
Product lines must avoid the creation of vapor in the lines and deliver a minimum pressure of 25 psi at
the dispenser inlet when all dispensers at the station dispensing the same product are operating.
A concrete foundation must be provided for the dispenser. Do not pour concrete around product lines or
electrical conduit risers.
Anchor bolts must be installed in the island to allow the dispenser to be bolted down in accordance with
NFPA requirements. The base of the dispenser contains six bolt hole slots (5/8 inch by 2 inch) for
anchoring the dispenser to the island. Use of all anchoring locations is re-commended. Position
the anchor bolts in accordance with the dimensions shown on the Installation Instruction drawing for the
dispenser model. These drawings are located in Appendix B.
Vertical supply risers and electrical conduits must be located per the Installation Instruction for the
appropriate model. Proper height must be maintained to avoid undue stress on the dispenser.
For E85 Ovation models, product piping, pipe nipples, etc., containing Ethanol fuel must be Ethanol
compatible. See the information in Section 1.1 on page 1.
For convenience, a 6” high pedestal is available to install under the dispenser base at locations where
there are no islands. The pedestal, shown in Figure 2-1, can be ordered separately. See the complete
assembly drawing 888813 in Appendix B.
Figure 2-1 Pedestal. See Note under the shear valve drawing on the following page.

6
Part No. 920559 Rev H November 2008
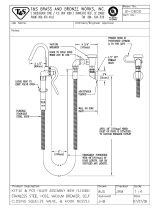
2.3 Emergency Shut-off (Shear) Valves
WARNING
For remote dispensers, a Listed
1
, rigidly anchored emergency shut-off valve must be installed, in accor-
dance with the manufacturer’s instructions, in each supply line at the base of each dispenser. For a typi-
cal emergency valve installation see Figure 2-2. Failure to install the proper emergency shut-off valve will
present a hazardous condition that could result in serious injury.
Note: Wayne does not supply the meter inlet pipe nipple or the union shown above.
2.4 Vapor Return Piping
NFPA 30A Section 4-3-7
2
states that a vapor return pipe inside the dispenser housing shall have a shear sec-
tion or flexible connector so that the liquid emergency shut-off valve will function properly. Wayne’s vapor
connections are secured to the chassis allowing for the use of a shear section.
Wayne dispensers provide 1" NPT pipe connections at the base of the dispenser for vapor return connections.
(See the installation foot print for location in Appendix B.) A minimum 1" riser at each dispenser is con-
nected to a minimum 2" return piping to the underground tank. If more than six (6) fueling points are con-
nected, then underground piping must be a minimum of 3". All lines should be sloped at a minimum of 1/8”
per foot (1/4” per foot preferred) from the dispenser to the tank to avoid liquid traps. Note: There is no vapor
recovery for the Ethanol product on E85 Ovation dispensers.
1. “Listed” means published on a list by a nationally recognized testing laboratory (NRTL) which is responsible for prod-
uct evaluation and is acceptable to the authority having jurisdiction. Underwriters Laboratories, Inc. is one example
of a Nationally Recognized Testing Laboratory. For more information on NRTL’s, see Title 29, Parts 1907 and 1910
of the Code of Federal Regulations, Safety Testing or Certification of Certain Workplace Equipment and Materials.
Figure 2-2 Typical Emergency Valve Installation. The Emergency valve is designed to close the product line due
to shock or fire. The shear section, shown above, functions if the dispenser is knocked out of position.
NOTE: The shear valve must always be at the ground plane. The pedestal shown on the previous page, is con-
sidered an extension of the dispenser, not the island.
2. Reprinted with permission from NFPA 30A-90, Automotive and Marine Service Stations Codes, Copyright 1990,
National Fire Protection Association, Quincy MA 02269. This material is not the complete and official position of the
National Fire Protection Association on the referenced subject, which is represented only by the standard in its
entirety.

7
November 2008 Part No. 920559 Rev H
2.5 Lifting and Installing the Dispenser
Remove the shipping carton from the dispenser and, if the dispenser is equipped with an optional val-
ance, survey the site to determine if it should be installed before or after the dispenser is set on the
island. Wayne recommends installing the valance after the dispenser is installed, if practical, to protect it
from installation damage. See the Valance Module drawing in the back of this manual.
Use door key (p/n 1-202022) to unlock and then remove the lower doors, see Figure 2-3 for location.
Install (2) eye-bolts in the dispenser top castings and lift the dispenser onto the island as per Lifting
Instructions drawing 888514-001 in Appendix B. When handling Ovation dispensers, lift only as per the
Lifting Instructions drawing contained in this manual. Do not lift by the electronic enclosure, nozzle
boot, or any external panels.
Bolt the dispenser into place (Section 2.2), remove the shipping discs from the meter inlets and connect
the product piping per the appropriate Installation Instruction drawing in Appendix B. When installing a
blending dispenser, make sure the Lo and Hi product inlets (and, if applicable, the single product inlet)
are correctly located.
To ensure tight, leak-proof connections when making piping connections, wash all cutting oils off the
threads and use a UL-classified pipe joint sealing compound, rated for use with petroleum-based prod-
ucts.
WARNING
Explosive or flammable vapors may accumulate within the dispenser housing. All piping connec-
tions in the final installation must be accurately fitted and all threaded joints tightly made up with a
Listed gasoline-resistant pipe joint compound. Put the compound on male threads only, being
careful not to get excess inside the pipe or fittings. Failure to perform the above will present a haz-
ardous condition that could result in serious injury.
Figure 2-3 DOOR LOCK LOCATIONS. One door key fits upper and lower door locks.
Optional VGA display screen shown.
Upper Door
Locks
VGA
Screen
Option
Lower Door
Locks (2)

8
Part No. 920559 Rev H November 2008
2.6 Electrical Wiring
2.6.1 General
Wayne recommends employing a qualified electrician for all wiring. A hazardous liquid is being handled, so it is
important to ensure that all wiring is in accordance with the National Electrical Code (NFPA 70) as well as all
federal, state and local regulations. Note: U.L. requires that all electrical connections to the dispenser be made
with threaded, rigid conduit and properly sealed conductors. Note: All dispensers and electrical connection
boxes must be grounded per NFPA 70.
2.6.2 Dispenser to Wayne Control System Interconnection
Dispenser installation wiring diagrams are provided in Appendix B. The system interconnection wiring diagrams
supplied are for reference purposes. Use these diagrams along with the wiring diagrams supplied with the control
system for laying out the system wiring requirements for a new site or when making changes to an existing one.
Two data wires to the Data Distribution Cabinet are required for the Wayne control system console operation.
Two data wires to the Site Controller Cabinet are required for dispenser card processing CAT operation.
Two data wires to the Site Controller Cabinet are required for Wayne TRAC operation.
One ethernet cable (gas and oil resistant) is required for dispensers equipped with the IDPOS or iX CAT option
from the switch in the dispenser to the switch in the building, see Section 2.6.6, Figure 2-5 and Figure 2-6. A UL
AWM Ethernet cable, Category 5 or higher, rated at least 300 V, 60 degrees C with a gasoline and oil resistant
jacket may be used. The conduit in the dispenser must be potted at the end of the installation.
Optional equipment wires, see Section 2.6.6.
NOTE: When data wires are installed, only the two data wires from the Data Distribution Cabinet used for pump control
are to be terminated at the dispenser’s terminal strip. The additional data wires should not be physically
connected to the data terminals on the dispenser’s terminal strip. Instead they should be properly terminated
individually using wire nuts.
Figure 2-4 shows the location of dispenser components that may need to be accessed during installation. If the
dispenser is not equipped with a junction box in the hydraulic cabinet, field wiring will terminate at the terminal
strip inside the electronic enclosure as shown in Figure 2-5 and the conduit fittings shown will be potted in the
field.
Figure 2-4 Location of Components in Lower Section (iMeter model shown). Side 1.
See Appendix B for new footprint drawings with the smaller junction box (above) effective in November 2008.
JUNCTION BOX
FILETR/STRAINER
VAPOR
PRODUCT INLET
RECOVERY
PROPORTIONAL
VALVE
/
OUTLET
WIP PULSER
E-M TOTALIZERS
CHECK VALVES
(under Valve Plates
in iMeter Dome)
VALVE COIL
CASTING

9
November 2008 Part No. 920559 Rev H
WARNING
Electric Shock Hazard! No connections (including neutral) may be shared between groups of dispensers.
A separate Control Power Circuit Breaker must be provided for each group. Failure to do so may result in
serious injury.
2.6.3 Field Wiring for Dispensers Without a Junction Box
All field wiring must enter the Electronic Head via potted conduit/conduit fittings. When a dispenser
does not contain a junction box, the conduits must be potted in the field during dispenser installation.
Note: This also applies to the secondary conduit containing the Ethernet cable and the intercom call button/
speaker wires even if the dispenser does have a junction box since these wires do not connect in the junction
box.
1. Install (2) 3/4” field conduits from the UL approved seal-offs at the base of the dispenser to the conduit at
the vapor barrier as identified in Figure 2-5. One conduit will contain, as applicable, the Ethernet cable
and the intercom (call button and speaker) wires (low voltage - Class 2 circuits). The other conduit will
contain the pump power, relay selects, valance lighting and data wires (Power - Class 1 circuits).
2. Clean conduit threads before connecting.
3. Pull continuous uninterrupted lengths of wires from the station electrical panels and control boxes to the
dispenser electronic head. Allow an extra 18” lengths past the vapor barrier fitting for terminating,
separating, potting and connecting to the terminal block. If installing iX CAT or IDPOS dispensers, allow
an extra 3 ft. of Ethernet cable past the top of the conduit in the vapor barrier.
4. From each conduit, separate the wires using 3-201623 Wire Separator Gasket. See Photo 1.
5. Roll separator gasket and wires into a cylinder and secure with electrical tape. Photo 2 and Photo 3.
6. Pull separator gasket and wires back through the conduit fitting (Photo 4) forming a dam in the conduit,
with the top of the separator down in the conduit past the dimple in the conduit.
Figure 2-5 Terminal Block Inside Electronic Enclosure. Field wiring connects to this terminal block when
the junction box shown in Figure 2-4 is not installed.
intercom speaker wires (Brown pair)
Potted Fitting contains Pump Power,
,
Potted conduit for Ethernet and
Terminal Block
used when junction box
Intercom Call Button/speaker wires only.
is not installed.
MGD Wiring Shown.
Note: With or without j-box,
Note: Main potted fitting contains
Data, Relay Selects, Valance lighting
this conduit now goes directly to the
seal offs under the dispenser to allow
for a straight run of Ethernet cable
from building switch to dispenser switch.
conduit along with the call button wires.
These must run in separate underground
See optional equipment section.

10
Part No. 920559 Rev H November 2008
2.6 Electrical Wiring, continued
7. Trim wires to appropriate length, terminate ends and connect to the terminal block as per Wiring Diagram
drawing 888445-001 located in the Appendix B of this manual. Note: Field wires are to be connected to
the lower terminals on the block.
8. Prepare the potting compound by pouring 4 oz. Rockite into an eight oz. paper cup.
9. Add 1-1/2 oz. of water.
10. Stir one to two minutes until reaching a consistency similar to pancake batter.
11. Pour mix into fitting and fill to within 1/8” of top of fitting (or top of conduit if the Ethernet conduit).
12. Close the service door.
13. Let fitting set for 12 hours. The wires must not be moved during this time.
Photo 1. Photo 2.
Photo 3. Photo 4.

11
November 2008 Part No. 920559 Rev H
2.6.4 Full Service (Stand-Alone) Dispenser Wiring
For full service operation, make electrical connections as shown on the Installation Wiring Diagram in
Appendix B. The electrical connections illustrated are typical when additional like model dispensers are
used.
Data wires shown on the wiring diagram are for connecting the dispenser to the Data Distribution Cabi-
net and the Site Controller Cabinet in a Wayne Control System. These data wires are not required for the
full service (stand-alone) dispenser. However, the six optional data wires and cable, whichever are
applicable, as described in Section 2.6.2, should be run at initial installation if a control system or
optional equipment is being installed or may be installed in the future.
Remote dispensers require a relay to control the submersible pump motor. These relays are available as
an option with the Wayne control system. If the dispenser is not connected to a Wayne control system, a
UL Listed magnetic motor controller assembly, constructed with Potter and Brumfield Relay No.
PRD7AYO (120) or equivalent, shall be used.
A maximum of 12 dispensers (24 fueling points) may be connected to a single PRD7AYO (120) relay;
other relays may have different limitations. All dispensers operating the same pump control relay must
be connected to the same circuit breaker; this may require multiple control relays for a submersible
pump.
Ensure that the submersible pump receives its power from its own separate circuit breaker as illustrated
in the Typical Site Wiring Diagram in Appendix B.
2.6.5 Multiple Dispenser Wiring
A primary requirement in dispenser installation wiring is to provide a means for disconnecting all power
connections, including the neutral, to the dispensers for safe shutdown and servicing of the units. Each
dispenser could be provided with a separate control Power Circuit Breaker. If this is not desirable or
practical, several dispensers can be grouped together and tied to the same Control Power Circuit Breaker
as illustrated in the Typical Site Wiring Diagram in Appendix B. A group of dispensers would then con-
sist of all the dispensers and associated Submersible Pump Control Relay coils supplied by the same
Control Power Circuit Breaker.
When more than one dispenser within the group activates the same submersible pump, the Relay Select
lines may be commoned at the Submersible Pump Control Relay Coil terminal up to a maximum of 12
connections (24 fueling points). Where more than 12 connections activate the same submersible pump,
additional relays should be used and the contacts paralleled as illustrated in the Typical Site Wiring
Diagram.
In larger installations, dispensers can be separated into multiple groups.

12
Part No. 920559 Rev H November 2008
2.6.6 Optional Equipment
Dispensers contain an extra pair of data wires in the junction box for Wayne TRAC as shown in
Figure 2-6 below. These wires are also identified in the installation wiring diagram in Appendix B.
Dispensers with the letter I in the model number will have an intercom call button.
Brown wires are speaker connections. Yellow wires are call button connections see Figure 2-6. Both
circuits are low voltage NEC Class 2 only.
Dispensers with a 3 or 6 in the main body of the model number indicates the dispensers are equipped
with iX CAT board option, VGA or QVGA, respectively. And, dispensers with the letter “L” in the 1st
suffix of the model number indicates iX Secure Keypad. All of these dispensers will require an unin-
terrupted run of Ethernet cable from the switch in the building to the switch in the dispenser elec-
tronic head. These dispensers will need a secondary underground conduit for this cable and other
NEC Class 2 wiring as shown below. From the factory, these dispensers will contain a short section of
conduit that can be used for making the connection to the secondary conduit seal off under the dispenser.
NOTE: The field Ethernet cable and Intercom (Call Button and Speaker) wires (NEC Class 2) must be
installed via a separate underground conduit to the dispenser. The intercom/speaker and call button
wires should be terminated with wire nuts in the electronics head.
2.6.7 Veeder-Root Vapor Flow Meter
Refer to the installation procedures in the Veeder-Root Manual No. 577013-796 Rev E (page 6, instruc-
tion steps 11 and 12) supplied with dispensers equipped with the Veeder-Root option.
2.6.8 Non-Dispenser Equipment
Do not run wiring for any non-dispenser equipment, in the same conduit as the dispenser wiring; this
wiring must be run in a separate conduit.
Figure 2-6 Ethernet, Intercom Call Button and Speaker Wiring. Ethernet and Intercom (Call Button and
Speaker) wiring must run in a separate underground conduit to the dispenser.
Terminal Strip
Y
Call Button
Speaker
Underground Conduit
Intercom (call button
Underground Conduit
for Pump Power,
and Data,
BU
OR
Wayne TRAC
Data Wires for
•
•
for Ethernet cable and
Electronic Head
Secondary Conduit
in Electronic Head
Y
Junction Box
Valance lighting
(NEC Class 1)
+
_
(NEC Class 2)
Ethernet Cable for
Note: This conduit now goes directly to the seal offs
under the dispenser to allow for a straight run of
Ethernet cable from building switch to dispenser switch.
and speaker) wires only.
option
iX CAT or
IDPOS option
Wire Nut (typical)
and relay select wires.
BN pair
•
Electronic Head
•
Main Conduit in
•
Speaker
••

13
November 2008 Part No. 920559 Rev H
2.7 Hose and Hose Retractor
Hose assemblies should be U.L. Listed and installed in accordance with the manufacturer’s instructions. To
ensure a proper joint, wash all cutting oil off the threads and use a U.L. classified gasoline-resistant pipe joint
sealing compound. Place the compound on male threads only; be careful not to get any excess compound
inside fittings. Install the fixed end of the hose to the dispenser outlet; secure according to the instructions of
the sealing compound and hose manufacturers. Install the swivel end of the hose or other swivels to the noz-
zle according to the manufacturer’s instructions.
Exception: Do not use the sealant on balanced or inverted hoses used with vapor recovery.
NFPA code requires a Listed emergency breakaway device, designed to retain liquid on both sides of the
breakaway point, must be installed on each hose dispensing Class I liquids; these devices must be installed
and maintained per the manufacturer’s instructions. Refer to your state and local codes for breakaway device
requirements that apply to your installation.
On E85 Ovation dispensers, all hoses, nozzles, breakaways, etc., containing the Ethanol fuel must be Ethanol
compatible. See the information in Section 1.1 on page 1.
On Wayne vapor recovery dispensers all hoses, nozzles, and breakaways, etc., must be CARB certified.
Hose Retractor: Caution!: On dispensers equipped with the Hose Retractor option, the hose clamp must
be mounted upstream of the breakaway device to avoid damage to the dispenser in the event of a drive-off.
The combined hose, breakaway, and whip maximum lengths are listed below.
WARNING
Use only Listed hoses and nozzles. Continuity must be present between the dispenser outlet and nozzle
spout to prevent static discharge while fueling. Continuity must be checked for each outlet/hose assem-
bly to insure that the nozzle is grounded. Failure to do so may result in a hazardous condition that could
cause serious injury.
2.8 Bleeding Product Lines (Remote Dispensers)
NOTE: To avoid severe damage to the dispenser, all air and air pockets must be bled from the product trunk
lines before attempting to dispense product.
Step 1 Make sure the power to the appropriate submersible pump is OFF.
Step 2 To bleed air from a trunk line, remove the pipe plug from the safety impact valve on the dispenser
farthest from the storage tank. For pipe plug location see Figure 2-2 earlier in this section.
Step 3 Attach a flexible hose to the pipe plug opening in the safety impact valve. Energize the appropriate
submersible pump and allow the air to bleed out of the trunk line into a test can until product flows
into the test can. De-energize the submersible pump and replace the pipe plug. Repeat the procedure
for each product and each trunk line.
Crossover Type
1 Hose per Side
Loopback Type
1 Hose per Side
Loopback Type
2 Hose per Side
Wayne Vac 14’ 0’’
Non-Vapor 3/4” 10’ 0’’ 10’ 0’’
Non-Vapor 5/8” 14’ 0’’ 14’ 0’’

14
Part No. 920559 Rev H November 2008
2.9 iMeter or Xflo™ Meter Calibration Procedure
Sufficient product must be run through each meter to thoroughly flush out all air and completely fill the system
prior to the calibration process.
Each meter assembly contains two meters. The WIP pulser (or XWIP for Xflo meter) contains two sets of sen-
sors, one set for each meter. On the front of the pulser, there are two calibration doors, one for each meter in
the assembly. The door closest to the front of the dispenser controls calibration of the front meter and the other
door controls calibration of the rear meter.
Only one door may be opened at one time during meter calibration
(only one meter at a time can be calibrated).
It is important to verify the product grade for each assembly to
assure the correct door is opened during the calibration process.
Dispensers have an operation mode setting that establishes the pulser’s calibration mode. This is set at the fac-
tory in the dispenser template (Read Only function F16). The imeter and the Xflow meter are calibrated using
the same procedure as shown below.
Verification Accuracy:
1. Dispense some product into the test measure to wet the container and then drain the container thor-
oughly, 10 seconds or more.
2. Dispense product into test measure until exactly 5 gallons (20 liters) are shown on dispenser display.
See Note 1.
3. Compare reading on site glass of test measure to dispenser display. Volume in test measure should be
within +/- 3 cu. in. (+/- 50 ml). See Note 2.
4. If values are out of range, calibrate as described below.
Calibration:
1. Identify calibration door for meter in need of calibration.
2. Remove seal wire and pin to allow access to door.
3. Dispense some product into the test measure to wet the container and then drain the container thor-
oughly, 10 seconds or more.
4. Open calibration door of meter to be calibrated. (Only one door can be opened at a time during the cali-
bration process).
5. Dispense exactly 5 gallons (20 liters) into the test measure exactly to the “0” mark on the sight glass
(read the bottom of the meniscus).
6. Close the calibration door. (This now redefines the calibration factor in the pulser).
7. Empty the test measure (drain completely, 10 seconds or more) and verify accuracy as described above.
8. Seal calibration door.
Note 1: In the Liter mode, in addition to 20 liters, a 10 liter or 5 liter test measure may be used if required
by the application. However, you should check with your jurisdiction on Weights & Measures tolerance
requirements.
Note 2: For the U.S. and Canada, acceptance tolerance of ±3 cu.in. for a 5 gallon measurement and ± 50
ml for a 20 liter measurement is only required for newly installed, newly placed in service devices for 30
days. After 30 days, the tolerance is increased to ±6 cu.in. for 5 gallons and ±100 ml for 20 liters.
/