Page is loading ...


NOTICE TO DEALERS
This manual is provided to ensure that the snowmobile is assembled correctly and given proper presale
preparation. Your
customer
expects and deserves a safe, reliable snowmobile, and performance of the
steps
listed here is essential to that end.
The
selling dealer assumes sole responsibility for any unauthorized
modifications
prior to sale. REFER
TO
YOUR
SNOW PRODUCTS BINDER
FOR
ANY SERVICE BULLETINS SPECIFYING FACTORY
DIREC
TED
MODIFICATIONS WHICH MUST
BE
PERFORMED BEFORE THE SNOWMOBILE
IS
READY
FOR
SALE.
SAFETY AWARENESS
WARNING
I
This warning
symbol
identifies
speCial In·
structions
or procedures which,
if
not
cor·
rectly followed,
could
result in personal in·
jury, or loss
of
life
This caution
symbol
identifies special in-
structions
or procedures which,
if
not
strictly
observed,
could
result in damage
to,
or destruction
of
equipment.
L

Table of Contents
Dealer's Assembly and Prepara
ti
on Check Lis
t.
. . . . . . . . . . . . . . . . . . . . . . . . . . . . . . . . . . . . . . . . . . . . . . . . . . .
..
ii
Assembly
.....
. . .
...
. . . . . . . . . . .
...
. . . . .
..
. .
..
. .
....
. .
.. ..
.....
. . .
..
. . .
...
. . .
....
...
. . . .
...
..
. . 1
Uncrate . : . . . . . . . . . . . . . . . . . . . . . . . . . . . . . . . . . . . . . . . . . . . . . . . . . . . . . . . . . . . . . . . . . . . . . . . . . . . . . . .
..
1
Skis
..
. .
.....
. . . .
..
. .
...
. .
......
...
.......
.
...
. , . . .
...
..
.. ..
.
..
.
....
. .
..
...
.
...
.. ..
. . .
..
. . 1
Win
ds
hiel
d.
. . . . . . . . . . . . . . . . . . . . . . . . . . . . . . . . . . . . . . . . . . . . . . . . . . . . . . . . . . . . . . . . . . . . . . . . . . . . . . . 2
Handlebar . . . . . . . . . . . . . . . . . . . . . . . . . . . . . . . . . . . . . . . . . . . . . . . . . . . . . . . . . . . . . . . . . . . . . . . . . . . . . . .
..
2
Thro
ttl
e and Brake Con
tr
ol Levers. . . . . . . . . . . . . . . . . . . . . . . . . . . . . . . . . . . . . . . . . . . . . . . . . . . . . . . . . 3
Tool Kit/Owner Manual and Safety H
andbook
. . . . . . . . . . . . . . . . . . . . . . . . . . . . . . . . . . . . . . . . . . . . . . . . . .
..
3
Safety Labels
... ...
.......
....
. . .
.. ..
. .
............
..
. . .
..
. .
..
. .
...
..
..
.
...
.
..
. . . .
......
.
..
3
Prepara
ti
o
n.
. . . . . . . . . . . . . . . . . . . . . . . . . . . . . . . . . . . . . . . . . . . . . . . . . . . . . . . . . . . . . . . . . . . . . . . . . . . . . . . . . . . 4
INTRUDER
Suspension . . . . . . . . . . . . . . . . . . . . . . . . . . . . . . . . . . . . . . . . . . . . . . . . . . . . . . . . . . . . . . . . . . . . . . . . . . . . . .
..
4
Ride Adjustme
nt
. . . . . . . . . . . . . . . . . . . . . . . . . . . . . . . . . . . . . . . . . . . . . . . . . . . . . . . . . . . . . . . . . . . . . .
..
4
Handling Adjus
tm
e
nt
. . . . . . . . . . . . . . . . . . . . . . . . . . . . . . . . . . . . . . . . . . . . . . . . . . . . . . . . . . . . . . . . . . . . 4
Swing Arm Adjustme
nt.
. . . . . . . . . . . . . . . . . . . . . . . . . . . . . . . . . . . . . . . . . . . . . . . . . . . . . . . . . . . . . . . . . 5
Ski
Spr
ing Preload Adjus
tm
e
nt
. . . . . . . . . . . . . . . . . . . . . . . . . . . . . . . . . . . . . . . . . . . . . . . . . . . . . . . . . . . . . . . . 5
Steering Ali
gnme
nt
...
....
.
......
. . . . . .
...
. . .
......
. .
...
..
.
...
..
.
..................
.
....
.. ..
6
Wirin
g Harness. . . . . . . . . . . . . . . . . . . . . . . . . . . . . . . . . . . . . . . . . . . . . . . . . . . . . . . . . . . . . . . . . . . . . . . . . . .
..
7
Ba
tt
e
ry.
. . . . . . . . . . . . . . . . . . . . . . . . . . . . . . . . . . . . . . . . . . . . . . . . . . . . . . . . . . . . . . . . . . . . . . . . . . . . . . . . . . . 8
Battery
Remova
l.
. . . . . . . . . . . . . . . . . . . . . . . . . . . . . . . . . . . . . . . . . . . . . . . . . . . . . . . . . . . . . . . . . . . . .
..
8
Ba
tt
ery Charging
..
.
....
.
..............................
.
.........................
.
......
8
Batte
ry Insta
llati
o
n....
...
...
..
. . .
.........
. .
..
.
....
. .
....
...
...
.
...
.
.......
.
...
.
...
.
..
. 9
Chaincase Lubri
ca
tion
. . . .
.....
.
..
. . . .
...
..
. . .
..
....
. . .
...
.
..
. . . .
..
...
. . .
...
. . . . . . . .
..
. . . . .
..
10
Brake Ad
ju
stme
nt.
.
..
.........
. .
..
.
...
. .
..
. . . .
..
.
...
. . . .
..
.
..
. . .
....
.
....
. .
..........
.
..
...
10
Fan Be
lt
Tension
.......
. . .
..
..
. .
..
.
..
.
.....
. .
...........
.
......
.
...
.. ..
. . . . . . .
.............
11
Drive and Dri
ve
n Conv
er
ter Alignment . . . . . .
..
....
.
...
. . .
..
..
. .
..
. .
......
.
....
. . . . . . . . .
..
.
...
. . .
11
Ce
nt
er-to-Ce
nt
er Distance
...
.
..
.
...
.
...
. . .
...
.
..
. . . .
..
. . . .
..
....
. .
...
....
. . . . .
....
. . .
....
12
Jacksha
ft
Bear
ing
Re
tainer S
himming
.....
. . .
..........
. . . .
..
. .
..
.
......
.
.......
.
.....
.
..
.
13
Converter O
ff
set Distance
...
...
....
..
. . .
........
..
. . .
......
.
...
. . .
..
. . . .
.....
.....
.
...
.
..
14
Co
nve
rt
er Parallelism
......
...
.
.........................
.
........
.
.. ..
....
. . . . .
...
..
...
.
14
Eng
ine
Break-In
..................................
.
..
.
..
...
.....
....
.
...
. .
..
. . . . .
........
. . .
15
Oil Rec
omm
enda
ti
on .
.....
. . . . . .
....
.
....
-
............
..
. . .
.......
. . .
......
.
...
. . . . . . . .
....
. ,
15
Fi
lling
Oil
Tank
....
....
. . . .
..
...
..
. .
.....
.......
. .
.. .. ..
.
.......
.
.....
.
........
. .
..
. . .
..
16
Fuel Reco
mm
en
dat
ion
..
....
..
.
..
.
...
.
...
. . .
...
..
.
...
. .
..
.
.....
. . .
..
. .
..
.....
.
...
.. ..
.
..
. .
..
16
Fuel/O
il
Mi
x
ture
(Break-in Only) . . .
..
...
.
.....
. . . .
...
..
. . .
....
..
. . .
...
. . . . . . . . .
....
.
..
. . .
..
16
Fuel/O
il
Mixt
ur
e (Standard) . .
...
.......
.
...
. .
..
. . .
..
.
..
. . .
..
.
...
.
....
.
..
..
..
. .
..
. .
...
..
..
.
16
Adding Gasoline An
tifr
eeze
.....
. . .
..
. .
..
.
..
. . . .
..
...
.
..
. . . . . . .
..
...
....
.
..
. . . . .
..
..
....
.
16
Filli
ng Fuel Tank
.....
. .
..
. .
..
.
....
. . . .
...
. . . . .
..
.
...
..
....
...
. . . . . . . . . . . . .
....
. . .
..
..
.
..
17
En
gine Gearcase
Lubr
ication
...
.
...
.
.. ..
.
...
. .
..
. . .
..
. . .
..
....
......
. .
..
.
..
. .
..
..
. . .
....
..
.
..
17
Oil Injec
ti
on System . . .
...
. .
....
.....
. . . . . . . .
...
. .
....
..
....
..
.
..
.
...
.
..
..
. . .
...
.
.....
. . . . . . .
17
Bleeding Oil P
ump
Supply T
ub
e
..
. . . . .
........
. .
....
...
..
.
.....
. . .
..
. .
........
. .
......
.
...
17
Oil
Pu
mp to Carburetor Synchroni
za
ti
on
...
.
....
.
......
.....
..
.
....
. . .
....
.
...
..
.
..
.
........
19
Purging
Air
From Oil
Pu
mp O
utl
et Tubes
.........
. .
......
...
. . . .
...
. .
...
....
.
..
... ...
..
.
...
20
Enrichener Cable Adjustment .
..
.......
.
.......
....
....
...
. .
..
...
. . . . . .
..
. . . .
..
. .
....
.
...
..
. . . 21
Carb
ur
et
or
Sync
hr
oni
za
tion .
....
......
.
...
. . . . . .
..
.
.....
.......
. . . .
... ... ...
. .
......
..
...
. .
..
22
Igni
ti
on Ti
ming
Check
..
......
. . . .
....
. .
...
....
..
.
...
. . .
...
.
.....
. . .
..
. . . .
......
. . .
...
.
......
23
Headlight
Adjustmen
t . .
...
.
...
. . . . .
..
.
..
. .
...
...
. . .
..
. . .
..
.
..
.
..
. .
..
....
....
..
.
..
. . . .
.....
..
25
Tail/Brake Light Test . . . .
...
.
...
. . .
....
.
..
. . . . .
..
....
. . . .
..
.
.....
. . .
.. ..
. . . . .
..
.
....
.
......
. . 26
Track Adj
ustmen
t
...
. . .
..
.
..
.
...
. . . .
......
. . .
..
..........
. . .
......
.
...
.
....
.
..
.
....
...
. .
...
. 26
Track Tension
........
..
. .
..
. . . . . .
..
. . . . . . . . . . .
..
. . . . . .
..
. .
.. ..
.
...
. . . . .
..
..
. . . . . . . . . . . . 26
Track
Alignme
nt
............
. . .
..
. .
..
.
.....
. . . . .
...
.
..
.
..
.
.......
. . . . . .
...
....
.
....
.
....
27
Test Ride (
Ope
ra
ti
onal Checks)
....
.
...
. . . .
..
. . . . . . .
...
. . .
....
.
............
. .
..
.
..
...
. .
.....
..
28
Spec
ifi
cations . . .
........
..
. . . . .
..
.....
. .
..
.
....
. .
..
...
. .
..
.
....
. .
....
...
. . .
...
.
.....
. .
...
. .
30
Engine
..........
. . . . .
...
. . .
..
..
.
...
, .
..
. . .
.....
..
.
..
.
.. ..
.....
.
..
...
..
. .
...
.....
.
....
. 30
Carburetor
Se
ttin
gs
......
.
.....
..
.
...
.
..
. .
....
.
..
. . . . .
...
. . .
....
.. ..
. .
......
. . . . .
..
.
....
30
Fuel .
......
. . . .
....
.
........
..
.
..
. . .
.....
. . . .
..
. .
.......
. .
..
. . .
..
. . .
..
.
.....
.
...
.
.. ..
.
30
Lubrica
nt
s
...............
.
....
..
. .
...
..
. . .
...
. . . . . . . . .
........
.
..
. .
..
. . . . . . . . .
...
.
..
...
30
Drive System
....
.
......
..
. . . . . . .
....
...
. .
...
.
...
.
....
.....
. .
...
. . .
.........
..
. .
..
.
.....
30
Electri
ca
l System . . . . . . . .
..
. . .
..
.
..
. .
...
...
.
...
. . . . . . . . . . .
...
.
..
. . . . .
......
. . . . .
.......
.
30
Tor
que Chart
.........
...
. . .
..
. . . . .
........
..
.
..
. . . .
..
. . . . .
..
. .
.......
.
....
.
....
. . . .
...
..
. . .
31
W
iring
Diagram
..
. .
...
. . . . . . .
..
.
..................................
. .
...
..
..
.
...
.
..
. .
....
...
.
32
TABLE OF CONTENTS

Dealer's Assembly and Preparation Check List
Remove the
Assembly
& Preparation
Check
List
from
sto
rage case.
Complete
each
item
of
the
check
list
following
the
procedures
outlined
in
this
manual.
Verify
compliance
by
placing
a
check
(
....
) in
box
preceeding each
item
as
it
is
completed.
Be sure
to
sign
all
sections
of
the form as
they
are
completed.
Retain
completed
chec
k
list
for
your
records.
ii
KAWASAKI
SNOWMOBILE
DEALER'S
ASSEMBLY & PREPARATION CHECK
LIST
I
hereby
certi
fy
that
prior
to
de
livery
to
the
first
reta
il
purchaser assembly and
preparation
servicing
waS
performed
on
the
snowmo
-
bile listed below in accordance
with
the
following
check list, and in compliance
with
the established procedures p
re
scr
ibed
by
Kawa-
sak
i:
(
~
check each
item
when
completed
I.
SNOWMOBILE
INFORMATION
MODEL
SERIAL
NO.
ENGINE
NO.
ASSEMBL
Y
CHECK
LIST
CI
REMOVE
CRATE·
check
for
damaged & missing parts.
2 D SK IS .
install·
torque
all
bolts
.
3 D SKI SHOCKS ·
moun
t and
torque
bolts
.
4 D
WINDSHIELD
·
mount
to
hood
.
5 D
HANDLEBARS·
adjust
to
proper
position/
torque
bolts
.
6 D
SAFETY
DECALS
·
properly
installed.
7 D
TOOL
KIT
· complete/installed.
ASSEMBL
Y
BY
:
Signature
PREPARATION
CHECK
LIST
1 D
STEER
ING·
al
ign
sk
is/
components
secure.
2 D
CLUTCH
ALIGNMENT
· check/adjust.
3 D
CLUTCH
CENTER
TO
CENTER
· check/adjust.
4 D
CHAI
NCASE . add lube
if
required/check
for
leaks.
5
CI
BRAKE·
clean disc/adjust.
6 D
WIRING
HARNESS
·
properly
routed
/electri
ca
l con·
nectors secure.
7 D SUSPENSION · check/
ad
just.
B
[J
NUTS,
BOLTS
,
OTHER
FASTENERS
· check/
tighten
.
·9
D ENG I
NE
GEARCASE
LUBRICA
NT
· check level/add
recommended
oi
l
as
required.
10 D
FUEL
PUMP
TUBES
· secure and no kinks
11 D
ENRICHENER
CONTROL
· check/
ad
just.
·12
DOlL
PUMP · ch
ec
k
synchronization
/adjust.
13 D
THROTTLE
CABLE·
check/
ad
j
ust
.
·14
C
CARB
SY
N
CHRONIZE
· check/adjust
(twin
carb mode
ls)
.
·15
D
FAN
BELT
· check/adjust (axial fan modelsl.
·16
DOlL
TAN
K ·
fill
with
Kawasaki approved
oil
/check
for
l
eaks
.
·17
D 01 L
LI
NE
TO
PUMP · (all
oil
injection
models) bleed/
secure/
properly
routed.
· 18 D
ENGINE
COOLANT
· check level/freeze
protection
.
19 C
SPARK
PLUGS
· check/gap.
20
0
GAS
TAN
K .
fill
with
recommended fue
ll
oil
mix
(refer
to
Owner
's ManualJ check
for
leaks.
21
D
CARBURETOR
AI R SCREW · adjust.
22
LJ
CARBURETOR
IDLE
SPEED · adjust.
·23
D
PR
IMER·
check
operation
.
24 D
IGNITION
TIMING
· check when engine is
warm
/adjust.
25 C
ELECTRICAL
SYSTEM·
check
operation
. adjust
[J
Headlight •
:!
Ba
ttery
Chargmg
Syst
em
o Taillight C Brake
Light
· 0 Elec
tric
Starte
r · 0 In
struments
&
Ind
i
cator
Lights
26 D
TRACK
· adjust tension/align
PREPARATION
BY
:
S
ignature
TEST
RIDE
D
CONTRO
L
CAB
LES .
throttle
& brake
works
withou
t
bjnd
i
n ~
in
any
stee
ring
position
/
returns
freely.
2 0
ENGINE
STOP
SWITCH
· check operation.
3 D SU
SPE
NSI
ON
· check slider ride adj
ustm
ent.
4 0
STEER
ING ·
action
is
free
lock
to
lock/no
loo
sene
ss.
5 8 ENGINE · recoil
starte
works
properly
/engine
starts
prompt
ly
/
good
throttle
response
and
return.
Exhaus
t
smoke
present
but
not
ex
cessive (oil inj
ect
i
on
mode
l
s)
.
6 D
CLUTCHES
·
smooth
operation
/
correct
maximum
RPM.
7
~
BRAKES·
adequate ·
sm
ooth
stoppin
g
power.
8 0
SPEEDOMETERIT
ACHOMETE
R . check
operation
.
g D
NO
UNUSUAL
NOISES.
·10
C
NO
COOLANT
LEAKS
.
11
D
NO
FUEL
OR
OIL
LEAKS
.
· 12 D
COOLANT
LEVEL
· check/add
coolant
mix
as
required.
13 0
CONTROLS
·
properly
positioned
/secure/adjusted.
TEST
RIDDEN
BY
:
Signature
CUSTOMER
DELIVERY
D OWNE
R'
S
MANUAL
·
explain
contents
/
pr
oper mainte·
nance
li
nsta
ll
.
4 0
CONTROLS
·
explain
lo
cation
&
operation/properly
pos
itio
ned
for
customer
.
2 D
OWNER'S
SAFETY
HANDBOOK
· explain
contents
/
install.
3 :J
WARRANTY
CERTIF
I
CATE
·
exp
lain wa rr
anty
and
customer
respons
ibi
li
ties
thoroughly
/i
nstal
l.
DELIVERED
BY
:
DEALER
VERIFICATION
S
ig
nature
Doaler Name _ _
__
_ _
__
_ _
_______
__
_ _
Signature
of
Dealership Manager
___
__
____
_ _ _
Addrou
_
_____
__
___
_
___
________
_
_________
_
Date
__
_
______
_
•
App
li
cable
mode
ls
onl
y·
refer
to
assembly
instruction
pro
....
i
ded
by
Kawasaki for specific
models
.
PIN
49007-.350'
wh
i
te
copy
.
dee'er
tile
/ c
enerv
copy
.
own.r
Printed
in
U .S.A .
If
it
is
desired
to util
ize
the French portion
of
this
check
list,
please
remove
the carbon sheet
and
insert
in
proper location.
DEALER'S ASSEMBLY AND PREPARATION CHECK LIST
INTRUD
ER

Assembly
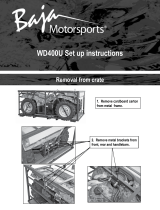
Uncrate
Observe this
[:~:~~~~~::]
during
next
step
Bend over
all
exposed
crate fasteners to
prevent
personal
injury
or
possible vehicle
damage.
In a large clear
work
area, open the crate. Separate
the
top
and sides of the crate and remove the
windshield from the seat. Unscrew
nut
s securing
ski
assemb
lies and sp
indle
s
to
the crate
bottom
and discard hardware as
it
is
not
us
ed
for
snowmobi
le
assemb
l
y.
(See Figure
1.)
NOTE: When
uncrating
vehicle, inspect
for
con-
cealed damage that may
occ
ur
dur
ing s
hipping
. If
damage is apparent, STOP
uncrating
and
check
your WARRANTY POLICIES & PROCEDURES sec-
tion
of
your
S
now
Products
Bin
der
under R
ECE
IV-
ING WAREHOUSE UNITS.
1
1.
Ski Assembly
2.
Ski Spindle
INTRUDER
Observe this
WARNING'
during
next
step
To
prevent personal inju
ry,
use lifting
equipment
with approved safety hooks
when raising the snowmobile.
With
assistance,
or
the use
of
a hois
t,
carefu
lly
lift
snowmobile
from crate.
Thoroughly
inspe
ct
the
s
nowmobil
e
for
sh
ipping
damage and
missing
parts.
Remove
plastic
bag
conta
ining
mounting
hard-
ware
for
skis
and win
dshield
from
sto
rage case.
Skis
Place the
snowmobi
le on
it
s side. Be sure to pro-
vide a
protected
surface
to
prevent marring the
finish
of
the
snow
mobile. Then perform the
following
:
1.
Install the ski
attitude
damper. Apply S
ilicone
spray
or
soapy
water
on the
damper
to ease in-
stall
ation
of
the ski saddle over the damper.
(See Figure
2.
)
2
1.
Ski
Attitude
Damper
2. Grease Groove
3.
Ski Saddle
ASSEMBLY

2.
Fill the grease groove
or
cut
away area
of
the
spindle sleeve
with
a
low
temp
erature ex
tr
eme
pressure (ep) grease, and insert
sleeve
int
o
spindle. (See Figure
2.)
Obse
rve
thi
s
WARNING
I during
next
step
Improp
er
tigh
tening
of
spindle
to saddle
bolt
will
result in excessive steering
system pla
y.
This negatively
affects
vehi-
cle handling
and
could
r
esult
in loss
of
control
leading to
possible
personal
injury
to
the operator.
3.
Se
cure the ski assembly
to
the spindle
with
the hardware supplied. Be sure the
nut
and
large flat washer are installed on the inward
side
of
the ski assembly. Torque
nut
46
ft
Ib
(6
.4
kg-m
).
(See Figure
3.)
3
1. Flat Washer
Windshield
Remove plastic covering and install trim seal on
windshield
. Ins
tall
wind
shie
ld
with
o-ring
fasteners provided.
(See Figure
4.)
Handlebar
Prior
to
securing the handlebars, check the lower
handlebar holder
for security
to
the steering pole.
Torque the lower handlebar holder mounting
bolt
35
ft
Ib
(4
.8 kg-m). (See F
igur
e 5.)
2 A
SSEMBL
Y
4
1.
"0 " ring
2.
Trim seal
Check the routing
of
the cab1es and w
ir
e
harnesses
for
proper positioning. They should
pass through the console at the handlebar holder,
and have adequate free movement
to
prevent bin-
ding or rubbing during vehicle operation. (See
Figure 5
.)
1.
Lower Handlebar
Holder
2.
Console
Observe
this
[:~~0!~:~::J
during
next
step
Adjust
the handlebar
so
it
does
not
hit
the
windshi
eld
when turning in
either
direc·
tion.
INT
RUDER

Adjust
the handlebar
for
a
comfortable
driving
position
and evenly torque the
four
socket
screws
secur
ing the handlebar
holder
10
5 in.lb
(1.2
kg-m).
(See Figure
6.)
Throttle and Brake Control Levers
Check
throttle
and brake
control
lever position. Be
sure they are
comfortable
for
dr
iving. Torque set
screws
25
in.lb
(0
.3
kg-m). (See Figure
7.)
1.
Set Screw
Tool Kit, Owner Manual,
and Safety Handbook
Check the storage box
to
be sure it
contains
the
Tool Kit,
Owner's
Manual and Safety Handbook.
INTRUDER
Safety Labels
WARNING'
Safety labels specify special instructions
or procedures, which
if
not fol/o
wed
cor-
rectly,
could
lead to personal injury.
Safety labels are loc
ated
on, or
next
to,
compenents that, under certain
condi-
tions, could cause personal inju
ry.
Be sure
they are properly
located
and
secure. (See
Figure 8.)
ASSEMBLY 3

Preparation
Suspension
The
snowmobile
is
shipped
with
the
suspension
springs
ad
ju
sted
during
production
assembly
to
provide
satisfactory
ride
and
handling
characteristics
for
average driver weight. Normal-
ly,
no
ad
justment
s are required.
WARNING
t
Suspen
sion
springs
are under
heary
spring load,
improper
adjusting
tech-
niques may result in personal injury.
Ride
Adjustme
nt
Ride
Adjustment
may be varied by changing the
pos
iti
on
of
the
shock
absorber spring
adjusting
cam, using the special
tool
provided in the
tool
kit.
Rotating
the cam
towards
the heavy pre-load posi-
tion
will
increase
spring
pre-load, resu
lting
in a
s
tiff
er ride. If the cam is rotated
towards
the
light
pre-load
posit
ion,
this
will
decrease spring pre-
load,
resulting
in a so
fter
rid
er
for
th'e operator.
(See Figure
9.)
1. Cam
Adjustfng
Tool
2.
Spring Cam
4
PREPARATION
NOTE: An
optional
heavy-duty
shock
absorber
spring
kit
is available to increase the load carrying
capacity
of
the
snowmobile.
Handling
Adjustment
The handling
adjustment
is
controlled
by chang-
ing spring tension
of
the
front
suspension
springs. Increasing spring
tension
causes the
suspension
to
press harder on the ground,
resulting
in less ski pressure. Reducing the
spring
tension
causes the front
of
the
suspension
to
have
less pressure on the ground and the ski
pressure
to
increase. A change in ski pressure will
affect
the vehicles steering response.
The
tension (pre·load)
of
the
front
springs
on each side
of
the suspension arm
must
be equal. Excessire tension
of
one
spring
can cause spring breakage
or
excessire
wear
to
one side
of
the
slide
wear strips.
(See Figure 10.)
The
spring
arm on each
side
of
the
suspension
should
be
positioned
as required, to acheive the
desired steering response and
effort
for
existing
terrain and
snow
conditions
in
your
area.
To change spring tension:
1.
Install spring
adjust
ing tool
PIN
57001-3507
onto
the end
of
the
spring
arm as
shown
. (See
Figure 10.)
10
1.
Spring
Adjusting
Tool
2.
Spri ng Arm
3.
Spring Retainer
INTRUDER

IT
Observe
this
WARNING'
during next step
Front suspension springs are under heavy
spring
load and
improper
adjusting
tech-
niques may result in personal injury.
2.
Apply
a firm grip on the spring
adjusting
tool
with
both hands and
carefully
lift
the spring
arm
out
of
the
detent
in the
spring
retainer. Be
perpared
for
the heavy spring load
to
be
transferred to the
spring
adjusting
tool as the
spring arm is
lifted
out
of
the retainer detent.
3.
Install
the spring arm
into
the retainer
detent
necessary
to
obtain
the
handling
characteristics
desired.
4. Repeat procedure on
other
front
spring
to
make
tension
equal on
both
sides
of
suspen-
sion
(front
to
front).
Swing
Arm
Adjustment
I
WARNING'
Front suspension arm
is
under heavy
spring
load. Remove
spring
tension from
the
front
suspension
springs
before
relocating the
front
swing
arm assembly to
prevent
possible
personal injury.
The
front
swing
arm
is
positioned
in
lower
hole
of
suspension
front
bracket
for
best over-all ac-
celeration
and ride
characteristics.
Changing sw-
ing arm to
upper
hole
location
causes less
weight
transfer
from
skis
to
suspension
during
accelera-
tion. Less
weight
transfer
decreases ski
lift
allow-
ing increased
steering
stability
during
accelera-
tion. (See Figure 11.)
To change
swing
arm
position:
1.
Position spri
ng
adj usti
ng
tool
PIN
57001-3507
onto
end
of
front
spr
ing. (See Figure
10.)
INTRUDER
11
1.
Suspension
Front Swing Arm
2.
Upper
Ho
le
Location
3. Suspension Front Bracket
2.
Applying firm
grip
on
adjusting
tool, carefully
force
spr
ing
out
of
retaining bracket detent.
Be
prepared
to
accept heavy spring load as
spr
ing is released
fr
om retainer detent.
3. Repeat procedure on
other
front
spring
to
re
lieve
spring
on
suspens
ion front.
4.
Loosen rear axle a
dju
sting b
olt
jam
nut
s. Back
out
adj
ust
ing bo
lt
s to relieve track tensio
n.
5.
Remove
swing
arm to bracket mou
nti
ng bol
ts
and
positio
n
sw
ing arm in upper locatio
n.
Re
install
bolts
and t
or
que 30 ft Ib
(4
.1 k
g-
m).
6. Use
spr
ing
adjust
ing tool to reposition
spr
ing
into
desired
dete
nt.
7.
Adjus
t
tr
ack tension as ins
truct
ed in
tr
ack ad-
j
ustment.
Ski Spring Preload
Three positions have been provided
for
the front
ski
spr
ing
mount
ing bol
t:
CENTER HOLE POSITION - During
factory
assembly the bolt was installed in the
cente
r hole
in the ski and norma
lly
no change is required for
general sn
ow
m
ob
ilin
g. (See Figure 12
.)
PREPARATION 5

12
REAR HOLE POSITION -
Inst
allation
of
the bo
lt
in
the
re
ar hole
of
the ski
will
reduce
spring
preload,
increase the spring arch, and
result
in a
softer
rider
with
greater
spring
travel. This
position
is
recommended
for
deep
snow
operation
or
slow
speed trail riding.
FRONT HOLE POSITION - Placing the
bolt
in the
fro
nt
hole
of
the ski
will
incr
ease
spr
ing preload,
reduce the
spr
ing arch, and
re
su
lt
in a s
tiff
er rider
with
less
spr
ing travel. This
position
should be us-
ed
for
maximum
sta
bility
during
high
speed opera-
tion.
NOTE:
Always
mount
the
front
sk
i
spring
bolt
int
o
the same
position
on each ski.
To change the
preload
of
the
sk
i spring, be sure
the
weight
of
snowmobile
is on the ski
s,
and pro-
ceed as
follows:
1.
Remove
nut
from
front
spring
mounting
bolt.
2.
Open hood and
with
assistance
from another,
stand on
front
bumper
to
relieve spring ten-
sion
from
mounting
bolt.
3.
With
weight
still on
front
bumper
, remove bolt,
slide
spr
ing rub
strip
to
align w
ith
desired hole
pos
ition
of
ski, and
insert
bolt.
4.
Install
nut
and
torque
25
in. Ib (0.3 kg-m).
6
PREPARATION
Steering Alignment
Check the ski
alignment
and handlebar centering:
1.
Place a long board (
or
suitab
le
straight
edge)
against the
right
hand edge
of
the track, and
measure the
distance
between
the board and
center
line
of
the ski.
Position
the ski
so
that
the
distance
measured between the ski
center
line and edge
of
board is the same at
the front and rear
of
the ski. (See Figure 13.)
13
1.
Strai
ght
Edge
Against
Track
2.
Measure
Distance
Here
2. When the
center
line
of
the ski is parallel
to
the
outs
ide edge
of
the
track,
check
steering
handlebar
for
center
ing. The handlebar
holder
should
be parallel
to
lower
edge
of
control
panel.
3. To
center
handlebar, loosen
lock
Uam)
nuts
and turn
tie
rod
adjusting
stud
in the
direction
necessary
to
center
handlebar. (See Figure
14.)
INTRUDER

NOTE: Be
sure
the
center
l
ine
of
the
ski
remains
parallel
to
the
straight
edge
while
turning
the
tie
rod
length
adjusting
stud.
14
1.
Tie
Rod
Length
Adj
ust
ing Stud
2.
Locknuts
3. 1-1/4 in. (32
mm
) Max
imum
WARNING
t
To
prevent
possible
steering
linkage
failure the
adjusting
stud
must
remain
centered
between
the
two
jam
nuts
and
the
measurement
between
the
jam
nuts
must
not
exceed
1-114
in. (32 mm). (See
Figure 14.)
4. To align
other
ski
move
both
ski
tips
towards
center
of
snowmobile
to
remove
steering
linkage
play.
Loosen
l
ock
nuts
and
turn
tie
rod
to
obta
in an
equal
distance
from
ski
center
to
sk
i
center
when
measured
at
the
front
and rear
of
the
skis
. (See Fi
gure
15.)
WARNING'
After
proper
alignment
is obtained, the
number
of
exposed
threads
at
each rod
end
must
be
equal
and
not
exceed
112
in.
(12.7
mm)
when measured from the
jam
nuts
or
possible steering linkage failure
may
occur. (See Figure 15.)
INTRUDER
5
tL-0
-
3-
---"I~'-r
:--Gr
-
3-
Te
1.
Equal
Distance
Front
and
Rear
2. Tie Rod
3.
Exposed
Threads
- 1/2 in.
(1
2.
7 mm)
max
imum
15
5.
Tighten
all
hardware
(nut
s,
bolts,
etc.) in
stee
r-
ing
syste
m.
Torque
jam
nuts
on
tie
rod
assemblies
120
in.lb
(1.4 kg-m).
Refer
to-
Torque
Ch
ar
t f
or
recommended
to
r
qu
e values
of
other
fasteners
in
th
e
steer
ing system
Wiring Harness
Check
wir
ing
harness
for
prop
er
routing.
Be
sure
w
ir
es are not
being
rubbed
or
pinch
ed and all con-
necto
rs are
secu
re and
fully
connected.
PREPARATION
7

Battery
The battery's primary
function
is
to
provide
power
to
start the engine. It also
supplies
power
for
lights
and other
accessor
ies when the engine is
not running. Once the engine has started, the
charging system takes over and
supplies
the
re-
quired power and recharges the battery.
The battery is supplied in a dry-charge
condition.
To prepare the battery for use, perform the follow-
ing procedure.
Battery Removal
1.
Unfasten
clamp
and remove battery cover
assembly. (See Figure 16.)
2.
Disconnect
cables from terminals
of
battery.
Care
fully
l
ift
battery out
of
mounting
bracke
t.
(See Figure 17.)
3.
If corrosion
or
dirt
are present, clean batte
ry
terminals and
top
surface
with
solution
of
water and baking soda.
8 PREPARATION
Battery Charging
WARNING
I
Battery electrolyte
contains
sulfuric
acid
which
is
poisonous
and
causes severe
burns. When
installed
in the battery, the
electrolyte generates Hydrogen gas
which
under certain
conditions
is
flammable and
explosive. Keep
all
flames
and
sparks
(cigarettes, etc.) away and always wear eye
protection
when working on
or
near the
battery.
POISON/DANGER
KEEP OUT OF REACH OF CHILDREN
ANTIDOTE
EXTERNAL-Flush
with
water
at
least 5 min-
utes.
INTERNAL-Drink large
quantity
of
water
or
milk.
Follow
with
milk
of
magnesia, beaten egg
or
vegetable oil.
CALL
PHYSICIAN IMMEDIATELY.
EYES
-Flush with water
for
15
minutes. GET
PROMPT MEDICAL ATTENTION.
INTRUDER
D

1.
Cut
off
sealed end
of
battery vent tube and
remove
filler
caps.
2.
Fill each cell
to
upper level
line
on battery
case
with
fresh
electrolyte
at a temperature
of
86°F
(30°C)
or
less. Let battery stand
for
30
minutes
before charging.
NOTE: If
electro
lyt
e level drops, add
electrolyte
to
upper
level line before charging.
3. Cover
filler
openings
with
a
cloth,
paper towel,
etc.
to
prevent
splashing
of
electro
lyte
dur
ing
chargin
g.
Observe this
[~~~~~~:]
during next step
Charging the battery
at
higher rate than
specified
may damage the battery.
The
higher
charging rate causes excess heat,
which can warp the plates creating
inter·
nal
short
circuits.
Also, the plates may
shed
active
material,
accumulating
deposits
that cause internal
short
circuits.
4.
Connect
battery
to
a
12
Volt charger. Set
charging rate at 12
volts
, 1.6 amps and charge
for
10
hours. (See Figure 18
.)
SATTERY CHARGER
INTRUDER
NOTE: If
electrolyte
temperature rises above 115°
(45°C)
during
charging, reduce charge rate
to
lower
the temperature. Increase charging
tim
e
proportionately
.
5.
Disconnect
charger and measu
re
batt
ery
voltage. The voltage
should
be
12
to
13 volts.
Check
specific
gravity
of
each cell
with
a
hydrometer. A
hydrometer
reading of 1.
26
or
above is good. A l
ower
indicati
on means addi·
tional
charging is necessary.
Battery Installation
1.
Dispose
of
the
cloth
and
install
filler
caps. Dry
the
top
of
the battery.
2.
Lower battery
into
mounting
bracket (be sure
protective
pads are
positioned
between bat·
tery and
mounting
brackets
to
prevent
damage). Route vent tube
downward
through
chaincase drain plug hole.
3.
Secure the battery
with
cover assembly.
Observe
this
[:~~~!!~~:]
during
next
step
Do
not
reverse battery
connectio
ns
or
damage to the voltage regulator/rectifier
will
result.
4.
Connect
"RED"
cable and fuse wire to
positive
(+)
terminal. Coat
termina
l
with
grease to prevent
corros
ion. Slide rubb
er
boo
t
over
terminal
for
protect
ion.
5.
Connect
"BLACK"
cable
to
negative
(-)
ter-
mina
l and
coat
terminal
with
grease
to
prevent
corrosion.
PREPARATION
9

(
Chaincase Lubrication
NOTE: Use DEXRON "
Automatic
Transmission
Fluid when
filling
the chaincase.
I
WARNING
I
Prevent
oil
mist
from coating brake com·
ponents, which may reduce braking ac·
tlon, by installing the
fill
plug
with vent
hole
painted
away from brake disc.
1.
Chaincase F
ill
Plug
2.
Lubricant
Level
Sight
Gauge
Check the chaincase
fluid
level. For proper
lubrication
of
chain and bearings,
fluid
level
must
be between the
center
and top
of
sight
gauge.
If additional
fluid
is required, remove upper plug in
chaincase
and
pour
DEXRON
II
Automatic
Transmission Fluid
into
chaincase
until
correct
level is attained. (See Figure 19.)
10
PREPARATION
Brake Adjustment
The INTRUDER is
equipped
with
a
self-adjusting
disc brake. To ch
eck
proper operation, apply the
brake
firmly
and measure
the
movement
which
should
be
3/4
in.
(19
mm) when brake is
fully
ap-
plied. (See
Figure
20.
) Release the brake handle
and measure distance. (See Figure 21.) This
dimension
should
be no
greater
than 1/8 in. (3.2
mm). Perform Brake
Adjustment
if
required.
21
1.
Back both brake cable
jam
nuts
away
from
bracket
about
1/4 in. (6.4 mm). (See Figure 22.)
2.
Remove cable
slack
by
pulling
brake cable up-
ward
without
moving brake cam lever and snug
upper jam nut
to
bracket. .
3.
Turn lower jam
nut
up
to
bracket and
torque
both jam
nuts
to
50
in.lb
(0
.6 kg-m).
4.
Check handlebar brake lever
for
correct
dimension.
(Se
e Figure 21.)
INTRUDER

5. Apply brake
firmly
and
turn
manual
adjuster
until
correct
measurement
of
3/4
in. (19 mm) is
achieved.
(S
ee
Figure
22.)
22
NOTE:
Clockwise
rotation
of
the
adjuster
screw
increases the handlebar brake lever measure-
ment, and
counter
-
clockwise
rotation decreases
the measurement.
The brake
disc
and
hub
assemb
ly
must
float
(free
movement
from
left
to
right
on jackshaft)
to
maintain
proper
alignment
between the brake
pads.
This
movement
may result in a rattle heard
during
vehicle
operation
and is a normal condi-
tion
.
Fan Belt Tension
Remove fan guard
to
test
fan
belt
tension
.
With
11
I b
(5
kg) force appl ied
to
belt, the be
lt
tension
should
be 5/32 in. (4.0 mm). (See Figure 23
.)
If ad
justment
of
fan
belt
tension
is required,
r
emo
ve
outer
pulley
half
from fan shaft. Add
or
remove spacers
between
pulley
halves as required
for
proper
belt
tension.
Adding
spacers
will
decrease
belt
tension
and removing spacers
will
increase tension.
To
prevent fan
belt
damage, remove spark
plugs
and
rotate
engine
crankshaft
while
torquing outer
pulley
mounting nut.
INTRUDER
1.5/32
in. (4.0 mm)
Use Fan
Pulley
HolderTool
PIN
57001-3506
to
hold
pulley
and
torque
nut
47
ft
Ib
(6
.5 kg-m).
Drive and Driven Converter
Alignment
1. Drive Converter
2.
Alignment
Guage
PIN
57001-3508
3.
Driven Converter
PREPARATION
24
11

Correct
converter
center
-
to-center
distance
of
12.0 in. (304.8 mm) and
converter
offset
distance
of
0.525
to
0.588 in.
(14
.34
to
14
.94 mm) is
obtained
when
al
i
gnme
nt gauge PIN 57001-3503 is
correctly
pos
ition
ed
betw
een drive and driven
converter
sheaves. (See Figure 24.)
Center-To-Center Distance
NOTE:
Improper
handling
or
misuse
of
the align-
ment
gauge
will
result
in i
naccurate
converter
al
ignme
nt.
Check
the
flatness
of
the
alignment
gauge
with
a
straight
edge
prior
to
each use.
1.
Remove the drive
belt
guard and drive belt.
NOT
E:
Drive belt
wil
l
not
be
reinstalled
until
run-
ning
tests
on the
engine
are
completed.
25
1.
Driven
Converter
Movable Sheave
2.
Driven Converter
Stationary
Sheave
3.
Ali
gnment
Gauge Deep
Notch
4.
Alignment
Gauge PIN 57001-3503
12
PREPARATION
2. Rotate the driven
converter
movable sheave
clockwise,
and
insert
the
alignment
gauge
between the sheaves
with
the deep
notch
fac-
ing
the
stationary
sheave.
Carefully
release
the movable sheave,
allowing
the
spring
ten-
sion
to
keep the gauge in
position
between
the
stationary
and movable sheaves. (See
Figure
25.)
3.
Center
distance
is
correct
if
the
notch
in the
alignment
gauge
fits
over
the
shaft
on the
drive converter.
If
adjustment
of
the
converter
center
distance
is
required:
1.
Loosen
the
jackshaft
bearing retainer moun-
ting
bolts
and the
adjusting
bolt
locknut.
(See
Figure 26.)
26
1.
Bearing Retainer
Mounting
Bol
ts
2.
Adjusting
Bolt
Locknut
3.
Adjusting
Bolt
4.
Bearing Retainer
Shims
5. Parallel
INTRUDER
J)

2.
With
the battery removed (refer
to
Battery
Removal) loosen
four
mounting
bolts
securing
lower battery bracket, then remove the bracket
for
access
to
chaincase
mounting
bolts. (See
Figure
27
.)
1. Chaincase
Mounting
Bolts
2.
Battery Bracket
3.
Loosen all
four
chaincase
mounting
bolts
and
move the
jacks
haft bearing retainer and chain-
case forward
or
rearward as required
to
obtain
12.0 in. (304.8 mm)
center
distance.
4.
To insure
correct
center
distance
is maintain-
ed, turn the
adjusting
bolt
so the head
of
the
bolt
contacts
the
jackshaft
bearing retainer
flange, and
tighten
the locknut. (See Figure
26.)
To
prevent premature jackshaft bearing
failure, reshim the bearing retainer
after
changing
center
distance.
5. Tighten chaincase
mounting
bolts
and torque
18
ft Ib
(2
.5 kg-m). Reinstall lower battery
bracket. (See Figure
27.)
6.
Install battery (refer to Battery Installation).
Perform procedure for
Jackshaft
Bearing
Re-
tainer
Shimming.
INTRUDER
Jackshaft Bearing Retainer Shimming
After
adjusting
center-to-center distance, shim
the
jackshaft
bearing retainer as
follows:
1.
Remove
the
left
side
aluminum
trim from
lower
pan and
unscrew
the
bolt
securing
driven converter
to
jackshaft. (See Figure 28.)
28
1.
Aluminum
Trim
2.
Retaining
Bolt
2.
Remove the
shims
below the bearing retainer.
(See Figure
26.)
3. Position
the
bottom
of
the retainer parallel to
the top surface
of
the chassis. (See Figure
26
.)
Observe this
[~~~~~~~~~]
during
next
step
The bearing retainer should be
shimmed
until the
jackshaft
centerline is 6.62 in.
(168.2
mm)
above the track drive shaft
center
line.
4.
Install
"U"
shaped shims, as required,
to
fill
the space between the
bottom
of
the retainer
and
top
of
chassi
s.
This procedure prevents
excessive preloading
of
the
jackshaft
bear-
ings.
5.
Tighten all
bolts
and
nuts
on the
jackshaft
bearing retainer.
6.
Position
the
driven
converter
onto
the
jackshaft
and
check
Converter
Offset
Distance.
PREPARATION 13

'"
I
Filling
Oil Tank
Fill oil tank
with
recommend
ed oil.
DO
NOT
ALLOW DIRT TO
ENTER
TANK
WHILE FILLING.
Oil
tank
capcity
is 2-1/2
quarts
(2.37 liters).
Check the
oil
tank vent
tub
e for:
1.
Proper R
outing
- Sharp bends
or
kinks in the
vent tube
will
reduce
oil
flow
to the oil pump.
2.
Tie Band In
stallation
- Tie band may
pinch
off
tub
e,
reducing oil
flow
to the oil
pump
,
if
in-
stalled
too
tight.
3.
Vent Tube
Position
- To prevent
siphoning
ac-
tion
possible
under
certain
conditions,
posi-
tion end
of
vent tube
higher
than top
of
oil tank
and away from brake
components
(disc and
pads).
Fuel Recommendations
Use regular
or
premium
leaded
gasoline
with
a
minimum
PUMP POSTED ANTI-KNOCK NUMBER
OF 89.
DO
NOT USE GASAHOL.
WARNING'
Gasoline fumes are heavier than air and
can become explosive Is exposed to a
pilot
light
from a furnace,
hot
water heater,
clothes dryer, etc.
Mix
fuel or
fill
fuel tank
only
In an area that Is well ventilated and
free from
pilot
lights
and sparks.
FuellOIl
Mixture
(Break-in Only)
To insu
re
adequate
lubric
ation
of
internal engine
comp
oenents
during
early break-in, a
25
-
to-1
gasoline-to-oil ratio is
recommended
for
the
first
three
(3)
gallons
of
gasoline. This ratio can be ob-
tained by
thoroughly
mixing
1
pint
(0.47 liter)
of
Kawasaki
Snowmobile
Oil
with
three
(3)
gallons
(11
.4
liters)
of
gasolin
e.
Pre-mixing
gasoline
and
oil
will
no
longer
be required
after
the initial three
gallons
of
gasoline
and oil
mix
have been consum-
ed.
16 PREPARATION
25
to
1
Gasoline
to
Oil
Mixture. Break-in
Only
Oil
Gasoline
1
pint
(U
.
S.)
3 gal. (U.S.)
2.6 gal. (Imp.)
1
pint
(Imp.)
3 gal. (Imp.)
3.7 ga
l.
(U.S.)
FuellOil
Mixture
(Standard)
The
fuel-to-oil ratio required is
automatically
con-
trolled
at the engine
oil
pump.
Adding
Gasoline
Antifreeze
A
major
brand
of
Gasoline
Antifreeze (such as
Heet)
should
be added
to
the fuel tank by
follow-
ing the
manufacturer
's
recommendations
on the
container
for
proper
mix
ratio
of
gasoline
with
antifreeze. (See Figure
33
.)
Each time fuel tank is filled, gasoline
antifreeze
must
be added to fuel system.
Moisture trapped in fuel system com-
ponents
(fuel tank, lines, fuel pump
or
car-
buretors) may freeze causing engine
malfunction
or
damage.
33
INTRUDER

IT
Filling
Fuel Tank
Before removing
filler
cap from the fuel tank,
remove any ice, snow,
or
water
from around the
fuel tank
opening
to
prevent
contamination
of
fresh fuel mixture.
WARNING
I
Gasoline fumes are heavier than
air
and
can become explosive is exposed to a
pilot
light
from a furnace,
hot
water heater,
clothes
dryer, etc.
Fill
the fuel tank
only
in
an area that
is
well
ventilated
and
free
from
pilot
lights
and
sparks.
Fill
the fuel tank
slowly
and
pour
the fuel
into
the
tank using a
funnel
with
a fine mesh screen.
Engine Gearcase Lubrication
Components
inside
the gearcase drive the
oil
in-
jection
pump.
Lubricant
level is
correct
when the oil appears
above the
center
of
the si
ght
gauge,
but
not
higher
than the top. The
sight
gauge is located on the
engine
front,
below
left-hand
cylinder
assemb
ly.
(See
Figure 34.)
Fill
or
add
lubricant
to the gearcase as
follows:
1. Remove the i
nstrument
panel
mounting
screws
to
provide the additional clearance
needed and remove the a
ir
silencer assembly.
2.
Loosen
clamp
screw
and separate the left-
hand
carburetor
from
its
rubber holder.
3.
Remove gearcase
fill
plug (located on
top
of
gearcase) and
pour
Kawasaki engine gearcase
oil
or
Shell FIRE AND ICE 10W40
or
an
equivalent
viscosity
motor
oil that meets
or
exceeds API service
SE
specifications.
Gear-
case
capacity
is
about
1.35
oz.
(40
cc). (See
Figl!re
35.)
INTRUDER
34
1.
Oil Level
Sight
Gauge
2.
Engine Gearcase Drain Plug
3.
Gearcase Breather
Hole
1. Gearcase
Fill
Hole
2.
Container
of
Oil
PREPARATION 17

NOTE: The
air
silence
r
assemb
ly should
not
be in-
stalled
until
Purging
Air
from
Oil Pump
Outlet
Tubes procedure is
completed.
Engine gearcase
oil
should be changed
after
the
i
nit
ial 100
mil
es
of
engine operation, and at the
end
of
each seaso
n,
to
remove any
impuriti
es
or
foreign
matter
prese
nt
in the gearcase cavity. To
drain gearcas
e,
remove drain
plug
and raise rear
of
snowmobile.
(See Figure 34.)
Observe
this
[~~~:~~~:]
during
next
step
Failu
re
to remove
obstructions
from gear-
case bre
ather
hole may cause excessive
oil
consumption
resulting
in extensive
engine damage. (See Figure 34.)
To insure proper operation
of
the oil seal between
the engine gearcase and crankcase,
check
for
ac-
cumulated
obstructions
in the gearcase breather
hole, located abo
ve
the gearcase si
ght
gauge.
Before
reins
talling
the
carburetor
, perform Oil In-
jec
tion
System preparation.
Oil Injection System
The oil
pump
is a variable ratio pump; at idle, the
fue
ll
oil ra
tio
is approximately 110
to
1
incr
easing
with
throttl
e
position
to
approximately
25
to
1 at
maximum
power.
Bleeding Oil Pump Supply Tube
Observe
this
[:~~~~~~]
during next
step
18
Failure to bleed
out
air
trapped in the
oil
lin
e can cause severe engine damage.
PREPARATION
After
f
illing
the
oil
tank, bleed the a
ir
from
oil
pump
inlet
tube
as
follows:
1.
Remove in
strument
panel
mounting
screws
and the
air
silencer
assemb
ly
2. Loosen
carburetor
holder
clamp screw and
pull LH
carburetor
from engin
e.
3. Loosen the
locknut
s and remove oil
pump
cable. (See Figure 36.)
1.
Oil Pump Cable
2. Oil Supply Tube
3. Oil Pump
4.
Locknuts
4.
Remove oil
supp
ly tube
from
oil
pump
and pull
supply
tub
e
out
from
under
fuel tube cover.
(See Figure 37.)
1.
Oil Supply Tube Filter
2.
Fuel Pump
3.
Fuel Pump Filter
4.
Oil Supply Tube
5.
Fuel Line Cover Bracket
INTRU
DER
/