Page is loading ...


NOTICE
TO DEALERS
This manual is p
ro
vided to ensure that the snowmobile is assembled correctly and given proper presale
preparation. Your customer expects and de
se
rv
es a safe, reliable snowmobile, and performance of the
steps
listed here is essential to that end.
The
selling dealer assumes sole respon
sibility
for
an
y unauthorized modifications prior to sale. REFER
TO YOUR SNOW PRODUCTS BINDER FOR ANY SERVICE BULLETINS SPECIFYING FACTORY
DIRECTED MODIFICATIONS WHICH MUST BE PERFORMED BEFORE THE SNOWMOBILE IS READY
FOR
SALE.
SAFETY AWARENESS
WARNING'
This warning
symbol
identifies
special
in·
structions
or
procedures which,
if
not
cor·
rectly fol/owed,
could
result in personal in·
jury,
or
loss
of
life
This caution
symbol
identifies
special in·
structions
or
procedures which,
if
not
strictly
observed,
could
result in damage
to,
or
destruction
of
equipment.
(j
)

lL
______
_
LTD
440
Table of
Contents
Dealer's
Assembly
and Preparation Check
List
. . . . . . . . . . . . . . . . . . . . . . . . . . . . . . . . . . . . . . . . . . . . . . . . . . . .
..
ii
Assembly
.
.. ..
. .
.. .. ..
. . . . . . .
..
. . . . . . . .
..
. . . . .
....
.
...
. . .
..
. . . .
..
.
..
..
. . . . . . . .
..
. . . . . . . . . . .
..
. 1
Uncrate . . . . . . . . . . . . . . . . . . . . . . . . . . . . . . . . . . . . . . . . . . . . . . . . . . . . . . . . . . . . . . . . . . . . . . . . . . . . . . . . . . . 1
Skis . . .
..
. .
..
..
. . .
...
..
. . . .
....
. .
..
. . . . .
...
.....
..
. . . . . . . . . . .
..
..
. . . . . .
..
.. ..
. . . . . . . .
..
. . . 1
Windshield.
. . . . . . . . . . . . . . . . . . . . . . . . . . . . . . . . . . . . . . . . . . . . . . . . . . . . . . . . . . . . . . . . . . . . . . . . . . . . . . . 2
Handlebar . . . . . . . . . . . . . . . . . . . . . . . . . . . . . . . . . . . . . . . . . . . . . . . . . . . . . . . . . . . . . . . . . . . . . . . . . . . . . . . . . 2
Throttle
and Brake
Control
Levers. . . . . . . . . . . . . . . . . . . . . . . . . . . . . . . . . . . . . . . . . . . . . . . . . . . . . . . . . 3
Tool
Kit,Owner
Manual and Safety
Handbook.
. . . . . . . . . . . . . . . . . . . . . . . . . . . . . . . . . . . . . . . . . . . . . . . . . . . 3
Safety Labels
....
.
.......
.....
. .
....
.
....
. .
..
.
...
. . . . .
....
. .
..
. .
.....
...
..
.
....
..
. . . . .
..
.
..
3
Preparation.
. . . . . . . . . . . . . . . . . . . . . . . . . . . . . . . . . . . . . . . . . . . . . . . . . . . . . . . . . . . . . . . . . . . . . . . . . . . . . . . . . . . 4
Suspension
. . . . . . . . . . . . . . . . . . . . . . . . . . . . . . . . . . . . . . . . . . . . . . . . . . . . . . . . . . . . . . . . . . . . . . . . . . . . . . . . 4
Ride Ad
ju
stmen
t (Rear Springs).
.. .. ..
. . . .
..
. .
..
. . . .
....
. . .
..
. . . . . . . . . . . . . . . . . . . . . . . . .
..
. . 4
H
andling
Adj
ustment
(F
ront Springs). . . . . . . . . . . . . . . . . . . . . . . . . . . . . . . . . . . . . . . . . . . . . . . . . . . . . . 5
Swing
Arm
Adjustmen
t.
. . . . . . . . . . . . . . . . . . . . . . . . . . . . . . . . . . . . . . . . . . . . . . . . . . . . . . . . . . . . . . .
..
5
Ski Spring Preload
Adjustment
. . . . . . . . . . . . . . . . . . . . . . . . . . . . . . . . . . . . . . . . . . . . . . . . . . . . . . . . . . . . . . . . 6
Steering Ali
gnment
..
.
....
.. ..
.
...
. .
..
. .
..
.
....
. . . . . .
..
. . .
..
...
. . . . . . .
................
..
. .
..
7
Wiring Harness. . . . . . . . . . . . . . . . . . . . . . . . . . . . . . . . . . . . . . . . . . . . . . . . . . . . . . . . . . . . . . . . . . . . . . . . . . .
..
8
Battery . . . . . . . . . . . . . . . . . . . . . . . . . . . . . . . . . . . . . . . . . . . . . . . . . . . . . . . . . . . . . . . . . . . . . . . . . . . . . . . . . . . . 9
Battery
Removal
.........
.
.. ..
...
.
.....
........
......
..
...
......
..
. .
....
. . . .
..
. . .
.....
. 9
Battery Charging
...
. . . . .
..
.
.......
.
.........
. .
..
...
.
.........
. .
..
...
....
. . . . .
.. ..
. .
....
9
Battery
I
nstallat
ion . . . . . . . . . . . . . . . . . . . . . . . . . . . . . . . . . . . . . . . . . . . . . . . . . . . . . . . . . . . . . . . . . . .
..
10
Chaincase
Lubrication
. . . . . . . . . . . . . . . . . . . . . . . . . . . . . . . . . . . . . . . . . . . . . . . . . . . . . . . . . . . . . . . . . . . . .
..
11
Brake
Adjustment
......
. . .
..
....
......
.
...
.
.....
..
. .
..
..
. .
..
. . .
.. ..
. .
..
.
....
. . . .
..
.
.. ..
.
..
.
11
Engine
Coolant
Recommendation .
......
...
. .
...
. . .
...
. . . . . . . . . . .
.....
....
.
...
.
..
. .
...
....
. . . . 13
Filling
Coo
ling
System
. . . .
....
..........
. .
...
...
.
..
.
..
...
. . . . .
...
..
.
..
...
.
...
..
........
. 13
Dri
ve
and Driven Converter Ali
gnment
. . . . . .
...
. .
...
. .
..
. . . .
......
. . .
...
. . .
..
.
..
. . . .
..
. .
....
.
..
. 13
Center·to·Center
Distance.
. . . . . . . . . . . . . . . . . . . . . . . . . . . . . . . . . . . . . . . . . . . . . . . . . . . . . . . . . . . . .
..
14
Jackshaft
Bearing Retainer
Shimming
...
.
........
.. ..
...
..
...
.
....
. .
...
. .
..
. .
...
.
..
. . .
....
15
Converter
Offset
Distance.
. . . . . . . . . . . . . . . . . . . . . . . . . . . . . . . . . . . . . . . . . . . . . . . . . . . . . . . . . . . . .
..
16
Converter
Parall
elism.
.
...
. . . . . . .
.. ..
. .
...
. . . . .
..
. .
.. ..
.
..
. . . .
.......
. . .
....
.
..
. .
..
. .
...
17
Engine Break-In
....
.. ..
. .
..
...........
..
.
..
....
. .
...
....
. . . . .
..
.........
..
..
.
....
. . .
....
.
..
18
Oil
Recommendation
. . . . . . . . . . . . . . . . . . . . . . . . . . . . . . . . . . . . . . . . . . . . . . . . . . . . . . . . . . . . . . . . . . . . . . . . 18
Filling
Oil
Tank
..
.....
...
....
..
. .
..
. . . .
...
.
........
. . .
..
.
..
. .
..
.
.....
..
. .
..
. .
...
.
.....
. .
18
Fuel Recommendation
........
.
.......
.
.....
.
...
. .
....
. . . . .
...
..
. .
...
. .
........
..
.
..
.
......
.
18
Fuel/Oil
Mixture
(Break-in Only)
.....
.......
......
..
.
...
.
.....
. . . . .
...
. . . . . . . .
....
. . . .
...
. .
18
Fuel/Oil
Mixture
(Standard)
....
..
. . . .
..
..
........
..
.........
..
. .
....
... ...
..
.
....
. . .
....
. .
19
Adding
Gasoline
Ant
ifreeze . . . .
..
.
..
.
..
...
. .
...
.
..
. . . .
..
. .
..
. . . .
..
. .
...
.........
..
......
.
19
Filling Fuel Tank
...
...
....
.......
. . . . .
..
. . . . . .
...
. . . . .
..
...
. .
...
...
.
......
.
..
.
......
...
·
19
Engine Gearcase
Lubr
ication
....
..
. .
..
..
. .
...
....
.
..
. . . . .
...
.
..
...
. .
....
.
...
..
..
. . . . .
..
... ...
19
Oil
Injection
System
. . . . . . . . . . . . . . . . . . . . . . . . . . . . . . . . . . . . . . . . . . . . . . . . . . . . . . . . . . . . . . . . . . . . . . .
..
21
Bleeding Oil Pump Supply Tube
..
...
. . .
...
...
. .
....
. . . .
..
.......
..
.
..
. . .
..
.
.. ..
. . . .
.. ..
. . ,
21
Oil Pump
to
Carburetor
Synchronization.
. . . . . . . . . . . . . . . . . . . . . . . . . . . . . . . . . . . . . . . . . . . . . . . . . . .
22
Carbureto
r
Synchronization
(Mechanical) .
..
. .
.. ..
. .
..
.
..
.
....
. . . .
...
. .
...
..
. .
...
. .
......
..
. 23
Purging Air From Oil Pump
Outlet
Tubes
.....
..
...
. .
..
.
..
....
. .
..
....
. .
..........
.
..
. . .
....
24
Enrichener Cable
Adjustmen
t . . . . . . . . . . . . . . . . . . . . . . . . . . . . . . . . . . . . . . . . . . . . . . . . . . . . . . . . . . . . . . .
..
25
Carburetor
Synchronization . . .
..
.
..
.
.......
..
.
...
.
..............
. . .
..
...
.....
.
.....
. .
..
. . . .
..
25
Ignition
Timing
Check
. .
.......
.
....
.
..
. . . . . . . . . . . . . .
..
. .
...
....
.
.........
.
.....
. . . . .
..
. .
...
.
28
Headlight
Adjustmen
t . . . . . . . . . . . . . . . . . . . . . . . . . . . . . . . . . . . . . . . . . . . . . . . . . . . . . . . . . . . . . . . . . . . . . . .
30
Tail/Brake
Light
Test.
. . . . . . . . . . . . . . . . . . . . . . . . . . . . . . . . . . . . . . . . . . . . . . . . . . . . . . . . . . . . . . . . . . . . . . .
31
Track Adju
stment
. . . . . . . . . . . . . . . . . . . . . . . . . . . . . . . . . . . . . . . . . . . . . . . . . . . . . . . . . . . . . . . . . . . . . . . . .
..
32
Track
Tension.
. . . . . . . . . . . . . . . . . . . . . . . . . . . . . . . . . . . . . . . . . . . . . . . . . . . . . . . . . . . . . . . . . . . . . . . . .
32
Track
Alignment
..
....
.....
. .
...
..
.
........
.
...
. .
...
.
.. ..
. . .
..
.
..
....
.
...
....
.
..
. . .
..
.
..
33
T
est
Ride (Operational Checks) . . . .
........
. . .
...
.
....
.
..
.
.....
.
..
......
..
. . .
....
......
.
..
...
,
34
Specif
i
cations
. . . . . . . . . . . . . . . . . . . . . . . . . . . . . . . . . . . . . . . . . . . . . . . . . . . . . . . . . . . . . . . . . . . . . . . . . . . . . .
36
Engine . .
..
..........
. . . . . .
....
...
..
.
..
. .
..
. . . .
...
. . . . . .
...
......
. .
..
.
........
..
....
..
.
36
Carburetor
Settings
. . . . . . . . . . . . . . . . . . . . . . . . . . . . . . . . . . . . . . . . . . . . . . . . . . . . . . . . . . . . . . . . . . .
..
36
Fuel
..
.....
. . .
...
.
...
..
. . .
...
. .
...
..
. . .
....
.
..
.
.......
.
..
.
..
.
.....
.. ..
.
......
. . .
....
. . 36
Lubricants
. . . . . . . . . . . . . . . . . . . . . . . . . . . . . . . . . . . . . . . . . . . . . . . . . . . . . . . . . . . . . . . . . . . . . . . . . . . . . 36
Coolant
........
.. ..
......
..
.
...
..
....
. . . . .
.....
....
.
........
.
..
.
.....
.
....
. . .
..
...
.
...
36
Drive
System
. . . . . . . . . . . . . . . . . . . . . . . . . . . . . . . . . . . . . . . . . . . . . . . . . . . . . . . . . . . . . . . . . . . . . . . . .
..
36
Electrical
System
. . . . . . . . . . . . . . . . . . . . . . . . . . . . . . . . . . . . . . . . . . . . . . . . . . . . . . . . . . . . . . . . . . . . .
..
36
Torque Chart
...........
.
...
. .
..
.....
...
.....
. .
..
.
...
. . . . .
......
.
...
. . .
..
.
..
. . .
......
...
..
. . 37
Wiring
Diagram
.....
. .
..
.
...
....
.
..
....
. .
....
....
..........
.
... ...
........
. . . . . .
..
. .
....
. .
..
38
TABLE OF CONTENTS
-

Dealer's Assembly and Preparation Check List
Remove the Assembly & Preparation Check
Li
st from storage case. Complete each item
of
the check list
following
the procedures outlined in this ma
nu
a
l.
Verify compliance by placing a check (
......
) in box
preceeding each
it
em as
it
is complet
ed
.
Be
sure to sign all sections
of
the form as they are completed.
Retain completed check list for your records.
ii
KAWA
SAKI SNOWMOB
ILE
DEALER
'S ASSEMBL Y & PREPARATION CHECK LIST
I
hereby
certify
that
prior
to
delivery
to
the
first
retail purchaser assembly and prepar
atio
n servicing was pe
rformed
on
the
snow
mo-
bile listed below in accordance
with
the
following
check list, and in
compli
an
ce
with
the established procedu
res
prescribed
by
Ka
wa-
saki : (
if
check each item when completed).
SNOWMOB
IL
E I
NFORMATION
MOD
EL
SERIA
L
NO.
ENGINE
NO.
ASSEMBL Y CHECK
LIST
1 0
REMOVE
CRATE
- check
for
damaged & missing parts.
2 0
SKIS·
install - torque all bolts.
3 0 SKI SHOCKS ·
mount
and
torque
bolts.
4
0
WINDSHIELD
·
mount
to
hood.
5 0
HANDLEBARS·
adjust
to
proper position/
torque
bolts.
6 0 S
AFE
TY DECALS ·
properly
installed.
7 0 TOO L KIT -complete
/i
nstalled.
ASSEMBL Y BY:
Signature
PREP
ARA
TI
ON CHECK
LI
ST
1 0
STEERING
· align skis/components secure.
2 0
CLUTCH
ALIGNMENT
- check/adjust.
3 0
CLUTCH
CENTER TO
CENTER
· check/adjust.
4
0
CHAI
NCASE - add lube
if
required/check
for
leaks.
5 0
BRAKE
· clean disc/adjust.
6 0
WIRING
HARNESS
-
properly
routed/electrical con-
nectors secure.
7
0 SUSPENSION · check/adjust.
8 0 NUTS, BOLTS.
OTHER
FASTENERS -
checkltighten
.
"9
0
ENGINE
GEARCASE
LUBRICANT
- check level/add
recommended
oil as required.
10
0
FUEL
PUMP TUBES · secure and no kinks
11
0 ENR ICHENE R
CONTROL
· check/adjust.
"12 0 01 L PUMP - check synchronization/adjust.
13 O
THROTTLE
CABLE
· check/adjust.
"14
O
CARB
SYNCHRONIZE
· check/adjust
(twin
carb models).
"15 0
FAN
BEL
T - check/adjust (axial fan models).
"16 D
OlL
TANK
-
fill
with
Kawasaki approved oil/check
for
leaks.
"17 0
01
L
II
NE
TO PUMP - (all
oil
injection
models) bleed/
secure/properly
routed.
"18
0
ENGINE
COOLAN
T · check
level/fr~eze
protection.
19 0 SPARK PLUGS · check/gap.
20 0 GAS
TANK
·
fill
with
recommended
fuelloil
mix
(refer
to
Owner's
Manual)
check
for
leaks.
21
0
CARBUR
ETOR
AIR
SCREW - adjust.
22
0 CARB
URETOR
IDL
E SPEED · adjust.
"23
0 PRIMER · check operation.
24 0 IGN
IT
ION T IMI
NG·
check when engine
is
warm/adjUst.
25
0 EL
ECTRICAL
SYST
EM·
check operation - adjust
o Headlight " 0 Battery Charging System
o
Taillight
0 Brake
Light
· 0 El
ectri
c
Starter
· 0
Instruments
&
Ind
ic
ator
Lights
26 0
TRACK
- adjust tension/align
PREPARA
TI
ON
BY
:
Signature
TEST R
ID
E
o
CONTROL
CABLES
·
throttle
& brake works
without
binding,}n
any
steering
position
/
returns
freely
.
2 0
ENGINE
STOP SWITCH - check operation.
3 0 SUSPENSION - check slider ride adjustment.
4
0
STEERING
- action
is
free lock
to
lock
/no
looseness.
5 0
ENGINE
- recoil
start"'
works properly/engine starts
promptly
/
good
throttle
response and
return.
Exhaust
smoke
present
but
not
excessive (oil inject
ion
models).
6 0
CLUTCHES
·
sm
ooth
ope
rati
on/correct
maximum
RPM.
7 0 B
RAK
ES
- adequate · smooth stopping power.
8 0 SPEEDOMETE
RfT
ACHOMETE
R . check operation.
9 0 NO
UNUSUAL
NOISE
S.
"10
0 NO
COOLANT
LEAKS.
11
0 NO F
UEL
OR
OIL
LEAKS
.
"12
0
COOLANT
LEVEL
· check/add coolant
mix
as
required.
13 0
CONTROLS
-
properly
positioned/secure/adjusted.
TEST RIDDEN B
Y:
Signature
CUSTOMER
DELIVERY
o OWNER'S
MANUAL
· explain
cont
ents/proper mainte-
nance/ install.
4 0
CONTROLS
· explain location &
operation
/
properly
positioned
for
customer.
2 0 OWNER 'S
SAFETY
HANDBOOK
· exp
la
in contents/
install.
3 0
WARRANTY
CERTIFICATE
· explain
warranty
and
customer
responsibilities
thoroughly
/install.
D
ELIV
ERED
BY
:
DE
AL
ER
VE
RIFI
CA
TI
ON
Signatur
e
D
••
ler Name
__
________________
_ _ _
Signat
ur
e of
Dea
l
er
ship Manager
__
_
__
_
__
___
_
Addr.~
___
_________
____________
__
____
__
___
Oat.
___
______
_
•
Applicable
models
only
· refer
to
assembly
instruction
provided
by
Kawasaki
for
specific
models.
PIN
4
9007-350
1
white
copy
-
de
aler
file
/
canary
copy
-
owner
Printed
in
U .
S.A.
If
it
is
desired
to utilize the French portion
of
this
chec
k
li
st, pl
ease
remove
the carbon
shee
t and insert in proper locatio
n.
DEALER'S
ASSEMBLY
&
PREPARATION
CHE
CK
LIST
L
TD
440

II
Assembly
Uncrate
Observe
this
[:~~~!!~~:]
during next step
Bend over
all
exposed crate fasteners to
prevent personal injury
or
possible
vehicle
damage.
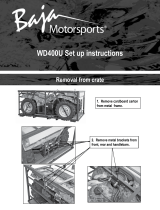
In a large clear work area, open the crate. Separate
the top and sides
of
the crate and remove the
windshield
from the seat. Unscrew
nuts
securing
ski
assemblies
and
spindles
to the crate
bottom
and discard hardware as
it
is
not
used
for
snowmobile
assembly. (See Figure
1.)
NOTE: When
uncrating
vehicle,
inspect
for
con-
cealed
damage that may
occur
during
shipping. If
damage is apparent, STOP
uncrating
and
check
your WARRANTY POLICIES & PROCEDURES sec-
tion
of
your Snow
Products
Binder
under RECEIV-
ING WAREHOUSE UNITS
..
Observe
this
WARNING
I during next step
To
prevent personal injury, use
lifting
equipment
with
approved safety hooks
when raising the snowmobile.
With
assistance,
or
the use
of
a hoist, carefully
lift
the
snowmobile
from
the crate. Thoroughly in-
spect
the
snowmobile
for
shipping
damage and
missing
parts.
Remove
plastic
bag
containing
mounting
hard-
ware for
skis
and
windshield
from storage case.
LTD 440
1. Ski
Assembly
2. Ski
Spindle
Skis
Place the
snowmobile
on
its
side. Be sure to pro-
vide a protected surface
to
prevent marring the
finish
of
the
snowmobile.
Then perform the
following:
1.
Install the ski
attitude
damper.
Apply
Silicone
spray
or
soapy
water
on the
damper
to
ease in-
stallation
of
the ski saddle over the damper.
(See F
igur
e
2.)
2.
Fill the grease groove
or
cut
away area
of
the
spindle
sleeve
with
a
low
temperature extreme
pressure (ep) grease, and
insert
sleeve
into
the
spindle.
(Se
e Figure
2.)
ASSEMBLY

2
1.
Ski
Attitude
Damper
2. Grease Groove
3.
Ski Saddle
Observe this I
WARNING
I during
next
step
Improper
tightening
of
spind
le to
saddle
bolt
will result in
excessive
steer
ing
system play. This
negatively
affects
vehi-
cle handling
and could
result in loss
of
control
and
po
ssible
personal
injury to the
operator.
3.
Secure the ski
assemb
ly
to
the spindle
with
the
hardware
supp
lied. Be sure the nut and
large
flat
washer
are installed on the
inw
ard
side
of
the ski
assembly
, then torque the
nut
46
ft
Ib (6.4 kg-
m).
(See Figure 3
.)
3
1. Flat Washer
2 ASSEMBLY
Windshield
Remove the plastic covering and install the wind-
shield with the o-ring fasteners provided. (See
Figure
4.)
Handlebar
Pri
or
to
securing
the handlebars,
check
the
lower
handlebar
holder
for
secur
ity
to
the
steering
pole.
Torque the l
ower
handlebar
holder
mounting
bolt
35
ft
Ib (5.0 kg-m). (See Fi
gure
5.
)
1.
Lower Handlebar
Hold
er
2.
Console
Check
the
routing
of
the cables and wi
re
harnesses
for
proper
positioning.
They
should
pass
through
the
co
nsole at
the
handlebar holder,
and have adequate
fr
ee
movement
to
prevent bin-
ding
or
rubbing
during
vehicle
operation
. (See
F
igur
e 5
.)
LTD
440

Observe
this
[:~~~~!~~:]
during
next
step
Adjust
the
handlebar
so
it
does
not
hit
the
windshield,
when
turning
in
eithe
r direc·
tion.
Adjust
the handlebar
for
a
comfort
able driving
position
and evenly torque the
four
socket
screws
secu
ri
ng the hand lebar
holder
105 i
n.1
b
(1
.2 kg·m
).
(See Figure 6
.)
6
Throttle
and Brake
Contro
l Levers
Check
throt
tle and brake
control
lever pos
ition
. Be
sure. they are
comfortable
for
driving. Torque set
screws
25 in. Ib
(0
.3
kg·
m)
. (See Figure 7.)
1.
Set Screw
LTD 440
Tool Kit,
Owner
Manual,
and Safety
Handbook
Check the storage box
to
be sure
it
contains
the
Tool Kit,
Owner's
Manual and Safety Handbook.
Safety Labels
I
WARNING'
Safety labels
specify
special
instructions
or
procedures
which,
if
not
followed
cor·
rectly,
could
lead to
personal
injury.
Safety labels are
located
on, or
next
to,
components
that,
under
certain
condi·
tions,
could
cause
personal
injury. Be sure
they are
properly
located
and
secure. (See
Figure 8.)
ASSEMBLY 3

Preparation
Suspension
The
snowmobile
is shipped
with
the suspension
springs adjusted during production
assembly to
provide
satisfactory
ride
and
handling
characteristics
for
average driver weight. Normal·
Iy,
no
adjustments
are required.
WARNING
I
Suspension springs are under heavy
spring
load,
Improper adjusting tech·
nlques may result
In
personal Injury.
Suspension
adjustments
consist
of
changing
front and rear spring tension
to
alter
vehicle handl·
ing and ride characteristics, and adjusting the
front swing arm mounting
position
to alter weight
transfer during
acceleration. (See Figure
9.)
9
1.
Suspension Front Springs
2.
Suspension Front Swing Arm
3.
Suspension Rear Springs
4 PREPARATION
Spring
tension (pre·load) of springs must
be equal on
each
side of suspension (front
to
front,
rear
to
rear).
Higher tension
ad·
justment on one spring
can
cause spring
breakage
or excessive slide
wear
strip
wear.
Ride Adjustment
The rear springs, located on each side
of
the rear
pivot arm,
control the ride by pushing downward
on the suspension
to
hold vehicle up. Increasing
rear spring tension
will
stiffen
the ride
allowing
more driver or passenger weight. Decreasing ten·
sion creates a
softer
ride for
lighter
loads.
To
change rear spring tension:
1.
Position spring adjusting
tool
PIN
57001·3507
onto
end of spring. (See Figure
10.)
1.
Rear Spring Retaining Bracket
2.
Suspension Rear Spring
3.
Low Tension Position
4.
Spring
Adjusting
Tool
PIN
57001·3507
5.
Mid Tension Position
6.
High Tension Position
LTD
440

I I
2.
Apply firm grip on adjusting tool
with
both
hands.
Carefully force spring out of retainer
detent.
Be
prepared to accept heavy spring
load as spring is released from retainer detent.
3. Install spring
into
upper detent
to
increase
tension
or
into
lower
detent
to
decrease ten-
sion.
4.
Repeat procedure on other rear spring to make
tension
equal on both sides of suspension
(rear
to
rear).
Handling
Adjustment
The front springs, located on each side
of
the
front swing arm,
contro
l handling
or
steering
response.
Increasing spring tension forces the
front
of
the suspension
to
lift
more,
shifting
weight
or
pressure from skis
to
the suspension.
Reducing tension causes
less suspension lift, in-
creasing pressure on skis. The amount
of
pressure on the
skis
directly
affects
steering ef-
fort and response. More ski pressure means in-
creased steering response and
effort
while less
pressure means easier
effort
but less response.
To change front spring tension:
1.
Position spring
adjusting
tool
PIN
57001-3507
onto
end
of
spri ng. (See Figure 11.)
2.
Apply firm grip on adjusting tool
with
both
hands.
Carefully force spring
out
of retainer
detent.
Be
prepared
to
accept heavy spring
load as spring is relea
se
d from retainer detent.
3. Install spring
into
lower detent
to
incr
ease ten-
sion
or
into
upper detent
to
decrease tension.
4.
Repeat procedure on
other
front spring
to
make tension equal on both sides
of
suspen-
sion (front
to
front).
LTD
440
/
.--0
1. Front Spring Retaining Bracket
2.
Spring
Adjusting
Tool
PIN
57001-3507
3. High Tension Position
4. Suspension Front Spring
5. Mid Tension Position - as produced
6.
Low Tension Position
Swing Arm
Adjustment
WARNING
I
Suspension
front
swing
arm Is under
heavy
spring
load.
Improper
service
techniques may result in personal Injury.
11
The front swing arm is
positioned
in lower hole
of
suspension
front
bracket
for
best over-all ac-
celeration
and ride characteristics. Changing
swing arm
to
upper hole location causes less
weight
transfer from
skis
to
suspension during ac-
celeration.
Less
weight
transfer decreases ski
lift
allowing
increased steering
stability
during ac-
celeration. (See
Figure
12.)
PREPARATION 5

12
1.
Suspension Front Swing Arm
2.
Upper Hole Location
3. Suspension Front Bracket
To change swing arm position:
1.
Relieve spring tension from front swing arm.
2.
Repeat procedure on other front spring.
3.
Loosen rear axle locking
bolts
and adjusting
bolt jam nuts. Back
out
adjusting bolts
to
relieve track tension.
(See
Figure
13.)
2
;
13
1.
Adjusting
bolt
jam nuts
2.
Adjusting
bolts
3.
Rear axle locking
bolts
4.
Remove swing arm
to
bracket mounting
bolts
and
position
swing arm in upper location.
Reinstall
bolts
and torque
25
ft
Ib
(0.2
kg-m).
5.
Use spring adjusting tool
to
reposition spring
into
desired detent.
6.
Adjust
track as
instructed
in Track
Adjustment
procedures.
6 PREPARATION
Ski Spring Preload Adjustment
Three positions
are
provided for front ski spring
mounting bolt.
14
FRONT HOLE POSITION - secures spring
to
reduce spring arch, increasing spring tension
preload, resulting in a firmer ride
with
less spring
travel for maximum
stability
during high speed
operation.
CENTER
HOLE POSITION -
allows
more spring
arch, reducing spring
preload, resulting in a
softer
ride for moderate speeds and trail riding.
REAR
HOLE POSITION - provides maximum spr-
ing arch,
further
reducing
spring
preload,
resulting
in a much
softer
ride. This
position
is
recommended for deep snow operation
or
slow
speed trail riding only.
NOTE: Always mount the front ski spring
bolt
into
the same position on each ski.
To change the
preload
of
the ski spring, be sure
weight of
snowmobile is on skis, and proceed as
follows:
1. Remove nut from front spring
mounting
bolt.
LTD
440

2.
Open hood and
with
assistance from another,
stand on front bumper
to
relieve spring ten-
sion from
mounting
bolt.
3. With
weight
still on front bumper, remove bolt,
slide
spring rub
strip
to
align
with
desired hole
position
of
ski, and insert bolt. (See Figure
15.)
1.
Spring rub
strip
2.
Spring
bolt
4.
In
stall nut and torque
25
in. Ib
(0
.3 kg-
m)
.
Steering Alignment
Check ski
alignment
and handlebar centering.
1.
Place long board (or suitable straight edge)
against right hand edge
of
the track, and
measure the distance between the board and
center
line
of
the sk
i.
(See Figure
16.)
2.
Position the
sk
i
so
distance measured be-
tween ski
center
line and board edge is the
same at
front
and rear
of
ski. (See Figure
16.)
LTD 440
16
1.
Straight Edge Against Track
2.
Measure Distance Here
3.
When the ski center line is parallel
to
the out-
side edge of the track, check steering
handlebar
for
centering. The handlebar holder
should
be parallel
to
lower edge
of
control
panel.
4. To center handlebar, remove
two
right-hand
muffler
mount
nuts and springs. Force
muffler
upward for access
to
tie rod adjusting stud.
5.
Loosen
lock
Gam)
nuts and turn tie rod ad-
justing
stud in the
direction
necessary
to
center handlebar. (See Figure
17
.)
To prevent possible steering linkage
failure, the
adjusting
stud
must
remain
centered between the
two
jam nuts and
the measurement between the jam
nuts
must
not exceed
1·114
In.
(32
mm).
(See
Figure
17.)
PREPARATION 7

17
1.
Tie
Rod
Length
Adjusting
Stud
2.
Locknuts
3.
1-1/4
in.
(32
mm) Maximum
NOTE:
Be
sure center line
of
ski remains parallel
to
straight edge while turning tie rod length
ad
-
justing
stud.
6.
To align
other
ski, move both ski tips towards
center
of
the
snowmobile
to
remove steering
linkage play. Loosen lock nuts and turn tie rod
to
obtain
an
equal distance from ski center to
ski center when measured at the front and rear
of
the skis. (See Figure
18.)
I
WARNING
I
After
proper
alignment
is
obtained, the
number
of
exposed threads
at
each rod
end
must
be equal
and
not
exceed
112
In.
(12.7 mm) when measured from the
Jam
nuts
or
possible
steering linkage failure
may occur.
(See Figure 18.)
7.
Tighten all hardware (nuts, bolts, etc.) in steer-
ing system. Torque jam nuts on tie rod
assemblies 120 in. Ib (1.4 kg-m). Refer
to
Tor-
que Chart for recommended torque values
of
other
fasteners in the steering system.
8 PREPARATION
~
t'-----0
-
3
_
---"I~
1.
Equal Distance Front And Rear
2.
Tie Rod
3.
Exposed Threads -
1/2
in. (12.7 mm)
Maximum
18
8. Reposition
muffler
and install
mounting
nuts
and springs.
NOTE:
Be
sure insulation washer lip is properly
positioned in
slotted
muffler
bracket and special
insulating shield is properly located before
tightening
muffler
mounting nuts.
Wiring Harness
Check wiring harness
for
proper routing.
Be
sure
wires are not being rubbed
or
pinched and all con-
nectors are secure and
fully
connected.
LTD
440

Battery (Electric Start Models Only)
The battery's primary function is
to
provide power
to
start the engine. It also supplies power for
lights and other accessories when the engine is
not running.
Once the engine has started, the
charging system takes over and
supplies the
re
-
quired power and recharges the battery.
The battery
Is supplied In a dry-charge condition.
To prepare the battery for use, perform the
follow-
Ing
procedure.
Battery
Removal
1.
Unfasten clamp and remove battery cover
assembly.
(See
Figure
19.)
LTD 440
2.
Disconnect cables from terminals
of
battery.
Carefully
lift
battery
out
of
mounting bracket.
(See
Figure
20.)
3.
If
corrosion or
dirt
are present, clean battery
terminals and top surface with solution
of
water and baking soda.
Battery
Charging
WARNING
t
Battery electrolyte contains
sulfuric
acid
which Is poisonous and causes severe
burns. When Installed In the battery, the
electrolyte generates Hydrogen gas which
under certain
conditions
Is flammable and
explosive. Keep
all
flames and sparks
(Cigarettes, etc.) away and always wear eye
protection when working on
or
near the
battery.
PREPARATION 9

POISON/DANGER
KEEP OUT OF REACH OF CHILDREN
ANTIDOTE
EXTERNAL· Flush
with
water at least 5 min·
utes.
INT
ER
NAL· Drink large
quantity
of
water
or
milk.
Follow
with
milk
of
magnesia, beaten egg
or
vegetable oil.
CALL
PHYSICIAN IMM
ED
IATELY.
EYES·
Flush
with
water for 15 minutes. GET
PROMPT MEDICAL ATTENTION.
1.
Cut
off
sealed end
of
battery vent tube and
remove
filler
caps.
2.
Fill each cell
to
upper level line on battery
case
with
fresh electrolyte at a temperature of
86°F (30°C)
or
less. Let battery stand
for
30
minutes before charging.
NOT
E:
If electrolyte level drops, add electrolyte
to
upper level line before charging.
3.
Cover
filler
openings
with
a cloth, paper towel,
etc
.
to
prevent splashing
of
electrolyte
during
charging.
Observe
this
[:~~~!!~~:]
during
next
step
Charging battery
at
higher
rate than
specified
may damage the battery.
The
higher charging rate causes excess heat,
which can warp the
plates
creating
Internal
short
circuits.
Also, the plates
may shed active material,
accumulating
deposits
that
cause Internal
short
circuits.
4.
Connect battery
to
a
12
Volt charger.
Se
t
charging rate at
12
volts, 1.6 amps and charge
for
10
hours. (See Figure
21.)
10
PREPARATION
NOTE: If electrolyte temperature rises above 115°
(45
°C) during charging, reduce charge rate
to
lower the temperature.
In
crease charging
time
proportionately.
5.
Disconnect charger and measure battery
voltage. The voltage should be
12
to
13
volts.
Check
specific
gravity
of
each cell
with
a
hydrometer. A hydrometer reading
of
1.26
or
above is good. A lower
indication
means addi·
tional
charging is necessary.
Battery
Installaion
1. Dispose
of
the cloth and install
filler
caps. Dry
the top of the battery.
2.
Lower battery
into
mounting
bracket (be sure
protective pads are
positioned
between bat-
tery and
mount
ing
brackets
to
prevent
damage). Route vent tube downward through
chaincase drain
plug hole.
3.
Secure the battery
with
cover assembly.
LTD 440

Observe
this
[:~~~!!~:~::J
during
next
step
Do
not
reverse battery
connections
or
damage to the voltage regulator I
rectifier
will
result.
4. Connect " RED" cable and fuse wire
to
positive
(+)
terminal. Coat terminal
with
grease
to
prevent corrosion. Slide rubber boot
over
terminal
for
protection.
5.
Connect "
BLACK"
cable
to
negative (-) ter-
minal and coat terminal
with
grease
to
prevent
corrosion.
Chaincase Lubrication
NOTE: Use DEXRON
II
Automatic
Transmission
Fluid when
filling
the chaincase.
22
1. Upper Fill Plug
2.
Fluid Level Sight Gauge
LTD 440
Check chaincase
fluid
leve
l.
For proper lubrica-
tion
of
chain and bearings,
fluid
level
must
be
between the
center
and top
of
sight
gauge.
If additional
fluid
is required, remove upper plug in
the chaincase and pour
DEXRON
II
Automatic
Transmission Fluid
into
chaincase
until
level is
correct. (See Figure
22.)
I
WARNING
I
Prevent
oil
mist
from
coating
brake com·
ponents, which may reduce braking ac·
tion,
by
installing
the
fill
plug
with
vent
hole
pointed
away from brake disc.
Brake Adjustment
The
LTD
is equipped
with
a
self
adjusting
disc
brake. To check proper operation, apply the brake
firmly and measure lever movement
which
should
be 3/4 in. (19 mm) when brake is
fully
applied. (See
Figure
23.)
23
1. 3/4 in. (19 mm)
Release the brake handle, measure distance. (See
Figure
24.)
This
dimension
should be no greater
than
1/8
in.
(3.
2 mm). Perform Brake
Adjustment
if
required.
PREPARATION
11

24
1.
1/8 in. (3.2 mm)
1.
Back both cable jam nuts away from bracket
about
1/4 in.
(6.4
mm). (See Figure
25.)
25
1.
Brake Cable
2.
Upper Brake Cable Jam Nut
3.
Lower Brake Cable Jam Nut
4.
Brake Actuation Lever
2.
Remove cable slack by pulling brake cable up-
ward I
without
moving brake cam lever and
snug upper jam nut to bracket.
12
PREPARATION
3.
Turn lower jam nut up to bracket and torque
both jam nuts
to
50 in.lb (0.6 kg-m).
4. Check
ha
-ndle bar brake lever. (See Figure 24.)
5.
Apply brake firmly and turn the manual ad-
juster until the correct measurement
of
3/4 In.
(19 mm) is achieved.
(See
Figure 26.) Do not
over adjust or brake drag
will
occur.
NOTE: Clockwise rotation
of
the adjuster screw
increases the
handlebar brake lever measure-
ment. Counterclockwise rotation decreases the
measurement.
26
1.
Brake Adjuster
The brake disc and hub
assembly must float (free
movement from
left
to
right) on jackshaft to main-
tain proper alignment between the brake pads.
This movement may
result in a rattie heard during
vehicle operation and is a-normal condition.
LTD 440

Engine
Coolant
Recommendation
I
WARNING
I
To be sure
coolant
level Is adequate,
always
fill
to
within
114
to
112
In. (6
to
12
mm)
of
th,e
tank top.
Coolant Supply - Use a 55/45 mixture
of
antifreeze
and water (55% ETHYLENE
GLYCOL base an-
tifreeze and 45% water) when
filling
the cooling
system. This recommended mixture
will
protect
against freezing
down
to
approximately -50° F
(-45°C). A
major
brand
of
antifreeze (such as
Prestone
II
or
Dowgard) is recommended. The
coolant level
must
be
within
1/4
to
1/2 in.
(6
to
12
mm)
of
the tank,
top
when cool.
Filling
Cooling System
Observe this I
WARNING
I during
next
step
Use
care removing the pressure cap when
engine is
hot
or
severe burns
could
result.
Remove pressure cap from reservoir only
after cooling system has had adequate
time
to
cool
or
temperature gauge needle
has returned
to
the peg
at
bottom
of
the
green
zone.
1.
Radiator Pressure Cap
2.
Vent Plug
LTD 440
1.
Remove the pressure cap from reservoir tank.
If
the cooling system is
empty
or
the coolant
level
is considerably low, loosen vent plug at
top
of
thermostat housing. (See Figure
27.)
Observe this
[:~~~~~~~:]
before
next
step
DO
NOT
USE
100% ANTIFREEZE
OR
WA
TE
R.
100% antifreeze
will
freeze before
a 55/45 mixture
of
antifreeze
and
water.
2.
Slowly fill
cooling
system through reservoir
tank opening.
Cooling system capacity is ap-
proximately 1.2 gallons.
3.
When coolant appears at vent opening in ther-
mostat housing, tighten vent
plug, and con-
tinue
filling
until
level is 1/4
to
1/2 in.
(6
to
12
mm) down from neck in reservoir' tank.
Reinstall pressure cap.
Drive and Driven Converter
Alignment
Correct converter center-to-center distance
of
12.0 in. (304.8 mm) and converter
offset
distance
of 0.525
to
0.588 in. (13.35
to
14.94 mm) is obtained
when
alignment
gauge
PIN
57001-3503 can be
positioned between drive and driven converter
sheaves
correctly. (See Figure
28
.)
28
1. Drive Converter
2.
Alignment
Gauge
PIN
57001-3503
3.
Driven Converter
PREPARATION 13

Center·to·Center Distance
NOTE: Improper handling
or
misuse
of
alignment
gauge
will
result in inaccurate converter align·
ment. Check flatness
of
alignment
gauge
with
straight edge prior
to
each use.
1.
Remove the drive belt guard and drive belt.
NOTE:
Drive belt
will
not be reinstalled
until
run·
ning
tests
on engine are completed.
2.
Rotate driven converter movable sheave
clockwise, and insert
alignment
gauge between
sheaves
with
deep notch facing the stationary
sheave.
Carefully release movable sheave, allow·
ing spring tension
to
keep gauge in position bet·
ween the stationary and movable sheaves. (See
Figure 29.)
29
1.
Driven Converter Movable Sheave
2.
Driven Converter Stationary Sheave
3.
Alignment
Gauge Deep
Notch
4.
Alignment
Gauge
PIN
57001·3503
14
PREPARATION
3.
Center distance is
correct
if
notch in align·
ment gauge
fits
over
shaft
on the drive con-
verter.
If adjustment
of
the converter
center
distance is
required:
1.
Loosen
jackshaft
bearing retainer mounting
bolts
and adjusting
bolt
locknut. (See Figure
30.)
30
1.
Bearing Retainer
Mounting
Bolts
2.
Adjusting
Bolt
Locknut
3.
Adjusting
Bolt
4.
Bearing Retainer
Shims
5.
Parallel
2.
Loosen
four
chaincase
mounting
bolts
and
three
bolts
securing the radiator brace bracket
assembly
to
chassis and chaincase. (See
Figure 31.)
LTD 440

Engine
Coolant
Recommendation
I
WARNING
I
To
be sure
coolant
level Is adequate,
always
fill
to
within
114
to
112
In.
(6
to
12
mm)
of
tIJ.e
tank top.
Coolant Supply - Use a 55/45
mixture
of
antifreeze
and water (55% ETHYLENE
GLYCOL base an-
tifreeze and 45% water) when
filling
the
cooling
system. This recommended
mixture
will
protect
against freezing
down
to
approximately -50° F
(-45°C). A major brand
of
antifreeze (such as
Prestone
II
or
Dowgard) is recommended. The
coolant
level
must
be
within
1/4
to
1/2 in.
(6
to
12
mm)
of
the tank.
top
when cool.
Filling
Cooling
System
Observe this I
WARNING
I during
next
step
Use care removing the pressure cap when
engine is
hot
or
severe burns
could
result.
Remove pressure cap from reservoir only
after
cooling
system
has had adequate
time
to
cool
or
temperature gauge needle
has returned
to
the peg
at
bottom
of
the
green zone.
1.
Radiator Pressure Cap
2.
Vent Plug
LTD 440
1.
Remove the pressure cap from reservoir tank.
If the
cooling
system is empty
or
the
coolan
t
level is considerably low, loosen vent plug at
top
of
thermostat housing. (See Figure
27.)
Observe this
[:~~~~~~:]
before
next
step
DO
NOT
USE
100% ANTIFREEZE
OR
WATER.
100% antifreeze
will
freeze before
a
55145
mixture
of
antifreeze and water.
2.
Slowly fill
cooling
system through reservoir
tank opening.
Cooling system capacity is ap-
proximately
1.2 gallons.
3.
When
coolant
appears at vent opening in ther-
mostat housing, tighten vent plug, and con-
tinue
filling
until
level is 1/4
to
112
in.
(6
to
12
mm) down from neck in reservoir' tank.
Reinstall pressure cap.
Drive and Driven Converter
Alignment
Correct converter center-to-
center
distance
of
12.0 in. (304.8 mm) and converter
offset
distance
of
0.525
to
0.588 in.
(13
.
35
to
14.94 mm) is obtained
when
alignment gauge
PIN
57001-3503 can be
positioned between drive and driven converter
sheaves
correctly. (See Figure
28
.)
28
1.
Drive Converter
2.
Alignment
Gauge
PIN
57001-3503
3.
Driven Converter
PREPARATION 13

Center-to-Center Distance
NOTE:
Improper
handling
or
misuse
of
alignment
gauge
will
result in inaccurate
converter
align-
ment. Check
flatness
of
alignment
gauge
with
straight
edge
prior
to
each use.
1. Remove the drive
belt
guard and drive belt.
NOTE:
Drive
belt
will
not
be reinstalled
until
run-
ning
tests
on
engine
are
completed.
2.
Rotate driven
converter
movable sheave
clockwise,
and
insert
alignment
gauge between
sheaves
with
deep
notch
facing
the
stationary
sheave. Carefully release movable sheave, allow-
ing
spring
tension
to
keep gauge in
position
bet-
ween the
stationary
and movable sheaves. (See
Figure 29.)
29
1.
Driven Converter Movable Sheave
2.
Driven Converter
Stationary
Sheave
3.
Alignment
Gauge Deep
Notch
4.
Alignment
Gauge
PIN
57001-3503
14 PREPARATION
3.
Center
distance
is
correct
if
notch
in align-
ment
gauge
fits
over
shaft
on the drive con-
verter.
If
adjustment
of
the
converter
center
distance
is
required:
1.
Loosen
jackshaft
bearing retainer
mounting
bolts
and
adjusting
bolt
locknut.
(See Figure
30.)
30
1.
Bearing Retainer
Mounting
Bolts
2.
Adjusting
Bolt
Locknut
3.
Adjusting
Bolt
4.
Bearing Retainer
Shims
5.
Parallel
2.
Loosen
four
chaincase
mounting
bolts
and
three
bolts
securing
the
radiator
brace bracket
assembly
to
chassis
and chaincase. (See
Figure 31.)
LTD 440
1
/