Page is loading ...

instructions
03 Sport
swivel wheel pushchair
IMPORTANT: Please read instructions carefully
and keep for future reference
10279: V7/01/06
© Mamas & Papas (Holdings) Ltd. 2006

03 PUSHCHAIR RANGE
1
Dear Customer,
Thank you for choosing one of the Mamas & Papas 03 range of pushchairs.
The 03 range of pushchairs combine the rugged features of a three-wheeled pushchair with the
d
esign, comfort and style expected of Mamas & Papas.
These pushchairs are at home in city high streets or on countryside lanes and tracks.
Ideal for those who expect a little more from their pushchair and appreciate the design and feel of
a high quality piece of engineering.
The Mamas & Papas Primo Viaggio Car Seat can also be attached to the pushchair using the Surefix
‘right first time’ attachment system.
Product Information.
..................................................................................................................................
2
Accessories.........................................................................................................................2
Instructions For Safe Use
...................................................................................................3
Pushchair Features.............................................................................................................4
General Operation
Fitting the wheels............................................................................................................5
Opening the pushchair for the first time ..........................................................................6
Selecting swivel or fix
ed wheel mode...............................................................................7
Fitting the hood ..............................................................................................................8
Operating the brakes.......................................................................................................9
Adjusting the legrest .......................................................................................................10
Adjusting the backrest.....................................................................................................11
Using and adjusting the safety harness ............................................................................12
Fitting the footmuff and babycosy...................................................................................13
Folding the pushchair ......................................................................................................14
Removing the wheels.......................................................................................................15
Opening the pushchair.....................................................................................................16
Attaching the Primo Viaggio car seat ..............................................................................16
Removing the Primo Viaggio car seat ..............................................................................17
Opening the pushchair
.....................................................................................................18
Car
e and Maintenance
Removing the basket .......................................................................................................19
R
emoving the fabric cover
...............................................................................................
20
Fitting and using the hand pump .....................................................................................21
Fitting the raincover ........................................................................................................21
Care and maintenance of the tyres...................................................................................21
Care and maintenance......................................................................................................22
CONTENTS

PRODUCT INFORMATION
2
This pushchair has been designed and tested to comply with the latest British safety standards.
•
This pushchair is designed for children from birth up to 15kgs (3 years of age approx).
•
The pushchair comes equipped with a five-point safety harness. Always use the harness when
your child is in the pushchair.
• Pneumatic tyres for increased comfort and improved grip.
• Supplied with a hand pump, hood and PVC raincover.
• The angle of the backrest can be adjusted for the added comfort of your child.
• A shower resistant removable fabric hood.
• A fitted basket.
• Easy to remove front and rear wheels for a more compact storage solution.
• The Primo Viaggio Car Seat can be attached to the pushchair.
• Easy to remove, hard wearing fabric cover that is machine washable.
ACCESSORIES
Babycosy
Sun canopyPrimo Viaggio Car Seat
The Primo Viaggio Car Seat is suitable from
birth to 13 kgs (12-15 months approximately).
Footmuff to k
eep
your baby warm in
colder weather.
03 Accessory Pack
Head-hugger
Gives extra support to
your child and a more
comfortable ride.
Rucksack and Travel bags
Several different bag styles are available
accor
ding to your pr
efer
ence and the fabric
colour of your pushchair.
Footmuff
To keep your child
warm in colder
weather.
Coordinating sun canopy to help protect your
child from the sun.

INSTRUCTIONS FOR SAFE USE
3
• WARNING: A CHILD’S SAFETY IS YOUR RESPONSIBILITY.
• NEVER LEAVE YOUR CHILD UNATTENDED AT ANY TIME.
•
Always ensure that your pushchair is fully erect and all locking clips are engaged. (Take particular
c
are if the PVC Raincover is fitted. Check that it is not entangled or preventing the locking
mechanism from functioning correctly).
• Your pushchair is supplied with a five-point safety harness. We recommend that the harness is
worn by your child at all times. Ensure that the harness is correctly adjusted, providing a snug fit
around your child. Adjustments can be made using the buckles on the shoulder, waist and crotch
straps. Please refer to “Using and Adjusting the Safety Harness” on page 12. The pushchair is
supplied with ‘D’ ring harness attachment points. These are located on either side at the base of
the backrest and are for fitting a separate harness conforming to BS 6684 if required.
• Always ensure the brakes are correctly engaged whenever the pushchair is left for any reason,
even if only for a short time on a flat surface. Check the brakes are engaged by rocking the
pushchair backwards and forwards.
• Care should be taken when using any PVC raincover. Regularly check that your baby is
comfortable and not over heating. There are ventilation holes in the sides of the raincover. These
are essential to aid the flow of cool air around your baby. When it is not raining or the pushchair
is indoors always remove the raincover.
• Always ensur
e your child is clear of moving parts before adjusting the position of the backrest,
hood or sun canopy.
• When you change the angle of the backrest, always ensure that the harness is corr
ectly adjusted.
• Always manoeuvre your pushchair up and down kerbs and steps gently. Do not let your pushchair
drop. Carry it up stairs whenever possible.
• Never allow additional children to ride on the pushchair at any time.
• Never overload your pushchair with additional goods.
• Do not hang shopping from the handlebars.
• Do not use any replacement parts or accessories e.g. child seats, raincovers, stand-on platforms
etc, e
xcept those recommended or supplied by Mamas & Papas. The use of non-approved
replacement parts or accessories may damage your pushchair or make it unsafe.
•
Never for
ce your pushchair
.
Adjustments and locks should be fr
ee and easy to operate.
• Do not store your pushchair in a damp place. Always allow the fabric to dry naturally away from
dir
ect heat.
• The basket supplied with your pushchair is designed to hold a maximum of 3kgs. Excessive
weight could damage the basket or impede the safe operation of the pushchair.
• We recommend that you fit a Mamas & Papas Sun Canopy to shade your child from direct
sunlight. We recommend that this is used in conjunction with the appropriate sun protection
cream and clothing.
•
The tyres of the pushchair should be regularly checked and inflated if necessary using the hand
pump supplied, or a suitable foot pump. Do not use high pressure air lines or mechanical pumps
as used in garages to inflate the tyres.
IMPORTANT: Never inflate the tyres above - 28 P.S.I.

03 SPORT SWIVEL WHEEL PUSHCHAIR
4
B
ackrest
Basket
Swivel
knob
Footrest
Safety harness
Adjustable
handlebars
Brake pedal
Backrest
adjustment strap
H
ood
Hand
pump
Hand pump
Use the hand pump to keep your
pushchair tyr
es corr
ectly inflated.
Raincover
Fully waterproof PVC raincover to
prevent your child and the pushchair
from getting wet.
F
rame lock
The hood comes with a detachable
pocket as well as a removable back
section to allow increased ventilation
for your child.
Legrest

FITTING THE WHEELS
5
Fitting the rear wheels:
Slot the pin on the rear
wheel into the hole in the
end of the rear wheel
housing.
Test the wheel is correctly
fitted by pulling it.
Repeat the procedure to
attach the second wheel.
F
itting the front wheel:
Place the folded pushchair
on a flat work surface with
the forks facing up.
Align the holes in the plastic
hubs with the ends of the
forks and slot them
together. Ensure the
suspension mechanism is
positioned at the back of
the forks.
Push down on the wheel
until the two locking pins in
the forks spring into the
corresponding holes in the
plastic hubs.
Forks
Rear wheel
h
ousings
Suspension mechanism

6
Important: Check that the
locks ar
e fully engaged by
attempting to push the
handlebars forwards as if
you were folding the
pushchair.
OPENING THE PUSHCHAIR FOR THE FIRST TIME
L
ocate the frame lock on
the right hand side of the
pushchair frame and
disengage it from the stud.
Grip the fr
ont wheel and
pull it up to unfold the
pushchair.
When the pushchair is
almost fully open, pull the
wheel up sharply to lock
the frame open.
Adjusting the handlebars:
Locate the two handlebar
adjustment buttons on
either side of the
handlebars and push them
in. W
ith the buttons held
in, unfold the handlebars
and rotate them to the
desired position. Release
the buttons to lock the
handlebars in position.
Frame lock

SELECTING SWIVEL OR FIXED WHEEL MODE
7
T
urn the swivel knob to
position
A for fixed wheel
mode and position B for
swivel wheel mode.
Important: If you are
going to be jogging with
the pushchair, only ever
use the wheel in the fix
ed
wheel mode.
The pushchair can be
operated in swivel wheel
mode or fixed wheel mode.
Turn the swivel knob at the
front of the footrest to
switch between these
modes.
Ensure that the brakes are
applied. Turn the swivel
knob clockwise or anti-
clockwise 90 degr
ees from
a vertical position to
unlock the front wheel and
engage swivel wheel mode.
A
A
B
B

FITTING THE HOOD
8
Slot the back of the hood
through the handlebars
and position the hood
pivots against the frame.
Fasten the press studs on
the side flaps of the hood
A to the studs on the sides
of the backrest.
F
asten the two pr
ess studs
on the back of the hood
B
to the studs on the
pushchairs backrest.
Push the tabs on the end
of the hood pivots onto
the frame.
Push the tensioning bars
on the hood down.
To remove the back section
of the hood, unfasten the
zip in the middle of the
hood.
Removing the hood is the
reverse of fitting.
Important: Always r
elease
the tensioning bars and
fold the hood back before
folding the pushchair.
Hood pivot
A
A
B
Zip

OPERATING THE BRAKES
9
Releasing the brakes:
Lif
t the brak
e pedal up as
far as it will go.
Do not use excessive force
when releasing the brakes.
Applying the brakes:
Press the brake pedal
down as far as it will go.
Do not use excessive force
when applying the brakes.
Important: Always check
that the brakes have fully
engaged by rocking the
pushchair backwar
ds and
forwards.

ADJUSTING THE LEGREST
10
L
owering the legr
est:
1 Lift the two catches
either side of the legrest.
2 Lower the legrest.
Raising the legrest:
Lift the legrest up into the
horizontal position.
2
1
1

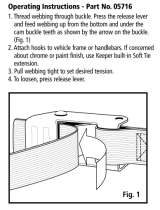
ADJUSTING THE BACKREST
11
Raising the backrest:
Push the backr
est up until
it is in the desired position.
Pull the backrest
adjustment strap until all
of the slack is removed and
the backr
est is held firmly
in position.
Fasten the end of the
adjustment strap onto the
velcro strip on the
backrest.
Important: Do not adjust
the backrest when your
child is pressed against it.
Lowering the backrest:
Feed the backrest
adjustment strap through
buckle and lower the
backrest to the desired
position.
Fasten the end of the
adjustment strap onto the
velcro strip on the
backrest.
Important: Do not adjust
the backrest when your
child is pressed against it.
Velcro strip

USING AND ADJUSTING THE SAFETY HARNESS
12
Locking the harness:
Push the tongues on the
ends of the waist straps
into the buckle on the
crotch strap
1.
The harness will
automatically lock when
the tongues have been
fully inserted.
Unlocking the harness:
Squeeze the ends of the
tongues together
2 and
then slide them out of the
buckle 3.
Your child can now be
removed from the
pushchair.
I
MPORTANT:
E
very time you place your child in the pushchair or whenever you alter the
p
osition of the backrest always check that the harness is correctly fitted and adjusted
using the shoulder and waist strap buckles. Tighten the harness until it fits snugly around
your child.

FITTING THE FOOTMUFF AND BABYCOSY
13
Note: The footmuff and
babycosy are available as
a
ccessories. For more
i
nformation please consult
your retailer.
Before fitting the footmuff
or babycosy, unfasten the
harness. Disconnect the
shoulder straps from the
waist straps by squeezing
the ends of the tongues
together and then slide
them out of the buckle.
Slot the crotch strap
through hole
1 in the back
pad of the footmuff or
babycosy.
Slot the shoulder straps
through the hole
2 in the
back pad.
Slot the waist straps
through the side holes 3 in
the sides of the back pad.
Clip the shoulder straps
back onto the waist straps.
Important: Ensur
e that the
harness webbing has not
become twisted.
The front of the footmuff
can be removed from the
seat pad by unfastening
the zip.
Reattach the top cover of
the footmuff to the seat
pad by zipping the two
sections together
.
1
2
3
3
Shoulder
straps
Back pad
BuckleTongues

FOLDING THE PUSHCHAIR
I
mportant:
B
efore folding
the pushchair ensure that
the brakes are applied, the
hood is folded and the
backrest is in the upright
position. Also ensure that
the front wheel is in fixed
wheel mode,
see page 7.
Release the locking catch
on the left hand side of the
pushchair and slide the
lock on the handlebars up.
While holding the locks
open, push the handlebars
forward and down until
the pushchair starts to
fold.
Release both of the locks
and continue to push down
until the pushchair is
folded flat.
Release the locking catch
on the right hand side of
the pushchair and slide the
lock on the handlebars up.
Gently push down on the
handlbars and fasten the
frame lock over the stud to
lock the pushchair in the
folded position.
Finally, fold the handlebars
flat,
see page 7.
Important: Never fold and
lock the pushchair when in
swivel wheel mode.
14
L
ocking
catch
Lock

REMOVING THE WHEELS
15
Removing the rear
wheels:
L
ocate the two r
ear wheel
release levers on either
side of the rear axle.
Lif
t one of the r
ear wheel
release levers to unlock the
wheel and pull it from the
r
ear wheel housing.
Repeat for the second rear
wheel.
Removing the front
wheel:
Lay the pushchair on its
side or back. Push the two
locking pins on the forks
through the holes in the
plastic hubs. Then pull the
front wheel and the hubs
from the pushchair.
Release
lever
Locking
pin

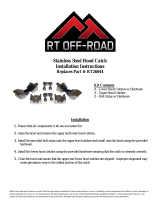
ATTACHING THE PRIMO VIAGGIO CAR SEAT
16
A
pply the brakes on the
pushchair then lower the
backrest to its lowest
position,
see page 11.
R
aise the legrest to the
u
pper position,
s
ee page
10
.
Disconnect the crotch strap
and fold the harness flat
on the seat. Fold back the
fabric flap on the bottom
of the seat to reveal the
two attachment brackets.
F
old the fabric flap in half
over the legrest and use
the velcro pads to hold it
in place.
Raise the attachment
brackets to the vertical
position.
1Slide the attachment
brackets sideways
towards the centre of the
seat.
2Rotate them up until they
are vertical.
3The attachment brackets
will lock in the vertical
position.
Align the centre locking
clips in the car seat with
the attachment brack
ets.
Push the car seat down
onto the attachment
brackets until it clicks into
place.
Check the car seat
is firmly in place by
attempting to lift it off
.
With the car seat in position
pull the backrest
adjustment strap until
all
of the slack is removed and
the backrest is positioned
firmly against the front of
the car seat.
A
ttachment
brackets
V
elcro
pads

REMOVING THE PRIMO VIAGGIO CAR SEAT
17
Apply the brakes on the
pushchair before removing
the car seat.
Pull the release handle on
the back of the car seat up
and hold it in position.
Lift the car seat from the
pushchair.
Lower the attachment
brackets.
1Slide the attachment
brack
ets sideways
towar
ds the centr
e of the
seat.
2Rotate them down until
they ar
e flat.
Unfold the fabric flap on
the legrest and cover the
bottom section of the seat
to conceal the attachment
brackets.
Fix the fabric cover in
position using the velcro
pads.
Release
handle

OPENING THE PUSHCHAIR
Locate the frame lock on
the right hand side of the
pushchaIr frame and
disengage it from the stud.
Grip the handlebars and lift
them up until the frame is
fully open and the locking
catches on the frame have
engaged.
Adjust the handlbars as
required,
see page 6.
Important: Check that the
locks are fully engaged by
attempting to push the
handlebars forwards as if
you wer
e folding the
pushchair.
18

REMOVING THE BASKET
19
Remove the hand pump
and pouch from the rear of
the basket frame to access
the two r
ear bask
et ties.
The basket can now be
cleaned according to the
instructions on the
washcare label attached to
the pushchair
.
The basket is attached to
the basket frame by eight
press stud ties. Unfasten
them and remove the
basket from the frame.
/