Page is loading ...

1 of 2 Workrite Ergonomics | (800) 959–9675 www.workriteergo.com
⅜" Wrench or pliers
#2 Phillips screwdriver or drill/driver
Solace Sit-to-Stand
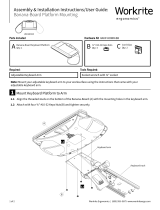
Note: Addition of the Dual Monitor Adaptor reduces total weight capacity by 3 lb.
A Dual Monitor Adaptor
Qty: 1
D M4 × 8 mm Phillips Head Screw
Qty: 4
E M4 × 12 mm Phillips Head Screw
Qty: 4
B VESA Quick
Release Adaptor
Qty: 1 F Cable Manager
Qty: 1
C #10-24 " Keps Nut
Qty: 4
Parts Included Hardware Kit
Tools RequiredRequired
Assembly & Installation Instructions:
Solace Sit-to-Stand Dual Monitor Adaptor
SOL-ADPT-TWIN-S
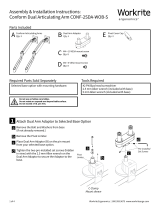
Mount Dual Arm Adaptor to Monitor Mount
Attach Dual Monitor Adaptor (A) to Monitor
Mount on Solace using the four #10 × 24 " Keps
Nuts (C)included.
If purchased after installation of a single monitor,
remove existing monitor first. Keep the Quick
Release on the monitor if pre-installed.
Note: Do not install Quick Release Adaptor
between Dual Arm Adaptor and Solace
Monitor mount!
Mount Quick Release to Monitor
Attach the VESA Quick Release Adaptor (B) to the back of both
monitors. Remove existing base if necessary, being sure to keep and
use the mount screws that came with your monitor to mount the
monitor to the Quick Release Adaptor.
If manufacturer screws are not available or are not the correct
length, use four screws included with the Solace Sit-to-Stand and
the same size screws included with the Dual Arm Adaptor (D) or (E).
Light monitor
5–9 lb.
Medium monitor
(factory default)
Heavy monitor
14.5–20 lb.
1.
Remove top cap
2.
Remove/install pins as necessary
Light monitor Medium monitor Heavy monitor
TENSION ADJUSTMENT
8 mm
#2 Drive
8 mm
4 mm
3.2 mm
M4 x 0.7 mm Thread
8 mm
#2 Drive
12 mm
4 mm
3.2 mm
M4 x 0.7 mm Thread
8 mm
#2 Drive
18 mm
4 mm
3.2 mm
M4 x 0.7 mm Thread
8 mm
#2 Drive
8 mm
4 mm
3.2 mm
M4 x 0.7 mm Thread
8 mm
#2 Drive
12 mm
4 mm
3.2 mm
M4 x 0.7 mm Thread
8 mm
#2 Drive
18 mm
4 mm
3.2 mm
M4 x 0.7 mm Thread
1
2
C
A
B
Important Note:
It is strongly recommended to use the mounting screws provided by
the monitor manufacturer if possible. Always use the same size screws
and the shortest screws possible to avoid damage to the monitor.
See Note!

2 of 2 Workrite Ergonomics | (800) 959–9675 www.workriteergo.com
1500261 Rev A
Adjust Counterbalance Tension on Solace Monitor Mount
With the monitors installed, counterbalance the monitors by
following the instructions on the label on the back of the Solace
monitor tower.
Keep unused pins installed in the bracket hole for
possible future use.
Adjust Tilt on Solace Monitor Mount
If your monitor droops with the dual monitors installed, tighten
the tilt adjustment to compensate using " Allen Wrench
provided with the Solace Sit-to-Stand.
Add Cable Manager
Aix the Cable Manager (F) to the back side of the monitor tower
in a convenient location to rout cables.
Mount Monitors to Dual Arm Adaptor
Slide the monitor with the Quick Release Adaptor onto the VESA
mount of the Solace Dual Arm Adaptor.
Repeat for other side.
Light monitor
5–9 lb.
1.
Remove top cap
2.
Remove/install pins as necessary
Light monitor
Light monitor
5–9 lb.
Medium monitor
(factory default)
8.5–15 lb.
Heavy monitor
14.5–20 lb.
Light
monitor
Heavy
monitor
Tighten
Loosen
1.
Remove top cap
2.
Remove/install pins as necessary
Light monitor Medium monitor Heavy monitor
TENSION ADJUSTMENT
Light monitor
5–9 lb.
Medium monitor
(factory default)
8.5–15 lb.
Heavy monitor
14.5–20 lb.
Light
monitor
Heavy
monitor
Tighten
Loosen
1.
Remove top cap
2.
Remove/install pins as necessary
Light monitor Medium monitor Heavy monitor
TENSION ADJUSTMENT
Light monitor
5–9 lb.
Medium monitor
(factory default)
8.5–15 lb.
Heavy monitor
14.5–20 lb.
Light
monitor
Heavy
monitor
Tighten
Loosen
1.
Remove top cap
2.
Remove/install pins as necessary
Light monitor Medium monitor Heavy monitor
TENSION ADJUSTMENT
Light monitor
1.
Remove top cap
2.
Remove/install pins as necessary
Light monitor
4
5
6
3
F
From arm
assembly
/