Page is loading ...

This manual is copyrighted. Under the copyright laws, this manual may
not be copied without consent from Reynolds Building Systems, Inc.
Assembly Book
Stair kit for 16' wide buildings.
Manufactured by Reynolds Building Systems, Inc.
205 Arlington Drive Greenville, PA 16125
Sentry Buildings
Revised January 7, 2021
2x10 Floor Joist

3. Repeat to assemble the upper stairs with 5 steps.
The bottom 2x6 will not be treated.
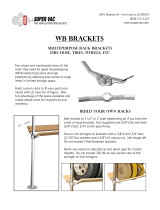
Step 1 Assemble Stairs
1. Locate the longer stair stringers with 6 steps. Place on the floor as shown below.
2. Locate (2) two 32-1/2" long 2x6 boards. One will be pressure treated. Install boards
between the stair stringers as shown. Use the treated 2x6 for the bottom of stairs.
Secure with (2) two 3" deck screws on each end of 2x6.
2x6 Board Flush with
End of Stringer
End with 6-1/2" Rise
Stringer
2x6 Treated Board
Flush with End
of Stringer

Step 2 Assemble Stair Landing
1. Assemble the stair landing using the material shown.
Use (3) three 3" deck screws at end of each board. 2x6-45"
Boards
2x12-48" Board
2. Select the corner you want to install the stairs. Drawing shows back left corner.
3. Install the stair landing with the top set at 52" above floor. The 48" side should be against 16'
wall. Check that landing is level. Use (2) two 3" deck screws to secure to each stud.
4 Cut a pre-cut 2x4 to fit and install as a brace under the 2x12 to support the front corner. Save
cuttoff for a later step. Toenail a 3" screw to secure.
2x6-34-1/2"
Boards
52"
2x4 Cut to Fit
16' Wall

OSB Flooring
3. Install (5) five 7-1/4" x 36" risers.
4. Glue bottom of tread to the stringers and risers. Pre-drill holes and secure to stringers with
(3) three 2-1/2" screws on each end.
5. Cut a 36" x 48" from a piece of 23/32 OSB sub floor. Install on landing using 2-1/2" screws
and glue.
6-1/2" High
White Pine Riser.
7-1/4" High
White Pine Riser
Stair Tread
2. Starting at the bottom, install a 6-1/2" x 36" riser so the top of the board is flush with first
step. Nail to 2x6 board and stringers with 6d common nails.
1. Secure 6 step stringer assembly to the landing and against wall studs with the pressure
treated 2x6 on floor. Insure stairs are level. Use (2) two 3" deck screws per stud and
(6) six 3" deck screws for landing.
If installing on a cement slab secure pressure treated 2x6 to floor with concrete anchor
screws or bolts (not included). Use a moisture barrier (not included) under stringers.
Step 3 Install Lower Stairs

89" To Wall Frame
16' Gable End Wall
20', 24', 28', or 32' Long Wall
2x4 Wall Brace
2x12 Board 2x12 Board
Detail 'B'
1. Cut cuttoff from step 2 to a length of 39-1/2" long board.
Cut (1) one treated 2x4-8' to a length of 39-1/2". Save
cuttoff. Install (4) four pre-cut studs between plates. Use
10d sinkers for top and 16d galv. nails for bottom.
2. From a pre-cut stud cut a 36" long 2x4 tie plate and install to
the top of the wall frame. Save cuttoff. Use 10d sinkers.
3. Locate a 36" long 2x12 board, packed in our kit, and install this
board to the top of the frame. Use 10d sinkers. See detail above.
4. Install the wall 89" from the long wall. Brace the wall frame
using a pre-cut stud. Install wall frame with the 2x12 facing
towards the stair opening. See Detail 'B'
5. Set 5 step stringer on top of landing. Screw the stair stringer to
the wall studs and the 2x12 with 3" deck screws. Install risers
and treads as done with the 6 step stringer.
16" 18-1/2"
39-1/2" Wall Frame
Treated 2x4
Plate
36" Wall Plate 36" Wall Plate
36" Long 2x12 Board
Stairs Shown Installed
at Back Left Corner
Stairs Installed at
Back Left Corner
Step 4 Install Upper Stairs

1. Refer to chart on next page. Cut from 2x10 boards the quantity and size required for the length
of building you are assembling.
2. Install 2x10 boards as joist headers on the 20', 24', 28', or 32' long walls. No joist header will
be installed over the stairs. Install each 2x10 flush with the top of the tie 2x4 tie plate. Secure
with (2) two rows of 10d sinker nails spaced 3" apart across the top 2x4 plates. Nail the 2x10
to each wall stud with one 10d sinker. See Detail 'C'.
Step 5 Install 2x10 Joist Headers
10d Sinker Nail
DETAIL 'C'
2 Rows 10d
Sinker
Step 6 Install 2x10 Joist Hangers
2x4 Tie Plate
Install LU28 joist hangers on the 2x10 joist header, directly above each wall stud. Where the
wall panels butt together install the hanger in the center of the wall studs. Install the hanger flush
with the bottom of the 2x10 so the top of the floor joist will be flush wit the top of the 2x10.
Install hangers with 1-1/2" hanger nails.

Joist Header 'A' Length
20' Building .........92-1/2"
24' Building .........92-1/2"
Joist Header 'A' Joist Header 'B'
Joist Header 'C'
Joist Header 'D' Joist Header 'C'
Joist Header 'B' Joist Header 'C'
Joist Header 'A'
20' and 24' Building Lengths
28' and 32' Building Lengths
Joist Header 'B' Length
20' Building .........140-1/2"
24' Building .........188-1/2"
Joist Header 'A' Length
28' Building .........92-1/2"
32' Building .........92-1/2"
Joist Header 'B' Length
28' Building .........144"
32' Building .........144"
Joist Header 'D' Length
28' Building............132"
32' Building............132"
Joist Header 'C' Length
20' Building .........128"
24' Building .........176"
Joist Header 'C' Length
28' Building .......92-1/2"
32' Building .....140-1/2"
2x10 Joist Header Chart
Refer to the diagrams below to cut the 2x10 joist header to length.
The diagrams shows the stair located in the left corner. The stair
can be moved to the opposite corner.

Stair Wall
Install 3/4" T&G flooring with the 'Tongue' edge flush with the 2x4 tie plates on side walls.
Stagger the seams in an alternating pattern (see below). Secure flooring with 8d galv. spiral
deck nails spaced 6" apart.
Balance of flooring will
be installed after stairs
are installed.
20' Building .........8 boards
24' Building........11 boards
28' Building........14 boards
32' Building........17 boards
Cut 16' long 2x10 boards to a length of 182". Refer to list below for the correct quantity.
Set boards in joist hangers and secure with 1-1/2" hanger nails.
Step 7 Install Floor Joists - Opposite End from Stairs
4'x4'
Tongue Edge
Step 8 Install Loft Flooring
4'x8'
4'x4'
4'x8'

Step 9 Assemble Stair Walls
53" Wall (check measurement)
Install this frame first.
68-1/4" Wall (check measurement)
Last Full Length
Floor Joist
Wall Will Butt
Against Floor Joist
1. Cut to 53" long the 2x4 cuttoffs from step 4 (one will be treated). IMPORTANT: Verify
measurement from 39-1/2" wall to lower stair section and adjust length if necessary. Install wall
against upper stair section. Use 3" deck screws to attach to stairs and 10d sinkers to 39-12" wall.
2. Cut a pre-cut stud and a treated 2x4-8' to 68-1/4" long. IMPORTANT: Verify measurement
from 53" wall to 2x10 floor joist and adjust length if necessary. Install wall between 53" wall
and floor joist. Use 10d sinkers.
15-1/4"
68-1/4" Long Wall (Check Length) 53" Long Wall (Check Length)
15-1/4"
16"
Treated 2x4
Plate Treated 2x4
Plate
16"16"
16" 16"

Cut 12' Long 2x10 Floor Joist
Cut to fit 8' Long 2x10 Floor Joists
1. Measure from 68-1/2" wall to opposite wall and cut (4) four 12' long 2x10s to this length.
Install floor joists using LU28 hangers. Floor joists should measure 14-1/2" between joists.
2. Finish by measuring, cutting and installing (2) two 8' long 2x10s.
Step 10 Install Tie Plates & Joist Header
2. Cut, from a 12' long 2x10, to length and install as joist headers on the 68-1/4" and the 39-1/2"
long wall frames, flush with the top of the tie plate. Use 10d sinkers as described previously.
1. Select a pre-cut stud and remove 2x4 brace. Cut these boards to length and install as 2x4 tie
plates over wall frames. Use 10d sinkers.
2x10 Joist Header
2x10 Joist Header
Step 11 Install Balance of Floor Joist

Install remaining 3/4" flooring. Install flooring flush with the outside edge of the 2x4 tie
plates on the exterior walls around the stairwell. Secure flooring with 8d galv. nails.
Step 12 Install Balance of Loft Flooring
Install Floor over
Tie plates
Cut Flooring To Fit
Install Floor over Tie plates
Step 13 Return to Main Assembly Manual

Packing List
Qty. Material Packed in Kit
2 1x12 - 6-Step Stair Stringer
2 1x12 - 5-Step Stair Stringer
9 1x8 36"' Stair Riser (7-1/4")
2 1x8 36"' Stair Riser (6-1/2")
1 2x6 32-1/2" Treated
3 2x6 32-1/2" Framing Lumber
2 2x6 34-1/2" Framing Lumber
2 2x6 45" Framing Lumber
Qty. Material Packed in Kit
1 2x12 36" Framing Lumber
1 2x12 48" Framing Lumber
11 - 36"' 10-1/2" Stair Treads
50 ea. 2-1/2" Wood Screws
75 ea. 3" Deck Screws
1 ea. 2" Star Screw Bit
/