Telos Alliance xSelector User manual
- Category
- Musical Equipment
- Type
- User manual

xSelector
Installation & User’s Guide
Manual Rev 1 – January 2019
p/n 1490-00105-002
TelosAlliance.com

User Warnings and Cautions
The installation and service instructions in this manual are for use by qualied personnel only. To avoid electric
shock, do not perform any servicing other than that contained in the operating instructions unless you are qualied
to do so. Refer all servicing to qualied personnel.
This instrument has an autoranging line voltage input. Ensure the power voltage is within the specied range of 100-
240VAC. The ~ symbol, if used, indicates an alternating current supply.
This symbol, wherever it appears, alerts you to the presence of uninsulated, dangerous voltage inside the
enclosure – voltage which may be sufcient to constitute a risk of shock.
This symbol, wherever it appears, alerts you to important operating and maintenance instructions. Read the
manual.
CAUTION: HAZARDOUS VOLTAGES
The instrument power supply incorporates an internal fuse. Hazardous voltages may still be present on some of the
primary parts even when the fuse has blown. If fuse replacement is required, replace fuse only with same type and
value for continued protection against re.
WARNING:
The product’s power cord is the primary disconnect device. The socket outlet should be located near the device
and easily accessible. The unit should not be located such that access to the power cord is impaired. If the unit is
incorporated into an equipment rack, an easily accessible safety disconnect device should be included in the rack
design.
To reduce the risk of electrical shock, do not expose this product to rain or moisture. This unit is for indoor use only.
This equipment requires the free ow of air for adequate cooling. Do not block the ventilation openings on the rear
and sides of the unit. Failure to allow proper ventilation could damage the unit or create a re hazard. Do not place
the units on a carpet, bedding, or other materials that could interfere with any panel ventilation openings.
If the equipment is used in a manner not specied by the manufacturer, the protection provided by the equipment
may be impaired.
USA CLASS A COMPUTING DEVICE INFORMATION TO USER.
WARNING:
This equipment generates, uses, and can radiate radio-frequency energy. If it is not installed and used as directed
by this manual, it may cause interference to radio communication. This equipment complies with the limits for a
Class A computing device, as specied by FCC rules, part 15, subpart j, which are designed to provide reasonable
protection against such interference when this type of equipment is operated in a commercial environment.
Operation of this equipment in a residential area is likely to cause interference. If it does, the user will be required to
eliminate the interference at the user’s expense. Note: objectionable interference to TV or radio reception can occur
if other devices are connected to this device without the use of shielded interconnect cables. FCC rules require the
use of shielded cables.

CANADA WARNING:
“This digital apparatus does not exceed the Class A limits for radio noise emissions set out in the radio interference
regulations of the Canadian department of communications.”
“Le présent appareil numérique n’émet pas de bruits radioélectriques dépassant les limites applicables aux appareils
numériques (de Class A) prescrites dans le règlement sur le brouillage radioélectrique édicté par le ministère des
communications du Canada.”
CE CONFORMANCE INFORMATION:
This device complies with the requirements of the EEC council directives:
93/68/EEC (CE MARKING)
73/23/EEC (SAFETY – LOW VOLTAGE DIRECTIVE)
89/336/EEC (ELECTROMAGNETIC COMPATIBILITY)
Conformity is declared to those standards: EN50081-1, EN50082-1.
Trademarks, Patents, and Licenses
Axia is a trademark of TLS Corp. All other trademarks are the property of their respective holders.
All versions, claims of compatibility, trademarks, etc. of hardware and software products not made by The Telos
Alliance which are mentioned in this manual or accompanying material are informational only. The Telos Alliance
makes no endorsement of any particular product for any purpose, nor claims any responsibility for operation or
accuracy. We reserve the right to make improvements or changes in the products described in this manual which
may affect the product specications, or to revise the manual without notice.
This document and its content are copyrighted by TLS Corporation and may not be copied, reproduced, or
distributed in any form without expressed written permission.
Patent information can be found at www.TelosAlliance.com/legal
Updates
Axia xSelector features and operations are determined largely by software. The Telos Alliance strives to provide the
most stable and feature-rich software available. We encourage you to check for software updates from time to time
by visiting our website or by contacting us directly.
Feedback
We welcome feedback on any aspect of our products or this manual. In the past, many good ideas from users have
made their way into software revisions or new products. Please contact us with your comments or suggestions.

We support you…
By Phone/Fax
You may reach our Telos Support Team in emergencies by calling +1 216-622-0247. For billing questions or other
non-emergency technical questions, call +1 216-241-7225 between 9:00 AM to 5:00 PM USA Eastern Time,
Monday through Friday.
By Email.
Non-emergency technical support is available at Support@TelosAlliance.com.
By Web
The Axia Web site has a variety of information that may be useful for product selection and support. The URL is
https://www.telosalliance.com/Axia .
SERVICE
You must contact Telos Alliance before returning any equipment for factory service. We will need your unit’s serial
number, located on the back of the unit. We will issue a return authorization number, which must be written on the
exterior of your shipping container. Please do not include cables or accessories unless specically requested by the
Technical Support Engineer. Be sure to adequately insure your shipment for its replacement value. Packages without
proper authorization may be refused. US customers, please contact Telos Alliance Technical Support at +1-216-622-
0247. All other customers should contact local representative to make arrangements for service.
Warranty
For the latest Telos Alliance warranty, visit: telosalliance.com/warranty
Register your product
Register your product today to get the full benets of our warranty, support, and product updates.
telosalliance.com/product-registration/
The Telos Alliance
1241 Superior Ave. Cleveland, OH 44114 USA
+1 (216) 241-7225
For Telos Support:
24/7 telephone: +1 (216) 622-0247
Email: [email protected]
Web: telosalliance.com/support-request

Table of Contents
Quickstart Fast Setup . . . . . . . . . . . . . . . . . . 1
Fast Setup Using Axia iProbe Software . . . . . . . . 2
Fast Operation . . . . . . . . . . . . . . . . . . . . . 3
Front Panel . . . . . . . . . . . . . . . . . . . . .3
Rear Panel . . . . . . . . . . . . . . . . . . . . . 4
Chapter One: Introducing the xSelector . . . . . . . . 5
xSelector Features . . . . . . . . . . . . . . . . . . . 5
Front Panel Controls & Indicators. . . . . . . . . . . 6
Rear Panel Connections . . . . . . . . . . . . . . . . 7
Web Interface . . . . . . . . . . . . . . . . . . . . .9
What’s Next? . . . . . . . . . . . . . . . . . . . . .9
Chapter Two: Using xSelector . . . . . . . . . . . . . .11
Power Up! . . . . . . . . . . . . . . . . . . . . . . . 11
Basic Operation . . . . . . . . . . . . . . . . . . . . 11
Selecting a Stream to Record, Store or Play . . . . 11
Programming And Fast Selection keys. . . . . . .12
Adjusting Output Volume . . . . . . . . . . . . . .13
Advanced Operation. . . . . . . . . . . . . . . . . . 13
GPIO Page . . . . . . . . . . . . . . . . . . . . . 13
Node ID Page . . . . . . . . . . . . . . . . . . . 14
IP Address Page . . . . . . . . . . . . . . . . . . 15
Title Page . . . . . . . . . . . . . . . . . . . . . .16
Meters Page . . . . . . . . . . . . . . . . . . . . 16
What’s Next? . . . . . . . . . . . . . . . . . . . . .17
Chapter 3: In Depth / Advanced Programming . . . . 19
Accessing xSelector’s Web Pages . . . . . . . . . . . 19
Login/Password . . . . . . . . . . . . . . . . . . 19
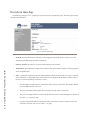
The xSelector Home Page . . . . . . . . . . . . . . . 20
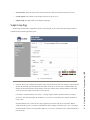
Simple Setup Page. . . . . . . . . . . . . . . . . . . 21
Advanced Options Screens . . . . . . . . . . . . . .23
Advanced Options – Sources . . . . . . . . . . . .23
Advanced Options – Destinations . . . . . . . . . 25
Advanced Options – Meters Page . . . . . . . . . . . 26
QoS Page . . . . . . . . . . . . . . . . . . . . . . .27
Synchronization . . . . . . . . . . . . . . . . . . 28
Live Audio/Clock Streams . . . . . . . . . . . . . 30
Standard Audio Streams . . . . . . . . . . . . . . 30
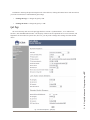
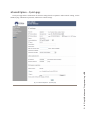
Advanced Options – System page. . . . . . . . . . . 31
IP Settings . . . . . . . . . . . . . . . . . . . . . 32
User password . . . . . . . . . . . . . . . . . . . 33
Firmware Version . . . . . . . . . . . . . . . . . 33
Installing New Firmware . . . . . . . . . . . . 33
Performing a Reset to Factory Default Settings . . . . 34
Wrapping It Up . . . . . . . . . . . . . . . . . . . .34
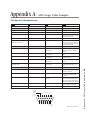
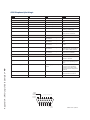
GPIO Operator’s Microphone Logic . . . . . . . 35
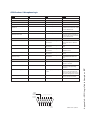
Appendix A: GPIO Logic Table Samples . . . . . . . 35
GPIO Control Room Guest Microphone Logic . . 36
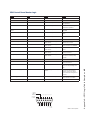
GPIO Producer’s Microphone Logic . . . . . . . 37
GPIO Line Input Logic . . . . . . . . . . . . . . .38
GPIO Codec Logic . . . . . . . . . . . . . . . . .39
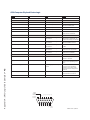
GPIO Telephone Hybrid Logic . . . . . . . . . . .40
GPIO Control Room Monitor Logic . . . . . . . . 41
GPIO Computer Playback Device Logic. . . . . .42
Appendix B: Unbalanced Connections . . . . . . . . . 43
Appendix C: Specications . . . . . . . . . . . . . . . 45
Warranty . . . . . . . . . . . . . . . . . . . . . . . . . 47


Creating the Most Exciting and Engaging
Audio Experiences Imaginable
Congratulations on your new Telos Alliance product!
The gang here at Telos is committed to shaping the future of audio by delivering innovative, intuitive
solutions that inspire our customers to create the most exciting and engaging audio experiences imaginable.
We’re grateful that you have chosen audio tools from Telos® Systems, Omnia® Audio, Axia® Audio,
Linear Acoustic®, 25-Seven Systems®, and Minnetonka Audio®. We’re here to help you make your work
truly shine. We hope that you enjoy your Telos Alliance product for many years to come and won’t hesitate
to let us know if we can help in any way.
The Telos Alliance

CAT.6, m n ig
n n dt r rt.
Wh ag s ts?.

Quickstart • 1
Quickstart
Fast Setup
Thanks for purchasing xSelector! Like all Axia xNodes, xSelector has a one-minute Fast Setup capability that
automatically assigns a network IP Address and Livewire Output Channel based upon a two-digit ID Number you
assign. Here’s how:
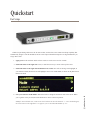
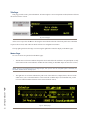
1. Apply power to the xSelector and let it boot. You’ll see a title screen in a few seconds.
2. Push in the knob on the right side 3 times, or until the screen says ‘Node’ in the top left corner.
3. Push in the knob on the right and and hold it for 10 seconds. You will see the Page icon highlight; as
you continue to hold, the Pencil icon will highlight. You’re now in Edit Mode, as shown in the photo below.
Release the knob.
4. Give your xSelector an ID number. Rotate the knob to change the numerical value at the cursor. When
you’ve got the value you want, Press the knob once to move to the next position.
Example: Press the knob once, rotate it one click clockwise to enter the numeral “1”. Press the knob again;
the cursor moves to the right and a “0” appears; you’ve entered an ID number of “10.”

Quickstart • 2
5. Press the knob again to exit Edit Mode. With the value of 10 assigned, your xSelector has an IP address
of 10.216.0.110 and a Livewire channel of 1001. If you’d entered “11”, it would have an IP address of
10.216.0.111 and a Livewire channel of 1101. See how it works?
6. You’re done! Attach xSelector to your network using one of the rear-panel Livewire™ ports, and begin
selecting sources.
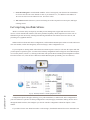
Fast Setup Using Axia iProbe Software
iProbe is a software utility developed by Axia that provides management, support and control of Livewire
devices. It is not included with xSelector, but can be purchased separately. iProbe simplies a lot of the work of
administering an Axia network by scanning and collecting information from connected Livewire devices, and
presenting it in a graphical interface.
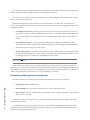
When an xSelector boots and it has no conguration, it will broadcast a BootP request within 4 seconds. The broad-
casts will continue, with an increasing delay between messages, until a conguration is set.
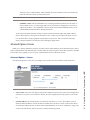
If your computer is running iProbe when xSelector’s BootP request is issued, it will sense the request and offer
you the option to respond or ignore. A counter at the bootstrap conguration button will appear when a BootP request
is received by iProbe (version 1.2). Clicking on the button will open the Device Bootstrap and Conguration window.
From the window view, select the device that has issued the BootP request (presumably your new xSelector).
Fig. Q-1: Bootstrap indication in iProbe highlighted for clarity
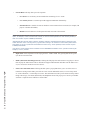
Conguration options will appear, allowing you to push an IP address, a Subnet mask, and a Conguration to
your new xSelector. If you have no backup conguration to send, then apply an IP address and log into the device
through the iProbe interface, then congure it per the web interface conguration outlined in Chapter 3 of this
manual.
If you’d like to know more about how iProbe works its magic, download the manual from www.AxiaAudio.com.

Quickstart • 3
Fast Operation
You’ll nd in-depth instructions further on in this manual, but here’s a fast overview to get you started.
Front Panel
• Left Knob: controls the volume of the adjacent ¼” Headphone output.
• Display Screen: By default, displays meters of Input and selected Output streams.
• Right Knob: Rotate to select an audio stream from the Livewire™ network; press to “take”. Audio is auto-
matically fed to rear-panel outputs and front-panel ¼” jack.
• Preset Keys: Use these to quickly recall frequently-used sources. To program:
» Choose a stream using the Display Screen and Right Knob.
» Press-and-hold one of the Preset keys until it turns yellow.
» Release the key; it turns green. The source is now programmed to that key.
» Press any Preset key to recall its preset source. It turns green to indicate selection.

Quickstart • 4
Rear Panel
• Analog and AES/EBU Connections: You can connect one local input and one local output to xSelector,
using XLR or RJ-45 connectors.
» Analog and AES/EBU inputs are exclusive. Connecting an AES/EBU input disables the Analog
input.
» Analog and AES/EBU outputs simultaneously output the audio source selected using the front-panel
controls.
• GPIO Connections. xSelector has two DB-15 connections for GPIO. Each one has 5 GPI and 5 GPO clo-
sures. They can be associated with the audio stream selected using the front-panel controls, or customized
to suit your purposes. For setup information, please refer Chapter 3 of this manual.
• Livewire RJ-45 Ports. Mirrored ports connect xSelector to your Livewire network.

1: Introducing the xSelector • 5
Chapter One:
Introducing the xSelector
This section will introduce you to xSelector, a networked router selector node with one input and one output.
Streams received by xSelector can be easily selected from a list of available sources using the front panel display
screen. Additionally, six frequently-used streams can be assigned to front-panel lmcap buttons for instant access. A
headphone jack and volume control round out the front panel.
While xSelector is a handy audio selector when installed in the studio, it can also be a useful piece of test and
monitoring equipment in the Technical Operations Center or rack room.
xSelector is also AES67 compatible. AES67 is the standard for audio over IP interoperability approved by
the Audio Engineering Society in September 2013. AES67 compliance means that different AoIP formats such as
Livewire, Ravenna and others can all work and play well together.
xSelector Features
• Rear panel audio I/O with RJ45 or XLR
» 1 Stereo Analog input or AES-3 input (AES data stream presence pre-empts analog input)
» 1 Stereo Analog output and 1 AES-3 digital audio output (simultaneous)
• 1 Headphone output (mirrors selected audio output)
• Volume control for headphone and rear output (selectable)
• 2 GPIO ports, each with ve opto-isolated inputs and ve opto-isolated outputs
• OLED display for source selection, metering, GPIO status, and setup
• Dual mirroring redundant 100BT Ethernet ports or secondary management port
• Thermal sensor for over temperature status
• IEEE 1588 synchronization support
• Ravenna stream routing support
• AES-67 compatible

1: Introducing the xSelector • 6
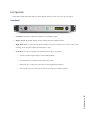
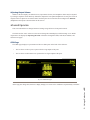
Front Panel Controls & Indicators
Fig. 1-1: xSelector front panel
xSelector’s front panel has a number of controls that make it fast and easy for operators to quickly select audio
sources from the network for local playback:
OLED Display and Control Knob: The display and adjacent rotary encoder perform multiple functions including:
• I/O Level meters (this is the default view),
• Selection of available audio streams from a scrolling list,
• The one-minute fast setup routine,
• Other settings.
Fast Select Keys: The six lm-cap keys select stored sources which are routed to the output (destination) of the
device. These work in a similar fashion to the preset buttons on a car radio. When pressed, the keys glow green to
indicate selection. Keys may be labeled by laser-printing on standard transparency lms and inserting them behind
the button caps, or with transparent adhesive labels if you wish.
Headphone Jack and Volume Control: On the far left of the front panel is a ¼-inch TRS headphone jack with
adjacent volume control.

1: Introducing the xSelector • 7
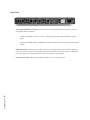
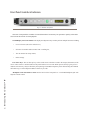
Rear Panel Connections
Fig. 1-2: xSelector rear panel
The rear panel of the xSelector has both XLR connectors, and RJ-45 connectors which follow the StudioHub+
standard for audio I/O.
LINE and AES INPUT CONNECTIONS (RJ-45)
Pin Function: Analog/AES
1 Analog Left Channel Input + /AES+
2 Analog Left Channel Input - /AES-
3 Analog Right Channel Input +
4 Ground
5 Not Used
6 Analog Right Channel Input -
7 Not Used
8 Not Used
INPUT CONNECTORS (XLR-F)
Pin Function: Analog/AES
1 Ground
2 Balanced Input +/AES+
3 Balanced Input -/AES-
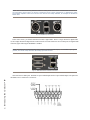
Fig. 1-3: Analog I/O connections
The Analog I/O section is on the far left side. There are two XLR-F connectors for Left/Right input, which are
electrically in parallel with the top RJ45 positioned to their immediate right.
Just beneath it is another RJ45, which is the unit’s Analog output. This is electrically in parallel with two XLR-M
connectors to its right.

1: Introducing the xSelector • 8
NOTE: Axia recommends using balanced audio for analog audio connections. If unbalanced sources are to
be connected to these inputs, we strongly recommend using a balun (transformer) or balanced-to-unbal-
anced buffer amplier at the source device. Such devices are readily available, for example the StudioHub
“Match Jack”.
Fig. 1-4: AES/EBU I/O connections
In the center section, you’ll nd connections for AES-3 digital audio. There is a single XLR-F for digital audio
in, and a single XLR-M for digital audio out. Between the two XLR connectors are two RJ45 ports for digital audio
in and out, again following the StudioHub+ standard.
NOTE: The xSelector will automatically switch between analog and AES inputs; if a valid AES input signal is
present, this will be used, otherwise the analog input will be used.
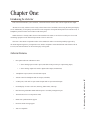
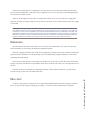
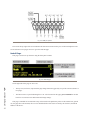
Fig. 1-5: GPIO and Livewire network connections
xSelector has two GPIO ports. Each has ve opto-isolated inputs and ve opto-isolated outputs. The pinout for
the GPIO’s DA-15 connectors is as follows:

1: Introducing the xSelector • 9
Next to the two GPIO ports are two RJ45 ports for connections to the Axia network. Default operation of the
ports is mirroring redundancy, but the ports can be congured as one Livewire port and a second management port,
for connection to another network.
Finally, to the far right of the rear panel is a standard IEC connection for AC power. The power supply has a
“universal” AC input, accepting a range from 90 to 240 VAC, 50-60 Hz. A fuse is located inside on the power supply
circuit board.
IMPORTANT! As with any piece of modern electronic gear, it is advisable that precautions be taken to pre-
vent damage caused by power surges. Standard line surge protectors can be used to offer some degree of
protection. It is the user’s responsibility to ensure protection adequate for their conditions is provided. This
equipment is designed to be operated from a power source which includes a third “grounding” connection in
addition to the power leads. Do not defeat this safety feature. In addition to creating a potentially hazardous
situation, defeating this safety ground will prevent the internal line noise lter from functioning.
Web Interface
xSelector options, like other Axia products, can be accessed via its internal Web server. This server provides
status information, as well as basic and advanced conguration options.
xSelector is designed so that the user can do basic conguration or change a route to the xSelector from the front
panel. From the web interface one can also change a route, and additionally, congure GPIO ports, check meters,
and change advanced settings.
There are times when xSelector’s front panel is the quickest way to do what you want, other times when a Web
browser is necessary. The Web server also enables remote access for those times when you’re not physically close to
the unit.
xSelector’s web server also breaks the old bugaboo about PC vs Mac. With a web browser, any Mac on the
network can get you into your web-enabled Axia gear.
What’s Next?
So, there’s your nickel tour of xSelector. If you followed the Quickstart at the front of the manual, you learned
how to set up your unit and get it running fast; in Chapter 2, we’ll take a more in-depth look at its operation.

D igt res
re ler DJs?
J Brary nws.

2: Using xSelector • 11
Chapter Two:
Using xSelector
xSelector is designed primarily so that operators can choose sources from the Livewire network, which are sent
to the unit’s audio output. Most, if not all, of these operations are done using the controls provided on the unit’s front
panel. This chapter will get you familiar with these controls.
Power Up!
Although xSelector has a built-in web server for conguration and administration, you can get xSelector
connected to your network using just front-panel controls (See the Quickstart preface to this manual for instructions
on how to do this). Some users will prefer to assign an IP address using the front panel controls, and then perform
the rest of the conguration from the node’s web pages; we’ll cover Advanced Programming in Chapter Three.
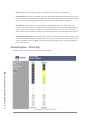
As soon as you plug xSelector in, it performs a short power-on self test. Once booted, the LED to the right of the
selector knob will turn from red to green. The OLED display illuminates and you’ll see the default screen showing
the meters.
Basic Operation
Operating xSelector from the front panel is quite simple. Streams can be selected, assigned to an instant access
lmcap button if desired, and the headphone/ output volume may be adjusted.
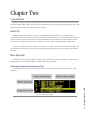
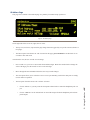
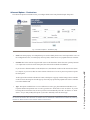
Selecting a Stream to Record, Store or Play
From the default menu screen click the control knob once. The source selection screen, shown below, will be
displayed.
Fig. 2-1: Source selection page.

2: Using xSelector • 12
The OLED display works with the adjacent knob. By default, the display shows the meters for input and output.
Rotating the knob changes the display, showing sources available for selection.
To select a source to route to xSelector’s outputs, rotate the knob to highlight the desired source, then press the
knob to “take” that source. That’s it!
Streams can be displayed in order by their Livewire channel number, or by their name. To change the sort
criteria, rotate the knob clockwise until you reach the end of the source list. You can now highlight and select from
the following options:
• Unassigned (clear preset): This option provides the ability to clear the source assigned to any of the six
front-panel Preset keys. To do this, highlight the option and press and hold the selection knob. While hold-
ing, press and hold the preset button you wish to clear. When the button turns yellow, its preset has been
cleared.
• Go to RAVENNA sources…: Selecting this option lters the list to display only RAVENNA sources
advertised on the network. At the bottom of the Ravenna listing is an option to Go to Livewire sources…
which returns you to a listing of Livewire sources.
• Sort by channel name…: By default, xSelector shows sources in order of their Livewire channel number.
Selecting this option organizes the source listing by name instead. The channel number will still be shown,
but the order of sources is now based on the alphabetical order of names.
NOTE: At the top of the list, you’ll see “(no audio)” . Highlight and select this in order to clear your selection
and mute the outputs.
While in the Source Selection screen, you’ll nd a “Return” icon to the bottom left (as shown in Figure 2.1).
This informs you of the function assigned to the left-most front-panel control knob (the Headphone Volume Control
knob). While in the Source Selection view, pressing this knob will return the screen to the meter view. (The screen
will also return automatically to the meter view if you do nothing for 30 seconds.)
Programming And Using the Fast Selection keys
The xSelector has six preset buttons on the front panel for frequently-used sources. To program:
• Selecting the source as outlined above.
• Press and hold the key you want to assign the source to, until it illuminates yellow.
• Release the key. The key’s illumination turns from yellow to green, indicating that the key is programmed
and the source is selected.
To instantly recall a stream assigned to a key, just press that key. It will illuminate green and the audio will be
routed to the unit’s outputs.
You can label these keys for easy reference, if you like, by laser-printing on standard transparency lms and
inserting the cut squares behind the keycaps (pry gently to remove), or by using an adhesive-lm labeler such as a
P-Touch or other label-strip printing device.
Page is loading ...
Page is loading ...
Page is loading ...
Page is loading ...
Page is loading ...
Page is loading ...
Page is loading ...
Page is loading ...
Page is loading ...
Page is loading ...
Page is loading ...
Page is loading ...
Page is loading ...
Page is loading ...
Page is loading ...
Page is loading ...
Page is loading ...
Page is loading ...
Page is loading ...
Page is loading ...
Page is loading ...
Page is loading ...
Page is loading ...
Page is loading ...
Page is loading ...
Page is loading ...
Page is loading ...
Page is loading ...
Page is loading ...
Page is loading ...
Page is loading ...
Page is loading ...
Page is loading ...
Page is loading ...
Page is loading ...
Page is loading ...
Page is loading ...
-
 1
1
-
 2
2
-
 3
3
-
 4
4
-
 5
5
-
 6
6
-
 7
7
-
 8
8
-
 9
9
-
 10
10
-
 11
11
-
 12
12
-
 13
13
-
 14
14
-
 15
15
-
 16
16
-
 17
17
-
 18
18
-
 19
19
-
 20
20
-
 21
21
-
 22
22
-
 23
23
-
 24
24
-
 25
25
-
 26
26
-
 27
27
-
 28
28
-
 29
29
-
 30
30
-
 31
31
-
 32
32
-
 33
33
-
 34
34
-
 35
35
-
 36
36
-
 37
37
-
 38
38
-
 39
39
-
 40
40
-
 41
41
-
 42
42
-
 43
43
-
 44
44
-
 45
45
-
 46
46
-
 47
47
-
 48
48
-
 49
49
-
 50
50
-
 51
51
-
 52
52
-
 53
53
-
 54
54
-
 55
55
-
 56
56
-
 57
57


Telos Alliance xSelector User manual
- Category
- Musical Equipment
- Type
- User manual
Ask a question and I''ll find the answer in the document
Finding information in a document is now easier with AI
Related papers
-
Telos Alliance xNodes User manual
-
-
 Axia Axia Livewire+ AES67 IP-Audio Driver User manual
-
-
-
-
-
-
-

Other documents
-
 Telos Z/IP ONE User manual
-
 Axia Analog Node Owner's manual
-
Western Digital WDBACB0010HBK - Elements Play User manual
-
 Axia Element Installation & User Manual
-
 Digigram IQOYA *LINK User manual
-
 ATD2 RC1 User manual
-
 Telos Zephyr Xstream User manual
-
 Axia Fusion Installation and User Manual
-
BrickHouse Security LYSB019OWIAXS-ELECTRNCS Installation guide
-
 Futuro Futuro WL22RAVENNA Ravenna Wall Range Hood Manual


