MARKSMAN HANGER Track & Door Installation Instructions
RUSTICAHARDWARE.com
6
3
03
2017
VERSION
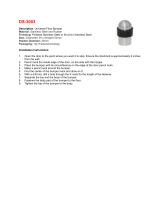
1-5/8”
1/2”
Door Height
Figure 1
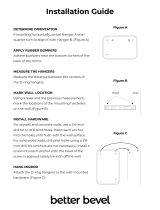
Figure 2
TRACK & DOOR INSTALLATION
FIRST THINGS FIRST
Check to see if the oor below the track area is level. If the oor rises more than 1/2” the door may rub or
not slide open completely. If the oor is not level, measure from the highest point of the oor surface to
the recommended track placement and adjust track placement accordingly.
2. Using a level and a pencil, make a line above
the doorway the same length as the track.
3. Hold the track up to where the pencil line is
visible through the holes in the track (Figure 2).
SUGGESTION:
Use pieces of double stick tape on the back of
the track to help hold the track in place while
completing steps 2 and 3.
4. Mark an intersecting line in the center of
each track hole (Figure 2).
5. Take the track down, remove double stick
tape (if used) and set the track aside.
Ensure the track will be installed onto wall studs. If wall studs are not lining up with the installation a
header will be required to provide the necessary strength and stability for the track and door.
1. To determine where the track should be
installed, rst measure the height of the door,
then add 2-1/4” to the door height. 1/2” of
this total will be for the clearance between the
bottom edge of the door and the oor. 1-5/8”
will be from the top edge of the door to the
center of the track. (Figure 1).