Page is loading ...

AWNING INSTALLATION MANUAL
Congratulations on your purchase of a Tepui
Awning. We strive to provide the ultimate
camping experience for every camper. Your
high-quality awning has been designed to
fit most roof rack and roof bar systems. This
versatile product is built to give you many
years of trouble-free service, providing you
follow these simple mounting, operating and
care instructions.
Your Tepui Awning is made with the most
durable materials that will stand up to the
most extreme conditions.
Most of your Tepui Awning components have
been fully assembled at the factory except for
attaching the mounting brackets. Awning setup
is composed of unpacking contents, attaching
mounting brackets to your vehicle, and then
attaching your Tepui Awning to the mounting
brackets.
This document also includes instructions for
the installation of the Tepui Awning Mosquito
Room and Tepui Awning Walls.
Should you have any questions, please email
[email protected] or call Customer Service at
1-800-301-9874.
Updated 2.21.19

2
TABLE OF CONTENTS
DELIVERY CONTENTS:
4’ & 6’ TEPUI AWNING ........................................3
6’ MOSQUITO WALLS ..........................................3
6’ AWNING WALLS .............................................3
AWNING INSTALLATION ............................................4
ATTACHING AWNING MOUNTING BRACKETS:
TO TEPUI ROOF TENT RAILS .................................5
TO ROOF RACKS WITHOUT MOUNTING TRACKS ..........6
TO ROOF RACKS WITH MOUNTING TRACKS ...............7
DIRECTLY TO A ROOF BASKET ...............................8
TO THE AWNING MOUNTING BRACKETS ....................9
AWNING OPERATION .......................................... 10-12
TEPUI MOSQUITO WALLS ........................................ 13
TEPUI AWNING WALLS ........................................... 14
LIMITED WARRANTY .............................................. 15

3
DELIVERY CONTENTS
Before you start to ax your awning to your car, take a minute to identify and organize all parts
provided.
6’ Mosquito Walls
Included in delivery:
• Mosquito Wall in Bag
• Stakes
4’ & 6’ Tepui Awning
Included in delivery:
• Pre-assembled awning
• 2 x L-shaped mounting brackets
• 6-8 x M6 bolts and nuts
(depending on awning model)
• 2 x Ropes and Stakes
6’ Awning Walls
Included in delivery:
• Awning Walls
• Awning Floor
• Stakes

4
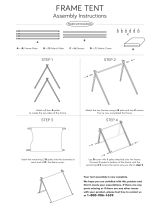
AWNING INSTALLATION
Your Tepui Awning comes pre-assembled but needs the mounting brackets installed (in most
circumstances) before it is ready to be mounted to your vehicle.
STEP-BY-STEP MOUNTING:
There are multiple ways to mount you Tepui Awning to your vehicle. The awning must first attach
to the mounting brackets (pg 9), which are attached to:
• Tepui roof tent rails (pg 5),
• Roof racks without mounting tracks (pg 6),
• Roof racks with mounting tracks (pg 7), or
• Directly to a roof basket (pg 8).
BRACKET POSITIONING:
The position of the mounting brackets has an eect on the height of your awning:
You can adjust the height by installing the
brackets facing up or downwards.
Make sure downwards facing brackets are
not in the way of your side doors.

5
ATTACHING AWNING MOUNTING BRACKETS
TO TEPUI TENT RAILS
1. Use the groove of the roof tent mounting
rail to slide in the mounting brackets with
the M6 bolts in place.
2. The head of the bolt will be held in place
from the roof tent mounting rail.
3. Slide them to the desired position and
fix the bracket with fitting nuts to the
mounting rails.
We recommend the use of roof tent
mounting rails to attach a Tepui awning to
the rear of your car.

6
ATTACHING AWNING MOUNTING BRACKETS
TO ROOF RACKS WITHOUT
MOUNTING TRACKS
1. Place the L-brackets on top of your rack.
3. Drill at least 2 holes for each bracket. We
highly recommend taking the racks o
your car for this procedure.
2. Make sure all L-brackets are aligned and
set at the desired distance to your car
before you mark the drilling holes on your
rack.
4. Bolt the brackets to your rack by using M6
bolts at the necessary length and tensile
strength.
Please note, not all factory roof racks or aftermarket roof bars can adequately
accommodate drilled holes and/or an awning. Attaching the awning mounting
brackets to roof racks without mounting tracks may compromise the integrity of
your racks.

7
ATTACHING AWNING MOUNTING BRACKETS
TO ROOF RACKS WITH
MOUNTING TRACKS
1. Many roof racks have a mounting track
system that allows the use of sliding bolts
to ax the L-brackets.
2. Make sure the sliding bolts have the
necessary size (M6) to fit the mounting
brackets. Position the brackets on top of
the rack and attach them with washer, split
ring and nut.

8
1. You can attach the awning on a vertical
surface simply by drilling 4 holes with the
desired distance and use the sliding bolts
to fix the awning directly to your car/
basket.
ATTACHING AWNING MOUNTING BRACKETS
DIRECTLY TO A ROOF BASKET
Make sure the Awning does not overhang by 18” or more in order to preclude any
kind of wobble during driving. It may be necessary to use 3 mounting brackets for
long awnings and/or heavy o-road use (contact Tepui for additional brackets).
Prepare and choose your roof rack accordingly.
Please note, not all roof baskets can adequately accommodate an awning. Attaching
the awning mounting brackets directly to a roof basket may compromise the
integrity of the basket.

9
ATTACHING AWNING
TO THE MOUNTING BRACKETS
1. Now that the brackets are in place, put the
remaining 4 M6 bolts into the groove of
the backside of the awning.
2. Space the bolts to the distance of your
mounting brackets on the car.
3. Make sure the awning is the right way
around. Use two persons to lift it in place
and insert the bolts at the back of the
mounting plate to the mounting brackets.
4. Secure the awning to the mounting
brackets by tightening the nuts to the M6
bolts.
Tighten all the nuts and make sure your
Awning is securely attached. Check the
awning before, during and after each trip
that it is securely mounted.

10
AWNING OPERATION
1. Choose a serene spot to park your car.
Make sure the surface is flat and not in the
risk of falling branches or flooding.
2. Open the travel cover and release the
straps.
3. Unroll the awning completely and hold it
in place. If someone is available, use two
persons. One person to hold the awning
in place while the other is installing the
frame work.
4. All poles are hinged and telescopic. They
lock and unlock with a slight twist. Unfold
the horizontal poles.
Step-by-step instructions on opening your awning:

11
(AWNING OPERATION CONT’D)
5. Feed the poles into the designated
opening on the outer frame and extend
them to tension the awning material.
6. Unfold the vertical poles and put them on
the ground.
7. Lock them at the desired height with a
slight twist movement.
8. Fix the awning material to the frame with
the Velcro fasteners.

12
(AWNING OPERATION CONT’D)
9. Use ropes and stakes to fix the awning
securely to the ground.
10. During rain and unsupervised periods,
always lower one leg to allow rainwater
to run o the awning and avoid pooling.
That’s it! You’re ready to enjoy the shade!

13
TEPUI MOSQUITO WALLS
1. Feed the outer zip flap into the channel track of
the awning. This part needs to be inserted for
the first assembly and can remain on the awning
thereafter.
2. Slide the mosquito net into the channel track at
the bottom of the awning mounting plate.
3. Zip the other side of the awning to the zip flap
you installed at the very beginning.
4. Ax the mosquito net to the side poles of the
awning with the clip connectors.
5. Stake the mosquito net to the ground.

14
TEPUI AWNING WALLS
1. Feed the outer zip flap into the
channel track of the awning. This
part needs to be inserted for the first
assembly and can remain on the
awning thereafter.
2. Zip floor onto walls. It is easier to
do this prior to attaching wall to
awning.
3. Slide the awning wall into the
channel track at the bottom of the
awning mounting plate.

15
LIMITED WARRANTY
WHAT IS COVERED
Tepui Outdoors, Inc., producer of Tepui Tents, warrants to the original purchaser that its products
are free from defects in material and workmanship, for the term described, except as qualified
below. The life of the product is determined from the date of purchase until such time as the
product is no longer serviceable due to normal wear and tear.
WHAT IS NOT COVERED
Tepui Outdoors, Inc. shall not be responsible for the natural breakdown of materials that occurs
inevitably with extended use (e.g., Ultra Violet (UV) light damage on tents, exhausted zippers), or
defects caused by accident, abuse, alteration, animal attack, storm damage, misuse or improper
care.
THERE ARE NO OTHER EXPRESS WARRANTIES BEYOND THE TERMS OF THIS LIMITED
WARRANTY. IN NO EVENT SHALL Tepui Outdoors, Inc. BE LIABLE FOR INCIDENTAL OR
CONSEQUENTIAL DAMAGES.
Some states do not allow the exclusion or limitation of incidental or consequential damages, so
the above limitation or exclusion may not apply to you.
WHAT TEPUI OUTDOORS, INC. WILL DO
If after inspection we find that a product failed due to a manufacturing or material defect, we will
repair or replace the product, at our option, without charge.
HOW TO OBTAIN WARRANTY SERVICE
Return the product, freight prepaid, to the Tepui Tents Dealer from whom it was purchased; or,
contact Tepui Tent’s Customer Satisfaction Department for return authorization: toll free 1-800-
301-9874. Collect shipments or shipments without return authorization cannot be accepted.
REPAIRS
If your tent needs service or repair due to normal wear and tear, animal attack, accident or some
other reason that is not covered under the warranty, we will provide the necessary service for a
reasonable charge, plus shipping and handling. We require that products accepted for any repair
be properly cleaned according to our recommended care instructions. Please send your product
or component that requires repair (e.g., tent fly), postage prepaid, along with a description
of what needs attention. For service and repairs, please contact our Customer Satisfaction
Department: toll free 1-800-301-9874.
HOW STATE LAW RELATES TO THIS WARRANTY
This warranty gives you specific legal rights. You may have other rights that vary from state to
state.
WARRANTY TERM
Limited 2 year warranty applies to all tent components including base, aluminum poles, ladder,
fabric and seams.

Tepui Outdoors, Inc.
2500 Rosedale Avenue
Soquel, CA 95073
1-800-301-9874
/