
ThinkPad Bluetooth Laser Mouse
User Manual

About this manual
Thank you for your purchase of this Bluetooth mouse set. This topics covered in this manual are
listed as following.
(This mouse will be sold without dongle.)
◆ Introduction
◆Installing and the Batteries
◆Installing and Uninstalling the WIDCOMM Bluetooth Stack
◆Setting up the Laser Mouse
◆Using the Laser Mouse
◆Using the WIDCOMM Bluetooth Stack
◆ Troubleshooting

1. Introduction
Features
Laser Mouse Features
• With scroll wheel and two buttons、tilt wheel
• Power saving mode
• LED indicator
a. Amber:Low battery
b. Flashing green: mouse is pairing
USB Bluetooth Dongle Features
• Bluetooth specification v1.2 and v2.0 compliant
• Supports mouse
• Supports additional Bluetooth devices
System Requirements
• Bluetooth / USB mouse supported computer
• Microsoft Windows 98/ME/2000/XP or later

2. Installing the Batteries
The mouse needs two AA size batteries. Follow the steps below to install the batteries.
1. Press the button and the battery cover pops out.
2. Install two "AA" batteries while observing the polarity (+ and -) indicated inside the mouse.
3. Replace the battery cover

3 Installing and Uninstalling the
WIDCOMM Bluetooth Stack
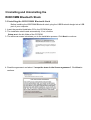
3.1 Installing the WIDCOMM Bluetooth Stack
Before installing the WIDCOMM Bluetooth stack, plug the USB Bluetooth dongle into a USB
port of your computer.
1. Insert the provided Installation CD in the CD ROM drive.
2. The installation stack loads automatically. If not, click the
Setup.exe in the bin folder of the CD ROM.
3. The welcome screen introduces you to the installation process. Click Next to continue.
4. Read the agreement and select “I accept he terms in the license agreement”. Click Next to
continue.

5. The program will be installed in the folder as shown. Click Change to install in a different location.
Click Next to continue.
6. Click Install to start the installation. The installation may need some time to complete.
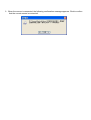
7. The following screen appears to indicate the installation is complete.

8. Remove the dongle and plug it back in, the mouse will pair automatically. Click Finish to exit
the installation.
The following prompt requires you to restart the computer so that the Bluetooth stack takes
effect. Click Yes to restart your computer now or No to restart later.
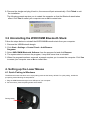
3.2 Uninstalling the WIDCOMM Bluetooth Stack
Follow the steps below to uninstall the WIDCOMM Bluetooth stack from your computer.
1. Remove the USB Bluetooth dongle.
2. Click Start > Settings > Control Panel > Add/Remove
Programs.
3. Select WIDCOMM Bluetooth Software from the program list and click Remove.
4. The system starts to remove the program, it may take some time to uninstall.
5. When the program has been removed, a prompt requires you to restart the computer. Click Yes
to restart your computer now or No to restart later.
4. Setting up the Laser Mouse
4.1 Quick Pairing in Windows
The Bluetooth mouse has been set to a pre-pairing mode as the factory default. For quick pairing, enable the
pre-pairing mode following the steps below.
1. Plug the USB Bluetooth dongle into a USB port of your computer.
2. For the mouse, press the pairing button at its bottom.
Pairing button

3. Press the button on the bottom of the USB Bluetooth dongle until the LED begins to flash
once every second. This indicates the. Bluetooth dongle has started to search for device to
be paired.( This mouse will be sold without dongle.)
4. Move your mouse to ensure they are connected.
Enabling the function of USB mouse in BIOS
If the mouse failed to work (refer to “7 Troubleshooting” on page 14 for more probable
conditions), check that the USB function of the mouse has been enabled in the BIOS setup.
Some old PC systems do not support the USB keyboard/mouse in
BIOS/DOS environment.
4.2 Pairing on WIDCOMM Bluetooth Stack
Before using the Bluetooth stack for mouse pairing, install the stack as instructed in “3 Installing
and Uninstalling the WIDCOMM Bluetooth Stack” . Then follow the steps below.
1. Press the USB Bluetooth dongle button until the following Human Interface Device (HID) screen
appears.

2. When the mouse is connected, the following confirmation message appears. Click to confirm
that the correct mouse is connected.

5 Using the Laser Mouse
After plugging in the USB Bluetooth dongle and setting the mouse in the Bluetooth connection
environment as described in “4.Setting up the Laser Mouse” , you can begin using the mouse
immediately.
5.1 Power Status of the Laser Mouse
The Bluetooth mouse has a battery status LED. When the battery runs out,
the LED turns amber. You should change the batteries immediately
.(The top LED indicate is the same with bottom LED)
To view more detailed information on the mouse battery status, go to the Control panel > Mouse >
Bluetooth.
LED

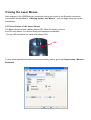
6. Using the WIDCOMM Bluetooth Stack
6.1 Using the Stack for the First Time
To start using the Bluetooth Stack, double click the Bluetooth icon in the system tray.
1. The Initial Bluetooth Configuration Wizard will launch. Follow the instructions on screen to
complete the configuration.
2. When the Bluetooth Configuration is complete, the following HID screen appears and starts to
search for Bluetooth devices.
3. Click on the HID device you want to connect with. Then follow the instructions on-screen to
enable the selected device.
About the Bluetooth icon
The Bluetooth icon acts as an indicator for dongle status.
1. A red icon indicates there is no dongle inserted.
2. A white icon indicates the dongle is plugged in.
3. A green icon indicates the dongle has detected the HID devices.

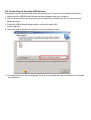
6.2 Connecting to the other HID Devices
Besides the mouse, the Bluetooth Stack also allows you to connect to other Bluetooth devices.
1. Make sure the USB Bluetooth dongle has been plugged onto your computer.
2. Set the Bluetooth devices, such as printers, modems, and PDAs, you want to connect to the
Bluetooth stack.
3. Press the USB Bluetooth dongle button until the following HID
screen appears.
4. Select the type of devices to search for from the drop-down menu.
5. The detected devices will be displayed. Click on a device and the stack will instruct you to enable
the connection.

7. Troubleshooting
If you have any problems with your Bluetooth mouse, please check the following:
• Check the system requirements to make sure that your system is compatible.
• Check to see if the batteries in the mouse are installed correctly. Make sure the polarity of the
batteries corresponds with the polarity signs inside the mouse battery compartments.
• When the mouse LED is lit red, it indicates battery power low. Replace them with new batteries
immediately.
• Once the Bluetooth stack (see “Installing the WIDCOMM Bluetooth Stack” on page 4) has
been installed in your computer, you can check the battery status of mouse from Control Panel
>Mouse > Bluetooth.
• If the mouse fail to work, check the USB mouse function in your system’s BIOS. The function
should be enabled for
the normal use of mouse.
• If your PC system’s BIOS setup has options for the mouse, make sure they are set to default
settings. If you are not familiar with the BIOS, refer to your PC’s manual for more information.
• Only use the mouse on a clean, flat, non-slippery surface in order to ensure smooth and accurate
cursor action. If you use a mouse-pad, choose a light-colored one, not a dark one, to use less
battery power.
For further assistance with any other questions you may have, please contact your dealer for
technical support.

Federal Communication Commission Interference Statement
This equipment has been tested and found to comply with the limits for a Class B digital device, pursuant to Part 15 of
the FCC Rules. These limits are designed to provide reasonable protection against harmful interference in a
residential installation. This equipment generates, uses and can radiate radio frequency energy and, if not installed
and used in accordance with the instructions, may cause harmful interference to radio communications. However,
there is no guarantee that interference will not occur in a particular installation. If this equipment does cause harmful
interference to radio or television reception, which can be determined by turning the equipment off and on, the user is
encouraged to try to correct the interference by one of the following measures:
- Reorient or relocate the receiving antenna.
- Increase the separation between the equipment and receiver.
- Connect the equipment into an outlet on a circuit different from that to which the receiver is connected.
- Consult the dealer or an experienced radio/TV technician for help.
This device complies with Part 15 of the FCC Rules. Operation is subject to the following two conditions: (1) This
device may not cause harmful interference, and (2) this device must accept any interference received, including
interference that may cause undesired operation.
FCC Caution: Any changes or modifications not expressly approved by the party responsible for compliance could void
the user's authority to operate this equipment.
IMPORTANT NOTE:
FCC Radiation Exposure Statement:
This equipment complies with FCC radiation exposure limits set forth for an uncontrolled environment. End users must
follow the specific operating instructions for satisfying RF exposure compliance.
This transmitter must not be co-located or operating in conjunction with any other antenna or transmitter.
Canada IC Statement
Operation is subject to the following two conditions: 1) this device may not cause interference and 2) this device must
accept any interference, including interference that may cause undesired operation of the device.
-
 1
1
-
 2
2
-
 3
3
-
 4
4
-
 5
5
-
 6
6
-
 7
7
-
 8
8
-
 9
9
-
 10
10
-
 11
11
-
 12
12
-
 13
13
-
 14
14


Ask a question and I''ll find the answer in the document
Finding information in a document is now easier with AI
Related papers

Other documents
-
RocketFish RF-BTCMBO User manual
-
Allnet ALL1578 Quick start guide
-
 Heng Yu CK103A User manual
-
 Heng Yu Electronic Manufacturing CK82A User manual
-
 Think Outside Travel Mouse (for Asus MyPal A620BT) User manual
-
 Think Outside 4.2T User manual
-
X-Micro XBT-DG2G Software Manual
-
Areson Technology Corp. L168BT User manual
-
KeySonic ACK-340 BT Datasheet
-
KeySonic ACK-3400 BT Datasheet


