Page is loading ...


Contents ii
Contents
Movie Creation Guide
Software Applications .............................................................................................................................................. 1-1
Computer Configuration ...................................................................................................................................... 1-2
Optimizing Your Computer ........................................................................................................................ 1-2
Processor speed and RAM memory ......................................................................................................... 1-3
Hard drive space ............................................................................................................................................ 1-4
DVD writer ....................................................................................................................................................... 1-4
USB 2.0 ............................................................................................................................................................... 1-5
Windows XP .................................................................................................................................................... 1-5
Graphics Cards ................................................................................................................................................ 1-5
Capturing Video from a Video Source
Step 1: Install Hardware ................................................................................................................................ 2-1
Step 2: Start Ulead DVD MovieFactory 3 ............................................................................................... 2-2
Step 3: Set Video Capture Parameters .................................................................................................... 2-3
Step 4: Set Audio Parameters ..................................................................................................................... 2-4
Step 5: Perform the Capture ....................................................................................................................... 2-5
Capturing Video Using Direct to Disc
Starting DVD MovieFactory 3 .............................................................................................................................. 3-1
Using Direct to Disc ...................................................................................................................................... 3-1

Contents iii
Creating a WMV file for Zen Portable Media Center
Starting VideoStudio 8 ............................................................................................................................................. 4-1
Creating a WMV file from an existing video file ............................................................................................. 4-2
Capturing a WMV file .............................................................................................................................................. 4-6
Taking Control of Your DVD Project
Planning Space and Organizing Your DVD ....................................................................................................... 5-1
Organization ..................................................................................................................................................... 5-3
Capturing in MPEG or DV/AVI .................................................................................................................. 5-4
Capturing in DV ............................................................................................................................................... 5-4
Capturing in MPEG ......................................................................................................................................... 5-6
Controlling the MPEG Capture Parameters .......................................................................................... 5-7
Setting Capture Properties .......................................................................................................................... 5-9
Controlling the Project Settings for Output ........................................................................................ 5-10
Change MPEG Settings ................................................................................................................................ 5-11
Selecting the DVD Format and Media Type
Select a DVD format ...................................................................................................................................... 6-1
Video and Audio Monitoring
About Monitoring ..................................................................................................................................................... 7-1
Television Display ..................................................................................................................................................... 7-2
Audio Monitoring .................................................................................................................................................... 7-3
Technology Glossary
DoMiNoFX™ ........................................................................................................................................................... A-1

Contents iv
PerfectView® Pro MPEG encoding .................................................................................................................. A-2
TrueView™ Pro: Motion Compensated Temporal Filtering ................................................................... A-3
Video Formats ........................................................................................................................................................... A-3
Analog Television Video Formats – NTSC, PAL and SECAM ................................................................... A-4
Video Transmission — Composite Video and S-Video (SVHS) ............................................................... A-5
Digital Video Formats – DV and MPEG ............................................................................................................ A-6
Digital Audio Formats ........................................................................................................................................... A-8
Digital Video and Audio Resolutions and Bitrates ......................................................................................... A-9
DVD Format ............................................................................................................................................................ A-12
Frequently Asked Questions
Questions About Video .......................................................................................................................................... B-1
General Usage ............................................................................................................................................................ B-2
General Precautions ................................................................................................................................................. B-4

Movie Creation Guide 1-1
Movie Creation Guide
This guide will help you use Creative Sound Blaster Audigy 2 ZS Video Editor to
produce quality DVDs and movies on your computer. Read ahead to learn how to:
• capture video using Audigy 2 ZS Video Editor into a digital video file on your
computer and make professional-looking DVDs or SVCDs (See "Capturing Video
from a Video Source" on page 2-1)
• archive your home movies quickly and burn them to disc using Direct to Disc
(See "Capturing Video Using Direct to Disc" on page 3-1)
• create Windows Media Video (WMV) movie files for your Zen Portable Media
Center (See "Creating a WMV file for Zen Portable Media Center" on page 4-1)
Software
Applications
Your Audigy 2 ZS Video Editor software package contains:
•
Ulead DVD MovieFactory™ 3 SE to create movies and slideshows on VCDs,
SVCDs and DVDs. You can use MovieFactory for all of your DVD projects that
need basic editing facilities. You can also import edited videos from Ulead
VideoStudio.
•
Ulead VideoStudio™ 8 SE to edit your video. You can capture, edit and create
final MPEG or DV(AVI) files for use in MovieFactory. In VideoStudio, you can use
advanced editing features not found in MovieFactory, especially timeline editing
operations.
•
Ulead DVD Player to view your DVDs on your computer.
The following diagram illustrates the steps in creating a movie:
For instructions on how
to use your Audigy 2
ZS Video Editor or the
Creative and Ulead
software package, read
the User’s Guide, and
the online Help.
Video
Capture and Compress
Edit
Burn

Movie Creation Guide 1-2
Computer
Configuration
Audigy 2 ZS Video Editor features hardware MPEG encoding, which greatly reduces
the burden on your computer during video capture.
However, working on your DVD project will be easier if you have a computer
configured for video capturing and editing. Performing basic computer
maintenance can also make a difference when working on your video project.
A recommended computer configuration is:
• 1.5 Ghz processor or better
• 256 to 512 MB RAM
• 20 GB of available hard drive space
• DVD writer or recorder drive
• Available USB 2.0 port
• Microsoft® Windows® XP
Optimizing Your
Computer
Each video project may have different requirements in relation to system speed
and resources.
To check your system’s specifications, click
Start → Settings → Control Panel →
System
. Or, for device-specific information, click Start → Settings → Control Panel
→ System → Hardware and select Device Manager.
Before starting a video project, you should:
• Defragment your hard drives
• Enable DMA for your hard drives for optimal performance, as indicated in the
Audigy 2 ZS Video Editor User’s Guide.
• Uninstall previous video and audio device applications before installing Audigy 2
ZS Video Editor, to reduce the possibility of software conflicts.
• Install the latest drivers, firmware and application updates and patches for your
operating system, DVD recorder drive, graphics card, BIOS and your Audigy 2
ZS Video Editor.
• Close all non-Ulead applications, to minimize system resource conflicts.
The recommended
configuration discussed
in this section will
serve most purposes,
but it is not required.
You can still perform
video editing and make
DVDs on a computer
with a slower
processor or less RAM
than recommended.

Movie Creation Guide 1-3
Processor speed
and RAM memory
The more RAM and the faster the processor you have, the more responsive your
computer will be during the editing and rendering phases.
While editing, for example, you would preview the results of your latest edit in
real-time. Most of your edits are accumulated in a “non-destructive” way called an
edit list – the underlying video files are not actually modified as you make the
edits. On lower powered computers, this can result in slow video previews or jerky
video as your computer labors to display 30 frames per second in the Preview
window.
You should have 256 MB of RAM for basic Windows XP operations with video
applications; 512 MB will improve performance on complex projects. More than
512 MB will not improve performance significantly for most projects.

Movie Creation Guide 1-4
Hard drive space The amount of available hard drive space you need varies from one project to the
next. One important factor is whether you will be capturing and editing in DV or
MPEG. See "Digital Video Formats – DV and MPEG" on page A-6.
The amount of storage you need for your project is the total of:
• All the raw video you will capture — 10 minutes of DV will take up
approximately 2 GB while 10 minutes of MPEG2 video will take up between 300
– 700 MB depending on the level of compression
• 5-10 GB of temporary storage — needed to render the image of a DVD before it
is burned to the DVD media
• storage for other media files, such as audio and pictures
Fast hard drives (7200 RPM) are preferred as they improve the speed of real-time
Preview and video output operations, however hard drives at 5400 RPM also give
good performance. A computer system with a hard drive dedicated to video editing
can make data management easier as well as offer speed improvements when the
drive is on a separate IDE channel from the system drive. Hard drives formatted
with NTFS file systems are preferred over FAT32 since NTFS has no file size limit,
while FAT32 imposes a limit of 4 GB per file.
DVD writer A DVD writer that can handle all the different DVD media types (DVD-R, DVD-RW,
DVD+R and DVD+RW) is preferable. Some consumer DVD players only support
limited formats, so you should ensure that your DVD player supports the same
formats as your DVD writer.
Burning speeds are important as well, as faster writers can greatly speed up the
burning process. As mentioned in the note above for external drives, 1394
connectivity is preferred so there is no bus contention with the Audigy 2 ZS Video
Editor, but USB works well too. See "Selecting the DVD Format and Media Type" on
page 6-1.
External IEEE 1394
hard drives are
preferable over USB
hard drives because
the full USB bandwidth
can be dedicated to
Audigy 2 ZS Video
Editor. USB hard drives
are best connected
directly to the host
system, preferably on
a separate USB hub
from that of Audigy 2
ZS Video Editor, but
can also be connected
to the USB inputs on
Audigy 2 ZS Video
Editor itself.

Movie Creation Guide 1-5
USB 2.0 Audigy 2 ZS Video Editor will work well with either USB 1.1 or USB 2.0 connections
to your computer; Audigy 2 ZS Video Editor also serves as a USB hub. For
flexibility, USB 2.0 is preferred. USB 1.1 does not support the data transfer speed
required for capturing DV. However, Audigy 2 ZS Video Editor can encode video
into MPEG and USB 1.1 will support MPEG bitrates that give excellent results for
DVD projects (the Ulead applications allow up to 5 Mbps for USB 1.1).
To see if you have USB 2.0 on your system and to ensure you have the right driver
software to enjoy full USB 2.0 transfer speed, click Start
→ Settings → Control
Panel
→ System → Hardware and select Device Manager. Look under
Universal Serial Bus controllers. One or more of your controllers may say “USB
2.0”. Under the Properties of such a controller, look at the Driver tab to
determine if you have the latest high speed drivers. These may be obtained from
the website for your computer or motherboard manufacturer, or the Intel website.
Windows XP Use Windows XP because of its USB 2.0 support, general reliability and improved
media functionality.
Graphics Cards Your graphics card needs to be compatible with Direct X (in particular, to support
Direct X 9) but does not need 3D performance – video applications use 2D, which
is adequately supplied by all modern graphics cards.

Capturing Video from a Video Source 2-1
Capturing Video from a Video Source
Follow the next few steps to successfully capture video. Your Quick Start guide has
full instructions on how to connect your Audigy 2 ZS Video Editor.
Step 1: Install
Hardware
1. Be sure that you have properly connected and turned on your video source
and Audigy 2 ZS Video Editor. See your Quick Start guide.
2. Put your video device into Play, playback or VCR mode. Do not start playing
video at this time.
Connect Audigy 2 ZS
Video Editor to the USB
port you used during
installation. If you
connect Audigy 2 ZS
Video Editor to a
different USB port, the
operating system may
indicate a new device
has been detected and
attempt to locate
drivers.

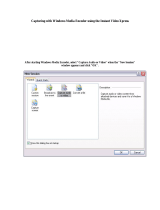
Capturing Video from a Video Source 2-2
Step 2: Start Ulead
DVD MovieFactory
3
1. Run DVD MovieFactory and click Create
Video Disc.
2. Select the
New Project option and select
the Output disc format option you require
(either DVD, VCD, SVCD or DVD-VR). Click the
OK button to proceed.
3. In the Add Media window, select Capture
Videos from a Video Device.
Disable any scheduled
tasks on your
computer, such as
virus scans, so that
they do not interfere
with the video capture
process.

Capturing Video from a Video Source 2-3
Step 3: Set Video
Capture
Parameters
1. In the Capture Video window, select
the pull-down button to expose the
Advanced Capture settings.
2. Select a Format option suitable for
your project.
The options available are appropriate
for common tasks; however you can
adjust the format parameters with
Capture Properties in Advanced
Settings - see "Planning Your DVD
Project" on page 5-1.
3. In the Capture Mode list box, select
Marked Capture.
This enables you to use the mark-in
and mark-out timecode controls to
mark the start and stop recording
points in your video.
Use this mode only with digital video
sources.
4. Select Advanced Settings and click the Capture
Properties option. Set the Input Source
according to how your video device is connected
to the Audigy 2 ZS Video Editor.
Select VCR Input when capturing from a VCR;
this allows the Audigy 2 ZS Video Editor to
stabilize video from older VCRs.
You do not need to
select the Source
device listed at the
top of the Capture
Video window – this is
a logical name
indicating which
software driver
components will be
used for the capture
and may change
depending on the
Format and Input
Source selections you
make.
You should defragment
your hard drive before
capturing video. Also,
make sure your hard
drive has enough free
space for your video
capture. See "Hard
drive space" on page
1-4.
mark-in and mark-out
timecode controls

Capturing Video from a Video Source 2-4
Step 4: Set Audio
Parameters
1. Go to Start -> Programs/All Programs ->
Creative -> Sound Blaster Audigy 2 ZS Video
Editor ->
Creative Speaker Settings and select
the Speaker or Headphone settings.
2. Go to
Start -> Programs/All Programs ->
Creative -> Sound Blaster Audigy 2 ZS Video
Editor -> Creative
EAX Console and enable or
disable any environmental effects. For
example, disable CMSS-3D in order to monitor
the audio exactly as it is on your video source.

Capturing Video from a Video Source 2-5
Step 5: Perform
the Capture
1. Start your video device playing in order to preview your video before
capturing. This can be done manually, or in the case of a DV camera, with the
buttons underneath the Capture Video window. At this point you should see
your video displayed in the Preview window. If not, see "Frequently Asked
Questions" on page B-1.
Tip: If your video is too dark, light, faded or grainy – for example, if it was
recorded in low-light conditions - consider performing the capture in VideoStudio
which allows real-time color adjustments in hardware during the capture. This is
preferable to using software video filters after capture to make color adjustments.
Videos captured in VideoStudio are easily imported into DVD MovieFactory.
2. Stop and reposition the video source to the desired capture location and click
the Capture Video button.
3. Start your video source (it will start automatically for DV cameras with camera
control). You can manually stop the video capture by clicking Stop Capture,
or it may stop automatically due to running beyond the set time length.
After Stop Capture, DVD MovieFactory may be unresponsive for a short period
as it finalizes the operation.
During video capture,
do not disconnect or
turn off Audigy 2 ZS
Video Editor, stop the
video device or start
other CPU-intensive or
USB-intensive tasks on
your computer.
The colors in the
Preview video may not
exactly match the
colors seen on a TV or
camera, due to
differences in color
conversion.

Capturing Video Using Direct to Disc 3-1
Capturing Video Using Direct to Disc
The Direct to Disc function in DVD MovieFactory enables you to quickly capture
videos from a video device, like your digital video camera or your VCR, and burn
the video directly onto a DVD in one operation. For example, using Direct to Disc,
you can archive your home movies into DVD or other available format.
Starting DVD
MovieFactory 3
1. Be sure you have properly connected and turned on your video source and
Audigy 2 ZS Video Editor. See your Quick Start guide.
2. Insert a blank DVD into your DVD recorder.
3. Launch DVD MovieFactory 3.
Using Direct to
Disc
1. Click Direct To Disc.

Capturing Video Using Direct to Disc 3-2
2. In the window that appears, select
an Output disc format (DVD).
3. Select the drive that you want to
use to burn the DVD.
If the drive you want does not
appear, check your drive
connections.
If you have a blank DVD in the
drive, disc information appears in
the window.
4. Check the details of the DVD you
have in the DVD drive. If the Free
space is insufficient for your video,
use another disc. Be sure that the
Disc type is supported by your DVD
writer.

Capturing Video Using Direct to Disc 3-3
5. In the dialog box that appears, select a DVD
recording format.
Select:
• DVD-Video when you have no need to later
edit or append to the DVD. This format is not
as fast as the next format.
• DVD-Video (fast re-editable) when you
will be adding more video to the disc or for
the quickest, on-the-fly, recording to DVD
• DVD+VR only if you have a +VR compatible
playback device. This format allows flexible
on-disc editing.
For more information on DVD recording formats, see
"Selecting the DVD Format and Media Type" on page 6-1.
6. Click the OK button.
7. In the window that appears, configure the settings for video capture:
• Select Fixed duration as the capture mode, and set the duration of your
video.
• Click the Burner Settings icon to set DVD writer settings.
• Click the Create Menu icon to configure your DVD menu.
• Click the Create Chapter icon to configure your DVD chapters.
• Click a Format option to set the DVD capture quality (this affects how
much space is taken up). See "Capturing Video from a Video Source" on
page 2-1.
• Click the Capture Folder entry box to specify the folder to store your
captured video.
• Click the Advanced Settings icon for other technical capture settings. See
"Capturing Video from a Video Source" on page 2-1.

Capturing Video Using Direct to Disc 3-4
8. On your video source, find the capture start point.
9. Click the record button. Click the pause button to
pause the recording. Click the stop button to end
the recording, and burn your project to the DVD.
When the DVD burning is complete, a dialog box
appears.

Capturing Video Using Direct to Disc 3-5
10. Click Return to Start page option to save your video project and start a new
one. Click
Continue to burn another copy of your project, or to burn a new
DVD with different settings. Click
Close to save your project and close
MovieFactory.
Use Ulead DVD player to view your new DVD!

Creating a WMV file for Zen Portable Media Center 4-1
Creating a WMV file for Zen Portable Media Center
Use Ulead VideoStudio 8 Editor to create specially configured Windows Media
Video (WMV) files for your Creative Zen Portable Media Center. These files have
faster transfer times to your player than other types of digital video files. With
VideoStudio, you can apply a wide range of video edits and effects, as well as
optimize the video files for quick transfers to your Zen Portable Media Center.
Working with video files requires a large amount of hard disk space, depending on
how large your original video file is. Be sure to have sufficient free hard disk space
for your computer to create the new video file.
This section shows you how to create WMV files from an existing video file, and by
direct capture from a video source.
Starting
VideoStudio 8
1. Be sure that you have properly connected and turned on your video source
and Audigy 2 ZS Video Editor.
2. Launch Ulead VideoStudio 8.0 SE.
3. If a VideoStudio 8 dialog box appears, click the VideoStudio Editor option.
/