Page is loading ...

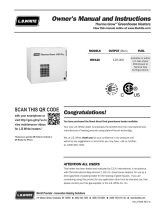
MMaaddee ttoo WWoorrkk.. BBuuiilltt ttoo LLaasstt..
SSMM
P.O. Box 2000 State Road 15 North
Milford, IN. 46542-2000 U.S.A.
219-658-4101 Fax 877-730-8825
www.ctbinc.com
Made in the U.S.A.
CHORE-TIME
FOR YOUR SAFETY
If you smell gas:
1. Open Windows
2. Don't touch electrical switches
3. Extinguish any open flame
4. Immediately call your gas supplier
FOR YOUR SAFETY
Do not store or use gasoline or other flammable
vapors and liquids in the vicinity of this or any other
appliance.
POUR VOTRE SURETE
Si vous sentez une odeur de gaz:
1. Ouverz les fenêtres
2. Ne touchez pas aux de commutateurs électriques
3. Eteindre n'importe quelle ouverture flambe
4. Immédiatement appeler votre fournisseur de gaz
POUR VOTRE SURETE
Pas l'essence de magasin ou usage ou les autres
vapeurs et les liquides inflammables à proximité de
cet ou l'autre appareil.
I n s t r u c t i o n M a n u a l
10900000
May 2004
®

(Pg. 2)
The installation of these appliances is to be in accordance with CAN/CGA-B149.1 and National Fuel Gas Code, ANSI
2223.1/NFPA 54 installation codes for gas burning appliances and equipment and/or local codes.
WARNING: Improper installation, adjustment, alteration, service or maintenance can cause property damage, injury
or death. Read the installation, operating and maintenance instructions thoroughly before installing or servicing this
equipment.
DANGER !
SICKNESS AND/OR DEATH MAY RESULT FROM USE OF THIS HEATER IN
AN UNVENTILATED BUILDING OR IN HUMAN LIVING AREAS.
Do not use the heater to heat human living areas.
The intended use of the heater is to provide warmth for poultry and hog buildings. Adequate ventilation must be provided.
The installation of the heater must comply with all applicable state, local, and/or national codes in accordance with
CAN/CGA - B149.1 or .2 installation codes.
Use only the type of gas being supplied to the unit as marked on it (Propane or Natural Gas). Do not operate with
improper fuel.
Ventilation air and combustion air must not be obstructed.
Do not operate the heater in the presence of combustible vapors, liquids, or gases. Failure to heed this warning could
result in an explosion and/or fire.
Test all pipe and pipe joints for leaks by a suitable means (Example: soap and water solution or a pressure check). Do
not operate the heater until this test has been preformed.
Do not move, handle, repair, or adjust height of the heater while in operation or when still hot.
Do not bypass any safety devices.
Before each use, a visual inspection of the heater is essential to insure safe and satisfactory heating. Replace or repair
defective components before operating heater. Failure to do so will void warranty and could result in injury or property
damage.

N
N
O
O
T
T
E
E
S
S

LIMITED WARRANTY:
CHORE-TIME INDUSTRIES, INC. WARRANTS THAT ITS PRODUCTS SHALL BE FREE FROM DEFECTS
IN MATERIAL AND IN WORKMANSHIP FOR A PERIOD OF ONE (1) YEAR, WHEN PROPERLY USED FOR
THEIR ORDINARY AND INTENDED PURPOSES AND WHEN PROPERLY MAINTAINED AND REPAIRED.
It is expressly agreed and understood that the Buyer's sole and exclusive remedy for any breach of this
Limited Warranty shall consist of the repair or replacement of any defective part or product when returned to
the Seller or to the Seller's authorized representative. It is further expressly agreed and understood that this
sole and exclusive remedy shall be in lieu of and shall preclude any other liability of the Seller to the Buyer for
any consequential or incidental damages sustained by the Buyer as a result of any defect in the products
including any loss of profits, loss of business opportunity, inconvenience, increased costs of operation, loss of
goodwill, property damage or any other economic or business loss. The forgoing provisions of this Limited
Warranty constitute the final and complete expression of the agreement between the Buyer and Seller
concerning express warranties of the product. Any other statements, representations, or promises made by
salesmen, dealers, brokers, distributors or others which purport to expand or extend the coverage or term of
this Limited Warranty in any particular whatsoever, are unauthorized and shall not be binding on the Seller
and shall not operate as warranties of the product. It is further understood that no salesman, dealer,
distributor, broker or other person is authorized to change, modify, alter, amend, delete, or supplement the
printed terms of this Limited Warranty in any manner or in any particular. No handwritten or typewritten
interlineation, modification, amendment, addendum, deletion, supplement change or alteration of the printed
terms of this Limited Warranty shall be effective or shall be binding upon the Seller. All prior discussions,
negotiations, statements, promises, agreements, understanding and representations concerning the character
and quality of the products are merged with and superseded by the terms of this Limited Warranty. The
printed term of the Limited Warranty contain the final and exclusive statement of the Buyer's and Seller's
intentions, understanding and agreement concerning the subject matter hereof.
DISCLAIMER AND EXCLUSION OF WARRANTIES - The foregoing LIMITED WARRANTY is given in lieu of
and in substitution for any and all other warranties of any kind or description whatsoever, specifically including
the implied warranty of the character or condition of the products. The SELLER disclaims and excludes any
implied warranty or merchantability or fitness for a particular purpose in connection with the products subject
to this transaction. The SELLER further disclaims any express warranties concerning the products other than
the foregoing "LIMITED WARRANTY". There are no warranties of any nature whatsoever which extend
beyond the express "LIMITED WARRANTY" set forth in the preceding paragraph.
Any exceptions to this warranty must be authorized in writing by an officer of the company. Chore-Time
Industries reserves the right to change models and specifications at any time without notice or obligation to
improve previous models.

(Pg. 3) 03000000 Space Heater manual
The installation of these appliances is to be in accordance
with CAN/CGA-B149.1 and National Fuel Gas Code, ANSI
2223.1/NFPA 54 installation codes for gas burning appliances
and equipment and/or local codes.
If you smell gas:
1. Open Windows
2. Don't touch electrical switches
3. Extinguish any open flame
4. Exit the building
5. Immediately call your gas supplier
Do not store or use gasoline or other flammable vapors and
liquids in the vicinity of this or any other appliance.
WARNING: Improper installation, adjustment, alteration,
service or maintenance can cause property damage, injury or
death. Read the installation, operating and maintenance
instructions thoroughly before installing or servicing this
equipment.
DANGER: Sickness and/or death due to asphyxiation
if this space heater is used in an unventilated building or
living area, such as a home, shop for human habitation, or
recreational vehicle.
Installation of this heater in a home, shop or recreational
vehicle may result in fire or explosion, property damage or
loss of life.
DANGER: Sickness and/or death may result from
use of this space heater in an unventilated building.
WARNING:
Proper gas supply pressure must be provided to the inlet of
the appliance. Refer to the rating plate for proper gas supply
pressure. Gas pressure in excess of the maximum inlet
pressure specified at the appliance inlet can cause fires or
explosions, leading to serious injury, death, building damage,
or loss of livestock.
WARNING: Use only the type of gas being supplied to
the unit as marked on unit (Natural or LP). Do not operate
with improper fuel.
SPACE
HEATER
MANUAL
WARNING: Do not expose unit to rain, or
electrical shock hazard may result. This space heater
is designed for indoor use only.
WARNING: This heater must not be washed. Use
of a pressure washer, water or liquid cleaning solution
on this heater can cause severe personal injury or
property damage due to waster and/or cleaning
solution:
A. In electrical components, connections and wires
causing shock or component failure.
B. On gas control components causing corrosion
which can result in gas leaks and fire or explosion
from the leak. Heater must be cleaned without being
subjected to liquid spray or excessive wetting.
WARNING:
Adequate ventilation must be provided. Ventilation air
and combustion air must not be obstructed. Do not
place this space heater in close proximity of intake
and/or discharge ductwork. This could cause
equipment to produce an excessive amount of
combustion, by-products and/or cause overheating
conditions or malfunction.
WARNING:
This space heater is equipped with a three-prong
grounded plug. For your safety against shock, this
should only be used in a properly grounded three-
prong receptacle outlet. The use of the extension
cords to supply power to the Space Heater is not
recommended.
WARNING: Test all pipe and pipe joints for
leaks by a suitable means (Example: soap and water
solution or a pressure check). Do not attempt to
operate this space heater until this test has been
performed.
WARNING:
Do not repair, handle, move, or adjust height of the
space heater while in operation or when still hot.
WARNING: Do not bypass any safety devices.
Replace or repair defective component before
operating the space heater. Failure to do so will void
warranty and could result in injury or property damage.

(Pg. 4)
SPECIFICA
TIONS
LP NAT
Input BTU/hr 225,000 200,000
Inlet Pressure 11" w.c. 7" w.c.
Burner Manifold Pressure 9" w.c. 3" w.c.
Electrical v/hz/a 110 V 60 HZ
230/50/5.5
230/60/5.5
Motor Thermal protected 1/3 H.P.
Heated air output 850 C.F.M.
Unit Switch On-Off Toggle
High temp safety Manual reset limit switch
Air flow safety Wind vane sail switch
Gas flow safety Automatic gas shut off control
with flame sensing rod
Power cord 6' wire power cord with molded plug
Thermostat Control Remote thermostat or computer
control system*
Dimensions (L x W x H) 24
3/4” x 19 1/4” x 29 1/4”
Net weight 116 lbs. w/kit 52.73 KG
108 lbs. w/o kit 49.09 KG
Shipping weight 123 lbs. w/kit 55.35 KG
115 lbs. w/o kit 51.75 KG
Clearances 20” from sides, back, top, bottom, to any roof, floor, or
side walls of building. Allow a minimum of 10 feet to
discharge air outlet.
* Not included in Standard Unit
Note - Refer to price sheet for standard features, accessories, and options.

(Pg. 5)
9. Make the last connection of the flexible hose to the
supply pipe and turn on the gas supply. Use a good
grade of pipe dope compound on all gas pipe
connections.
10. Check for gas leaks ( use a
50/50 soap and water solution
or a pressure check). This is
very important. DO NOT
operate the Space Heater if
there are any gas leaks.
11. Assemble air deflector with
the flaps pointing vertically
and place it on the air
discharge opening with
screw supplied.
12. When connecting the
Space Heater directly to
thermostat or a whole house system, check the wiring
diagram of that type of controller for proper wiring to
insure safe operation of the Space Heater, if any
difficulty arises, call your dealer. Turn the thermostat dial
to a temperature lower that the temperature of the
building.
13. Plug in the three-prong power cord to a correctly
grounded three-prong electrical outlet. DO NOT use any
electrical extension cords to supply power.
1. Read all safety precautions in this owner's manual.
2. Do not allow the Space Heater to come closer than 20
inches from sides, back, top, bottom, to any roof, floor,
or side walls of building. Allow a minimum of 10 feet to
discharge air outlet.
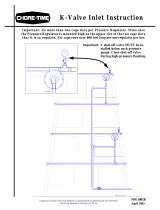
3. If the Space Heater is suspended by chains in a fixed
position, be sure the chains are rated for the weight of
the Space Heater.
4. If height adjustment is desired, the Space Heater can be
mounted on a cable suspension system operated by a
winch. Attach the properly weight-rated cable to the four
S Hooks at the top of the Space Heater. Be sure to
install a safety device to keep the Space Heater from
being accidentally lowered too close to the floor. Also, be
sure to add a stop in the winching system to protect the
unit from being winched up too high; therefore, being too
close to the ceiling of the building.
5. The Space Heater should be level and not to exceed a 5
degree incline.
6. Install a gas pipe trap to the gas pipe inlet on the
Space Heater.
7. We recommend that high-pressure lines and regulators
be outside of house.
8a. For: LP Gas pressure requirements, if the supply
pressure to the Space Heater is greater than 11" w.c., a
secondary regulator will need to be installed.
Caution: Do not exceed maximum rated pressure to the
secondary regulator. Note:
the pressure on the outlet of
the gas valve should be 9" w.c.
8b. For: Natural Gas pressure requirements, if the supply
pressure to the Space Heater is greater than 7" w.c., a
secondary regulator will need to be installed.
Caution: Do not exceed maximum rated pressure to the
secondary regulator. Note
: the pressure on the outlet of
the gas valve should be 3" w.c.
10
Leak Test:
Soap and
water method
shown.
11

(Pg. 6)
SPACE HEATER
GAS PIPING AND MINIMUM CLEARANCES

(Pg. 7)
OPERATING INSTRUCTIONS
1. Read all instructions in this owner's manual before
operating the Space Heater.
2. Recheck the type of gas being supplied to the unit.
Make sure it is the same gas for which the Space
Heater and orifice is adjusted.
3. Double check for any gas leaks ( see Safety
Precautions). This is very important. Do not operate this
heater until there are no gas leaks.
4. Turn on all gas valves to the Space Heater.
5. Open the end door and turn the knob labeled PILOT
VALVE clockwise until it stops. Push the red button
down and hold. Light the pilot through the hole in the
pilot shield. Continue holding the button down for
approximately 30 seconds after the pilot lights. Release
the knob and make sure the pilot remains lit. Note
:
The pilot may be hard to light on initial start up or after
service because of air in the lines.
6. Turn the system switch to the ON position. This is
located on the outside of the heater near where the
power cord enters the case.
7. After flame is established, allow unit to run for a couple
of minutes. Then make the Space Heater go through
several "start-ups and shut downs" to check the
operation of the unit.
8. Set the thermostat or system control to desired house
temperature.
Note: When the Space Heater has not been used for an
extended length of time due to off season or between flocks,
follow the maintenance instructions before restarting the
heater. Then follow regular operation instructions.
SHUT DOWN INSTRUCTIONS
1. Turn systems switch to the off position.
2. Turn the knob on the gas valve inside the unit to the
"off" position.
3. Turn off the gas valve between gas hose and supply
pipe.
4. Turn off the gas supply valve at supply source.
5. Unplug the power cord.
The instructions and information on pages 7 thru 11 are
for the Pilot controlled Space Heater.
If your Space Heater has the Direct Spark Ignitor or Hot
Surface Igniter continue on to page 12.

(Pg. 8)
TROUBLE SHOOTING GUIDE
Possible Cause Corrective Action
Problem 1) a. No power to heater a. Check electric supply
Blower Will Not Run b. System switch to "off" b. Turn switch to "on"
c. Defective motor c. Replace the motor
d. Bad capacitor d. Replace capacitor
Problem 2) a. Bad wind switch a. Replace switch
Wind Switch Does Not Close b. Low air flow b. Clean blower and refer to problem #1
c. Obstruction or bent sail arm c. Remove obstruction or straighten arm
d. Loose or broken wire d. Repair or replace wire
Problem 3) a. Manifold pressure to high a. Check pressure and adjust as required
High Limit Switch Open b. Blower wheel loose or damaged b. Tighten or replace wheel
c. Blower wheel dirty c. Clean blower wheel
d. Motor turns too slow d. Replace motor or refer to Problem #1 or 2
e. Wrong burner orifice e. Replace orifice with correct one
f. Wrong type of gas f. Check the gas type
g. Blockage on inlet or outlet g. Clean and remove blockage
h. Defective limit switch h. Replace switch
Problem 4) a. Air in gas lines a. Purge the gas lines
Pilot will not light b. No gas to the unit b. Check the gas supply
Problem 5) a. Defective thermocouple a. Replace thermocouple
Pilot lights but goes out when knob is
released
Problem 6) a. Leak in the pilot assembly. a. Tighten or replace pilot assembly
Burner lights will not stay lit b. Blockage around base of burner b. Clean out carbon or debris from burner
c. Incorrect manifold pressure c. Check pressure and adjust as required
d. Shield damaged or removed d. Replace pilot shield
Problem 7) a. Air in gas line a. Purge gas line
Burner does not light b. No gas b. Refill LP tank or check natural gas supply
c. Thermostat not calling for heat c. Replace or Adjust thermostat
d. Tripped limit switch d. Reset or replace limit switch
e. Defective gas valve e. Replace gas valve
f. Wind switch is defective or f. See problem #2
improperly functioning
Problem 8) a. Gas supply pipe to small a. Replace with larger pipe
Unit won't heat b. Blockage in gas pipe b. Clean out trap and check gas lines
c. Burner does not light c. Refer to problem #5
d. Wind switch open d. Refer to problem #2
e. High limit open e. Refer to problem #3
f. Defective gas valve f. Replace the valve
Problem 9) a. Defective gas valve a. Replace the valve
Main Burner does not shut off b. Gas pressure too high b. Check gas manifold pressure
c. Defective thermostat c. Replace the thermostat

(Pg. 9)
PILOT SPACE HEATER
WIRING DIAGRAM
240 VOLTS / 50 HRZ

(Pg. 10)
PILOT SPACE HEATER
Exploded Parts

ILLUSTRATION PART DESCRIPTION REQUIRED
NUMBER NUMBER NUMBER
1 23006000 DOOR RIGHT/LEFT F/SPACE 2
2 33024958 TURBO COMBUSTION CHAMBE 1
3 23005000 CABINET TOP/BACK F/SPAC 1
4 33014925 TURBO 2 FAN SWITCH/BRKT 1
5 23105010 CABINET BTM/FRONT F/ SP 1
6 33002900 EXHAUST AIR KIT 1
7 13004938 SWITCH 2450 THERMO 1
8 33007088 TURBO 2000 FAN HOUSING 1
9 13005233 FAN SQUIRREL CAGE 1
10 23305030 MNT PLATE F/SPACE HTR 1
11 11000067 MOTOR 1/3 HP 110-230V/ 1
- 13000067 MOTOR TURBO FAN 230V/5 -
12 13008075 LATCH DOOR 93-225 2
13 22000005 SPACER 1/8 X 1 1/4 2
14 13005210 BURNER CAST IRON 1
15 11006188 PILOT ASM 2 CHL-10 LP 1
- 21006170 PILOT ASM 2CHL PILO NAT -
16 16000064 SCREW #12 X 2 1/2 HEX T 2
17 13005235 SCREW 8 X 1/2 TEK 2
18 23127088 PILOT SHIELD CE 1
19 21200326 TUBE ALUM 1/4 X 15 1
20 13005270 BOLT 3/8 - 16 X 3/4 1
21 13005224 ORIFICE .188" LP 1
13006224 ORIFICE .330" NAT 1
22 13007072 PIPE NPL 1/4 X 4 3/4 B 1
23 13002747 BSHG 1/2 X 1/4 HEX BLK 1
24 13008095 VALVE GAS TURBO-2 SP 1
25 11004900 HOOK S LARGE 4
26 13005283 SWITCH TOGGLE DOUBLE 1
27 16-61225 CORD: SJT W/PLUG-FG 18 1
28 33007002 TURBO CONTROL BOX 1
(Pg. 11)
PILOT SPACE HEATER

(Pg. 12)
OPERATING INSTRUCTIONS
1. Read all instructions in this owner's manual before
operating the Space Heater.
2. Recheck the gas being supplied to the unit. Make sure it
is the same for which the Space Heater is adjusted.
3. Double check for any gas leaks (see Safety
Precautions). This is very important. Do not operate this
heater until there are no gas leaks.
4. Turn on all gas valves to the Space Heater.
5. Turn the system switch to the ON position. This is
located on the outside of the cabinet near where the
power cord enters the case.
6. Adjust the remote thermostat or the system controls to a
temperature higher than in the house.
7. On initial start up or when the Space Heater has not
been in use for awhile, the unit may cycle several times
to purge the lines of air.
8. After flame is established, allow unit to run for a couple
of minutes. Then make the Space Heater go through
several "start-ups and shut downs" to check the flame
sensors and hot surface igniters for proper setting.
9. Set the thermostat or system control to desired house
temperature.
NOTE: When the Space Heater has not been used for an
extended length of time due to off season or between flocks,
follow the maintenance instructions before restarting the
heater. Then follow regular operation instructions.
SHUT DOWN INSTRUCTIONS
1. Turn thermostat or system control to the lowest
temperature setting.
2. Turn systems switch to the "off" position.
3. Turn off the gas supply valve at supply source.
4. Turn off the gas valve between gas hose and supply
pipe.
5. Unplug the power cord.
The instructions and information on pages 12 thru 17
are for the Direct Spark Ignitor and Hot Surface Igniter
Space Heaters.
If your Space Heater has the Pilot Igniter return to
page 7.

(Pg. 13)
TROUBLE SHOOTING GUIDE
The LED light located in the module cover can help isolate where a problem might be located.
THE LED LIGHT WILL FLASH FROM 1 TO 4 TIMES AFTER THE MODULE LOCKS OUT DUE TO FAULTY OPERATION.
1. LED blinks, fan runs, heater lights Normal operation
IF THERE IS A PROBLEM THE:
2. LED does not blink when the unit No voltage to heater from thermostat
is turned on, fan does not run, 24 volts not supplied from transformer to thermostat
heater does not light
3. LED flashing:
1 time Sail switch is stuck, closed, or shorted out
2 times Sail switch flapper stuck to base of blower housing with debris
Sail switch doesn't close or is defective
Fan wheel binding or dirty
Bad motor, capacitor or wiring
High limit switch tripped or defective
3 times No fuel
Broken or disconnected igniter
Defective improperly positioned, dirty, or disconnected flame sensor
Bad valve or wires connected to valve
4 times Bad HSI board
Possible Cause Corrective Action
Problem 1) --------------------------------------------- a. No power to heater --------------------------------- a. Check electric supply
Blower Will Not Run b. System switch to "off" b. Turn switch to "on"
c. Defective motor c. Replace the motor
d. Bad capacitor d. Replace capacitor
Problem 2)---------------------------------------------- a. Bad sail switch---------------------------------------- a. Replace sail switch
Sail Switch Does Not Close b. Low air flow b. Clean blower and refer to problem #1
c. Obstruction or bent sail arm c. Remove obstruction or
straighten arm
d. Loose or broken wire d. Repair or replace wire
Problem 3) --------------------------------------------- a. Manifold pressure to high-------------------------- a. Check pressure and adjust as required
High Limit Switch Open b. Blower wheel loose or damaged b. Tighten or replace blower wheel
(Reset limit switch after c. Blower wheel dirty c. Clean blower wheel
Problem corrected) d. Motor turns too slow d. Replace motor or refer to Problem #1 or 2
e. Wrong burner orifice e. Replace orifice with correct one
f. Wrong type of gas f. Check the gas
g. Blockage on inlet or outlet g. Clean and remove blockage
h. Defective limit switch h. Replace limit switch
Problem 4) --------------------------------------------- a. Flame sensor not completely in------------------ a. Adjust flame sensor into flame
Burner lights will not flame
stay lit b. Defective flame sensor b. Replace
c. Flame sensor circuit not complete c. Check for loose connection and repair
d. Blockage around base of burner d. Clean out carbon or debris
e. Manifold pressure to low or to high e. Check pressure and adjust as required
Problem 5) --------------------------------------------- a. Igniter broken------------------------------------------ a. Replace igniter
Burner does not light b. Igniter not in adjustment b. Re-adjust the igniter
c. Igniter not making complete circuit c. Check wiring and connections
d. Air in gas line d. Purge gas line
e. No gas e. Refill LP tank or check natural gas supply
Problem 6)----------------------------------------------- a. Gas supply pipe to small -------------------------- a. Replace with larger pipe
Unit won't heat b. Blockage in gas pipe b. Clean out trap and check gas lines
Problem 7)---------------------------------------------- a. Defective gas valve---------------------------------- a. Replace the valve
Main Burner does not shut off b. Gas pressure too high b. Check gas manifold pressure
c. Defective thermostat c . Replace the thermostat

(Pg. 14)
SPACE HEATER
DSI WIRING DIAGRAM

(Pg. 15)
SPACE HEATER
HSI WIRING DIAGRAM

(Pg. 16)
HSI / DSI SPACE HEATER
EXPLODED VIEW

(Pg. 17)
ILLUSTRATION PART DESCRIPTION REQUIRED
NUMBER NUMBER NUMBER
1 23006000 DOOR RIGHT/LEFT F/SPACE 2
2 33024958 TURBO COMBUSTION CHAMBE 1
3 23005000 CABINET TOP/BACK F/SPAC 1
4 33014925 TURBO 2 FAN SWITCH/BRKT 1
5 23105010 CABINET BTM/FRONT F/ SP 1
6 33002900 EXHAUST AIR KIT 1
7 13004938 SWITCH 2450 THERMO 1
8 33007088 TURBO 2000 FAN HOUSING 1
9 13005233 FAN SQUIRREL CAGE 1
10 23305030 MNT PLATE F/SPACE HTR 1
11 11000067 MOTOR 1/3 HP 110-230V/ 1
13000067 MOTOR TURBO FAN 230V/5 -
12 13008075 LATCH DOOR 93-225 2
13 22000005 SPACER 1/8 X 1 1/4 1
14 13005210 BURNER CAST IRON 1
15 13008086 IGNITOR GLO COIL 220 V 1
16 16000064 SCREW #12 X 2 1/2 HEX T 2
17 13005235 SCREW 8 X 1/2 TEK 2
18 23004043 COVER HOT SURFACE IGNI 1
19 23014958 BRKT IGNITER TURBO-2 1
20 13005270 BOLT 3/8 - 16 X 3/4 1
21 13005224 ORIFICE .188" LP 1
- 13006224 ORIFICE .330" NAT -
22 13007072 PIPE NPL 1/4 X 4 3/4 B 1
23 13002747 BSHG 1/2 X 1/4 HEX BLK 1
24 13006223 VALVE WR 36E LP 9" 1
25 11004900 HOOK S LARGE 4
26 13005283 SWITCH TOGGLE DOUBLE 1
27 16-61225 CORD: SJT W/PLUG-FG 18 1
28 23007000 CONTROL BOX F/ SPACE H 1
29 13008094 MODULE IGNITION HSI 240 VOLT 1
13008074 MODULE IGNITION HSI 120 VOLT 1
- 16-101141 BOARD: CTRL IGN DSI SH -
30 13004931 TRANSFORMER 40VA 240/2 HSI 1
- 13004932 TRANSFORMER 40VA 120/2 DSI -
31 16-101293 IGNITOR: DSI 1
32 13014929 FLAME SENSOR / .187 MA 1
33007003 TURBO CTRL BOX COMP HSI 1
33007001 TURBO CONTROL BOX COMP DSI 1
HSI / DSI SPACE HEATER

(Pg. 18)
MAINTENANCE INSTRUCTIONS
1. Turn off gas supply and disconnect electrical supply
from unit before any type of work or cleaning is done.
2. Do not use any cleaning solvents and/or liquids of any
type to clean the Space Heater. Use only compressed
air to clean the Space Heater.
3. Pay close attention to the dirt and dust build up on the
concave side of blades on the blower wheel. This is
very important. A dirty wheel will reduce the air flow
output and could cause the wheel to become out of
balance thus causing premature failure.
4. Clean out control box with compressed air between
flock and annually. Dust-build up could cause electrical
shorts, reduce wiring life, and require higher
maintenance.
5. Check all electrical wiring and cords for loose
connections or frayed wires. Tighten, repair, or replace
any damaged parts.
6. Check all gas hoses and piping frequently. Be sure the
hose is not cut, weathered, cracked or worn. Inspect all
gas piping and check for leaks (see Safety
Precautions). This is very important as gas leaks
should be watched for and corrected. Also, clean out
the pipe trap of water, line scale, and/or rust.
7. Keep the main burner orifice clean and free from
carbon build-up, dust, and debris. Also, inspect around
the air inlet of the burner and keep clean. This will help
the Space Heater run more efficiently
8. Check the wind sail switch for proper operation. Pay
close attention to the travel of the sail switch arm and
make sure it is not restricted. Occasionally, clean dust
build up off of sail part of wind switch. This is
necessary.
9. Check the chains or cable holding the unit for safety.
10. If the remote thermostat is used, be sure to keep the
coil clean.
11. Turn on the Space Heater and allow it to cycle several
times at the beginning of each heating season or
between flocks of birds to insure the Space Heater is
running properly.
12. An annual inspection by a qualified service person is
recommended.
/