Page is loading ...

MMaaddee ttoo WWoorrkk.. BBuuiilltt ttoo LLaasstt..
SSMM
P.O. Box 2000 State Road 15 North
Milford, IN. 46542-2000 U.S.A.
219-658-4101 Fax 877-730-8825
www.ctbinc.com
Made in the U.S.A.
CHORE-TIME
FOR YOUR SAFETY
If you smell gas:
1. Open Windows
2. Don't touch electrical switches
3. Extinguish any open flame
4. Immediately call your gas supplier
FOR YOUR SAFETY
Do not store or use gasoline or other flammable
vapors and liquids in the vicinity of this or any other
appliance.
POUR VOTRE SURETE
Si vous sentez une odeur de gaz:
1. Ouverz les fenêtres
2. Ne touchez pas aux de commutateurs électriques
3. Eteindre n'importe quelle ouverture flambe
4. Immédiatement appeler votre fournisseur de gaz
POUR VOTRE SURETE
Pas l'essence de magasin ou usage ou les autres
vapeurs et les liquides inflammables à proximité de
cet ou l'autre appareil.
I n s t r u c t i o n M a n u a l
10900000
May 2004
®

(Pg. 2)
The installation of these appliances is to be in accordance with CAN/CGA-B149.1 and National Fuel Gas Code, ANSI
2223.1/NFPA 54 installation codes for gas burning appliances and equipment and/or local codes.
WARNING: Improper installation, adjustment, alteration, service or maintenance can cause property damage, injury
or death. Read the installation, operating and maintenance instructions thoroughly before installing or servicing this
equipment.
DANGER !
SICKNESS AND/OR DEATH MAY RESULT FROM USE OF THIS HEATER IN
AN UNVENTILATED BUILDING OR IN HUMAN LIVING AREAS.
Do not use the heater to heat human living areas.
The intended use of the heater is to provide warmth for poultry and hog buildings. Adequate ventilation must be provided.
The installation of the heater must comply with all applicable state, local, and/or national codes in accordance with
CAN/CGA - B149.1 or .2 installation codes.
Use only the type of gas being supplied to the unit as marked on it (Propane or Natural Gas). Do not operate with
improper fuel.
Ventilation air and combustion air must not be obstructed.
Do not operate the heater in the presence of combustible vapors, liquids, or gases. Failure to heed this warning could
result in an explosion and/or fire.
Test all pipe and pipe joints for leaks by a suitable means (Example: soap and water solution or a pressure check). Do
not operate the heater until this test has been preformed.
Do not move, handle, repair, or adjust height of the heater while in operation or when still hot.
Do not bypass any safety devices.
Before each use, a visual inspection of the heater is essential to insure safe and satisfactory heating. Replace or repair
defective components before operating heater. Failure to do so will void warranty and could result in injury or property
damage.

N
N
O
O
T
T
E
E
S
S

LIMITED WARRANTY:
CHORE-TIME INDUSTRIES, INC. WARRANTS THAT ITS PRODUCTS SHALL BE FREE FROM DEFECTS
IN MATERIAL AND IN WORKMANSHIP FOR A PERIOD OF ONE (1) YEAR, WHEN PROPERLY USED FOR
THEIR ORDINARY AND INTENDED PURPOSES AND WHEN PROPERLY MAINTAINED AND REPAIRED.
It is expressly agreed and understood that the Buyer's sole and exclusive remedy for any breach of this
Limited Warranty shall consist of the repair or replacement of any defective part or product when returned to
the Seller or to the Seller's authorized representative. It is further expressly agreed and understood that this
sole and exclusive remedy shall be in lieu of and shall preclude any other liability of the Seller to the Buyer for
any consequential or incidental damages sustained by the Buyer as a result of any defect in the products
including any loss of profits, loss of business opportunity, inconvenience, increased costs of operation, loss of
goodwill, property damage or any other economic or business loss. The forgoing provisions of this Limited
Warranty constitute the final and complete expression of the agreement between the Buyer and Seller
concerning express warranties of the product. Any other statements, representations, or promises made by
salesmen, dealers, brokers, distributors or others which purport to expand or extend the coverage or term of
this Limited Warranty in any particular whatsoever, are unauthorized and shall not be binding on the Seller
and shall not operate as warranties of the product. It is further understood that no salesman, dealer,
distributor, broker or other person is authorized to change, modify, alter, amend, delete, or supplement the
printed terms of this Limited Warranty in any manner or in any particular. No handwritten or typewritten
interlineation, modification, amendment, addendum, deletion, supplement change or alteration of the printed
terms of this Limited Warranty shall be effective or shall be binding upon the Seller. All prior discussions,
negotiations, statements, promises, agreements, understanding and representations concerning the character
and quality of the products are merged with and superseded by the terms of this Limited Warranty. The
printed term of the Limited Warranty contain the final and exclusive statement of the Buyer's and Seller's
intentions, understanding and agreement concerning the subject matter hereof.
DISCLAIMER AND EXCLUSION OF WARRANTIES - The foregoing LIMITED WARRANTY is given in lieu of
and in substitution for any and all other warranties of any kind or description whatsoever, specifically including
the implied warranty of the character or condition of the products. The SELLER disclaims and excludes any
implied warranty or merchantability or fitness for a particular purpose in connection with the products subject
to this transaction. The SELLER further disclaims any express warranties concerning the products other than
the foregoing "LIMITED WARRANTY". There are no warranties of any nature whatsoever which extend
beyond the express "LIMITED WARRANTY" set forth in the preceding paragraph.
Any exceptions to this warranty must be authorized in writing by an officer of the company. Chore-Time
Industries reserves the right to change models and specifications at any time without notice or obligation to
improve previous models.

Pg. 3
05000000
NOTE: The installation of these appliances is to be in accordance with
CAN/CGA - B49.1 and B149.2 Installation Codes for gas burning
appliances and equipment and/or local code.
1. Remove all parts from the box - save empty box for use
in assembly.
2. Turn the BURNER
ASSEMBLY(10) and the
EMITTER ASSEMBLY (9)
UPSIDE DOWN. Insert
the stud on top of the
BURNER (10) through the
BURNER SPACER (11)
and the small end of the
emitter cone. Place the
large WASHER (7) onto
the stud inside the emitter
cone and finger tighten
SS NUT (6). Align one of
the emitter legs with the
two holes in the burner
pan. Firmly tighten SS
nut inside Emitter.
3. Set the CANOPY (1)
UPSIDE DOWN on the
box. Place the CONE
INSULATION (8) with the
large end down in the
center of the canopy. Set
the EMITTER over the
CONE INSULATION,
inserting the leg that is
aligned with the holes in
the burner pan through
the slot aligned with the hole in the outer edge of the
canopy.
4. Attach the CONTROL VALVE
ASSEMBLY (4) on the edge of
the CANOPY (canopy top), the
gas outlet on the valve should
be in the "up" position (gas
valve down), and secure with
two SCREWS (3) and STAR
NUTS (5).
5. Attach the 1/4" TUBING (14) to the GAS CONTROL
VALVE. Tighten firmly, making sure that the studs on the
air intake/ orifice bracket align with the holes in the
burner pan- USE TWO WRENCHES TO PREVENT
TWISTING OR DAMAGING THE TUBING. Insert the
two studs on the AIR INTAKE/ORIFICE BRACKET
through the holes in the BURNER PAN. Use two
WASHERS (18) and WING NUTS (16) to secure bracket
to pan.
6. Attach the THERMOCOUPLE (17) to the GAS
CONTROL
VALVE
(Caution:
Finger tighten
plus quarter
turn!) Form the
thermocouple
along the
tubing.
NOTE:
Check all Screws & Fittings to make sure they
are tight per instructions.
2
3
4
5
6
HIGH PRESSURE ASSEMBLY INSTRUCTIONS

Pg. 4
GENERAL INFORMATION
The heater must be located so there is a minimum
clearance of 14" above the heater and 36" from the side.
Any combustible material must not be adjacent to the
heater.
The heater should be hung with a min. of 26" from
bottom of the heater to the floor.
Be sure to comply with all local, state, and federal gas
codes for your area.
12
28
7. "T-Hanger" assembly instructions:
A. Insert slot in the middle of BACK T-HANGER (2B) into
the slot in the end of the FRONT T-HANGER (2F) (Note:
adjustment holes at top)
B. Insert hook on front T-hanger through top leg of
EMITTER which is aligned with the four holes the
CANOPY. Insert the hook on the right end of the back T-
HANGER through right top leg of the EMITTER.
C. Assemble and tighten BOLT (31), NUT (32), and
WASHER (33) as shown with back T-hanger on outside
of Emitter legs.
12. Suspend the brooder: To level the heater, simply support
the heater underneath and then move the S-HOOK (28)
forward or backward. After it is level clamp both ends of
the s-hook shut. The brooder should hang with the
control assembly tilted slightly downward. Normally the
brooder is attached to a winch cable used for raising and
lowering. In addition, we strongly recommend that a
safety cable or chain be attached to the brooder to
prevent the brooder from falling to the litter if the
winching cable should happen to break.

Pg. 5
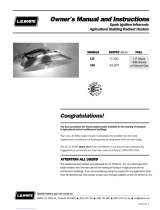
A - 11005195 Hose Barb 3/8 x 1/8 FP
B - 21190493 Valve Bracket
C - 11005245 Valve S.I.T. SSO Assem.
D - 11005193 Thermocouple
E - 21300326 1/4” x 20” Tubing
LP Air Intake Bracket
Air Inlet is larger
.5299”
Natural Gas Air Intake
Bracket
Air Inlet is smaller
.250”

Pg. 6
1 21002008 Canopy 24 Hp17 Galv Compl 1
2B 21004002 HANGER-T BACK LEG 1
2F 21014002 HANGER-T FRONT LEG 1
3 18003945 Screw 10-24 X 3/8 2
4 31005245 VALVE ASM HP17 SSO 1
5 18000021 Nut 10-24 Star Kep 2
6 11000064 Nut 3/8-16 Stainless 1
7 11000151 Washer Flat 2" 2
8 11000075 Sierra Infrd 21,22 Cone Insul 1
9 31001028 Sierra Infrd 21,22 Emitter Asm 1
10 31001123 Infra Red Welded Burner H21 1
11 21077088 Burner Spacer H-21 1
12 11000203 Orifice No 73 (Clean) 1
13 21000624 Elbow Brass 1/4Mct X 1/8Mpt 1
14 21300326 Tubing Hp17 1/4 x 20" 1
15 31004904 Air/Intk Brkt LP Hp17 1
31004905 Air Intake Brkt NAT 1
16 13005190 Nut 10-24 Wing 2
17 11005193 Thermocouple 600MM (24") 1
18 13005189 Washer (Fender) 3/16"X1" 2
19 21004507 Bracket HP17 TCOUPLE & SHLD 1
27 11004900 Hook S Large 1
29 11000028 1/4-20 BOLT 1
30 11000187 1/4-20 NUT 1
31 11000338 1/4-20 WASHER 1
HIGH PRESSURE BROODER P
HIGH PRESSURE BROODER P
ARTS LIST
ARTS LIST

Pg. 7
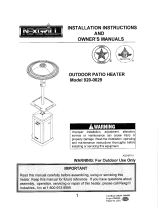
MANIFOLD OPERATION
A. Install the manifold by connecting the gas supply from the LP tank to the ½"
pipe tee located next to the Red regulator.
B. Connect the piping to the heaters to the ½" pipe tee closest to the gauge.
Check all connections for leaks.
T
O ADJUST
THE MANIFOLD
The supply pressure to the manifold should be between 5 psi and 10 psi
a. Light all the heaters. Turn on the bottom solenoid, this is the Maximum rate
solenoid. Set the pressure on the manifold gauge so that the pressure is 5 psi.
Turn off the bottom solenoid.
b. Turn off the Maximum rate solenoid and turn on the 2nd solenoid up from the
bottom of the manifold, this is the Med-Hi solenoid. The pressure should be
set so that it is 3.5 psi.
c. Turn off the Med-HI rate solenoid and turn on the 3rd solenoid up from the
bottom of the manifold, this is the Med-Lo solenoid. The pressure should be
set so that it is 2 psi.
d. Turn off the Med-Lo solenoid. Gas will be going through the top section of
the manifold. This is the minimum rate burn. Adjust the manifolds gauge
pressure so that it is .5 psi (13" water column)
T
O SET UP THERMOSTAT/CONTROLLER
Set the set point on each thermostat progressively lower from Med-Lo to Hi. There should be about .5
to 1 degree difference in the set point of each solenoid.
Example:
Med-Lo Set Point 85
Med-Hi Set Point 84
Hi set point 83

Pg. 8
LIGHTING INSTRUCTIONS
1. Turn on main gas supply to supply pipe.
2. Turn on High Solenoid Valve.
3. Depress and hold blue button and light the Burner. Allow to burn "45" seconds before releasing.
4. Adjust thermostat to proper setting.
SHUT DOWN INSTRUCTIONS
1. Turn off gas supply.
2. Turn off power to manifold.

Pg. 9
MAINTENANCE
Proper care and maintenance of your HIGH PRESSURE Radiant Heater cannot be over emphasized!!
A POORLY MAINTAINED HEATER WILL:
Raise Operating Costs - due to poor combustion
Lower Air Quality
Cause Inconsistent Temperatures
Decrease the Life of the Heater
MAINTENANCE PROGRAM:
Daily: Check flames, they should be burning clear and blue; if not, clean as required or and/or
check gas pressure.
Clean heater after each flock:
Inspect for any orifice blockage caused by spider webs in the burner assemblies.
DANGER! Never spray penetrating oil (WD-40) on the control valve. This will cause the loss of
high temperature valve grease and cause the valve to leak.
Clean dust and dirt from burner ports with compressed air by removing the wing nuts and
washer from the top of the burner pan and lowering the air intake assembly. If an air compressor
is not available, turn the heater to a vertical position and tap on the side of the burner brackets
with a screwdriver handle, pliers, or any other suitable object, to knock the dust from the unit.
If houses are washed down, care should be taken to prevent moisture from accumulating on
control valve and burner assemblies. After wash downs we recommend that you light the
heaters to dry up any excess moisture.
For proper combustion it is important that the small holes in the Emitter be clean and
unobstructed. The Emitter can be cleaned by inserting a long brass bristle brush between the
emitter screen and inner cone.
Clean air intakes with a small brush
Extreme care must be taken not to enlarge or distort the burner orifice.
Special burner orifice cleaning kits, which includes the correct size orifice cleaning
gauges and brushes, are available for purchase at your dealer.
If heater is disconnected from the gas line, use tape to seal the open connections. This will keep
moisture, dust, and insects out and prevent future problems.

Pg. 10
N
N
O
O
T
T
E
E
S
S
/