Aiphone NI-SOFT User manual

Type
User manual

This manual is also suitable for

Thank you for selecting Aiphone for your communication needs. Please read this manual carefully before using this product.
Please make sure to read this manual for safe and correct use of the product, and keep it in a safe place for future reference.
*
Please note that images and illustrations depicted in this manual may differ from the actual product.
NI-SOFT
OPERATION MANUAL
GETTING STARTED USING THE NI-SOFT APPENDIX
2
Contents
Introduction ................................................................... 3
Notices ........................................................................... 3
Unpacking ..................................................................... 3
Connections .................................................................. 3
GETTING STARTED ................................................................... 4
Installing the NI-SOFT .................................................. 4
System requirements for PC ...............................................4
Installing ...............................................................................5
Starting up the NI-SOFT ......................................................7
Exiting the NI-SOFT .............................................................8
Con guring the initial setup of the NI-SOFT .............. 9
USING THE NI-SOFT ................................................................ 10
Displaying the call history by specifying search
criteria .......................................................................... 10
Displaying the call history ...............................................10
Displaying the call history list
in graph form
......................................................................13
Con guring the sub station settings ........................ 14
APPENDIX ................................................................................. 15
Troubleshooting .......................................................... 15
3
Introduction
This product is application software that can be used by installing it on a PC connected with the master station. With this software, you
can check the history of calls/answers in a table or graph format.
Notices
Depending on the computer, it may not be useable.
We will under no conditions be liable for any damages or
losses resulting from this product's contents or speci cations.
This manual was created by Aiphone Co., Ltd., all rights
reserved. Copying a part of or this entire manual without prior
permission from Aiphone Co., Ltd. is strictly forbidden.
Please note that this manual may be revised or changed
without prior notice.
Please note that product speci cations may be changed for
the sake of improvement without prior notice.
Please be aware that it is the customer's responsibility
to ensure that their computer is secure. We will under no
conditions be liable for security failures.
Unpacking
After unpacking, check that the following are included.
CD-ROM RS232C cable Information sheet
Contents:
NI-SOFT (this software),
NI-SOFT OPERATION MANUAL (this manual)
Contents:
Product Key, China RoHS
Please keep these items in a safe place for future use.
*
Connections
Connect a PC on which you will install the NI-SOFT to the master station with the included RS232C cable.
TX RX I-G
TX RX I-G
RS232C
terminal
RS232C cable (1m (3.3'))
(included)
Master station rear
PC
Red
Black
White
* Install NI-SOFT on the PC
from the included CD-ROM.
Refer to the instruction
manual for NI-SOFT for
details.
* When extending the RS232C cable, the distance between the master station and the PC should be 15m (50') or less.
4
GETTING STARTED
Installing the NI-SOFT
Install the NI-SOFT on your PC from the CD-ROM.
NOTES:
The PC should be operable 24 hours a day. Call history is obtained only while the NI-SOFT is running.
Call history is not obtained in the following cases:
- When the NI-SOFT is not running
- When the PC is in the standby or sleep mode, or the system is logged off
- When the PC cannot communicate with the master station for any cause
System requirements for PC
Your PC must meet the following system requirements to use the NI-SOFT.
Also refer to the instruction manual supplied with your PC.
OS
(English ver. only)
Windows 7 Home Premium/Professional/Ultimate (Service Pack 1, 32/64bit)
Windows 8.1/Pro (32/64bit)
Processor 2.7 GHz or higher
System memory
(RAM)
2 GB RAM or higher
Hard disk Total 100 MB or higher (*1)
Run-time Microsoft® .NET Framework 4.5 (*2)
Display 1024 (W) x 768 (H) or higher, 16-bit or more
Serial port RS-232C, D-sub 9-pin
Fonts Arial
(*1): If the software is to be installed onto a drive other than C: drive, both the C: drive and the installation drive each require 50
MB or more of memory.
(*2): If the speci ed Run-time is not installed on the PC, it will be installed automatically when installing the NI-SOFT.
The NI-SOFT may not run, or may not operate correctly (such as freezes occurring) on a PC with speci cations below
the necessary requirements.
We recommend using a PC and CD-ROM/DVD-ROM drive that exceed the basic system requirements.
The NI-SOFT is registered to the start-up for the user designated when it was installed
. (The NI-SOFT starts up
automatically when logged in to the Windows.)
When the system memory of the PC is running out, the NI-SOFT reboots the Windows to prevent the PC from being
frozen. If there is concern of the occurrence of Windows reboot, con gure the Windows so that login is performed
automatically with the user's account with suf cient attention given to security.
It is recommended to install a PC exclusive for the NI-SOFT and acquire a dedicated account to obtain a complete call
history.
Microsoft and Windows are either registered trademarks or trademarks of Microsoft Corporation in the United States and/or other
countries.
5
GETTING STARTED USING THE NI-SOFT APPENDIX
Insert the CD-ROM into your PC.
1
Run “Setup.exe” in the CD-ROM by double-clicking it.
2
Start the installation by following the on-screen
3
instructions.
Read “Software License Agreement” carefully, and then
select
I Agree
.
Input the Product Key, and click
4
OK
.
The Product Key can be found on the information sheet,
*
"Product Key for NI-SOFT".
NOTE:
If “.NET Framework 4.5” is not already installed, the .NET
Framework installation window is displayed. Follow the on-
screen instructions to install. (It might be nothing displayed for a
while to install.)
Read the description in the [Welcome to the NIM Call
5
Log Software Setup Wizard] window, and then click
Next
.
Select the folder and the PC in which the NI-SOFT is
6
to be installed.
Click
7
Next
to continue the installation.
Dialogs are displayed to con rm whether or not you want
to place a shortcut for the NI-SOFT in the Start Menu and
on the desktop. Click
YES
or
NO
.
When the [Installation Complete] window appears,
8
click
Close
to nish the installation.
After the installation has nished, restart the PC.
*
NOTES:
When starting up the NI-SOFT, if a security or virus check warning
is displayed, please allow the NI-SOFT to continue.
When the [User Account Control Settings] window appears, click
OK
to continue the installation.
Depending on the OS of a PC, different screens may be displayed.
Follow the on-screen instructions to install.
CD-ROM
Installing
6
Uninstalling
When you need to uninstall the NI-SOFT, follow the procedure
below.
The uninstallation procedure differs depending on the
*
Windows OS version. Con rm the procedure for the Windows
OS on your PC.
Click the Windows’ “Start” button, and then click
1
“Control panel”.
The control panel opens.
Click “Programs and Features”.
2
Select “NIM Call Log Software”, and then click
3
“Uninstall”.
A dialogs is displayed to con rm whether or not you want to
keep log data and program settings. Click
YES
or
NO
.
When uninstalling has been nished successfully, the message
“The program was successfully uninstalled” appears.
7
GETTING STARTED USING THE NI-SOFT APPENDIX
Starting up the NI-SOFT
Read the instruction below while viewing the actual display of
the PC.
Start up the PC.
1
The following login window is displayed automatically after
starting or restarting the PC.
When you rst start up the NI-SOFT after it has been
*
installed, a dialog box is displayed saying that COM port
setting has not been made. Click
OK
and proceed to
the next step. After the initial setup ( P.9
1
), the dialog
box will not be displayed again.
Click “Login”.
2
When the password entry box is displayed, enter the
*
password, and then click “Login”.
When you start up the NI-SOFT for the rst time, entering
password is not needed. You can set up a password for
security purposes if needed. ( P. 9)
If you do not want to log into the NI-SOFT, click
*
Exit
.
The [Call log] window is displayed.
Buttons available in all the windows
Status bar
Displays the current status of the NI-SOFT.
Version of the
NI-SOFT
[Call log] window
Click to open the
[Call log] window.
(P. 10)
Click to
maximize the
window.
Click this again
to restore the
window to
normal size.
Click to close the window.
The window closes and "
" icon remains on the task bar.
Clicking the icon opens the window again.
Click to open
the [Sub station
settings] window.
(P. 14)
Click to open the
[Program settings]
window. (P. 9)
Click to log out
of the NI-SOFT.
(P. 8)
8
Exiting the NI-SOFT
NOTE:
When
Exit
is clicked, the NI-SOFT stops running. While
the NI-SOFT is not running, call history logs cannot be
obtained, so the call history in that period is not displayed.
Click
1
Log out
.
A con rmation message is displayed.
Click
2
OK
to continue the exit operation.
Click
3
Exit
.
A con rmation message is displayed.
Click
4
OK
to exit the NI-SOFT.
When you start the NI-SOFT again;
Double-click the "
NIM Call Log Software
" icon on the desktop.
If another location is speci ed for installing the NI-
*
SOFT during installation, run "NIMlog.exe" from the
location where it is installed.
9
GETTING STARTED USING THE NI-SOFT APPENDIX
Con guring the initial setup of the NI-SOFT
Con gure the initial setup before using the NI-SOFT.
First click
Program settings
to
display the [Program settings]
window.
Then set up the items of
1
,
2
,
3
below.
(
1
: Required,
2
,
3
: As needed
)
1
Con guring the initial setup (Required)
Set up the following items.
1
[Communication port]:
Select the communication port to be used from the drop-
down list.
[Master station]:
Select the master station model connected with this PC
from the drop-down list.
[Date format]:
Select the year-month-day format to be used in the window
from the drop-down list.
DD: day MM: month YYYY: year
Click
2
Apply settings
to save the setting changes of
these items.
NOTES:
The items that cannot be changed or selected are grayed out.
If you change the window or click
Log out
without saving the
setting changes, a notice dialog box appears saying that “Exit
without saving? (Changes to settings will not be saved)”. To save
the changes, Click
Cancel
, and then click
Apply settings
.
2
Registering a note in the footer area
When printing out a call history list etc., the registered note is
printed in the footer area of a print sheet.
* Only English one-byte alphanumeric characters can be used
for a note. Up to 80 characters can be inputted.
Enter a note in the text box of [Footer notes].
1
Click
2
Apply settings
to save the note.
3
Setting up a login password
You can set up a password for security purposes if needed.
* Only English one-byte alphanumeric characters can be used
for a password. Up to 32 characters can be inputted.
Setting up a password for the rst time
Uncheck the check box of [Use without password].
1
Unless this check box is unchecked, a password cannot
*
be entered.
Enter a new password in the [New password] box.
2
Enter the same new password in the [Retype
3
password] box again.
Click
4
Change password
to save the password.
* Inputting the set password is required when logging into the
NI-SOFT the next time.
Changing the password
Enter the current password in the [Current password] box
1
.
Enter the new password in the [New password] box.
2
Enter the new password in the [Retype password]
3
box again.
Click
4
Change password
to save the new password.
NOTES:
If you will not use a password for login, check the check box of [Use
without password] and then click
Change password
.
The items that cannot be changed or selected are grayed out.
If you have forgotten the password, you need to re-install the NI-SOFT
.
[Program settings] window
3
1
2
10
USING THE NI-SOFT
Displaying the call history by specifying search criteria
The call history is displayed in the [Call log] window.
NOTES:
Call history logs are not obtained in the following period of time, so the call history in such a period of time cannot be displayed.
- When the NI-SOFT is not running
- When the PC is in the standby or sleep mode, or the system is logged off
- When the PC cannot communicate with the master station for any cause
Call history
does not updated on a real-time basis. Call history logs can be obtained only while the NI-SOFT is running.
Displaying the call history
Click
Call log
to display the [Call log] window.
Specify search criteria by following the procedure below to limit the scope of target calls.
Select the target period of time from the following.
1
[Today]
[Yesterday]
[7 days]: 7 days including the current day
[30 days]: 30 days including the current day
[All dates]: No limitation of term
You can also specify the term by selecting start and end
dates from the calendar respectively.
Click to display
the previous
month.
Click to display
the next month.
Click to select the
target month or year.
2
Click to select
the target date.
[Call log] window
Specify the target period of time.
Specify the target
sub station ID,
number, name/
remarks.
The call history is
displayed in the list
here.
Click to start a
search with the
speci ed criteria.
The avarage
response time of
the calls in the list.
The number of call
records in the list.
Start date End date
1
Click
When
Exit
is clicked, the NI-SOFT is quitted.
11
APPENDIXUSING THE NI-SOFT
GETTING STARTED
NOTE:
The specifi ed dates are not updated automatically. Specify the target
dates and conduct a search again to update the call history data.
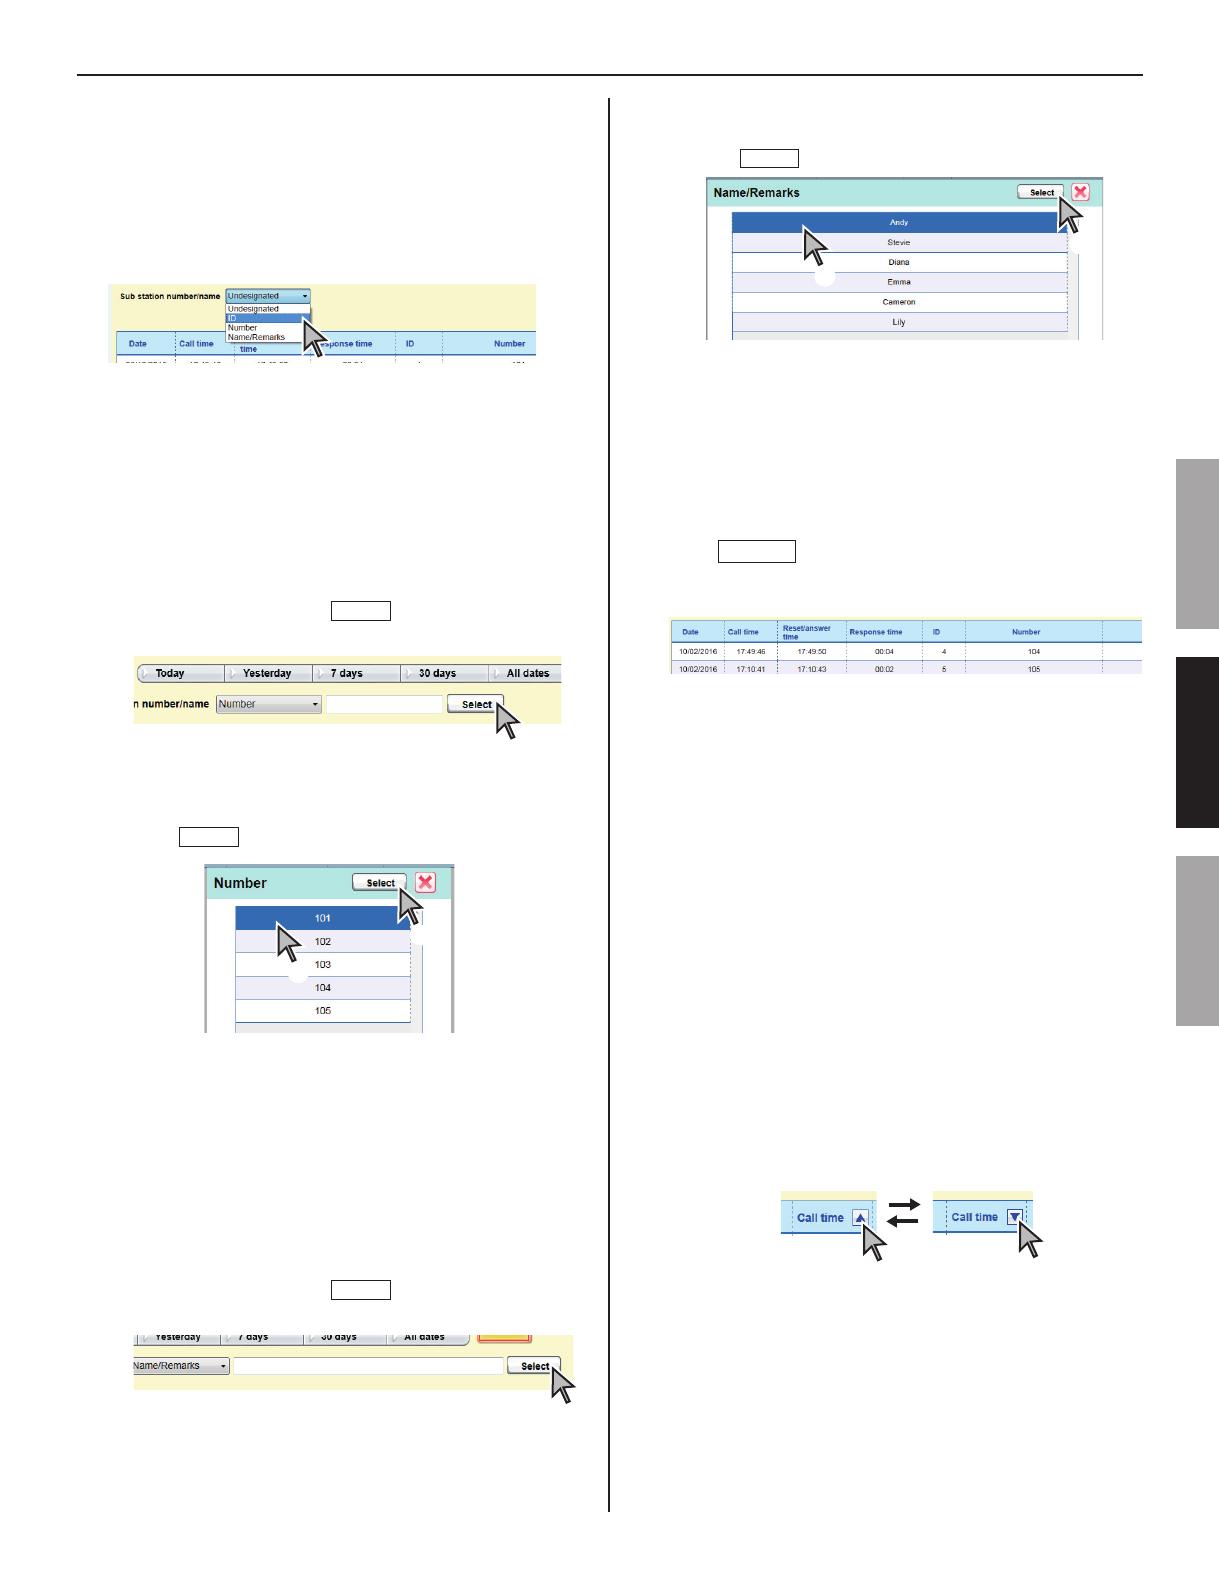
If needed, specify the sub station ID, number or
2
name/remarks by selecting the search item from the
drop-down list.
[Undesignated]: none speci ed
[ID]:
When this is selected, a drop-down list is displayed. Select
the target ID from the list.
* All the IDs recorded in the call history are displayed in the
list.
[Number]:
1
After selecting this, click
Select
on the right hand of the
window.
The [Number] dialog box is displayed.
2
Select the target sub station name, bed number, etc.
within the dialog box.
3
Click
Select
.
3
2
The selected name or number is displayed in the input
box.
* The names or numbers displayed in the dialog box
are those recorded in the call history list. When a new
name or number is registered in the [Sub station setting]
window (P. 14), it will be displayed in this dialog box
after it has been recorded and displayed in the call
history list.
[Name/Remarks]:
1
After selecting this, click
Select
on the right hand of the
window.
The [Name/Remarks] dialog box is displayed.
2
Select the target name, remark, etc. within the dialog
box.
3
Click
Select
.
The selected name, remark, etc. is displayed in the
input box.
* The names, remarks, etc. displayed in the dialog box are
those recorded in the call history list. When a new name
or remark is registered in the [Sub station setting] window
(P. 14), it will be displayed in this dialog box after it has
been recorded and displayed in the call history list.
Click
3
Search
.
The history of calls that meet the speci ed criteria is
displayed in the list.
< Table column headings >
Date: The date when the call was received by the master
station.
Call time: The time when the call was received by the
master station.
Reset/answer time: The time when the call was answered
or reset.
Response time: The length of time from when the call was
received to answered or reset.
ID: The ID of the target sub station.
Number: The target sub station name, bed number, etc.
Name/Remarks: The target sub station name, remarks,
etc.
The history is displayed in ascending or descending
*
order. The order changes each time an item name on the
table head is clicked.
ex.)
When call records are not all displayed, scroll the window
*
up or down by using the vertical scroll bar.
NOTES:
A maximum of 100,000 call records can be stored. When
the number of call records exceed 100,000, the old ones are
overwritten.
When the response time of a call is more than 59 minutes and 59
seconds, it is displayed as 59 minutes and 59 seconds.
The NI-SOFT does not support displaying summer time.
1
1
3
2
12
Printing out the displayed call history list
Click
1
Print
on the [Call log] window.
The print preview window is displayed.
Zoom in
: Click to enlarge the preview.
Zoom out
: Click to reduce the preview.
When the preview is not fully displayed, scroll the window
*
by using the scroll bar.
When the call history list is to be printed in two or more
*
sheets, you can display other pages by clicking
<<
(previous page) or
>>
(next page). You can also
designate the page number you wish to preview by
entering the number.
Click
2
Print
to print out the current preview window.
NOTES:
A maximum of 3,000 call records (100 pages) can be printed out at
one time.
Do not quit the NI-SOFT until the printing is completed. The
printing may not fi nish completely.
Exporting the displayed call history list in
CSV format
Click
1
CSV export
.
The “Save as” window is displayed.
If needed, change the le name and the destination
2
to save.
Click
3
Save
to save the le.
Current page number
* You can enter the desired
page number in this box.
13
APPENDIXUSING THE NI-SOFT
GETTING STARTED
Displaying the call history list in graph form
Click
1
Graph
on the [Call log] window.
The [Graph] window is displayed, and the current call history list is displayed in bar graph sorted by response time.
* The screen image shows a bar graph sorted "By response time".
If needed, change the graph type by clicking the corresponding button.
2
By response time
(default): Click to display a call history list in bar graph sorted by response time.
By time of day
: Click to display a call history list in bar graph sorted by time of day.
By sub station
: Click to display a call history list in bar graph sorted by sub station ID. Up to 20 sub station IDs are displayed in
descending order when more than 20 sub stations are connected to the master station.
By name/remarks
: Click to display a call history list in bar graph sorted by name/remarks.
Click to close the
[Graph] window.
Click the button for the graph type
you wish to display.
Click to display the print preview window.
* Refer to "Printing out the displayed call history list"
(P. 12) for the printing procedure.
The average
response time of
the calls in the
graph (displayed in
the "By response
time" graph only)
The speci ed
search criteria
The number of
call records in the
graph
14
Con guring the sub station settings
Con gure the settings for the sub stations connected to the master station.
Set number (station name, bed number, etc.) and name/remarks etc. for each of the sub stations.
The number, names, remarks, etc. registered in this window are used as the search criteria for calls in the [Call log] window.
Click
1
Sub station setting
to display the [Sub station settings] window.
Enter a station name, bed number, etc. in the “Number” column, and enter remarks or other information in the “Name/
2
Remarks” column for each ID.
Item Max number of characters in a cell
Number 16
Name/Remarks 40
* Double quotation mark (") and backslash mark (\) are disabled.
Click
3
Apply
to save the settings.
NOTES:
Usable font is "Arial" only.
If you try to change the window without clicking
Apply
, the pop-up, "Exit without saving?" is displayed. Click either
OK
or
Cancel
.
ID con guration
IDs are con gured on the master station
as shown in the illustration on the right.
Click to display the print preview window.
* Refer to "Printing out the displayed call history list"
(P. 12) for the printing procedure.
Click to export the
sub station setting
data in this window
in CSV format.
* Refer to "Exporting
the displayed call
history list in CSV
format" (P. 12)
for the exporting
procedure.
Click to save the
setting changes.
All the IDs for
the sub stations
connected (or to
be connected) to
the master station
are displayed.
(See below for
details about the
sub station IDs.)
[Sub station settings] window
The illustration shows the *
master station, 20-call
(NIM-20B).
ID 1
ID 2
ID 10
ID 11
ID 12
ID 20
15
APPENDIXUSING THE NI-SOFT
GETTING STARTED
Troubleshooting
If the software fails to operate normally, check the following points to determine whether the fault can be corrected by the simple
measures suggested. If it cannot be corrected, or if the fault is not listed in the "Symptom" column, contact the system supplier or
service center for help.
Symptom Cause Remedy
NI-SOFT software is not found or no
display on the computer monitor
installed with the NI-SOFT software.
The software is not installd
successfully.
Install the software again.
The short-cut of NI-SOFT software
disappeared.
Search the installed NI-SOFT software les.
Product Key code is not found.
-
Con rm the attached information sheet that
contains the Product Key code of NI-SOFT.
NI-SOFT software does not show
history.
Improper RS-232C connection Verify wiring type and distance.
Error message, "Communication with
master station cannot be established.
Please check the cable" is displayed.
Improper RS-232C connection Verify the connection of RS-232C cable. The
error message will be remained on the screen
until corrected.
APPENDIX
AIPHONE CO., LTD., NAGOYA, JAPAN
http://www.aiphone.net/
Issue Date: Feb. 2016
FK2246 A P0216 SZ 57290
  • Page 1 1
  • Page 2 2
  • Page 3 3
  • Page 4 4
  • Page 5 5
  • Page 6 6
  • Page 7 7
  • Page 8 8
  • Page 9 9
  • Page 10 10
  • Page 11 11
  • Page 12 12
  • Page 13 13
  • Page 14 14
  • Page 15 15
  • Page 16 16

Aiphone NI-SOFT User manual

Type
User manual
This manual is also suitable for

Ask a question and I''ll find the answer in the document

Finding information in a document is now easier with AI