Denver IPO-1320MK2 User manual

Type
User manual

This manual is also suitable for

DENVER IPO-1320MK2
DENVER IPC-1030MK2
APP Download
Please Download and install the DENVER IPC APP before you set up the
IP Camera. Search on Google Play store and APP Store for DENVER IPC
One Key Setting Functionality (cell phone must be connected to the WiFi. This one key setting functionality is
only available for the models IPO-1320MK2 and IPC-1030MK2
)
a). Connect the camera with power adaptor (you do not need to connect the Ethernet cable).
b). Launch the APP, tap on “+” to access the Add Camera” function, then click on “One Key
Setting, and the screen shown below will appear:
c). Enter the correct WiFi password, then click on “Start configuration”, like shown in the screen
below:
d). Wait for 60 seconds, then choose the respective device and enter the password. If done,
click on save to connect to the WiFi.
How to connect the IP Camera
Connect the power supply cable to the IP Camera and wait for about 2 seconds until the green
indicator will light permanently. After another 10 second the yellow indicator will start flashing
and the camera will perform the IP detection automatically.
You may continue with the next step, if after another 30 seconds the camera successfully was
launched.
IP Camera
IP Camera
IP Camera
Internet
Router
PC
Internet Cable
WAN
LAN
Use of the APP Functions
App Icon:
Home screen:
Part 1. Home screen
Here you are provided with the options: Video”, “Device List”, Multimedia”, and “Message”.
1. Video:
You may add up to four cameras to this multi-device page. Here the three functions below are
provided:
a) You may stop the video by sliding over the video thumbnail. To view the footage in full
screen mode, double click on the respective thumbnail.
b) To access the Menu, click on the icon in the upper left corner of the screen.
2. Device List:
In the device list the connected cameras are shown. Here the four functions mentioned below
are possible:
a) Click in the upper left corner of the screen on the “Edit” button to access the device settings
if you want to change or delete the parameters of one or all devices.
b) To add a new camera, click on “+” icon in the upper right corner of the screen.
c) To set or modify the settings of a device, click on the icon on the right side next to the
respective camera.
d) Click on the camera thumbnail to activate the full screen display.
3. Multimedia:
Multimedia includes the photo and video management. The three functions below are possible:
a) Click on the button to access the list of all photos and videos.
b) Click on the button to view a video remotely.
c) Click on to view the video of the recent day.
4. Message:
Message includes all alarm events recorded by the connected camera(s).
a) To view the alarm events click on the desired camera menu item.
Part 2. App Management
The App management enables you to perform individual and also contains the Help function for
the APP. The screen displays 7 options: Flow statistics”, “Message sound”, “Network limited”,
“Skin”, “Help, “Push”, About.
App management:
1. Flow statistics:
Here the network traffic used will be displayed. The traffic metrics for the mobile network and
the WiFi will be shown.
Here the three functions below are possible:
a) By moving the grey slider offer the screen the traffic statistics for the mobile network and
WiFi will be displayed.
b) By clicking the button in the upper right corner of the screen you are able to
configure limits for the mobile network and WiFi network. This setting will not affect the use
of the app, it just provides an intuitive reminder of the traffic used on the mobile and WiFi
networks.
c) By clicking the button on the bottom you may clear the traffic
statistics for the mobile and WiFi networks.
2. Message sounds:
Here you may activate/deactivate the Message alarm sounds.
3. Network Limited:
Here you may set that the video only may be opened if the cell phone is connected to a WiFi
network.
4. Skin:
Here you may change the appearance of the App. Currently the colors blue, green, or gold are
available.
5. Help:
Under “Help” you will find the help web page for the App. The contents of the web page changes
according to the screen you are using.
6. Push:
Under Alarm push you may configure if you want to receive alarm notifications, or not. After
deactivation the App will not receive any alarm messages anymore.
7. About:
In the About us” screen the essential information on the App is displayed, like name, version etc.
Part 3. Add Camera
By using this screen you may add new cameras to the App. Here are the three functions Adding
camera manually, “Scan QR code”, and “LAN search” possible.
Add Camera:
1. Add camera manually
Enter the device information (ID, account, password), and click on the "Save" button in the
upper right corner of the screen.
2. Add a camera by scanning QR code,
Scan QR Code
For the scanning, please enter the put the QR code into the scan box. Then the device ID number
will be scanned. After the scan is completed you only must enter the account and the password
of the device, and the camera will be added to the device list.
If the label on the camera mentions Password: “NONE” - then it means there is no password. So
when connect camera first time do not enter any password. Then when connected you can press
blue color “I” button in the smartphones application and write the password that you want to
use for your IP camera.
3. LAN Search:
LAN requires two preconditions
a) The mobile device must be connected to the local network.
b) The camera must be located in the same network.
After the app was completing the camera search, click on the new menu item displayed. This will
redirect you to the Add camera screen where you modify the configuration, and save the device.
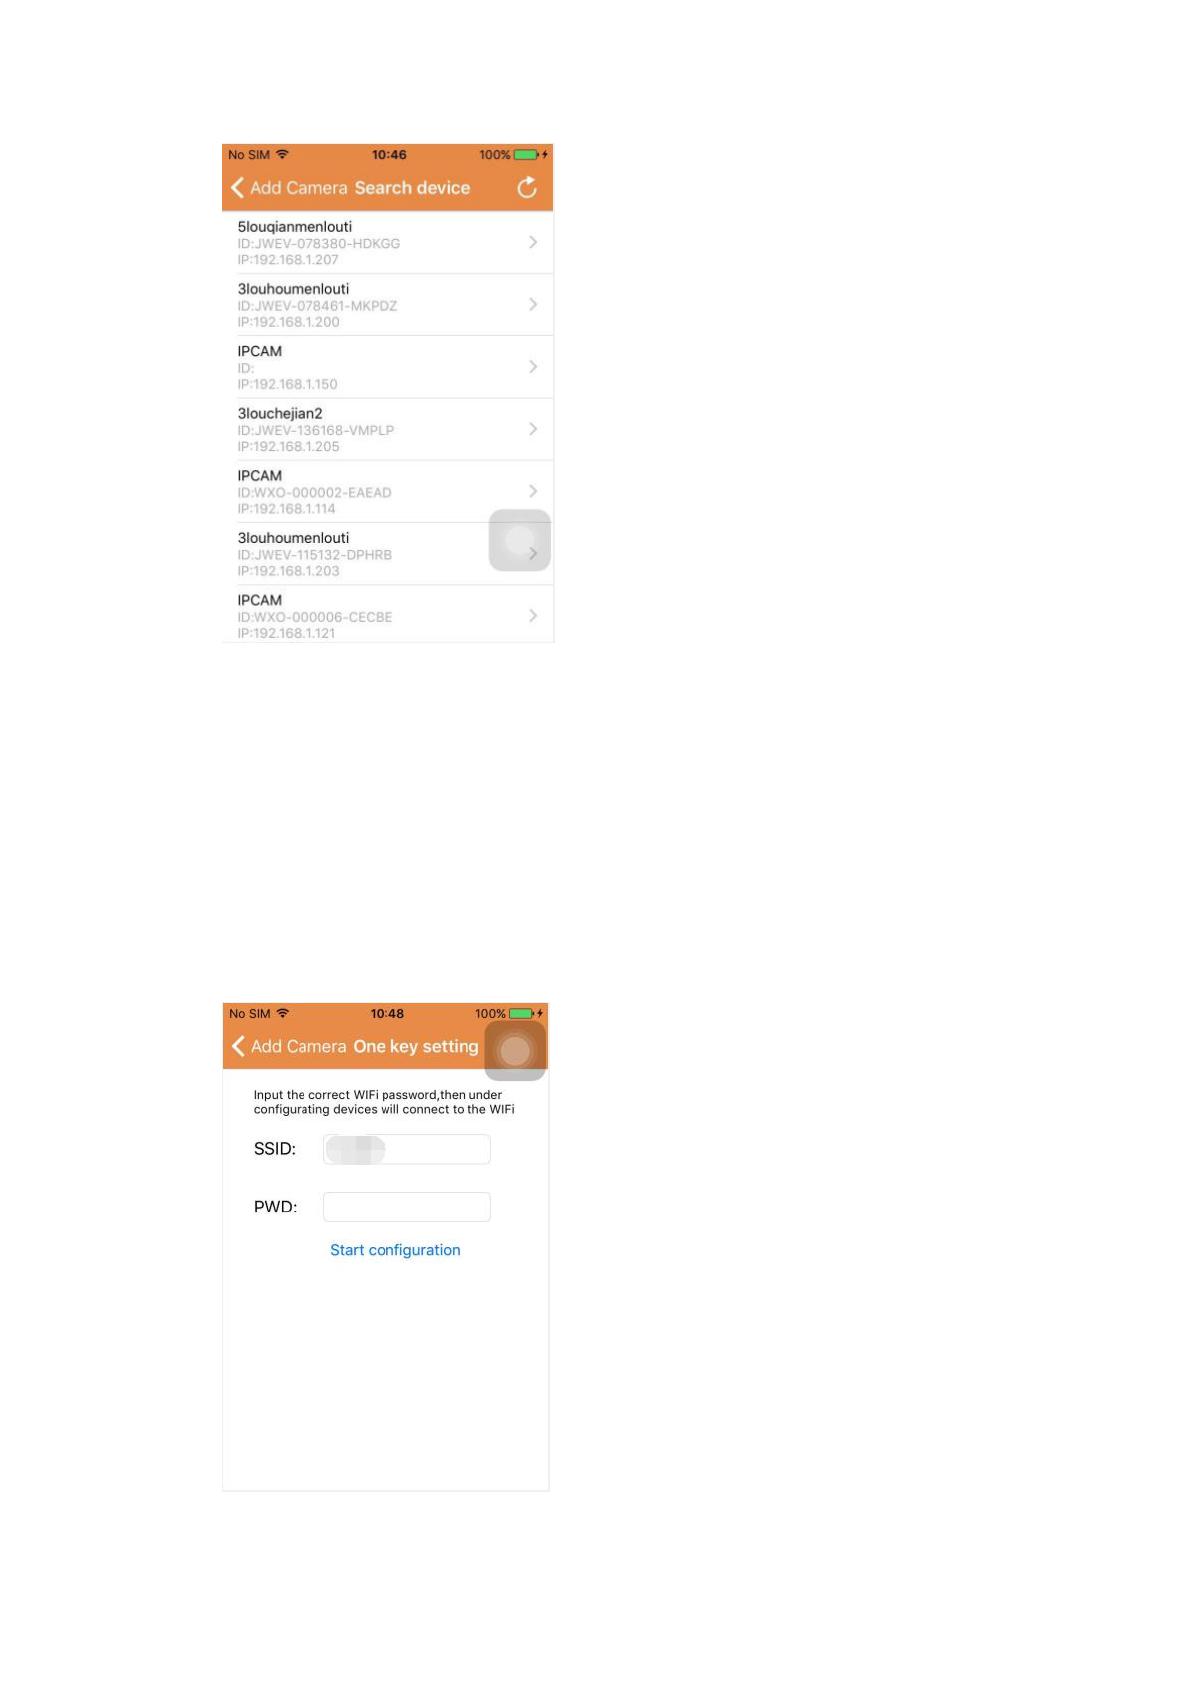
4. One key setting function (mobile phone is connected to a WiFi. This function only is available
for IPO-1320MK2 and IPC-1030MK2).
a) Connect the camera with the power supply (you do not need to connect Ethernet cable).
b) Launch the APP, click on the add “+” icon, the Add Camera” screen will be displayed. In the
screen, click on the “One key setting option, then the screen like below will appear:
c) Enter to PWD the correct password of the WiFi, then click on “Start configuration”, like
shown in the image below:
d) Wait for about 60 seconds. Then choose the corresponding device and enter the password,
click on "Save" to connect to the WiFi.
Part 4. Camera setting
The Camera Setting screen contains the following options: “WIFI”, “User, “FTP, “EMail”, Alarm”,
“SD Card”, Time zone”.
Camera Settings:
1. WiFi setting is used for the activation/deactivation of the camera access via WiFi.
WiFi settingClick in the desired WiFi SSID, then enter the password in the next screen and the
camera will be connected to the WiFi (a camera reboot is normal)
2. User setting is used for setup and modification of the user account and password. You may
setup three types of accounts (administrator, operator, visitor)
User setting:
After the user setup, the camera will reboot.
3. FTP setting: FTP setting is used for the footage upload if the motion detection is activated
FTP Setting:
4. Email setting: Configuration of the alarm messages of the camera.
Mail setting:
5. Alarm setting is used for the configuration of the parameter for the conditions of the alarm
message push. Please note that all our current cameras donot suport I/O function .
Alarm setting:
Motion detect armed:when turn on this menu,menu will get green.
Motion detect sensitivity:The smaller the value, the more sensitive the motion detection
Preset linkage:When an alarm occurs, the machine will go to the preset position settings
Send mail triggered:When an alarm occurs, send e-mail notification to specifed email box.
Alarm recording:When an alarm occurs, it will record video to TF Card .(only avaliable for
the models which support TF Card recording function)
Upload picture to FTP if triggered:When an alarm occurs, upload pictures to an ftp server
Enable the alarm sound: Start the alarm sound(only avaliable for the models which support
audio function)
Alarm clock:Setting the alarm time
Then select the motion detection alarm time
Finally, the APP management Push to open
6. SD card setting is used for checking the status of SD card and configuring the recording time.
SD card setting:
7. Device Time Zone Setting:
Part 5. Remote Playback Video
Remote playback video is used for the remote playback of videos recorded on the SD card. To
access this function, click in the upper right corner of the Multimedia screen on the
button.
Remote Video Playback:
  • Page 1 1
  • Page 2 2
  • Page 3 3
  • Page 4 4
  • Page 5 5
  • Page 6 6
  • Page 7 7
  • Page 8 8
  • Page 9 9
  • Page 10 10
  • Page 11 11
  • Page 12 12
  • Page 13 13
  • Page 14 14
  • Page 15 15
  • Page 16 16
  • Page 17 17
  • Page 18 18
  • Page 19 19
  • Page 20 20
  • Page 21 21
  • Page 22 22
  • Page 23 23
  • Page 24 24
  • Page 25 25
  • Page 26 26

Denver IPO-1320MK2 User manual

Type
User manual
This manual is also suitable for

Ask a question and I''ll find the answer in the document

Finding information in a document is now easier with AI