Page is loading ...

User's
Manual
WOHD
PROCESSING
SPREAD
SHEETS
EATA
MANAGEMENT
.
tr

USER'S
"This
equipment
generates
and
uses
radio
frequency
energy.
If
it
is
MANUAL
not
Pr°Per|y
installed
and
used
in
strict
accordance
with
the
manu-
STATEMENT
facturer's
instructions,
this
equipment
may
interfere
\\
Ih
■
idio
and
television
reception.
This
machine
has
been
tested
and
found
to
com
ply
with
the
limits
for
a
Class
B
computing
device
in
accordance
with
the
specifications
in
Subpart
J of
Part
15
of
the
FCC
Rules,
which
are
designed
to
provide
reasonable
protection
against
such
interference
in
a
residential
installation.
If
you
suspect
interference,
you
can
test
this
equipment
by
turning
it
off
and
on.
If
you
determine
that
there
is
interference
with
radio
or
television
reception,
try
one
or
more
of
the
following
measures
to
correct
it;
•
reorient
the
receiving
antenna
•
move
the
computer
away
from
the
receiver
•
change
the
relative
positions
of
the
computer
equipment
and
the
receiver
•
plug
the
computer
into
a
different outlet
so
that
the
computer
and
the
receiver
are
on
different
branch
circuits
If
necessary,
consult
your
Commodore
dealer
or
an
experienced
radio/
television
technician
for
additional
suggestions.
You
may
also
wish
to
consult
the following
booklet,
which
was
prepared
by
the
Federal
Communications
Commission:
"How
to
Identify
and
Resolve
Radio-TV
Interference
Problems."
This
booklet
is
available
from
the
U.S.
Government
Printing
Office,
Washington,
D.C.
20402.
Stock
No.
004-000-00345-4;
You
should
use
only
the
cables,
accessories,
and
peripherals
re
commended
by
Commodore
for
your
Plus/4.
All
cables,
including
the
cables
for
the
television
hookup,
serial
port,
video
port,
Datassette™
and
joysticks,
are
specially
shielded,
in
accordance
with
the
regula
tions
of
the
Federal
Communications
Commission.
Failure
to
use
the
appropriate
accessories
and
cables
will
invalidate
the
FCC
grant
of
certification,
and
may
cause
harmful
radio
interference.
Copyright
©
1984
by
Commodore
Electronics
Limited
All
rights
reserved.
This
manual
contains
copyrighted
and
proprietary
information.
No
pan
ol
this
publication
may
be
reproduced,
stored
in
a
retrieval
system,
or
transmitted
in
any
form
or
by
any
means,
electronic,
mechanical,
photocopying,
recording
or
otherwise,
without
the
prior
written
permission
of
Commodore
Electronics
Limited
Commodore
BASIC
v
3
5
Copynghi
■£■
1984
by
Commodore
Electronics
Limited,all
rights
reserved.
Copyright
©
1977 by
Microsoft,
all
rights
reserved.

COMMODORE
PLUS/4
USER
MANUAL
-

TABLE
OF
INTRODUCTION
1
_
CONTENTS
CHAPTER
1
Unpacking
and
Setting
Up
7
-
CHAPTER
2
Using
the
Keyboard
and
Screen
22
CHAPTER
3
Using
Software
33
—
CHAPTER
4
Getting Started
42
CHAPTER
5
Beginning
BASIC
58
CHAPTER
6
Numbers
and
Calculations
68
—'
CHAPTER
7
Using
Graphics
and
Color
83
_
CHAPTER
8
Making
Sound
and
Music
104
COMMODORE
PLUS/4
ENCYCLOPEDIA
n?
1
BASIC
3.5
Encyclopedia
115
Commands
1
u—
Statements
130
Functions
15b—
Variables
and
Operators
16^
2
BASIC
3.5
Abbreviations
169
3
Conversion
Programs
U%~^
4
Error
Messages
17^
5
TEDMON
184
6
Screen
Display
Codes
193—
7
ASCII
and
CHRS
Codes
196
8
Screen
and
Color
Memory
Maps
199
9
Memory
Register
Map
201—'
10
Deriving
Mathematical
Functions
203
11
Musical
Note
Table
204
12
Programs
To
Try 206
'

13
RS-232
Guidelines
209
14
Book
List
215
INDEX
216
~
n
-
n

_

INTRODUCTION
H
~
You've
made
a
wise
purchase...
the Plus/4
is
the
first
home
computer
ever
designed
especially
for
productivity
applications.
Of
course,
it's
still
able
to
do
all
the
other
things
a
home
computer
can
be
used
for.
This
manual
is
designed
to
help
you
learn
those
"other
things"
your
Plus/4
can
do.
You'll
learn
how
to:
•
Set
up
your
Plus/4
•
Use
the
different
functions
of
all
the
keys
on
the
keyboard
•
Access
different
types
of
Commodore
Software
•
Use
the
mathematical,
graphics,
sound
and
programming
capabilities
of
your
Plus/4
The
other
manual
included
with
your
computer
(T/ie
Plus/4
Built-in
Integrated
Software
Manual)
tells
you
how
to
use
the
wordprocessing.
electronic
spreadsheet,
database
and
graphics
packages.
If
your
main
interest
is
in
these
productivity
applications,
and
you
can't
wait
to
get
started
using
them,
we
still
recommend
that
you
read through
at
least
chapter
one
of
this
manual
("Unpacking
and
Setting
Up")
before
reviewing
the
Built-in
Software
Manual.
n

WHAT'S
SPECIAL
ABOUT
THE
PLUS/4
64K
RAM
(60K
available
for
BASIC
programming)
Full
Typewriter
Style
Keyboard
Optional
Built-in
Software
Screen
Window
Capability
HELP
Key
8
Pre-programmed,
Reprogrammable
Function
Keys
Four
Separate
Cursor
Keys
Uses
Most
COMMODORE
64
and
VIC-20
Peripherals
121
Colors
(16
primary
colors,
8
luminance
levels)
Over 75
BASIC
Commands
High
Resolution
Graphics
Plotting
Split-Screen
Text
With
High-Res Graphics
Graphic
Character
Set
On
Keyboard
Keyboard
Color
Controls
320
x
200
Pixel
Screen
Resolution
Reverse
and
Flashing
Characters
2
Tone
Sound
Generators
Built-in
Machine
Language
Monitor
(17
commands)
CREATING
A
COMPLETE
COMPUTER
SYSTEM
"i
Computer:
Commodore
PLUS/4

-
-
Display;
Commodore
1702
or
1802/1803
Color
Monitor
n

._
Storage:
Commodore
1531
Datasselte
(tape
recorder)
or
Commodore
Disk
Drive
Printer:
Commodore
Printer

-
H
n
n
Modem:
Commodore
MODEM/300
Controller:
Commodore
PLUS/4
Joysticks

WHERE
By
now
you've
done
enough
reading
and
you
want
to
get
started.
jn
Here's
what
we
recommend
you
do
now:
FROM
•
Send
in
your warranty
card
HERE?
•
Subscribe
to
the
Commodore
magazines
to
get the
latest
informa
tion
on
your
computer
Read
this
manual
and
try
the
exercises.
Read
the
built-in
software
manual
and
get
used
to
the
four
integrated
packages.
Keep
checking
in
with
the
Commodore
dealers
in
your
area
for
new
developments
in
software,
books
and
peripherals.
Learn,
program,
file,
write,
calculate,
graph,
play...
enjoy
your
new
Commodore
Plus/4!

CHAPTER
1
UNPACKING
AND
SETTING
UP
•
Unpacking
your
Commodore
•
Getting
to
know
the
switches
•
Setting
up
your
Commodore
•
Troubleshooting
chart
•
Peripherals
Plus/4
and
sockets
Plus/4

UNPACKING
Now
that
yc
YOUR
thls
manual,
the
first
COMMODORE
youhave
PLUS/4
7T
———=
containing
your
new Rus
t0
Your
Commodore
Plus/4
2.
The
power
supply
s
into
the
right
side
of
—

3.
The
TV
switchbox
This
connects
to
the
antenna
jack
on
the
back
of
your
TV.
You
don't
need
Ihe
switchbox
if
you
plan
to
connect
your
Plus/4
to
a
monitor.
4.
The
RF
cable
This
connects
the
TV
switchbox
to
the
RF
output
jack
on
the
left
side
of
the
Plus/4.
You
don't
need
this
cable
to
connect
your
Plus/4
to
a
monitor.
5.
The
user
manual
6.
Other
assorted
literature
Warranty card
Commodore
Magazines
subscription
card
7.
The
Plus/4
Built-in
Integrated
Software
Manual
If
you
don't
find
all
these
items
in
the
box.
check
with
your
dealer
immediately
for
replacements.
Before
you
connect
anything,
you
should
look
over
these
drawings
of
your
computer.
These
drawings
identify
all
the
outlets
so
you
can
set
up
your
computer
system
quickly
and
easily.

_
GETTING
TO
KNOW
THE
SWITCHES
AND
SOCKETS
The
Right
Side
of
Your
PLUS/4
1
.
r.
_
The
On/Off
Switch
Your
Plus/4
should
be
turned
OFF
when
you
install
or
remove
car
tridges
or
any
peripheral
device
such
as
a
printer
or
disk
drive.
There
is
a
red
power
light
located
below
the
keyboard on
the
left,
so
you
can
be
sure
whether
power
is off.
2
The
Reset
Button
There
are
two
ways
to
use
the
RESET
button:
1.
You
can
use
the
RESET
button
to
reset
your
computer
as
if
you'd
just
turned
it
on.
Just
press
the
reset
button
once.
Remember:
when
you
press
the
reset
button,
you
lose
any
BASIC
program
currently
in
memory."
2.
If
you
want
to
reset
your
Pius/4
and
keep
your
BASIC
program,
hold
down
the
RUN/STOP
key
and
then
press
the
RESET
button.
When
you
do
this,
your
Pius/4
goes
to
the
built-in
machine
language
monitor.
Type
an
X
and
press
the
RETURN
key
to
get
back
to
BASIC.
Your
pro
gram
remains
intact
in
the Plus/4
memory.
Just
type LIST
to
display
the
program
on
your
screen.
'When
you
press
RESET,
the
Plus/4
automatically
issues
the
NEW
command,
which
clears
the
screen.
This
can
be
reversed.
See
the
PluS'4
Programmer's
Reference
Guide
tor
information
on
UNNEWing
your
program
if
you've
pressed
the
reset
button
by
accident.
_

H
The
Left
Side
Of
Your
PLUS/4
~~
n
The
socket
and
the
switch
on
the
left
side
of
the
Plus/4
are
both
used
for
TV
connections.
Neither
is
used
if
you're
connecting
your
Plus/4
to
a
monitor.
3
The
RF
Jack
This
is
where
you
plug
in
one
end
of
the
RF
cable
(the
thin
black
cable).
You
can
plug
either
end
into
this
jack
and
the
other
end
into
the
TVswitchbox.
4
The
High/Low
Switch
This
switch
controls
which
channel
is
used
for
Plus/4
video
output.
Set
the
H/L
switch
to
L
for
output
on
channel
3.
Set
the
H/L
switch
to
H
for
video
on
channel
4.
You can
use
either
channel
3
or
4
on
your
TV
to
display
the
video
pic
ture
from your
computer.
If
you
have
a
channel
3
TV
station
in
your
area,
select
channel
4,
and
vice
versa.
Experiment
to
see
which
setting
gives
you
the
best
picture.
The
Back
of
Your
Computer
m
H
■i

The
sockets
on
the
back
of
your
computer
connect
a
variety
of
accessories
to
your
Plus'4.
Each
connector
is
different.
Be
sure
you
plug
each
accessory
into
the
correct socket.
The
Power
Socket
The
end
of
Ihe
power
supply
cable
fits
here.
Plug
the
other
end
into
a
standard
wall
socket
for
three-prong
plugs.
5
The
Serial
Bus
You
can
plug
a
disk
drive
or a
printer
into this
socket.
If
you
want
to
plug
in
both,
first
plug
the
disk
drive
into
this
opening,
then
plug
the
—
printer
cable
into
the
back
of
the disk
drive.
7
The
Cassette
Port
The
Commodore
1531
Datassette
tape
recorder
plugs
in
here.
8
The
RS-232
Port
Accessories
such
as a
modem
or
an
RS-232
adapter
plug
in
here.
An
RS-232
adapter
makes
it
possible
to
hook
up
accessories
not
ac
commodated
by
standard
Commodore
equipment
ports.
9
The
Memory
Expansion
Port
Plus 4
software
cartridges
and
the
Plus/4
SFS-481
disk
drive
plug
in
here.
Before
you
install
or
remove
cartridges,
make
sure
your
Plus/4
is
OFF.
10
Joy
1
and
Joy 2
:
The
Game
Ports
You
can
plug
joysticks
into
these
sockets.
The
Plus/4
uses
specially
designed
joysticks
available
from
your
Commodore
dealer.
11
The
Video
Socket
This
is
where
you
plug
in
the
cable
that
connects
a
monitor
to
your
Plus/4.
Although
this
socket
is
an
8-pin
connector,
you
can
use
a 5-pin
cable
in
this
socket
as
well.
Commodore
color
monitors
come
with
an
8-pin
cable
for
use
with
the
Plus/4.

TING
•
To
set
UP
y°ur
P'us''4'
y°u'"
need
at
leasl
tw0
wa"
P'ugs.
one
for
your
yp
Plus/4
and
one
for
your
TV
or
monitor.
YOUR
•
If
you're
installing
a
disk
drive
and
a
printer,
you'll
need
additional
PLUS/4
wall
plugs.
• Your
Plus'4
should
be
placed
a
comfortable
distance
from your
TV.
•
Make
sure
that
your
computer
is
OFF
before
you
start
the setup.
Check
that
the
POWER
LIGHT
on
the
front
left
is
not
lit.
If
you
are
connecting
the Plus'4
to
a
television
set.
you'll
need
a
small
screwdriver
to
attach
the
TV
switchbox.
The
way
you
connect
the
switchbox
depends
on what
type
of
antenna
connection
your
TV
set
has
IMPORTANT:
If
your
antenna
is
connected
to
your
TV
by
a
single
round-ended
cable
{the
75-ohm
co-ax
type),
you
will
need
either
the
300
ohm
to
75
ohm
adapter,
which
came
with
your
TV,
or
you
must
get
a
replacement
75
ohm
to
75
ohm
switchbox.
The
adapter
is
a small
plastic
part
with
a co-ax
connector
on
one
side
and
two
screws
on
the
other
If
you
do
not
have
one,
you
can
buy
one
at
most
electronics
stores.
Once
you
attach
the
adapter
to
the
co-ax
connector
on
your
set.
you
can
follow
the
rest
of
these
instruc
tions.
A
75-ohm
switchbox
allows
you
to
hook
the
antenna
lead
into
the
switchbox,
which
is
connected
to
the
TV,
so
that
you
only
have
to
move
the switch
on
the
switchbox
to
watch
TV.
You
need
only
connect
the
switchbox
once.
When
you
want
to
use
your
computer,
just
move
the
switch
to
the
COMPUTER
position.
When
you
want
to
watch
TV,
move
the
switch
to
TV.
The
switchbox
will
not
interfere
with
your
TV
reception.
13

STEP
1
Disconnect
the
antenna
from
your
TV:
use
a
screwdriver
to
loosen
the
screws
on
the
TV
Remove
the
two
antenna
leads
STEP
2
Connect
the
TV
swilchbox
lo
Ihe
TV
where
Ihe
anienna
leads
were
attach
the
leads
on
the
box
to
Ihe
antenna
inpul
on
your
TV
STEP
3
Connect
the
antenna
to
Ihe
swilchbox
attach
the
leads
from
the
antenna
to
the
screws
on
the
side
of
the
switchbox.
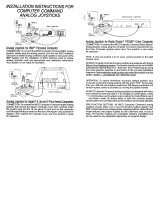
Connect
to
Antenna
input
(300
ohm]
n
Rear
of
TV
RF
Cable
Power
Supply
li
you
have
the
round
coax
type
anienna
connection
on
your
TV
sf EP
1
Disconnect
the
antenna
from
your
TV
unscrew
the
antenna
wire
You
can
disconnect
it
by
hand
STEP
2
Connect
the
swilchbox
to
your
TV hand
fasten
it
onto
Ihe
antenna
inpul
post
on
(he
back
of
your
TV
STEP
3
(For
the
75-ohm
switchbox)
Connect
ihe
anienna
lo
the
switchbox.
hand-lurnmg
the
antenna
cable
into
the
switchbox.
__
u
/