Page is loading ...

Installing C/CS-Mount Lens
Notes
Before mounting a lens, please check whether it is a C-mount or
CS-mount lens.
The back focus is set for the CS-mount lens at the factory.
Mounting a CS-Mount Lens
After removing the protecting cap, attach the lens into the camera
by turning clockwise.
. Use the lens under the specification as shown. Otherwise the
lens can damage the camera or abnormal fixing may result.
. A heavy lens may disturb the balance with the camera and
possibly result in damage. Don't use a lens heavier than 450g.
.
It is recommended to set the lens ALC mode to Av mode(Average).
Pk mode can be occurred hunting.
C-mount lens : 10mm or less
CS-mount lens : 5mm or less
Model
Signal System
CCD Pick-up Element
Effective Pixels
Video Output
Sync. System
Luminance S/N Ratio
Resolution
Sensitivity
Lens Mount
Electronic Shutter
White Balance
Wide Dynamic Range
Day & Night
Auto Gain Control
Back Light Compensation
Flickerless
Supplied Voltage
Power Consumption
Operating Temperature
Storage Temperature
Dimensions (WxHxD)
Weight
NTSC PAL
2 : 1 Interalce Transfer 1/3 inch Double Scan CCD
768(H) x 494(V) 752(H) x 582(V)
Composite : 1.0V p-p, 75, Unbalanced
Internal Sync.
More than 50dB (AGC OFF / BW Mode)
Horizontal : 480 TV
0.1 Lux (DSS 2FLD, Color), 0.001 Lux (DSS Max, Color)
C / CS Mount
1/60 ~ 1/10000 1/50 ~ 1/10000
AWB (AUTO, HOLD, USER)
On / Off Selectable
No Option
OFF / LOW / MID / HIGH Selectable
On / Off Selectable
On / Off Selectable
DC 12V (10V ~ 15V)
400mA 4.8W (Max)
-10~+50(Recommendation : -5~+40)
-20~+60
65 x 59.6 x 122.5mm
Approx. 430g
High Resolution
WDR ONLY
Model
Signal System
CCD Pick-up Element
Effective Pixels
Video Output
Sync. System
Luminance S/N Ratio
Resolution
Sensitivity
Lens Mount
Electronic Shutter
White Balance
Wide Dynamic Range
Day & Night
Auto Gain Control
Back Light Compensation
Flickerless
Supplied Voltage
Power Consumption
Operating Temperature
Storage Temperature
Dimensions (WxHxD)
Weight
NTSC PAL
2 : 1 Interalce Transfer 1/3 inch Double Scan CCD
768(H) x 494(V) 752(H) x 582(V)
Composite : 1.0V p-p, 75, Unbalanced
Internal / External Sync.
More than 50dB (AGC OFF / BW Mode)
Horizontal : 480 TV
0.1 Lux (DSS 2FLD, Color), 0.001 Lux (DSS Max, Color)
C / CS Mount
1/60 ~ 1/10000 1/50 ~ 1/10000
AWB (AUTO, HOLD, USER)
On / Off Selectable
No Option
OFF / LOW / MID / HIGH Selectable
On / Off Selectable
On / Off Selectable
AC 24V (20V~28V) or DC 12V (10V~15V)
600mA 7.2W (Max)
-10~+50(Recommendation : -5~+40)
-20~+60
65 x 59.6 x 122.5mm
Approx. 430g
High Resolution
WDR ONLY
Model
Signal System
CCD Pick-up Element
Effective Pixels
Video Output
Sync. System
Luminance S/N Ratio
Resolution
Sensitivity
Lens Mount
Electronic Shutter
White Balance
Wide Dynamic Range
Day & Night
Auto Gain Control
Back Light Compensation
Flickerless
Supplied Voltage
Power Consumption
Operating Temperature
Storage Temperature
Dimensions (WxHxD)
Weight
NTSC PAL
2 : 1 Interalce Transfer 1/3 inch Double Scan CCD
768(H) x 494(V) 752(H) x 582(V)
Composite : 1.0V p-p, 75, Unbalanced
Internal Sync.
More than 50dB (AGC OFF / BW Mode)
Horizontal : 480 TV
0.1 Lux (DSS 2FLD, Color), 0.001 Lux (DSS Max, Color)
C / CS Mount
1/60 ~ 1/10000 1/50 ~ 1/10000
AWB (AUTO, HOLD, USER)
On / Off Selectable
No Option
OFF / LOW / MID / HIGH Selectable
On / Off Selectable
On / Off Selectable
AC 100V ~ AC 240V
6.0W (Max)
-10~+50(Recommendation : -5~+40)
-20~+60
65 x 59.6 x 122.5mm
Approx. 430g
High Resolution
WDR ONLY
Day & Night Color Camera
Day & Night Color Camera
3
x Digital Zoom
3
x Digital Zoom
Model
Signal System
CCD Pick-up Element
Effective Pixels
Video Output
Sync. System
Luminance S/N Ratio
Resolution
Sensitivity
Lens Mount
Electronic Shutter
White Balance
Wide Dynamic Range
Day & Night
Auto Gain Control
Back Light Compensation
Flickerless
Supplied Voltage
Power Consumption
Operating Temperature
Storage Temperature
Dimensions (WxHxD)
Weight
NTSC PAL
2 : 1 Interalce Transfer 1/3 inch Double Scan CCD
768(H) x 494(V) 752(H) x 582(V)
Composite : 1.0V p-p, 75, Unbalanced
Internal Sync.
More than 50dB (AGC OFF / BW Mode)
Horizontal : 480 TV
0.1 Lux(DSS 2FLD, Color), 0.001 Lux(DSS Max, Color), 0.0003 Lux(DSS Max, BW)
C / CS Mount
1/60 ~ 1/10000 1/50 ~ 1/10000
AWB (AUTO, HOLD, USER)
On / Off Selectable
AUTO / DAY / NIGHT / EXT
OFF / LOW / MID / HIGH Selectable
On / Off Selectable
On / Off Selectable
DC 12V (10V ~ 15V)
400mA 4.8W (Max)
-10~+50(Recommendation : -5~+40)
-20~+60
65 x 59.6 x 122.5mm
Approx. 430g
High Resolution
DAY & NIGHT / WDR
10. Specifications -DC12V Input Model
Model
Signal System
CCD Pick-up Element
Effective Pixels
Video Output
Sync. System
Luminance S/N Ratio
Resolution
Sensitivity
Lens Mount
Electronic Shutter
White Balance
Wide Dynamic Range
Day & Night
Auto Gain Control
Back Light Compensation
Flickerless
Supplied Voltage
Power Consumption
Operating Temperature
Storage Temperature
Dimensions (WxHxD)
Weight
NTSC PAL
2 : 1 Interalce Transfer 1/3 inch Double Scan CCD
768(H) x 494(V) 752(H) x 582(V)
Composite : 1.0V p-p, 75, Unbalanced
Internal Sync.
More than 50dB (AGC OFF / BW Mode)
Horizontal : 480 TV
0.1 Lux(DSS 2FLD, Color), 0.001 Lux(DSS Max, Color), 0.0003 Lux(DSS Max, BW)
C / CS Mount
1/60 ~ 1/10000 1/50 ~ 1/10000
AWB (AUTO, HOLD, USER)
On / Off Selectable
AUTO / DAY / NIGHT / EXT Selectable
OFF / LOW / MID / HIGH Selectable
On / Off Selectable
On / Off Selectable
AC 100V ~ AC 240V
6.0W (Max)
-10~+50(Recommendation : -5~+40)
-20~+60
65 x 59.6 x 122.5mm
Approx. 430g
High Resolution
DAY & NIGHT / WDR
10. Specifications
-AC 100V
~
AC 240V Input Model
Model
Signal System
CCD Pick-up Element
Effective Pixels
Video Output
Sync. System
Luminance S/N Ratio
Resolution
Sensitivity
Lens Mount
Electronic Shutter
White Balance
Wide Dynamic Range
Day & Night
Auto Gain Control
Back Light Compensation
Flickerless
Supplied Voltage
Power Consumption
Operating Temperature
Storage Temperature
Dimensions (WxHxD)
Weight
NTSC PAL
2 : 1 Interalce Transfer 1/3 inch Double Scan CCD
768(H) x 494(V) 752(H) x 582(V)
Composite : 1.0V p-p, 75, Unbalanced
Internal / External Sync.
More than 50dB (AGC OFF / BW Mode)
Horizontal : 480 TV
0.1 Lux(DSS 2FLD, Color), 0.001 Lux(DSS Max, Color), 0.0003 Lux(DSS Max, BW)
C / CS Mount
1/60 ~ 1/10000 1/50 ~ 1/10000
AWB (AUTO, HOLD, USER)
On / Off Selectable
AUTO / DAY / NIGHT / EXT Selectable
OFF / LOW / MID / HIGH Selectable
On / Off Selectable
On / Off Selectable
AC 24V (20V~28V) or DC 12V (10V~15V)
600mA 7.2W (Max)
-10~+50(Recommendation : -5~+40)
-20~+60
65 x 59.6 x 122.5mm
Approx. 430g
High Resolution
DAY & NIGHT / WDR
10. Specifications -AC 24V Input Model
1. Attach the C-Mount lens adapter by turning clockwise.
2. Attach the lens to the camera by turning clockwise.
Mounting a C-Mount Lens
It is a terminal that controls the function of the camera at long distance.
1 2 3 4 5
It is the function that can turn on external IR LED Lamp by detecting the sensitivity
on CDS when the Day / Night mode is set "Auto" on the OSD menu of the camera.
It is the function that can be switched to DAY Mode or NIGHT Mode by receiving
the Day/Night on/off signal from external light sensor or IR LED LAMP.
When Day / Night Mode is set " External" on the OSD menu of the Camera.
Open contact : DAY
Close contact : NIGHT
3
4 GND
Day/Night Out
5V / 10mA
0V
: IR LED ON(NIGHT)
: IR LED OFF(DAY)
4
5
D/N ON (EXIT)
GND
TD
RD
GND
NAME
1. Frame GND
2. RD
3. TD
4. DTR
5. Signal GND
6. DSR
7. RTS
8. CTS
9. RI
PC Interface
DVR Interface (RS-485 Communication)
Tx +
Tx
-
Rx +
Rx
-
3
4
5
2
1
8
9
7
6
R +
R
-
T +
T
-
RS-232C D-Sub Connector (PC)
RS-232C TO RS-422 Converter
TRX +
TRX
-
R +
R
-
DVR (RS-485)
No. Function
1
2
3
4
5
R+ (RS-485)
R
-
(RS-485)
DAY/NIGHT OUTPUT "H"
GND
DAY/NIGHT INPUT(EXT) "L"
Remote Jack
Remote Input Jack (RS485)
DAY / NIGHT Output
DAY / NIGHT External Input
Press the MENU button to access the D & N mode.
Main Menu- D & N
/
TELE / WIDE
D & N
D/N MODE
LEVEL
FILTER DLY
INITIAL
EXIT
AUTO
48
10
ON
Your camera provides automatic mode changeover by CDS sensing day
or night conditions. It changes to Color mode in day condition for optimal
color and to BW mode in night condition for clear identification.
2. Set 'D/N MODE' to the desired mode using the LEFT( ) or RIGHT( ) button.
AUTO : DAY & NIGHT AUTO Mode / DAY : Only Day
NIGHT : Only NIGHT / EXT : Externel Interface (IR LED)
4.
Set 'FILTER DLY' to the desired mode using the LEFT( ) or RIGHT( ) button.
According to user's need, the turning delay time of 0~15 seconds can
be given.
1. Press the SET button to display the MENU and move the indicator
to 'D&N MODE' using the T or W button.
(15 : 40Lux, 28 : 30Lux, 48 : 20Lux, 88 : 10Lux, 128 : 5Lux, 200 : 1Lux)
This level is setting up the turning point of the filter. For example, if the
user set up the level to 48, the filter will be switched at 20Lux.
The level can be chosen from 0 to 200.
Please set up the level higher when you install this camera into the housing.
(example : Level 128)
3.
Set 'LEVEL' to the desired mode using the LEFT( ) or RIGHT( ) button.
INITIAL D&N MODE.
5. INITIAL
RETURN to MAIN MENU.
6. EXIT
Press the MENU button to access the WDR mode.
Main Menu- WDR
/
TELE / WIDE
WDR
WDR MODE
WDR LEVEL
BACK LIGHT
BLC LEVEL
INITIAL
EXIT
OFF
4
OFF
10
ON
1. Set 'WDR MODE' to 'ON/OFF' using the
LEFT( ) or RIGHT( ) button.
2. Set 'WDR LEVEL' to the desired mode using
LEFT( ) or RIGHT( ) button.
0~15 Ranged and adjust the brightness in WDR Mode.
3. Set 'BACK LIGHT' to 'ON/OFF' using the
LEFT( ) or RIGHT( ) button.
0~15 Ranged and adjust BLC Gain.
4. Set 'BLC LEVEL' to the desired mode using
LEFT( ) or RIGHT( ) button.
INITIAL WDR MODE.
5. INITIAL
RETURN to MAIN MENU.
6. EXIT
Press the MENU button to access the DISPLAY mode.
Main Menu- DISPLAY
/
TELE / WIDE
DISPLAY
CAMERA ID
ZONE LABEL
VERSION
INITIAL
EXIT
OFF
OFF
2.1
ON
MONITOR DISPLAY ON/OFF
1. CAMERA ID
MONITOR DISPLAY ON/OFF
2. ZONE LABEL
CAMERA VERSION.
3. VERSION
INITIAL DISPLAY MODE.
4. INITIAL
RETURN to MAIN MENU.
5. EXIT
Total 4 categories can be designated.
1.
Set 'AREA' to the desired mode using LEFT( ) or RIGHT( ) button.
Marks the area on the screen in state of 'ON'.
2.
Set 'MASK' to the desired mode using LEFT( ) or RIGHT( ) button.
Indicates the starting point of X axis.
3.
Set 'START X' to the desired mode using LEFT( ) or RIGHT( ) button.
Indicates the ending point of X axis.
4.
Set 'END X' to the desired mode using LEFT( ) or RIGHT( ) button.
Indicates the starting point of Y axis.
5.
Set 'START Y' to the desired mode using LEFT( ) or RIGHT( ) button.
Indicates the ending point of Y axis.
6.
Set 'END Y' to the desired mode using LEFT( ) or RIGHT( ) button.
INITIAL PRIVACY MODE.
7. INITIAL
RETURN to MAIN MENU.
8. EXIT
/
TELE / WIDE
PRIVACY
AREA
MASK
START X
END X
START Y
END Y
INITIAL
EXIT
1
OFF
OFF
ON
Press the MENU button to access the PRIVACY mode.
Main Menu- PRIVACY
If MASK is not 'ON' in setting AREA, data on X, Y coordinates
cannot be used.
3
COLOR VIDEO CAMERA
2
COLOR VIDEO CAMERA
5
COLOR VIDEO CAMERA
4
COLOR VIDEO CAMERA
7
COLOR VIDEO CAMERA
6
COLOR VIDEO CAMERA
11
COLOR VIDEO CAMERA
10
COLOR VIDEO CAMERA
13
COLOR VIDEO CAMERA
12
COLOR VIDEO CAMERA
15
COLOR VIDEO CAMERA
14
COLOR VIDEO CAMERA
19
COLOR VIDEO CAMERA
18
COLOR VIDEO CAMERA
21
COLOR VIDEO CAMERA
20
COLOR VIDEO CAMERA
23
COLOR VIDEO CAMERA
22
COLOR VIDEO CAMERA
27
COLOR VIDEO CAMERA
26
COLOR VIDEO CAMERA
29
COLOR VIDEO CAMERA
28
COLOR VIDEO CAMERA
31
COLOR VIDEO CAMERA
30
COLOR VIDEO CAMERA
35
COLOR VIDEO CAMERA
34
COLOR VIDEO CAMERA
9
COLOR VIDEO CAMERA
8
COLOR VIDEO CAMERA
17
COLOR VIDEO CAMERA
16
COLOR VIDEO CAMERA
25
COLOR VIDEO CAMERA
24
COLOR VIDEO CAMERA
33
COLOR VIDEO CAMERA
32
COLOR VIDEO CAMERA
43
COLOR VIDEO CAMERA
42
COLOR VIDEO CAMERA
41
COLOR VIDEO CAMERA
40
COLOR VIDEO CAMERA
37
COLOR VIDEO CAMERA
36
COLOR VIDEO CAMERA
39
COLOR VIDEO CAMERA
38
COLOR VIDEO CAMERA
. Memo
Color Video Camera Series
DCVIDEO
ELC
VIDEO OUT
RS485 UTP OUT
AC 24V
/
DC 12V
Class 2 Only
( ) ( )
T
( )
W
( )
MENU
Lens Selection Switch
Used to choose DC or VIDEO or ELC according to the type of your Lens.
Remote Jack (See page 21)
Used to connect remote plug.
POWER Input Terminal
Used to connect an AC 24V or DC 12V power source.
Used to connect a DC 12V power source.
Used to connect an AC 100V~AC 240V power source.
V.PHASE Adjustment V.R (AC 24V / DC 12V Input Model)
If the camera is to be used in LineLock mode, the vertical phase may
require adjustment to synchronize the vertical phase of the camera with
other camera in the system. Make this adjustment when the vertical phase
of the camera does not match with other cameras or systems. For correct
adjustment, use a multi-channel oscilloscope. The V.PHASE adjustment
can be readjusted.
VIDEO OUT Jack
Used to connect an external video monitor in jack.
UTP Video Output Terminal
These terminals provide a composite video output signal which may be
transmitted over a twisted-pair connection to furnished with a suitable receiver.
Function Setup Button
Functions can be setup using 5 buttons on the camera's rear panel.
MENU Buttons : Used to access menu mode.
Also used to essape menu mode.
UP/DOWN Buttons : Used to choose the desired
menu item. It also moves the cursor up or down
in the menu screen.
LEFT/RIGHT Buttons: Used to change the parameter
of the selected menu item. It also moves the cursor
the left of right in the menu screen.
MENU
( ) ( )
T
( )
W
( )
UTP Transmission Model
F unction
Setup Button
P ower Input
Terminal
Video Out Jack
L ens Selection
Swicth
UTP Video
Output Terminal
If you have trouble operating your camera, refer to the following table.
If the guidelines do not enable you to solve the problem, contact an
authorized technician.
Problem Solutions
Nothing appears
on the screen.
The image on the
screen is dim.
The image on the
screen is dark.
The camera is not
working properly,
and the surface of
the camera is hot.
The image on the
screen flickers.
. Check that the power cord and line connection
between the camera and monitor are fixed properly.
. Check that you have properly connected VIDEO
cable to the camera VIDEO output jack.
. Is lens stained with dirt? Clean your lens with soft,
clean cloth.
. Set the monitor to proper condition.
. If the camera is exposed to too strong light, change
the camera position.
. Adjust the lens' focus properly.
. Adjust the contrast feature of the monitor.
. If you have an intermediate device, set the 75/ Hi-z
properly. (refer to page 19)
. Adjust DC Level, VR Level properly. (refer to page 10)
. Check that you have properly connected the camera
to an appropriate power source.
(refer to page 16~18)
. Is the camera facing to direct sunlight or fluoresent
lighting? Change the camera position.
11. Troubleshooting
WDR
WDR
OWNER'S MANUAL
DIGITAL CAMERA SERIES
COLOR VIDEO CAMERA
P/N : 3810-0023L
(Ver.0609E)
Color Video Camera Series
WDR Camera Series
Design and specifications
are subject to
change without notice.
On-Screen Display
OSD
OSD
•
W
D
R
(
W
i
d
e
D
y
n
a
m
i
c
R
a
n
g
e
)
•
O
S
D
(
O
n
S
c
r
e
e
n
D
i
s
p
l
a
y
)
•
D
i
g
i
t
a
l
S
l
o
w
S
h
u
t
t
e
r
•
P
r
i
v
a
c
y
Z
o
n
e
480
TVL
MENU
9. Operating Camera
WDR MODE
WDR ELVEL
BACK LIGHT
BLC LEVEL
INITIAL
EXIT
ON, OFF
0 ~ 15
ON, OFF
0 ~ 15
ON, OFF
WDR
CAMERA ID
ZONE LABEL
NEGA/POSI
SHARPNESS
MIRROR
FREEZE
PROTOCOL
INITIAL
EXIT
GENERAL
000
~
255
SET
POSI/NEGA
0
~
15
NORMAL,MIRROR,VERTICAL,ROTATE
ON, OFF
DEF, P/D
ON, OFF
WB MODE
RED CONT
BLUE CONT
PUSH AUTO
INITIAL
EXIT
AWB
AUTO, HOLD, USER
NOT USE(AUTO, HOLD), 1
~
255(USER)
NOT USE(AUTO, HOLD), 1
~
255(USER)
NOT USE(AUTO, USER), OFF/PUSE(HOLD)
ON, OFF
A E
BRIGHTNESS
FLICKERLESS
SHUTTER SPD
AGC MAX SET
MAX FLD SET
INITIAL
EXIT
D/N MODE
LEVEL
FILTER DLY
INITIAL
EXIT
0
~
60
ON(PAL:x120, NTSC: x100), OFF
x250, x500, x1000, x2000, x4000, x10000
AGC OFF, LOW, MID, HIGH
OFF, 2
~
20 FLD, 40 FLD, 80 FLD, 160 FLD
ON, OFF
AUTO, DAY, NIGHT, EXT
0
~
200
0
~
15 SEC
ON, OFF
D & N
Configuration of The Menu
Use five setup Menu buttons on Rear side of the camera.
DOWN Button (WIDE)
LEFT Button
UP Button (TELE)
RIGHT Button
MENU
AREA
MASK
START X
END X
START Y
END Y
INITIAL
EXIT
PRIVACY
1 ~ 4
ON, OFF
ON, OFF
CAMERA ID
ZONE LABEL
VERSION
INITIAL
OFF STATE
DISPLAY
INITIAL
ON, OFF
ON, OFF
ON STATE, OFF STATE
EIXT
CONTROL
MENU
( ) ( )
T
( )
W
( )
DCVIDEO
ELC
V.PHASE
AC 24V
/
DC 12V
FG
VIDEO OUT
Class 2 Only
Setting Up The Menu
Resolution
High
High
High
High
High
High
High
High
High
High
High
High
High
High
High
High
Signal System
DAY&NIGHT
NTSC
PAL
NTSC
PAL
NTSC
PAL
NTSC
PAL
NTSC
PAL
NTSC
PAL
NTSC
PAL
NTSC
PAL
0
0
0
0
0
0
0
0
X
X
X
X
X
X
X
X
WDR
Power Input
0
0
0
0
0
0
0
0
0
0
0
0
0
0
0
0
DC 12V
DC 12V
AC 24V / DC 12V
AC 24V / DC 12V
AC 24V / DC 12V
AC 24V / DC 12V
AC 100V
~
AC 240V
AC 100V
~
AC 240V
DC 12V
DC 12V
AC 24V / DC 12V
AC 24V / DC 12V
AC 24V / DC 12V
AC 24V / DC 12V
AC 100V
~
AC 240V
AC 100V
~
AC 240V
UTP
X
X
X
X
0
0
X
X
X
X
X
X
0
0
X
X
When using AC 24V / DC 12V, make sure use the adaptor over
0.5A for AC 24V, over 1A for DC 12V.
Before operating the camera, confirm that you have the right
camera model and proper power voltage.
In order to help you understand this manual, we'll introduce
our model's description.
Thank you for purchasing this COLOR VIDEO CAMERA.
1. Model Description. Contents
Model Description
Precautions
Composition
Features
Name and Function
Connection
Remote Controller Operation
Communication Protocol
Operating Camera
Specifications
Troubleshooting
1.
2.
3.
4.
5.
6.
7.
8.
9.
10.
11.
5
6
7
8
9
12
22
24
26
36
42
5. Name and Function
CS-Mount Holding Screw
Used to readjust back focus of the camera. There are two back
focus lock screws. These must be loosened before the camera
may be back focused.
Loosen the lock screws to turn the CS-mount lens adaptor, and
tighten the lock screws after adjustment.
Tripod Mounting Hole
Used to install the camera on an optional tripod. The tripod
must be equipped with the screw specified as shown below.
Auto Iris Lens Connector
Used to connect Auto Iris Lens plug.
C-Mount Lens Adapter
Used to attach C-mount lens.
CS-Mount Lens Adapter
Used to attach CS-mount lens.
1/4"- 20 UNC (20 THREAD)
L : 4.5mm±0.2mm (ISO standard),
or 0.197" (ASA standard)
L
1. Wide Dynamic Range (WDR)
4. Fine Picture Condition Under Very Low Illumination (Sense up)
1/3 high density CCD and digital processor permit high quality pictures
to be captured in very low light condition.
SS-II DSP chip built-in SONY allows the camera to find the best picture
conditions in any environment and automatically gives a necessary
light level compensation, so you can always obtain the clear picture,
the finest detail and perfect light contrast.
5. VIDEO/ MANUAL/ DC Lens Selectable
The camera accepts 3 types of lenses (VIDEO/ MANUAL/ DC) and is
set with the VIDEO/ ELC/ DC selection switch.
6. Electronic Iris
The electronic iris shutter is automatically controlled at the speed of
1/60~1/10,000sec (NTSC Models), 1/50~1/10,000sec (PAL Models)
7. Controlled by OSD menu and RS-485
8. Privacy Zone
You can control the camera using OSD menu and RS-485 jack at a remote place.
3. High Resolution
The horizontal resolution of 480TV lines at Color mode can be achieved
by using a high density CCD having Double Speed 410,000 pixels
SONY CCD, which provides clean, noiseless and reliable pictures.
2. Day & Night
The camera provides automatic mode changeover by sensing day or
night conditions. It can change color mode in the day condition for
optimal color and BW mode in night condition for clear identification.
4. Features
MENU
( ) ( )
T
( )
W
( )
DCVIDEO
ELC
CONTROL
VIDEO OUT
Class 2 Only
DC 12V
CONTROL
MENU
( ) ( )
T
( )
W
( )
DCVIDEO
ELC
V.PHASE
AC 24V
/
DC 12V
FG
VIDEO OUT
Class 2 Only
CONTROL
MENU
( ) ( )
T
( )
W
( )
DCVIDEO
ELC
POWER INLET
VIDEO OUT
AC 24V/DC 12V Input Model
V .PHASE
Adjustment V.R
F unction
Setup Button
Video Out Jack
R emote Jack
L ens Selection
Swicth
P ower Input
Terminal
Left( ):Internal
Right( ):
External
DC 12V Input Model
F unction
Setup Button
Video Out Jack
R emote Jack
L ens Selection
Swicth
P ower Input
Terminal
AC 100V~AC 240V Input Model
F unction
Setup Button
P ower AC IN
Video Out Jack
R emote Jack
L ens Selection
Swicth
Notes
The lens is not supplied with this camera. Purchase a lens suitable
for your environment. This camera accepts the auto iris lens and
both C-and CS-mount lens.
1. Peel approximately 8mm from the end of the lens cable outer
cover.
2. Peel approximately 2mm from the end of the cable inner cover.
Installing Auto Iris Lens
. If the lens is marked with fingerprints or other marks, the
image quality might be poor.
. It is recommended to use a high quality lens to improve the
image quality under low illumination.
. For using main functions it is recommended to use
Auto Iris Lens with DC type.
6. Connection
LENS
8mm
2mm
3. Remove the cover from the iris lens plug supplied, and solder the lens
cable to the plug as shown below.
4. Remove the protective cap, and attach the lens to the camera by turning
clockwise.
5. Connect the lens plug to the auto iris connector on the right side of the
camera.
6. Set the VIDEO/ ELC/ DC selection switch to VIDEO or ELC or DC according
to the type of the lens.
No. 3 Pin
No. 1 Pin
connector
Lens cable
No. 4 Pin
No. 2 Pin
Pin.No. VIDEO TYPE
1
2
3
4
RED (Power Source)
N.C
WHITE (Video Signal)
BLACK (GND)
DC TYPE
--- Damping
-
--- Damping +
--- Drive +
--- Drive
-
CONTROL
MENU
( ) ( )
T
( )
W
( )
DCVIDEO
ELC
V.PHASE
AC 24V
/
DC 12V
FG
VIDEO OUT
Class 2 Only
Press the MENU button to access the GENERAL mode.
Main Menu- GENERAL
1. CAMERA ID
Set 'CAMERA ID' to the desired mode using LEFT( ) or RIGHT( ) button.
Press the MENU button to display the 'GENEARL' and move the arrow
indicator to 'CAMERA ID' using the T or W button.
If the 'CAMERA ID' feature is set to 'ON', the name will be displayed on
the monitor. (Main 'DISPLAY' MENU)
/
TELE / WIDE
MENU
GENERAL
AWB
AE
D & N
WDR
PRIVACY
DISPLAY
INITIAL
EXIT
GENERAL
CAMERA ID
ZONE LABEL
NEGA / POSI
SHARPNESS
MIRROR
FREEZE
PROTOCOL
GENERAL
Move up and down
using the TELE/
WIDE button.
CAMERA ID
ZONE LABEL
NEGA / POSI
SHARPNESS
MIRROR
FREEZE
PROTOCOL
INITIAL
EXIT
Can be changed
using the /
button.
- P/D
(Pelco-D)
- DEF
(Default)
001
SET
POSI
7
NORMAL
OFF
P/D
ON
2. ZONE LABEL
You can enter up to 10 characters.
Move the curser to character-enter location by using the
LEFT( ) or RIGHT( ) button.
Select the desired character by using T , W button.
The factory default characters are
A
~
Z,a
~
z,0
~
9,
~
, !, #, *, -, +, /, :, ;, ?, ., ", _, (, ), &, %, , , , ,
EXIT : RETURN to GENERAL MENU
3. NEGA/POSI
Select Nega/Posi.
4. SHARPNESS
Adjust the Sharpness of the screen.
5. MIRROR
NORMAL : Deactivation
MIRROR : Reverse turn Left or Right.
VERTICAL : Reverse turn Up or Down.
ROTATE : Rotate the Screen to 180.
6. FREEZE
Used when paused Video is needed.
7. PROTOCOL
P/D: Pelco-D
DEF: Default
8. INITIAL
INITIAL GENERAL MODE
9. EXIT
RETURN to MAIN MENU
UP/DN - CHAR SELECT
LE/RI - POSITION
MENU - EXIT
ZONE LABEL
If the 'DISPLAY MENU' feature is set to 'ZONE LABEL - ON', the
name will be displayed on the monitor.
Press the MENU button to access the AWB mode.
Main Menu- AWB
/
TELE / WIDE
AWB
WB MODE
RED CONT
BLUE CONT
PUSH AUTO
INITIAL
EXIT
AUTO
NOT USE
NOT USE
NOT USE
ON
1.
Set 'AUTO' to the desired mode using LEFT( ) or RIGHT( ) button.
'WB' is automatically set up between 2500~9500.
TELE / WIDE
AWB
WB MODE
RED CONT
BLUE CONT
PUSH AUTO
INITIAL
EXIT
HOLD
NOT USE
NOT USE
OFF
OFF
If 'PUSH AUTO is selected as 'ON', it fixes up the value setting the
current WB.
2.
Set 'HOLD' to the desired mode using LEFT( ) or RIGHT( ) button.
TELE / WIDE
AWB
WB MODE
RED CONT
BLUE CONT
PUSH AUTO
INITIAL
EXIT
USER
101
60
NOT USE
OFF
'WB' gains can be set by using RED CONT, BLUE CONT.
INITIAL AWB MODE.
3.
Set 'USER' to the desired mode using LEFT( ) or RIGHT( ) button.
4. INITIAL
RETURN to MAIN MENU.
5. EXIT
Press the MENU button to access the AE mode.
Main Menu- AE
/
TELE / WIDE
AE
BRIGHTNESS
FLICKERLESS
SHUTTER SPD
AGC MAX SET
MAX FLD SET
INITIAL
EXIT
19
OFF
NORMAL
MID
2 FLD
ON
0~60 BRIGHTNES Levels can be adjusted.
1.
Set 'BRIGHTNESS' to the desired mode using LEFT( ) or RIGHT( ) button.
OFF : Deactivation
ON : 1/100(PAL Models), 1/120(NTSC Models)
2.
Set 'FLICKERLESS' to the desired mode using the LEFT( ) or RIGHT( ) button.
3.
Set 'SHUTTER SPD' to the desired mode using LIFT( ) or RIGHT( ) button.
NORMAL : Deactivation
X250 : 1/250 sec, X500:1/500 sec, X1000:1/1000 sec,
X2000:1/2000 sec, X4000 : 1/4000 sec, X10000:1/10000 sec
AGC OFF : Deactivation
LOW : Gain is increased or decreased from 0 to 10dB automatically
according to the illumination.
MID : Gain is increased or decreased from 0 to 20dB automatically
according to the illumination.
HIGH : Gain is increased or decreased from 0 to 30dB automatically
according to the illumination.
4.
Set 'AGC MAX SET' to the desired mode using LIFT( ) or RIGHT( ) button.
OFF, 2 FLD ~ 20 FLD, 40 FLD, 80 FLD, 160 FLD
5.
Set 'MAX FLD SET' to the desired mode using LIFT( ) or RIGHT( ) button.
INITIAL AE MODE.
6. INITIAL
RETURN to MAIN MENU.
7. EXIT
Do use the camera under conditions where temperatures are within
-10C to 45C. Especially be careful for ventilation under high temperature.
Do not install the camera in extreme temperature conditions.
Do not install or use the camera in an environment where the
humidity is high.
It can cause the image quality to be poor.
Do not install the camera under unstable lighting conditions.
Severe lighting change or flicker can cause the camera to work improperly.
Never use the camera close to a gas or oil leak.
It can cause malfunctions to occur.
Do not disassemble the camera.
There are no user-serviceable parts inside it.
It can cause malfunctions to occur.
Do not drop the camera or subject them to physical shocks.
Never keep the camera face to strong light directly.
It can damage CCD.
Do not expose the camera to rain or spill beverage on it.
If it gets wet, wipe it dry immediately. Liquids can contain minerals that
corrode the electronic components.
Note
When this camera is installed near wireless communication
devices that emits strong electromagnetic field, irregularity
such as noise on the monitor may appear.
2. Precautions
. User Information
CAUTION!
TO REDUCE THE RISK OF ELECTRIC SHOCK,
DO NOT REMOVE COVER (OR BACK).
NO USER-SERVICEABLE PARTS INSIDE.
REFER SERVICING TO QUALIFIED
SERVICE PERSONNEL.
CAUTION
RISK OF ELECTRIC SHOCK
DO NOT OPEN
Explanation of two Symbols
The lightning flash with arrowhead symbol,
within an equilateral triangle, is intended to
alert the user to the presence of un-insulated
"dangerous voltage" within the product's
The exclamation point within an equilateral
triangle is intended to alert the user to the
presence of important operating and
maintenance-(servicing) instructions in the
THE GRAPHIC SYMBOLS WITH SUPPLEMENTAL MARKING ARE
ON THE BOTTOM OF THE SYSTEM.
"WARNING-TO PREVENT FIRE OR SHOCK HAZARD, DO NOT
EXPOSE THE UNIT TO RAIN OR MOISTURE"
enclosure that may be of sufficient magnitude to constitute a
risk of electric shock to persons.
literature accompanying the appliance.
INFORMATION
This equipment has been tested and found to comply with limits for a
Class A digital device, pursuant to part 15 of the FCC Rules.
These limits are designed to provide reasonable protection against
harmful interference when the equipment is operated in a commercial
environment.
This equipment generates, uses, and can radiate radio frequency energy
and, if not installed and used in accordance with the instruction manual,
may cause harmful interference to radio communications.
Operation of this equipment in a residential area is likely to cause
harmful interference in which case the user will be required to correct
the interference at their own expense.
WARNING
The manufacturer could void the user's authority to operate the
equipment.
CAUTION - To prevent electric shock and risk of fire hazards:
Do NOT use power sources except for that specified.
Do NOT expose this appliance to rain or moisture.
This installation should be made by a qualified service person
and should abide to all local codes.
Receiver
Remote Control
7. Remote Controller Operation (Pelco-D)
1 2 3 4
Power
DC 12V, 500mA
RS-485 Signal
- White Terminal :
- Black Terminal :
Camera Selection
- After camera connects with receiver,
firstly check camera I.D.
Menu
(
PROG
)
: Shows / Hides Menu.
Moves up and down items.
(
TELE
)
:
(
WIDE
)
:
- Press camera I.D. number(1
~
39 buttons)
on the top of wireless remote controller.
Caution : Usually camera I.D. number
are selected from No.1 to No.39.
over I.D. No.40, you will have a use limit.
- Initial camera I.D. number is set up No.0
when it takes out of manufacturer's warehouse.
Example: ZOOM IN
I.D. No.5: Press 5 +
<
TELE
>
I.D. No.15: Press
<F1>
+ 5 +
<
TELE
>
I.D. No.24: Press
<F2>
+ 4 +
<
TELE
>
I.D. No.34: Press
<F3>
+ 4 +
<
TELE
>
Set data for the selected items.
(
NEAR
)
:
(
FAR
)
:
F1
NEAR
FAR
FOCUS
F3
WIDE
F2
TELE
ZOOM
AUTO
SEQ PAN
PROG
A
7
4
1
6
9
A
0
8
5
32
The remote controller is optional item.
Cable Connection
Pelco-D/ RS-485
Receiver &
Remote Control
Pelco-D Keyboard
DVR System
Signal (RS-485)
MENU
( ) ( )
T
( )
W
( )
DCVIDEO
ELC
CONTROL
VIDEO OUT
Class 2 Only
DC 12V
Each model has different power specification, please check the name of
the model and power specification before connecting to power source.
Please refer to the sticker identifying the model, which is attached on the
product, for power specification.
The wire is polarized. Be careful of polarity.
Use DC 12V power source.
Class 2 Only
DC12V
Resistance of copper wire
[
at 20
(
68 F
)]
. As voltage may drop according to the length of electric cord as above
table, a camera may malfunction if too long output line of adaptor is
connected to the camera.
* Voltage for camera operation: DC 12V 10%
* Voltage drops on above table are variable according to types of electric
cord and makers.
Copper wire size
(
AWG
)
Resistance
(
/m
)
#18
(
0.83
)
Voltage Drop
(
V/m
)
#24
(
0.22
)
#22
(
0.33
)
#20
(
0.52
)
0.078 0.050
0.030
0.018
0.028 0.018
0.011
0.006
Connecting to Power
For DC 12V Power Type
PELCO "D" Byte Format
Command Message
8. Communication Protocol
Power OnFunction
MSG
BYTE 1
0xFF
BYTE 2
CamID
BYTE 3
0x88
BYTE 4
0x00
BYTE 5
0x00
BYTE 6
0x00
BYTE 7
Checksum
Power OffFunction
MSG
BYTE 1
0xFF
BYTE 2
CamID
BYTE 3
0x08
BYTE 4
0x00
BYTE 5
0x00
BYTE 6
0x00
BYTE 7
Checksum
Pelco D StopFunction
MSG
BYTE 1
0xFF
BYTE 2
CamID
BYTE 3
0x00
BYTE 4
0x00
BYTE 5 BYTE 6 BYTE 7
Checksum
Menu On / OffFunction
MSG
BYTE 1
0xFF
BYTE 2
CamID
BYTE 3
0x40
BYTE 4
0x00
BYTE 5
0x00
BYTE 6
0x00
BYTE 7
Checksum
Focus FarFunction
MSG
BYTE 1
0xFF
BYTE 2
CamID
BYTE 3
0x00
BYTE 4
0x80
BYTE 5
0x00
BYTE 6
0x00
BYTE 7
Checksum
Focus NearFunction
MSG
BYTE 1
0xFF
BYTE 2
CamID
BYTE 3
0x01
BYTE 4
0x00
BYTE 5
0x00
BYTE 6
0x00
BYTE 7
Checksum
Zoom WideFunction
MSG
BYTE 1
0xFF
BYTE 2
CamID
BYTE 3
0x00
BYTE 4
0x40
BYTE 5
0x00
BYTE 6
0x00
BYTE 7
Checksum
Zoom TeleFunction
MSG
BYTE 1
0xFF
BYTE 2
CamID
BYTE 3
0x00
BYTE 4
0x20
BYTE 5
0x00
BYTE 6
0x00
BYTE 7
Checksum
Menu On / OffFunction
MSG
BYTE 1
0xFF
BYTE 2
CamID
BYTE 3
0x00
BYTE 4
0x23
BYTE 5
0x00
BYTE 6
0x5F
BYTE 7
Checksum
Menu On / OffFunction
MSG
BYTE 1
0xFF
BYTE 2
CamID
BYTE 3
0x00
BYTE 4
0x03
BYTE 5
0x00
BYTE 6
0x62
BYTE 7
Checksum
Don't care
Pelco Keyboard (95+ PATTERN)
V/D Keyboard (Set Preset + 98)
DCVIDEO
ELC
VIDEO OUT
RS485 UTP OUT
AC 24V
/
DC 12V
Class 2 Only
( ) ( )
T
( )
W
( )
MENU
CONTROL
MENU
( ) ( )
T
( )
W
( )
DCVIDEO
ELC
V.PHASE
AC 24V
/
DC 12V
FG
VIDEO OUT
Class 2 Only
The wire is non-polarized.
Use AC 24V power source or DC 12V power source.
Class 2 Only
AC24V/DC12V F.G
When using AC 24V power, it is possible to supply the power within 100m.
Use 4 wires by 2 pair of wires.
When using DC 12V power, UTP wire can not be used for power line.
AC 24V
Power Supply
100m(Max)
2 Wire
For AC 24V / DC 12V Power Type
For AC 24V / DC 12V Power Type [UTP Video Output]
Notes
. Be sure to connect power after all the installation is done.
. Note that AC adaptor is not supplied with camera.
. Use only AC 24V / DC12V UL listed class 2 power supply.
. Do not use power sources other than that specified.
CONTROL
MENU
( ) ( )
T
( )
W
( )
DCVIDEO
ELC
POWER INLET
VIDEO OUT
Cabel
- Brown
- Blue
- Green
AC Power Input
Frame Ground
For AC 100V ~
AC 240V Power Type
CONTROL
MENU
( ) ( )
T
( )
W
( )
DCVIDEO
ELC
V.PHASE
AC 24V
/
DC 12V
FG
VIDEO OUT
Class 2 Only
CONTROL
MENU
( ) ( )
T
( )
W
( )
DCVIDEO
ELC
V.PHASE
AC 24V
/
DC 12V
FG
VIDEO OUT
Class 2 Only
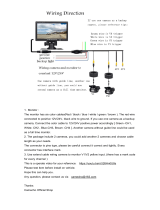
Connect the VIDEO out jack to the monitor video in jack.
Camera
CCD Camera
Intermediate
Video Receiver
End monitor
As the connecting method varies with the instruments, refer to the
manual supplied with the instrument.
Connect the cable after power is turned off.
Set the 75/ Hi-Z selection switch as shown below if you have an
intermediate device.
Monitor
Connecting to Monitor
For BNC Video Output Model
DCVIDEO
ELC
VIDEO OUT
RS485 UTP OUT
AC 24V
/
DC 12V
Class 2 Only
( ) ( )
T
( )
W
( )
MENU
Connecting to Monitor
Camera
Monitor(or DVR)
Connect the UTP video output terminal on the back of the product to
the monitor.
Connect UTP (Unshielded Twisted Pair) wire to the UTP output of the
camera directly.
UTP transmitter is included in the camera therefore additional UTP
transmitter is not necessary.
UTP receiver is necessary to connect UTP wire to Monitor or DVR.
When connecting UTP wire, make sure the polarity of the video signal.
Use UTP wire "CAT5 24AWG" to have the best transmission quality.
The twisted-pair output cannot be used at the same time as the
Composite Video output.
300m(Max)
UTP Cable
UTP Receiver
For UTP Video Output Model
1. WDR Color Video Camera .................
2. Auto Iris Lens Plug ..................
3. Remote Plug ....................
5. C-Mount Adapter ....................
6. Owner's Manual ................
3. Composition
D
a
y
&
N
i
g
ht
C
ol
or
C
a
m
er
a
D
a
y
&
N
i
g
ht
C
ol
or
C
a
m
er
a
3
x
D
i
gi
t
al
Zo
o
m
3
x
D
i
gi
t
al
Zo
o
m
W
D
R
W
D
R
O
W
NE
R'S
M
A
NU
A
L
DI
G
IT
A
L
C
A
M
E
R
A
S
E
R
I
E
S
C
O
L
O
R
V
I
D
E
O
C
A
M
E
R
A
O
n
-
S
c
r
e
e
n
D
i
s
p
l
a
y
O
SD
O
SD
•
W
D
R
(
W
i
d
e
D
y
n
a
m
i
c
R
a
n
g
e
)
•
O
S
D
(
O
n
S
c
r
e
e
n
D
i
s
p
l
a
y
)
•
D
i
g
i
t
a
l
S
l
o
w
S
h
u
t
t
e
r
•
P
r
i
v
a
c
y
Z
o
n
e
4
8
0
T
VL
/