Page is loading ...

CLOCKCAM-WIFI User’s Manual
Wall Clock iSecurity Camera
with Micro SD Recorder
12
6
9
3

© Copyright 2015
This manual is furnished under license and may be used or copied only in accordance with the terms
of such license. Except as permitted by such license, no part of this publication may be reproduced,
stored in a retrieval system, or transmitted, in any form or any means, electronic, mechanical,
recording, or otherwise, including translation to another language or format, without the prior written
permission of SecurityMan. The content of this manual is furnished for informational use only, is subject
to change without notice, and should not be construed as a commitment by SecurityMan. SecurityMan
Inc assumes no responsibility or liability for any errors or inaccuracies that may appear in this book.
FCC Information
Notes on FCC’s “Consistent Statement of Information” This product meet the requirements specified in
Part 15 of FCC Regulation. Operation rests with the following two conditions:
(1) The equipment should not cause any harmful interference.
(2) The equipment must receive and process any interference, including any
possible interference caused by operation mistakes.
After testing the product, we confirm that the camera complies with the provision for class C digital
equipment in the 15th part in FCC regulations; and the receiver complies with the limitations for class B
digital equipment in Part 15 of FCC regulation. The product generates, applies and emits radio waves.
It might cause harmful interferences to wireless communication if not be installed and used following
the description of the manual.
The product may cause interference in residential area, and the customer should take remedies to
eliminate the interference on their own costs.
If the product causes any harmful interference to wireless equipment or disturbs the receiving of TV
signals (it can be identified by turning on and off the product), you can solve the trouble by following
methods:
• Readjust the product or put it in another place.
• Extend the distance between the equipment interfered and the product.
• Refer to dealers or experienced radio electrician for help.
Warranty
SecurityMan Inc warrants that this product will be free from defects in title, materials and
manufacturing workmanship for one year or otherwise specified on the product packaging. This
limited warranty shall commence from the date of purchase. SecurityMan products warranty is not
transferable and is limited to the original purchaser. If the product is found to be defective then,
as your sole remedy and as the manufacturer’s only obligation, SecurityMan will repair or replace
the product. This warranty shall not apply to products that have been subjected to abuse, misuse,
abnormal electrical or environmental conditions, normal wear and tear, or any condition other than
what can be considered normal use.
Warranty Disclaimers
SecurityMan Inc, makes no other warranties, express, implied or otherwise, regarding this product,
and specifically disclaims any warranty for merchantability or fitness for a particular purpose. The
exclusion of implied warranties is not permitted in some states and the exclusions specified herein may
not apply to you. This warranty provides you with specific legal rights. There may be other rights that
you have which vary from state to state.
Limitation of Liability
The liability of SecurityMan Inc, arising from this warranty and sale shall be limited to a refund of the
purchase price. In no event shall SecurityMan be liable for costs of procurement of substitute products
or services, or for any lost profits, or for any consequential, incidental, direct or indirect damages,
however caused and on any theory of liability, arising from this warranty and sale. These limitations
shall apply not withstanding any failure of essential purpose of any limited remedy.
For Tech Support Call: 888-977-3777
SecurityMan
4601 E. Airport Drive, Ontario, CA, 91761, USA
Tel: 909-230-6668 Fax: 909-230-6889
Email: info@securitymaninc.com Website: www.securitymaninc.com
Copyright 2015 by SecurityMan v1.0

Introduction
Features
Important
Restrictions
Conditions
Package contents
Product Basics
Camera Setup
Phone Setup
Device Setting
Local Playback
Remote Playback
Local Snapshot
IPcam Live Setting
Software (CMS) Installation
IP Adress Setup
CMS Quick Connect (Intranet)
CMS Graphic User Interface
Menu Area
PTZ Control
Color
SYSTEM
PC Config
Base Config
Log Maintenance
Snapshot
Local Record
Device
Sync Time With PC
Start Up
Alarm Setting
I/O Trigger
Video Motion
Video Blind
Device Disconnect
Record Setting
Basic Settings
Device List
Schedule Type Selector
Plan Template Window
Schedule View
Version Info
IPCAM/CMS Account
Group
Add Group
Delete Group
Group List
Group Rights List
User
User Account Window
Add User
Delete User
Modify PW (Password)
Local Log
Lo g Type
Operation/Alarm
Begin Time
End Time
Detail Screen
Search
Next Page
Pre Page
Log Export
Add/Remove IPCam
Area List
Add Area
Add Devcie
Device List
IP Search
Device Name
Login Type
IP Address
Port
User Name
Table of Contents
NOTE: PTZ & I/O features may not be applicable to your device.
1
1
1
2
3
4
5
6
7
11
12
13
13
14
15
17
18
20
22
23
25
26
27
28
29
30
31
32
33
34
36
37
40
42
44
45
46
46
46
47
51
51
52
53
54
54
54
54
56
56
56
57
57
58
59
59
59
59
59
60
60
60
60
61
62
62
63
64
64
64
64
64
64
64

Password
Zone
Domain
Cloud
Edit Device
Add Device
Example How to Add the IPcam-SD to the CMS
Modify
Delete
Import Config
Export Config
Connection Test
IPCam Config
Device List
Sub-Menu Icons
Main Menu Icons
REC/Playback
Video
Snapshot
Alarm
Video Motion
Video Blind
Alarm Input
Alarm Output
Abnormal
System
General
System Time, Date Format, Date Separator, Time
Format, Language, HDD Full, Video Standard, DST
(Daylight saving Time).
Encode
Compression, Resolution, FPS, Bit Rate Type, Quality,
Bit Rate (KB/s), Frame Interval (Sec), Video/Audio,
Snapshot, Static Configuration of.
Network
Net Card (Wifi, PPPoE), DHCP Enable, IP Address,
Subnet Mask, Gateway, Primary DNS, Secondary DNS,
Media Port, HTTP Port, MAC Address, Remote Access
Full Bandwidth, Remote Access Priority.
Net Service
IP Filter, DDNS, Email, NTP (Network Time Protocol),
ARSP, Mobile Monitor, UPnP, FTP, Real Time Streaming
Protocol, Cloud.
GUI Display
CAM Name, Anti-Jitter, Transparency, Area Masking,
Date/Time Stamp, Camera Name (Position), Mirror
Image, Flip Image, Anti Flicker, IRSwap.
Advanced
SD Card Manage
Read/Write, Snapshot, Format Disk, Partition.
IPCam/CMS Account
Modify User, Modify Group, Modify PW (Password),
Add User, Add Group, Delete User, Delete Group.
Maintenance
IPCam Reboot, Delete Files (SD).
Default
Select All, General, Video, Network, GUI Display,
Encode, Alarm Set, NetService, IPCam/CMS Account.
Import/Export
Import (cfg), Export (cfg).
Upgrade
File Name (Browse), Upgrade.
Info
SD Card Info
Playback
IPCam Playback Tab
PC Playback Tab
Logout
Remote Access
Internet Explorer Remote Access
Smartphone Remote Access (iPhone, iPad/Tablet)
Smartphone Remote Access (Android)
P2P Remote Access
Specifications
64
64
65
65
65
66
66
70
70
70
70
70
71
72
72
73
74
75
77
79
80
83
86
88
90
91
92
95
98
102
109
112
113
115
120
121
123
124
125
125
130
131
133
133
134
135
138
141
144
146

1
Introduction
Stay connected wherever you go with the SecurityMan IP camera. You can remotely
access your IP camera from anywhere in the world; monitor your home or business
through a secure and password protected connection from your PC, Mac, iPhone,
iPad, iPod Touch, or any compatible Smartphone. Simply connect the IP camera
to a router over wireless network (Wi-Fi) or wired Ethernet, install the software on
your PC, or register online with our P2P server made easy for remote access and
configuration free, and download the free App for your Smartphone. Then, remote
video surveillance is right at your finger tips.
Features
Features
• Plug&Play/QR Code Setup
• Hidden color camera with built-in functional wall-clock (13.5”)
• Up to 57 hours of recording time on an 32GB micro SD card (SD card not
included)
• 720x480 @ 30fps crystal clear video quality
• Advanced H.264 video compression for smoother video streaming and smaller
file size
• 2-in-1 Design: Wired Ethernet or Wireless Wi-Fi
• Multiple private recording options (motion detection, manual or schedule
recording) to SD or remote PC
• Alarm email alerts
• Remote monitoring from Smartphone, Tablet, MAC and PC
• Supports up to 10 login users at the same time
• Point-to-point service for easy remote access without networking knowledge or
configuration
• Free CMS software for remote access/control, record/playback, and monitor up
to 64 IP based cameras (compatible with IPcam-SD, PIRSD-WiFi, & IPcam-SDII
models)
Important
This guide provides important information on the use and operation of your
IP camera. Please read all the information carefully prior to using the product
for the best performance and to prevent any damage/injuries or misuse of the
device(s). Customers are entitled to have read through this complete user’s manual
before using IP camera. Any unapproved changes or modifications will void
your warranty. Please ensure to have a complete understanding of the following
restrictions.

2
Restrictions
When using this product, the safety precautions below must be taken to avoid
possible legal liabilities and damages. Retain and follow all product safety and
operating instructions. Observe all warnings in the product operating instructions.
To reduce the risk of bodily injury, electric shock, fire and damage to the equipment,
observe the following precautions.
PLEASE NOTE that under certain circumstances, audio/video recording may
be PROHIBITED by law. This device should be used only in compliance with all
applicable federal, state and local statutes.
• DO NOT use this product near water, for example, near a bathtub, washbowl,
kitchen sink, or laundry tub, in a wet basement, or near a swimming pool.
• DO NOT place this product on an unstable cart, stand, or table. The product may
fall, causing serious damage to the product.
• DO NOT disassemble this product. Opening or removing covers may expose you to
dangerous voltages or other risks. Incorrect reassembly can cause electric shock
during subsequent use.
• DO NOT place this product too close to medical equipment.
1. This product may cause medical equipment to malfunction
2. Place the product at least 22cm from the heart pacemaker. Radio waves can
potentially influence the pacemaker and can lead to respiratory disturbance.
• DO NOT use this product to infringe on one’s privacy, spying intercepting and
related activities are illegal and punishable by law. Monitoring one’s private
activities without consent is illegal and this product is not designed or
manufactured for these purposes.
• DO NOT use this product to carry out any illegal activities such as sneak preview,
etc. SecurityMan shall not be responsible for any consequences of illegal conducts
made by users.
• DO NOT put the plastic packaging bags in reach of children or babies. Plastic bags
can create a suocation hazard when placed over the nose and mouth.
• DO NOT plug the AC adapter into the outlet in improper situations.
• Plugging in an AC adapter with wet hands might cause electric shock.
• Plugging in the AC adapter unsteadily might cause re or electric shock.
• DO NOT cover the AC adapter when it is connected to an outlet, place the adapter
near heaters, or put it on the floor which is equipped with a heater. The above
mentioned operation might cause fire or incidents.

3
Conditions
Please read the following messages to make sure your working environment is suitable.
• Please read the following messages to make sure your working environment
is suitable.
• The temperature should be kept between –10˚C and 50˚C (14˚F to 122˚F).
The relative humidity should be kept between 20% and 80%.
• Avoid putting the product in places where temperature or humidity may
change rapidly.
• Keep it dry, dustless and avoid lens exposure in direct sunlight.
• Keep product away from heat sources such as electric heaters.
• Do not use the camera near harmful chemicals.
• Do not place product near any strong magnetic objects
• It might influence the normal operation of the product if used at the fringe range
of normal temperature. Please turn o the power when not in use.
• Do not disassemble the product.
• Do not shake or strike the product.
• Please obey the local government’s environment protection policy.

4
Package Contents
AV Cable
CD (PC software and
manual)
3M Velcro
(cable management)
CLOCKCAM-WIFI
(Main Unit)
Network Dongle
Quick Start Guide
Mounting Screw
2 x Warning Stickers
Ethernet cable Power adapter
www.securitymaninc.com
VIDEO/AUDIO
MONITORING AND
RECORDING DEVICES
IN USE ON THESE
PREMISES
SecurityMan
¨
www.securitymaninc.com
VIDEO/AUDIO
MONITORING AND
RECORDING DEVICES
IN USE ON THESE
PREMISES
SecurityMan
¨

5
Product Basics
Hour Hand
Second Hand
Video Out
Battery
Ethernet Port
(Detachable)
Micro SD Slot
Wall Mount
Clock
Adjustment
Reset Button
Power Socket
NOTE: The reset button located on your camera is used to reset the IP camera to its
original “factory default” settings. To apply, power up your camera then press and
hold-in the reset button using a small non-pointed/non-metallic instrument
(paper clip or other stationary) for 15 seconds.
Minute Hand
Camera Lens
Front View
Rear View

6
We strongly recommend that you plug in and configure your IP camera prior to
mounting it.
NOTE: The IP camera must be configured through a “wired” Ethernet connection
before it can be used wirelessly (no Ethernet cable).
1. Set the time on the clock and insert a AA battery.
2. Insert a Micro SD card (not included) into the Micro SD slot.
3. Using the Ethernet cable provided, connect one end into the “Ethernet” port of
the clock and the other into your router/switch.
4. Insert the male end of the AC adapter into the power socket located on the back
of the CLOCKCAM-WIFI and the other end into a power outlet.
Camera Setup
+AA
Insert Clock Battery
(not included)
Connect the
Power Adapter
Insert Micro SD Card
(not included)
Connect the Ethernet
Cable to your Router

7
By User:
1: You can sync your IP camera to your user information by registering on xmeye.
net. Once you select “Login”, your camera screen will be displayed immediately.
2: Begin by opening Internet Explorer and going to http://www.xmeye.net (fig. 1.1).
Select “Register” and input your information into the available fields (fig. 1.2).
NOTE: Username, E-mail, and Password are required fields.
Fig. 1.1 Fig. 1.2
Phone Setup

8
3: Once you have filled out the information, press OK. A prompt showing “You have
registered successfully!” will be displayed (fig. 1.3)
4: Go back to the login page and login using your registered ID and PW.
5: Select “Device Manage” and select “Add” (fig.1.4)
6: The SerialNo. is the serial ID of the IP camera which you can obtain by scanning
the QR Code located on the device (please refer to the QSG for instructions on
how to scan the QR Code). Provide a Device Name for your device (fig. 1.5).
Note: Username is admin and the password is left blank.
7: With the device being registered to your XMEye account, you may use your phone
to login “By User” and the registered device will automatically display.
Fig. 1.3 Fig. 1.4
Fig. 1.5
By Device (Recommended):

9
4: Address:
A) Begin first by obtaining the IP Address of your router. Open your browser
and go to http://www.whatsmyip.org
B) Select “Address” next to Login Mode (Fig. 2.3)
C) Type in the IP Address of your router into the “Address” on your phone
(fig. 2.3).
D) The “Port” is 34568 (fig. 2.3). User ID should be admin and the password
should be left blank
E) Press “Save” (fig. 2.3) to complete the process and select your device to
view
1: This method is used to add your IPCam without registering your user information.
There are numerous ways to add/view your IP camera under “By Device”: QR
Code, Search in LAN, and Address
2: Serial / QR Code: Please refer to the Quick Start Guide
3: Search in LAN:
A) Make sure that your phone is connected to the same router as the IP camera
B) Begin by pressing “Add” and selecting the “Search in LAN” button (fig. 2.1)
C) Your IPCam device will display in a list form. Press on the + button (fig. 2.2)
and your device will appear in Device Detail. Press “Save” (fig. 2.1) to
complete the process and select your device to view.
Fig. 2.1 Fig. 2.2

10
Fig. 2.3
A: Channel Selection:
You may select up to 8 dierent channels to view more than the four quadrants
B: Play/Stop Icon Record Icon
Delete Channel Icon Alarm Icon
Snapshot Icon Microphone Icon
C: IPCam Live App Settings Icon:
Gives you access to change the settings for the IPCam Live application
Swipe Left/Right Screen Icon:
Indicates you can swipe to the left for more options

11
D: Full screen mode:
Double tap the camera screen to view it in full screen
E: Panning:
You can pan the camera using the Up, Down, Left, and Right arrow keys
F: Zoom In/Zoom Out:
You can zoom in and zoom out of the device. Not applicable for IP camera
G: Close/Far:
You can zoom up to a specific section of the camera. Not applicable for IP camera
H: Aperture:
Configure the opening of a lens’s diaphragm through which light passes. Not
applicable for IP camera
I: Camera Settings:
Configure settings for any specific devices you have connected to your phone.
Settings include, but not limited to, wifi setup, remote playback, video motion, alarm
settings, etc.
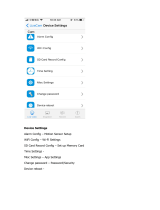
Device Setting

12
1: Ethernet: Configure your Ethernet settings through your phone. Your IP camera
must be connected to your router
2: Wi-Fi: Setup your wifi by searching for your router and inputting your password
through the phone
3: Time Setting: Able to change the date format and format
4: System Setting: Displays IP camera firmware. Performs IP camera reset.
5: Video Setting: Changes the quality of the video, resolution, frames per second,
bitrate, etc.
6: SD Card Info: Displays information on the SD card. Formats the SD Card and
configures the overwrite function
7: Alarm Setting: Configures video motion, alarm input and output, snapshots,
recording, and email function
Any recorded videos or snapshots from your phone will be displayed here. You can
play the videos/pictures from your phone by tapping on the files. To delete the files
from your phone, simply select “Edit” and press on the delete icon.
Local Playback

13
Remote Playback
Local Snapshot
The remote playback searches for recorded files that were saved onto the SD card in
the IP camera. You may select through the date, time, and type of recorded files (i.e.
Motion recording, snapshots, video blind, etc.)
You can view the IP camera snapshots which were taken on the IPCam app. You can
save the snapshots onto your phone’s photo gallery or delete them.

14
IPCam Live Setting
About & Help
Configures the settings for the IPCam application on your phone. Configurations
include alert sounds, audio, video ratio, wifi network, etc.
Information on the IPCam application and contact information are located on this
page.

15
1. Insert the Installation CD into the CD-ROM drive, and double click the “Open
folder to view files” option from the the AutoPlay window.
2. Next, double-click on the “CMS_V3.0.9.14.T.20130410.exe” file to start the
software installation process as shown above.
NOTE: Please note that software revision may change with noticed.
3. The CMS (Central Management Software) Setup screen will appear as shown
below. Select “Yes” in the User Account Control window and then click “Next” to
continue or “Cancel” to cancel the installation.
Software (CMS) Installation
System Requirements
• Operating System: Windows XP, Vista, 7 and 8 (32-bit/64-bit OS)
• Processor: Intel Pentium 4 (2.0GHz or above)
• Video Card: NVIDIA GeForce 6800 equivalent or better
• Memory: 2GB RAM
• Storage: 1GB available hard drive space
• Internet: Broadband Internet connection

16
4. Input the user name and company name. Then click “Next” to continue as
illustrated above.
5. The default Install CMS directory is C:\Program Files\CMS, click “Change” to select
a dierent destination folder, or click “Next” to continue (recommended).
6. The default shortcut icon folder is CMS. Click the drop-down menu for
more selections, or click “Next” to start installing the CMS to your computer
(recommended) as illustrated above.
7. Click “Next” in the Ready to Install window and then click “Finish” to complete
the CMS software installation as shown below.
NOTE: When you first launch the central management software you will be
prompted with a pop up stating that your device list is empty “please add a device”.
Click OK to proceed.
8. After the installation is complete, a “CMS” short-cut icon will automatically be
created on your desktop as shown above. Double-click on the “CMS” icon to
open the CMS software for IPcam-SD.
/