
Tuner Box
User Manual

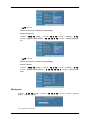
Starting
Picture
• Size
• 16:9
• Zoom1
• Zoom2
• Wide Fit
• 4:3
• Just Scan
Sound
• Multi-Track Options
• Preferred Language
• Multi-Track Sound
Channel
• Antenna
• Air
• Cable
• Auto Program
• Air
• Cable
• Auto
• Clear Scrambled Channel
• Channel List
• All
• Added
• Favorite
• Name
• Fine Tune
• Signal Strength
Setup
• Plug & Play

• Language
• V-Chip
• V-Chip Lock
• TV Parental Guidelines
• MPAA Rating
• Canadian-English
• Canadian-French
• Downloadable U.S. Rating
• Change PIN
• Caption
• Caption
• Caption Mode
• Digital Caption Options
• SW Upgrade
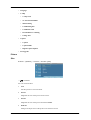
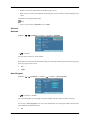
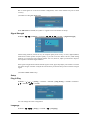
Picture
Size
D.MENU →[Picture] → ENTER → ENTER→[Size]
→ , → ENTER
You can switch the Size.
1. 16:9
Sets the picture to 16:9 wide mode.
2. Zoom1
Magnifies the size of the picture on the screen.
3. Zoom2
Magnifies the size of the picture more than Zoom1.
4. Wide Fit
Enlarges the aspect ratio of the picture to fit the entire screen.

5. 4:3
Sets the picture to 4:3 normal mode.
6. Just Scan
Use the function to see the full image without any cutoff when HDMI (720p/1080i/1080p) or
DTV (1080i) signals are input.
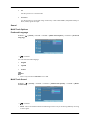
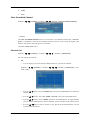
Sound
Multi-Track Options
Preferred Language
D.MENU → → [Sound] → ENTER → ENTER→ [Multi-Track Options] → ENTER→ [Preferred
Language]
→ , → ENTER
You can select the audio language.
1. English
2. Spanish
3. French
Note
• This is only activated if Antenna is set to Air.
Multi-Track Sound
D.MENU → → [Sound] → ENTER → ENTER→ [Multi-Track Options] → ENTER→ [Multi-
Track Sound]
→ , → ENTER
• Mono : Choose for channels that are broadcasting in mono or if you are having difficulty receiving
a stereo signal.

• Stereo : Choose for channels that are broadcasting in stereo.
• SAP : Choose to listen to the Separate Audio Program, which is usually a foreign-language trans-
lation.
(Available in Analog TV Mode Only)
Note
• This is only activated if Antenna is set to Cable.
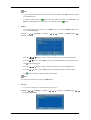
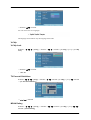
Channel
Antenna
D.MENU →
→ → [Channel] → ENTER → ENTER→ [Antenna]
→ , → ENTER
You can select a normal or wired channel.
If ANT IN are connected, select the antenna input you want. If the antenna input is not selected properly,
noise may appear on the screen.
1. Air
2. Cable
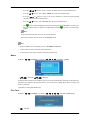
Auto Program
D.MENU →
→ → [Channel] → ENTER → → ENTER→ [Auto Program]
→ , → ENTER → ENTER
The TV automatically cycles through all of the available channels and stores them in memory.
In rare cases, "Auto program" may miss a few channels due to weak signals and the channels may
not be added to the channel memory.
1. Air

2. Cable
3. Auto
Clear Scrambled Channel
D.MENU → → → [Channel] → ENTER → → → ENTER→ [Clear Scrambled Channel]
→ ENTER
The Clear Scrambled Channel function is used to filter out scrambled channels after "Auto Pro-
gram" is completed. It removes the scrambled channels from the list by tuning the digital cable
channels. This process may take up to 20~30 minutes.
(Available in DTV Mode Only)
Channel List
D.MENU → → → [Channel] → ENTER → → → → ENTER→ [Channel List]
You can manage the channels.
1. All
• You can display a list of all channels, added channels or your favorite channels.
D.MENU → → → [Channel] → ENTER → → → → ENTER→ [Channel List] → EN-
TER→ [All]
• Press the or button to select "Channel List", then press the ENTER button to delete the
channel.
• Press the or button to select All , Added or Favorite , then press the ENTER button.
• Press the or button to select Channel, then press the ENTER button. To toggle between
your all channels, add channels or favorite channels, use the red button on the remote control.
• Press the or button to select a channel to view, then press the ENTER button. You can
watch the selected channel.

Note
• A gray-colored channel indicates the channel has been deleted. The Add menu only appears
for deleted channels.
•
A channel marked with the " " mark means the channel has been set as a Favorite. The
Delete from Favorite menu only appears for channels with the "
" mark.
2. Added
• All selected channels will be shown on ”Added” menu. To use the Channel List function,
first run Auto Program.
D.MENU → → → [Channel] → ENTER → → → → ENTER→ [Channel List] → →
ENTER→ [Added]
• Press the , , or button to select a channel to delete, then press the ENTER button.
Press the
or button to select Delete, then press the ENTER button to delete the channel.
The
mark will disappear.
• Press the , , or button to select a channel to add, then press the ENTER button.
Press the
or button to select Add, then press the ENTER button to add the channel.
The
mark will appear and the channel will be added.
Note
All selected channels will be shown on Added menu.
3. Favorite
• You can set channels you watch frequently as favorites.
D.MENU →
→ → [Channel] → ENTER → → → → ENTER→ [Channel List] → →
→ ENTER→ [Favorite]

• Press the , , or button to select a channel to delete, then press the ENTER button.
Press the
or button to select All or Added, then press the ENTER button.
• Press the , , or button to select your favorite channels to watch among the labeled
channels. Then press the ENTER button.
Press the
or button to select Favorite, then press the ENTER button .
The " " symbol will be highlighted and the channel will be set as a Favorite. To cancel your
Favorite channel selection, press the ENTER button until the" " symbol is no longer high-
lighted.
Note
Only memorized channels can be set as favorite channels.
All favorite channels will be shown in the Favorite menu.
Note
• Red(List Mode): Press repeatedly to select All, Added or Favorite.
• Green (Add All): Press to add all channels deleted.
• Yellow (Delete All): Press to delete all channels memorized.
Name
D.MENU →
→ → [Channel] → ENTER → → → → → ENTER→ [Name]
→ , / , → ENTER→ , / , → ENTER
If channel name information is broadcast when you store the channels either manually or automatically,
the names are assigned to the channels directly. You can however change these names or assign new
names as required.
(Available in Analog TV Mode Only)
Fine Tune
D.MENU →
→ → [Channel] → ENTER → → → → → → ENTER→ [Fine Tune]
→ , → ENTER

Due to weak signals or an incorrect antenna configuration, some of the channels may not be tuned
correctly.
(Available in Analog TV Mode Only)
When Fine Tune is enabled, the symbol "*" appears next to the number at the top.
Signal Strength
D.MENU → → → [Channel] → ENTER → → → → → ENTER→ [Signal Strength]
Unlike analog channels, which can vary in reception quality from "snowy" to clear, digital (HDTV)
channels have either perfect reception quality or you will not receive them at all. So, unlike analog
channels, you cannot fine tune a digital channel. You can, however, adjust your antenna to improve
the reception of available digital channels.
If the signal strength meter indicates that the signal is weak, physically adjust your antenna to increase
the signal strength. Continue to adjust the antenna until you find the best position with the strongest
signal.
(Available in DTV Mode Only)
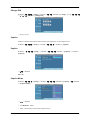
Setup
Plug & Play
D.MENU → → → → [Setup] → ENTER → ENTER→ [Plug & Play]→ ENTER→ ENTER→
, → ENTER→ , → ENTER
You can manage the entire configuration.
Language
D.MENU → → → → [Setup] → ENTER → → [Language]

→ ENTER→ , → ENTER
You can choose one of 3 languages.
The language chosen affects only the language of the OSD.
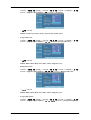
V-Chip
V-Chip Lock
D.MENU → → → → [Setup] → ENTER → → → ENTER→ [V-Chip]→ [0~9]→ [V-Chip
Lock]
→ ENTER→ , → ENTER
• Off / On
TV Parental Guidelines
D.MENU → → → → [Setup] → ENTER → → → ENTER→ [V-Chip]→ [0~9]→ → ENTER
→ [TV Parental Guidelines]
→ , / , → ENTER
MPAA Rating
D.MENU → → → → [Setup] → ENTER → → → ENTER→ [V-Chip]→ [0~9]→ → →
ENTER→ [MPAA Rating]

→ , / , → ENTER
Canadian-English
D.MENU → → → → [Setup] → ENTER → → → ENTER→ [V-Chip]→ [0~9]→ → →
→ ENTER→ [Canadian-English]
→ , / , → ENTER
Canadian-French
D.MENU →
→ → → [Setup] → ENTER → → → ENTER→ [V-Chip]→ [0~9]→ → →
→ → ENTER→ [Canadian-French]
→ , / , → ENTER
Downloadable U.S. Rating
D.MENU → → → → [Setup] → ENTER → → → ENTER→ [V-Chip]→ [0~9]→ → →
→ → → ENTER→ [Downloadable U.S. Rating]
→ , / , → ENTER

Change PIN
D.MENU → → → → [Setup] → ENTER → → → ENTER→ [V-Chip]→ [0~9]→ → →
→ → → → ENTER→ [Change PIN]
→ [0~9]→ [0~9]
Caption
Enables or disables the Caption feature and sets the appearance of closed caption text.
D.MENU → → → → [Setup] → ENTER → → → → ENTER→ [Caption]
Caption
D.MENU → → → → [Setup] → ENTER → → → → ENTER→ [Caption] → ENTER→
[Caption]
→ , → ENTER
Off / On
Caption Mode
D.MENU → → → → [Setup] → ENTER → → → → ENTER→ [Caption] → → ENTER
→ [Caption Mode]
→ , → ENTER
• The Default is “CC1“.
• CC1 : The Primary Synchronous Caption Service.

These are captions in the primary language that must be in sync with the sound, preferably matched
to a specific frame.
• CC2 : The Special Non-Synchronous Use Captions.
This channel carries data that is intended to augment information carried in the program.
• CC3 : Secondary Synchronous Caption Service.
Alternate program-related caption data, typically second language captions.
• CC4 : Special Non-Synchronous Use Captions. Similar to CC2.
• Text1 : First Text Service. This may be various non-program related data.
• Text2 : Second Text Service. Additional data, usually not program related.
• Text3 / Text4 : Third and Fourth Text Services.
These data channels should be used only if Text1 and Text2 are not sufficient.
Digital Caption Options
D.MENU →
→ → → [Setup] → ENTER → → → → ENTER→ [Caption] → → →
ENTER→ [Digital Caption Options]
Note
“Digital Caption Options” are available only when “Service1~Service6” can be selected in “Caption
Mode”.
Service1~Service6 in digital caption mode may not be available depending on the broadcast.
• Size
D.MENU →
→ → → [Setup] → ENTER → → → → ENTER→ [Caption] → → →
ENTER→ [Digital Caption Options] → ENTER→ [Size]
→ , → ENTER
Default, Small, Standard, Large
• Font Style

D.MENU → → → → [Setup] → ENTER → → → → ENTER→ [Caption] → → →
ENTER→ [Digital Caption Options] → → ENTER→ [Font Style]
→ , → ENTER
Default, Style0, Style1, Style2, Style3, Style4, Style5, Style6, Style7
• Foreground Color
D.MENU → → → → [Setup] → ENTER → → → → ENTER→ [Caption] → → →
ENTER→ [Digital Caption Options] → → → ENTER→ [Foreground Color]
→ , → ENTER
Default, White, Black, Red, Green, Blue, Yellow, Magenta, Cyan
• Background Color
D.MENU → → → → [Setup] → ENTER → → → → ENTER→ [Caption] → → →
ENTER→ [Digital Caption Options] → → → → ENTER→ [Background Color]
→ , → ENTER
Default, White, Black, Red, Green, Blue, Yellow, Magenta, Cyan
• Foreground Opacity
D.MENU → → → → [Setup] → ENTER → → → → ENTER→ [Caption] → → →
ENTER→ [Digital Caption Options] → → → → → ENTER→ [Foreground Opacity]

→ , → ENTER
Default, Transparent, Translucent, Solid, Flashing
• Background Opacity
D.MENU → → → → [Setup] → ENTER → → → → ENTER→ [Caption] → → →
ENTER→ [Digital Caption Options] → → → → → → ENTER→ [Background Opac-
ity]
→ , → ENTER
Default, Transparent, Translucent, Solid, Flashing
• Return to Default
D.MENU → → → → [Setup] → ENTER → → → → ENTER→ [Caption] → → →
ENTER→ [Digital Caption Options] → → → → → → → ENTER→ [Return to De-
fault]
SW Upgrade
D.MENU → → → → [Setup] → ENTER → → → → → ENTER→ ENTER→ [SW Up-
grade] → ENTER→ [USB]
Use to upgrade the software.

• USB
-
 1
1
-
 2
2
-
 3
3
-
 4
4
-
 5
5
-
 6
6
-
 7
7
-
 8
8
-
 9
9
-
 10
10
-
 11
11
-
 12
12
-
 13
13
-
 14
14
-
 15
15
-
 16
16


