
Before operating the unit, please read this manual thoroughly.
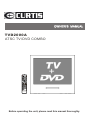
ATSC TV/DVD COMBO
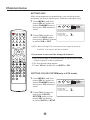
POWER TV/DVD
OPEN/CLOSE
Q.VIEW INFO
MUTE
1 2 3 4
5 6 7 8
99 00
CC
P.MODE
CH+
CH-
VOL
_
MENU
OK
STOP
SETUP
PAUSE/STEP
REV
FWD .
PREV
NEXT
D.MENU
REPEAT
A-B
PLAY/ENTER
SLOW
ANGLE
TITLE/PBC
SEARCH
AUDIO
EXIT
D.CALL
TV/AV
PROGRAM
ZOOM
10+
ARC
VOL
+
SUBTITLE
-
TV/DTV
SAP
S.MODE
GUIDE
CH.LIST FAV.LIST
TVD2000A
OWNER'S MANUALOWNER'S MANUAL

1
PRECAUTIONS
FCC WARNING-This equipment may generate
or use radio frequency energy. Changes or
modifications to this equipment may cause
harmful interference unless the modifications
are expressly approved in the instruction
manual. The user could lose the authority
to operate this e uipment if an unauthorized
change or modification is made.
q
LASER SAFETY
This unit employs a laser. Only a qualified
service person should remove the cover
or attempt to service this device, due to
possible eye injury.
CAUTION: USE OF CONTROLS OR
ADJUSTMENTS OR PERFORMANCE
OF PROCEDURES OTHER THAN
THOSE SPECIFIED HEREIN MAY
RESULT IN HAZARDOUS RADIATION
EXPOSURE.
CAUTION
LOCATION
: VISIBLE AND INVISIBLE
LASER RADIATION WHEN OPENAND
INTERLOCK DEFEATED. DO NOT
STARE INTO BEAM.
:INSIDE,NEAR THE DECK
MECHANISM.
CONTENTS
Before Operation
Basic operation
............................................................
...........................................................................................
..........................................................................
Preparation of the remote control......................................................
...................................
Front panel of the TV set..................................................................
Rear panel of the TV set....................................................................
...................................................................
The other video and audio equipment .................................................
Antenna connections ...........................................................................
Cable TV connections .........................................................................
Connections the other equipment .......................................................
Setting the language and blue screen .................................................
Channel menu .....................................................................................
Channel selection ................................................................................
Volume adjustment .............................................................................
Screen information ..............................................................................
Video menu ........................................................................................
Manual time setting ............................................................................
Setting the ON/OFF timer ..................................................................
Function menu ...................................................................................
Closed caption ...................................................................................
DTV setup menu ................................................................................
Other function ...................................................................................
........................................................................
Specifications .....................................................................................
Warranty ............................................................................................
Important Safety Instructions
Installation
Function buttons and
Using the remote control
Antenna Connection
Troubleshooting guide
External Connections
s
DVD Features...................................................................................
Special Playback Functions..............................................................
DVD System Setup..........................................................................
Playable Discs...................................................................................
Disc Protection and DVD Characteristics..........................................
Others
DVD Operation
1
5
5
5
6
6
7
8
9
10
11
12
13
14
16
17
18
19
21
22
23
28
29
34
36
38
39
43
44
45
46
47

1. READ THESE INSTRUCTIONS
All the safety and operating instructions should be read before the unit is operated.
2. KEEP THESE INSTRUCTIONS
The safety and operating instructions should be retained for future reference.
3. HEED ALL WARNINGS
All warnings on the unit and in the operating instructions should be adhered to.
4. FOLLOW ALL INSTRUCTIONS
All operating and use instructions should be followed.
5.CLEAN ONLY WITH DRY CLOTH.
Unplug this unit from the wall outlet before cleaning. Do not use liquid cleaners or aerosol cleaners.
Use a damp cloth for cleaning the exterior cabinet only.
6. DO NOT BLOCK ANY VENTILATION OPENINGS. INSTALL IN ACCORDANCE WITH THE
MANUFACTURER`S INSTRUCTIONS.
7. DO NOT USE THIS APPARATUS NEAR WATER
Do not use this unit near water. For example, near a bathtub, washbowl, kitchen sink, laundry tub, in a wet
basement, or near a swimming pool.
11. VENTILATION
Slots and openings in the cabinet back or bottom are provided for ventilation,
to ensure reliable operation of the unit, and to protect it from overheating.
These openings must not be blocked or covered.The openings should never be blocked by placing the unit
on a bed, sofa, rug, or other similar surface.This unit should never be placed near or over a radiator or heat
source. This unit should not be placed in a built-in installation such as a bookcase or rack unless proper
ventilation is provided and/or the manufacturer`s instructions have been adhered to.
12. POWER SOURCES
This unit should be operated only from the type of power source indicated on the rating plate. If you are not
sure of the type of power supply to your home, consult your appliance dealer or local power company. For
units intended to operate from battery power, or other sources, refer to the operating instructions.
IMPORTANT SAFEGUARDS
S3126A
PORTABLE CARTWARNING
(symbol providedby RETAC)
Caution - Use of controls oradjustments orperformance ofprocedures otherthan thosespecified
herein may result in hazardous radiationexposure
Product complies with radiation performance standardsunder theFederal Food,Drug andCosmeticAct
10.Use only with the cart, stand, tripod, bracket, or table specified by
the manufacturer, or sold with the apparatus. When a cart is used,
use caution when moving the cart/apparatus combination to avoid
injury from tip-over.
8. Do not install near any heat sources such as radiators, heat registers,
stoves, or other apparatus (including amplifiers) that produce heat.
9. Only use attachments/accessories specified by the manufacturer.
WARNING:TO REDUCETHE RISK OFFIRE OR ELECTRIC SHOCK,DO NOT EXPOSE
THISAPPLIANCE TORAIN OR MOISTURE.
CAUTION
RISK OF ELECTRIC SHOCK
DO NOT OPEN
CAUTION:TO REDUCETHE RISK OF ELECTRIC
SHOCK, DONOT REMOVE COVER (OR BACK).
NO USERSERVICEABLE PARTS INSIDE. REFER
SERVICINGTO QUALIFIED SERVICE PERSONNEL
This symbol indicates that dangerous
voltage constituting a risk of electrical
shock is present in this unit.
This symbol indicates there are important
operating and maintenance instructions
in packaged with this product.
2

3
Important safety Instructions
An outsideantenna system should not belocated in the vicinity ofoverhead power lines or
other electriclight or power circuits, orwhere it can fall ontoor against such powerlines or
circuits. Wheninstalling an outside antenna system,extreme care should be takento keep
from touchingsuch power lines or circuits,as contact with them mightbe fatal.
Do notoverload wall outlets and extensioncords, as this can resultin a risk offire or electric
shock.
19
Do notpush objects through any openingsin this unit, as theymay touch dangerous voltage
points orshort out parts that couldresult in fire or electricshock. Never spill orspray any
type ofliquid into the unit.
If anoutside antenna or cable systemis connected to the unit,be sure the antennaor cable
system isgrounded to provide some protectionagainst voltage surges and built-upstatic
charges, Section810 of the National ElectricalCode (NEC),ANSI/NFPA70, provides
information withrespect to proper grounding ofthe mast and supporting structure,
grounding ofthe lead-in wire to anantenna discharge unit, size ofgrounding conductors,
location ofantenna discharge unit, connection togrounding electrodes, and requirements
for thegrounding electrode.
17. POWER LINES
18. OVERLOADING
. OBJECT AND LIQUID ENTRY
20. OUTDOOR ANTENNA GROUNDING
21. SERVICING
Do notattempt to service this unityourself as opening or removingcovers may expose you
to dangerousvoltage or other hazards. Referall servicing to qualified servicepersonnel.
13. GROUNDING OR POLARIZATION
Do not defeat the safety purpose ofthe polarizedor grounding-type plug.Apolarized plug hastwo
blades with one wider than the other.Agrounding type plug has two blades and athird grounding
prong.The wideblade or the third prong are providedfor yoursafety. If the provided plug does not
fit into your outlet, consult an electricianfor replacementof the obsolete outlet.
14. Protect the power cord from being walked on or pinched particularly at plugs, convenience
receptacles, and the point where they exit from the apparatus.
15. Unplug this apparatus during lightning storms or when unused for long periods of time.
16. Refer all servicing to qualified service personnel. Servicing is required when the apparatus
has been damaged in any way, such as power-supply cord or plug is damaged, liquid has been
spilled or objects have fallen into the apparatus, the apparatus has been exposed to rain or
moisture, does not operate normally, or has been dropped.

4
Important safety Instructions
22. DAMAGE REQUIRING SERVICE
Unplug thisunit from the wall outletand refer servicing to qualifiedservice personnel under
the followingconditions:
a. Whenthe power-supply cord or plugis damaged.
b. Ifliquid has been spilled, orobjects have fallen into theunit.
c. Ifthe unit has been exposedto rain or water.
d. Ifthe unit does not operatenormally by following the operatinginstructions.Adjust
only thosecontrols that are covered bythe operating instructions, as animproper
adjustment ofother controls may result indamage and will often requireextensive
work bya qualified technician to restorethe unit to its normaloperation.
e. Ifthe unit has been droppedor the cabinet has beendamaged.
f. Whenthe unit exhibits adistinct change in performance, thisindicates a need for
service.
When replacementparts are required, be surethe service technician uses replacementparts
specified bythe manufacturer or those thathave the same characteristics asthe original part.
Unauthorized substitutionsmay result in fire, electricshock or other hazards.
Upon completionof any service or repairsto this unit, ask theservice technician to perform
safety checksto determine that the unitis in proper operating condition.
The productshould be situated away fromheat sources such as radiators,heat registers,
stoves, orother products (including amplifiers) thatproduce heat.
Keep yourfingers well clear of thedisc slot as it isclosing. It may causeserious personal
injury.
When youconnect the product to otherequipment, turn offthe power and unplug allof the
equipment fromthe wall outlet. Failure todo so may cause anelectric shock and serious
personal injury.Read the owner's manualof the other equipmentcarefullyand follow the
instructions whenmaking any connections.
Reduce thevolume to the minimum levelbefore you turn on theproduct. Otherwise, sudden
high volumesound may cause hearing orspeaker damage.
Do notallow the product output distortedsound for a longtime. Itmay cause speaker
overheating andfire.
Do notlook into the opening ofthe disc slot or ventilationopening of the productto see the
source ofthe laser beam. It maycause sight damage.
Do notuse a cracked, deformed, orrepaired disc. Thesediscs are easily broken andmay
cause seriouspersonal injury and product malfunction.
This reminderis provided to call theCable TV systeminstaller's attention toArticle 820-40of
the NECthat provides guidelines for propergrounding and, in particular, specifiesthat the
cable groundshall be connected to thegrounding system of the building,as close to thepoint
of cableentry as practical.
23. REPLACEMENT PARTS
24. SAFETY CHECK
25. HEAT
26. DISC SLOT
27. CONNECTING
28. SOUND VOLUME
29. SOUND DISTORTION
30. LASER BEAM
31. DISC
32. NOTE TO CABLE TV SYSTEM INSTALLER

Installation
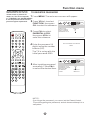
Preparation for the remote control
Battery installation
Tips for remote operation
Remove the battery cover.
When the remote control will not be used for a long period of time or when the
batteries are worn out, remove the batteries to prevent leakage.
Do not throw the batteries into fire. Dispose of used batteries in the specified
manner.
Do not drop, dampen or disassemble the remote control.
Insert two size AA batteries matching
the +/-polarities of the battery to the +/-
marks inside the battery compartment.
5
Antenna connection
300 twin-lead cable
Antenna adapter
75 coaxial cable
Plug
AC power socket
Aerial input
75 standard
coaxial type
Note:
* It is recommendedthat a 75ohm coaxialantenna isused toavoid
interference.
*To avoid interference fromelectrical signals,do notbind theantenna
cable together with anymains lead.
(Not supplied)
(Not supplied)
If the picture is not clear or is snowy, it is recommended that an External Aerial
is used, this is usually mounted outside.

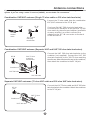
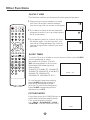
Parts and functions
Front panel the TV set
Power Switch
Power Indicator
Signal Receiver
Video
R/L
Audio
Menu
TV/AV/DVD
Switching
Volume up/ down
Channel Position
up/down
Open/close
the DVD
Play
the DVD
Stop
the DVD
The DVD Player
Stop
Remote Receiving
Window
Power Button
POWER
TV/AV/DVD
Switching
6
VIDEO L/MONO-AUDIO/R EARPHONE
Video
Audio
Earphone
OPEN/CLOSE PLAY STOP CH- CH+ VOL- VOL+ MENU
Menu
Channel Position
up/down
Volume up/ down
Stop
the DVD
Open/close
the DVD
Play
the DVD
Power Indicator
Signal Receiver
Power Switch
TV/AV/DVD
Switching

6
7
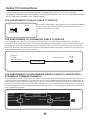
Parts and functions
Rear panel of theTV set
Antenna input socket
VideoCr input terminal
Audio left channel inputterminal
Audio right channel inputterminal
Audio left channel outputterminal
Audio right channel outputterminal
VideoCb input terminal
VideoY input terminal
Video1
Videooutput terminal
OUT
IN
VIDEO1
Y
Cb
Cr
LR
AUDIO1
COMPONENT
COAXIAL
OUTPUT
COAXIAL OUTPUT
Remote Receiving
Window
Power Button
OPEN/CLOSE
PLAY/PAUSE STOP SKIP- SKIP+
MENU VOL- VOL+ CH- CH+

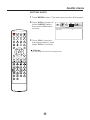
Using the Remote Control
Q.VIEW button:
SAP button:
CC
P.MODE (picture mode):
TV Sleep button
CH.LIST (channel list)
GUIDE
(favorite list)
SIZ: Aspect Ratio Control under 16:9 digital signal input
P
DVD PAUSE/STEP
DVD MENU
DVD A-B REPEAT
DVD Cursor Move button
DVD SLOW
DVD SEARCH
DVD TITLE
DVD PROGRAM
10+
CLR: clear
FAV.LIST
DVD FAST REVERSE
DVD FAST FORWARD
Power Switch
TV / AV Mode Selection
TV / DTV Mode Selection
TV / DVD Mode Selection
Mute Sound
Return to Previous Channel
Channel / Track Selection
Mode Selection:
Adjust Picture Mode
Adjusting
Go to TV Menu
Exit On Screen Display
Enter
Playback
Selection
Chapter / Track
Chapter / Track
Playback / Confirm Menu Selection
Mode
Change
Mode
Zoom Function
Second Audio Program
(selects mode).
reference (may not operate using some systems)
Closed captioning
DVD INFORMATION
Open/close DVD Tray
On Screen Display
Volume/Channel
DVD STOP
DVD CAPTION (SUBTITLE)
DVD
DVD REPEAT
DVD ANGLE
DVD AUDIO
DVD SETU
DVD NEXT
DVD PREVIOUS
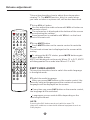
Buttons on the remote control
UP
DOWN
LEFT
RIGHT
POWER TV/DVD
OPEN/CLOSE
Q.VIEW INFO
MUTE
1234
5678
9 0
CC
P.MODE
CH+
CH-
VOL
_
MENU
OK
STOP
SETUP
PAUSE/STEP
REV
FWD
PREV
NEXT
D.MENU
REPEAT
A-B
PLAY/ENTER
SLOW
ANGLE
TITLE/PBC
SEARCH
AUDIO
CLR
D.CALL
TV/AV
PROGRAM
ZOOM
10+
VOL
+
SUBTITLE
-
TV/DTV
SAP
SLEEP
CH.LIST FAV.LIST SIZ GUIDE
8
- button: select additional channels being broadcasted.
For example, to select channel “54-3”, press “54”, “-”, “3”,
and then press “OK”.

9
The other video and audio equipment Connections
You can connect theDVD,VCR andstereo systemto theoutput to enjoy a
higher quality of pictureand sound effect.
COAXIAL OUT
Coaxial cable
To COAXIAL
type digital
audio input
Amplifier
ANT IN
1
1

If you are using an indoor or outdoor antenna, follow the instructions below that correspond to your antenna
system. If you are using a cable TV service (CABLE), see the Cable TV connections.
Combination VHF/UHF antenna (Separate VHF and UHF 300 ohm twin-lead wires)
Combination VHF/UHF antenna (Single 75 ohm cable or 300 ohm twin-lead wire)
Antenna connections
75 ohm
coaxial
cable
300-75 ohm
matching
transformer
300-75 ohm
matching
transformer
UHF 300 ohm
VHF 300 ohm
UHF 300 ohm
VHF 75 ohm
Separate VHF/UHF antennas (75 ohm VHF cable and 300 ohm UHF twin-lead wires)
RF IN
jack
RF IN
jack
RF IN
jack
Combiner
RF IN
jack
Combiner
Connect the 75 ohm cable from the combination
VHF/UHF antenna to the RF IN jack.
Connect the UHF 300 ohm twin-lead wire to the
combiner (not supplied). Connect the VHF 300
ohm twin-lead wire to the 300-75 ohm matching
transformer.Attachthetransformertothecombiner,
then attach the combiner to the RF IN jack.
ConnecttheVHF 75ohmcableand UHF300ohm
twin-leadwiretothecombiner.Attachthecombiner
to the RF IN jack.
10
If using aflatUHF 300 ohm twin-lead wire,
connect these flatwires to an optional 75/300
ohm matching transformer/adapter(available
at many retailers),andthen connect the
adapter to the'RF'IN connector on the back
of the television.

FOR SUBSCRIBERS TO BASIC CABLE TV SERVICE
For basic cable service not requiring a Converter/Descrambler
box, connect the 75 ohm Coaxial Cable directly to the RF IN
Jack on the back of the unit.
Cable TV connections
FOR SUBSCRIBERS TO SCRAMBLED CABLE TV SERVICE
75 ohm
coaxial cable
If you subscribe to a cable TVservice inwhich basicchannels areunscrambled andpremium channelsrequire the
useof aconverter/descramblerbox, you maywish to usea signal splitterandanA/B switchbox (available fromthe
cable company or an electronics supply store). Follow the connections shown below. With the switch in the "B"
position,youcandirectlytuneanynonscrambledchannelsonyourunit.Withtheswitchinthe"A"position,tuneyour
unitto theoutput of theconverter/descrambler box(usuallychannel 3or 4) anduse theconverter/descramblerbox
to tune scrambled channels.
FOR SUBSCRIBERS TO UNSCRAMBLED BASIC CABLE TV SERVICE WITH
SCRAMBLED PREMIUM CHANNELS
Incoming
75 ohm
cable TV cable
75 ohm cable to
unit
RF IN
jack
RF IN
jack
Splitter
B
A
Incoming
75 ohm
cable TV cable
A/B switch
75 ohm cable
to unit
Converter/
descrambler
RF IN
jack
Converter/
descrambler
This unit has an extended tuning range and can tune most cable channels without using a Cable TV
Converter box. Some cable companies offer "premium pay channels" in which the signal is
scrambled. Descrambling these signals for normal viewing requires the use of a descrambler device
which is generally provided by the cable company.
If you subscribe to a cable TV service which requires the use of a converter/descrambler box, connect the
incoming 75 ohm coaxial cable to the converter/descrambler box. Using another 75 ohm coaxial cable, connect
the output jack of the converter/descrambler box to the RF IN jack on the unit. Follow the connections shown
below. Set the unit to the output channel of the converter/descrambler box (usually channel 3 or 4) and use the
converter/descrambler box to select channels.
11

Video Game
Using the audio/video inputs
If you connect the TV to a camcorder or Video Game, you can select different modes by pressing
TV/AV.
Press TV/AV repeatedly to select the desired mode.
"AV1", "AV2" ,"COMPONENT","DVD" or TV channel will display on the screen for 4 seconds, no signal
will be displayed on the screen when no signal input.
To connect the TV to a camcorder
To playback from the camcorder, connect the camcorder to the unit as shown.
To connect the TV to a Video Game
The TV can also be used as a display device for many video games. However, due to the wide variety
of formats, they have not all been included in the suggested connection diagram. Youl need to consult
each component's Owner's Manual for additional information.
Audio/Video cord (not supplied)
To Audio/Video OUT
AV 1
Camcorder
To Audio/Video OUT
Audio/Video cord (not supplied)
VIDEO IN
AUDIO IN (L)
AUDIO IN (R)
AV1 AV2 COMPONENT DVD TV Channel
Connections to other equipment
12
VIDEO IN
AUDIO IN (L)
AUDIO IN (R)
Front of TV
Front of TV

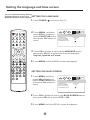
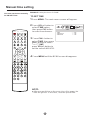
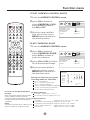
Setting the language and blue screen
You can choose from three different
languages (English, French and
Spanish) for the on-screen displays.
1 Press ( ) to turn on the TV.POWER
2 Press , and then
press button to
select menu,
then press button to
enter.
MENU
VOL+/-
FUNCTION
CH-
3 Press to select the option,
then press to select the desired language:
CH+/- LANGUAGE
VOL+/-
English, Spanish or French.
button
4 Press until the MENU screen disappears.MENU
SETTING THE LANGUAGE
0101
LANGUAGE ENGLISH
BLUE SCREEN ON
NTSC CAPTION C1
PARENTALLOCK
FUNCTION
SETTING THE BLUE SCREEN
1 Press , and then
press button to
select menu,
then press button to
enter.
MENU
VOL+/-
FUNCTION
CH-
2 Press to select the option,
then press to select or .
CH+/- BLUE SCREEN
VOL+/- OFF ON
button
3 Press until the MENU screen disappears.MENU
0101
LANGUAGE ENGLISH
BLUE SCREEN ON
NTSC CAPTION C1
PARENTALLOCK
FUNCTION
13
POWER TV/DVD
OPEN/CLOSE
Q.VIEW INFO
MUTE
1234
5678
9 0
CC
P. MO DE
CH+
CH-
VOL
_
MENU
OK
STOP
SETUP
PAUSE/STEP
REV
FWD
PREV
NEXT
D.MENU
REPEAT
A-B
PLAY/ENTER
SLOW
ANGLE
TITLE/PBC
SEARCH
AUDIO
CLR
D.CALL
TV/AV
PROGRAM
ZOOM
10+
VOL
+
SUBTITLE
-
TV/DTV
SAP
SLEEP
CH.LIST FAV.LIST SIZ GUIDE

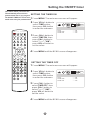
(When using antenna)
The channels broadcasted in DTV andATV are
automatically scanned and memorized. Only the
receivable channels in the area where this TV is
used will be memorized.
(When using basic cable)
The channels broadcasted in CATVare automatically
scanned and memorized.
AUTO SCAN (DTV/ATV)
AUTO SCAN (CATV)
NOTE:
Be sure that antenna or cable is connected properly before plugging the
power cord.
Here describes the case for searching and memorizing channels for DTV/ATV.
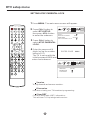
1 Press , and then press button to select
menu, then press buttonto enter.
MENU VOL+/-
CHANNEL CH-
2 Press to
select the
option.
CH+/-
RECEPTION
button
3 Press button
to select
VOL +/-
AIR/ CABLE.
0101
SKIP OFF
RECEPTION AIR
AUTOSCAN
COLOR SYSTEM AUTO
CHANNEL
When scanning is completed, the memorized
smallest channel will be displayed.
When you press button while scanning, the
scanning is interrupted and the memorized smallest
channel is displayed.
MENU
When you press on the remote control,
scanning the channels in both analog and digital
modes will automatically start.
VOL+
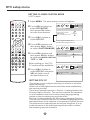
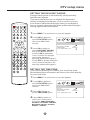
Channel menu
Only in analog signal
4 Press button
to select option.
CH +/-
AUTO SCAN
5 Press button to start scanning.VOL+
14
POWER TV/DVD
OPEN/CLOSE
Q.VIEW INFO
MUTE
1234
5678
9 0
CC
P. MO DE
CH+
CH-
VOL
_
MENU
OK
STOP
SETUP
PAUSE/STEP
REV
FWD
PREV
NEXT
D.MENU
REPEAT
A-B
PLAY/ENTER
SLOW
ANGLE
TITLE/PBC
SEARCH
AUDIO
CLR
D.CALL
TV/AV
PROGRAM
ZOOM
10+
VOL
+
SUBTITLE
-
TV/DTV
SAP
SLEEP
CH.LIST FAV.LIST SIZ GUIDE

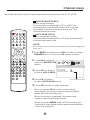
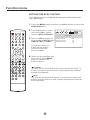
Channel menu
SETTING SKIP
0101
SKIP OFF
RECEPTION AIR
AUTOSCAN
COLOR SYSTEM AUTO
CHANNEL
1 Press , and then
press button to
select menu,
then press button to
enter.
MENU
VOL+/-
CHANNEL
CH-
2 Press to
select the option,
then press button
to select or .
CH+/-
SKIP
VOL+/-
ON OFF
button
SETTING COLOR SYSTEM(only in ATV mode)
After the programs are presetting, you can skip some
programs so that to select your favoritechannels only.
If you want to recover the skipped channel
1. Use button to select the number
of the channel to be recovered.
2. Do the above steps again.
3. Press button to set as .
Direct-digit Choosing
VOL+/- SKIP Off
1 Press , and then
press button to
select menu,
then press button to
enter.
MENU
VOL+/-
CHANNEL
CH-
2 Press to
select the
option, then
press button
to select or .
CH+/-
COLOR
SYSTEM
VOL+/-
AUTO NTSC
button
0101
SKIP OFF
RECEPTION AIR
AUTOSCAN
COLOR SYSTEM AUTO
CHANNEL
15
POWER TV/DVD
OPEN/CLOSE
Q.VIEW INFO
MUTE
1234
5678
9 0
CC
P. MO DE
CH+
CH-
VOL
_
MENU
OK
STOP
SETUP
PAUSE/STEP
REV
FWD
PREV
NEXT
D.MENU
REPEAT
A-B
PLAY/ENTER
SLOW
ANGLE
TITLE/PBC
SEARCH
AUDIO
CLR
D.CALL
TV/AV
PROGRAM
ZOOM
10+
VOL
+
SUBTITLE
-
TV/DTV
SAP
SLEEP
CH.LIST FAV.LIST SIZ GUIDE
NOTE: Whentuning DTV channels and nosignal is present,
the SKIP-overoption will be available.

You can select the channel by using either button
or buttons. How to select the channel
in each way is shown below.
CH +/-
Channel number
Channel selection
CABLE
VHF
2-13
STD/HRC/IRC
14-36
(A) (W)
37-59
(AA) (WW)
60-85
(AAA) (ZZZ)
86-94
(86) (94)
95-99
(A-5) (A-1)
100-125
(100) (125)
01
(5A)
TV
VHF
2-13
UHF
14-69
CABLE Mode Direct Channel Selection
When the Antenna/Cable menu option is inthe Cable position, channels
can be selectedas follows:
Press the Direct Channel selection
buttons to select the channel.
Antenna Mode Direct Channel Selection
When the Antenna/Cable menu option is in the Antenna position, all channels
can be instantly selected by using
2
2-9: Press 2-9 as needed.
Example, to select channel 2, press "2".
10-69: Press the 2 digits in order. If you select the channel more than 69,
the channel will not be change, it is no available.
1-9: Press 1-9 as needed. Example, to select channel 2,
press "2".
10-99: Press the 2 digits in order. Example, to select channel 32,
press "3" then "2".
100-125: Press the digital 1 button, the "1--" will appear
on the screen, then press the 2 digits of remain in order.
1 Using button
Using button on the remotecontrol, change the channel.
Same operationis available with button on the front panel
of themain unit.
CH +/-
CH +/-
CH +/-
digits button. For example:
16
POWER TV/DVD
OPEN/CLOSE
Q.VIEW INFO
MUTE
1234
5678
9 0
CC
P. MO DE
CH+
CH-
VOL
_
MENU
OK
STOP
SETUP
PAUSE/STEP
REV
FWD
PREV
NEXT
D.MENU
REPEAT
A-B
PLAY/ENTER
SLOW
ANGLE
TITLE/PBC
SEARCH
AUDIO
CLR
D.CALL
TV/AV
PROGRAM
ZOOM
10+
VOL
+
SUBTITLE
-
TV/DTV
SAP
SLEEP
CH.LIST FAV.LIST SIZ GUIDE
NOTE:
In the DTV broadcasting, one channel sometimes broadcasts
multiple programs depending on the air time. In this case, the
main channel is called major channel and the sub channel is
called minor channel.

This section describes how to adjust the volume when
viewingTV. The function, which is useful when
you have a visitor or a phone call, will be also described.
MUTE
1 Using button
You can adjust the audio volume with on
the remote control.
The volume bar is displayed at the bottom of the screen
when adjusting the volume.
Same operation is available with onthe front
panel of the main unit.
VOL +/-
VOL +/-
VOL +/-
button
2 Using
Press on the remote control to mute the
sound.
The colored volume bar is displayed on the screen while
muting.
MUTE
MUTE
button
button
To release the MUTE status, press again
or press .
MUTE will displayed continuously When CC is OFF,
MUTE
VOL+
button
button
MUTE
will disappeared 5 seconds later When CC is ON.
SWITCHING AUDIO
This section describes how to switch the audio language
in the digital mode.
2 Switch the audio language.
When you press on the remote control, the
currently selected language and the number of received
languages will be displayed on the screen.
SAP button
Every time you press on the remote control,
the language will be switched.
SAP button
Languages you can switch differdepending on the
receiving broadcast.
NOTE:
Pressing theSAP button worksonly with the someTV
channels, anddoes not work with externalequipment such as
DVD players.
Volume adjustment
17
POWER TV/DVD
OPEN/CLOSE
Q.VIEW INFO
MUTE
1234
5678
9 0
CC
P. MO DE
CH+
CH-
VOL
_
MENU
OK
STOP
SETUP
PAUSE/STEP
REV
FWD
PREV
NEXT
D.MENU
REPEAT
A-B
PLAY/ENTER
SLOW
ANGLE
TITLE/PBC
SEARCH
AUDIO
CLR
D.CALL
TV/AV
PROGRAM
ZOOM
10+
VOL
+
SUBTITLE
-
TV/DTV
SAP
SLEEP
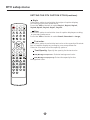
CH.LIST FAV.LIST SIZ GUIDE

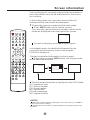
You can display the currently selected channel number or
other information such as the audio mode on the screen
for checking.
In the analog mode, the currently selected channel
number and the audio mode are displayed.
Display the channel number and the audio mode.
Press button on the remote control.
The currently selected channel number and the audio
mode are displayed at the top right of the screen.
1
INFO
To clear the display,press again.INFO button
In the digital mode, the detailed information for the
currently selected channel such as the program
GUIDEe is displayed.
Display the detailed information for the channel.
Every time you press , the display mode
will be switched as below.
INFO button
The following information is displayed in the INFO mode.
(1)
(2)
(3) Closed caption
(4)
(5)
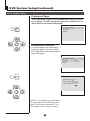
Program air time
Channel number
Channel title
Audio language
(6) Program content
Screen information
13
AUTO
14.1
DTV-AIR
ENCODE 17:00-18:30
INFORMATION
America Masters
9.2
ENGLISH 1/3 CC
Satchmo:The Life ofLauis
ArmstrongA self-taught
1
2
3
4
5
6
18
POWER TV/DVD
OPEN/CLOSE
Q.VIEW INFO
MUTE
1234
5678
9 0
CC
P. MO DE
CH+
CH-
VOL
_
MENU
OK
STOP
SETUP
PAUSE/STEP
REV
FWD
PREV
NEXT
D.MENU
REPEAT
A-B
PLAY/ENTER
SLOW
ANGLE
TITLE/PBC
SEARCH
AUDIO
CLR
D.CALL
TV/AV
PROGRAM
ZOOM
10+
VOL
+
SUBTITLE
-
TV/DTV
SAP
SLEEP
CH.LIST FAV.LIST SIZ GUIDE
NOTES:
When the program guide is displayed in more than 6 lines, use
button and scroll for reading.
"No description provided" is displayed when the program guide is not
provided.
VOL+/-

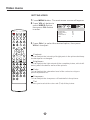
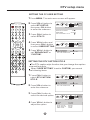
Video menu
1 Press button.Themain menu screen will appear.MENU
2 Press button to
select Option,
then press button
to enter.
VOL+/-
VIDEO
CH-
3 Press select the desired option, then press
to adjust.
CH+/-
VOL+/-
to
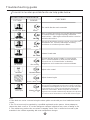
SETTING VIDEO
19
0101
CONTRAST 80
BRIGHTNESS 80
COLOR 50
SHARPNESS 50
TINT 0
VIDEO
Contrast
Brightness
Color
Sharpness
Tint
This willadjust the intensity of brightparts in the picture butkeep
the darkparts unchanged.
This willadjust the light output ofthe complete picture, which will
mainly affectthe darker areasof the picture.
This willadjust the saturation level ofthe colors to suit your
personal preference.
This willadjust the sharpness of finedetails in the picture.
Allows youto select the color mix(Tint)of the picture.
POWER TV/DVD
OPEN/CLOSE
Q.VIEW INFO
MUTE
1234
5678
9 0
CC
P. MO DE
CH+
CH-
VOL
_
MENU
OK
STOP
SETUP
PAUSE/STEP
REV
FWD
PREV
NEXT
D.MENU
REPEAT
A-B
PLAY/ENTER
SLOW
ANGLE
TITLE/PBC
SEARCH
AUDIO
CLR
D.CALL
TV/AV
PROGRAM
ZOOM
10+
VOL
+
SUBTITLE
-
TV/DTV
SAP
SLEEP
CH.LIST FAV.LIST SIZ GUIDE
Page is loading ...
Page is loading ...
Page is loading ...
Page is loading ...
Page is loading ...
Page is loading ...
Page is loading ...
Page is loading ...
Page is loading ...
Page is loading ...
Page is loading ...
Page is loading ...
Page is loading ...
Page is loading ...
Page is loading ...
Page is loading ...
Page is loading ...
Page is loading ...
Page is loading ...
Page is loading ...
Page is loading ...
Page is loading ...
Page is loading ...
Page is loading ...
Page is loading ...
Page is loading ...
Page is loading ...
Page is loading ...
-
 1
1
-
 2
2
-
 3
3
-
 4
4
-
 5
5
-
 6
6
-
 7
7
-
 8
8
-
 9
9
-
 10
10
-
 11
11
-
 12
12
-
 13
13
-
 14
14
-
 15
15
-
 16
16
-
 17
17
-
 18
18
-
 19
19
-
 20
20
-
 21
21
-
 22
22
-
 23
23
-
 24
24
-
 25
25
-
 26
26
-
 27
27
-
 28
28
-
 29
29
-
 30
30
-
 31
31
-
 32
32
-
 33
33
-
 34
34
-
 35
35
-
 36
36
-
 37
37
-
 38
38
-
 39
39
-
 40
40
-
 41
41
-
 42
42
-
 43
43
-
 44
44
-
 45
45
-
 46
46
-
 47
47
-
 48
48


